So I’m moving my 65 sedan Restoration project story over from the introductions section to the projects section as this could get lengthy. I was just reading some of the other projects and it’s glad to know that there’s a few other owners out there stricken with the illness also. I’m having a great time with my 65 sedan rebuild and have been hitting it hard for 4 months. Several days and evenings a week.
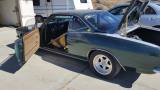
I’m dreaming daily about cruising in her again after 32 years. I’ll start this post with a photo of me going to my prom with THE car 33 years ago. (Yes it’s the same exact car…only now in much worse condition).
My goal is to bring the car back as a really nice driver. One to cruise in during the summer and store it for the winter.
So I was able to get the engine running after it sat for 30 years. And decided to tackle the body. No body…no driver! The car was fresh out of the woods after 25 years.
I’m working on the front half first and figure when The structure is solid, I’ll move to the back half, when I’ll pull the drive-train and tackle the body issues.
Thus far, I’ve replaced the front subframe, trunk, and floor.
Right now, a lot of grinding, cutting, fitting, and welding. Finding old patches from work previously before I owned it. Repairing major rusted metal. Heavy reconstruction.
Order a gas filler box from Clark’s today.
How hard is it to repair the lower windshield metal?
I’ll repost a few photos of the project from the beginning.
John’s 65 sedan
-
bbodie52

- Corvair of the Month

- Posts: 12141
- Joined: Mon Aug 06, 2012 12:33 pm
- Location: Lake Chatuge Hayesville, NC
- Contact:
Re: John’s 65 sedan

Project65 wrote: » Mon Dec 13, 2021 10:00 pm
So I’m moving my 65 sedan Restoration project story over from the introductions section to the projects section as this could get lengthy. I was just reading some of the other projects and it’s glad to know that there’s a few other owners out there stricken with the illness also. I’m having a great time with my 65 sedan rebuild and have been hitting it hard for 4 months. Several days and evenings a week.
I’m dreaming daily about cruising in her again after 32 years. I’ll start this post with a photo of me going to my prom with THE car 33 years ago. (Yes it’s the same exact car…only now in much worse condition).
My goal is to bring the car back as a really nice driver. One to cruise in during the summer and store it for the winter.
So I was able to get the engine running after it sat for 30 years. And decided to tackle the body. No body…no driver! The car was fresh out of the woods after 25 years.
I’m working on the front half first and figure when The structure is solid, I’ll move to the back half, when I’ll pull the drive-train and tackle the body issues.
Thus far, I’ve replaced the front subframe, trunk, and floor.
Right now, a lot of grinding, cutting, fitting, and welding. Finding old patches from work previously before I owned it. Repairing major rusted metal. Heavy reconstruction.

Brad Bodie
Lake Chatuge, North Carolina
 1966 Corvair Corsa Convertible
Lake Chatuge, North Carolina
1966 Corvair Corsa ConvertibleRe: John’s 65 sedan
It’s certainly a labor of love! But I’ve given myself a very aggressive schedule. I’m hoping to have the car back on the road this summer….2022. So if this project goes as planned, it will be faster paced.
To meet that goal, I need to finish the front end, and then turn focus towards my the back end and drop the drive train in around January. The engine runs and the transmission grabbed reverse, but I want everything gone through. Also wanting some mild performance out of the old powertrain, so I’m thinking a mild cam and dual exhaust…but that’s all. I want good drivability.
Meanwhile, I’m continuing welding and repairs on the driver’s fender-well and received the gas filler box yesterday. I did complete welding in the floor/subframe section at the driver’s fender-well and trimmed back the old gas filler box. Grinding down the welds somewhat, but it will all be re-undercoated, so it’s not pristine, but it will be all steel and rock solid!
- Attachments
-
-
-
John
1965 Monza Sedan “The Phoenix”. Rebuild in Progress.
1965 Monza Sedan “The Phoenix”. Rebuild in Progress.
-
terribleted

- Posts: 4584
- Joined: Sun Apr 18, 2010 2:36 pm
- Location: Atlanta, GA
- Contact:
Re: John’s 65 sedan
What engine is it? is it a 95Hp or a 110HP? For a mild cam that works really well in a 110HP with powerglide, I highly recommend Clark's new cam ground to GM cam #304 specs. https://ssl.corvair.com//user-cgi/search.cgi?part=C785 This cam gives great all around power and stronger torque off the line than stock. I have driven a number of cammed powerglide cars and none have driven as nice as the 304 cam ones I have built for myself (2 , one a late coupe and the other a 62 Loadside pickup ...man did it wake up the pickup compared to the stock 80HP engine...LOL) and actually 2 engine I built for others. This cam works well in a 140 as well (pushing a 4 speed anyway). Might work well in a 95Hp engine also (I would expect it to be good but have not tried that combination). Fully rebuilding a Corvair engine is quite expensive. I would not be in a rush to rebuild that one until I had run it a good bit, rebuilt some carbs and churched up the ignition and valve adjustments perhaps, and then of course a compression test when warm and run enough for all things to be unstuck and well lubed. These engines sometimes amaze coming back from a slumber of 20 or more years with no discernable issues. Given a parts and machine work cost of over 3k to really do one (can easily be over 4K) it is worth the effort to really check it out before deciding to tear it down for rebuild.
Corvair guy since 1982. I have personally restored at least 20 Vairs, many of them restored ground up.
Currently working full time repairing Corvairs and restoring old cars.
https://www.facebook.com/tedsautorestoration/
Located in Snellville, Georgia
Currently working full time repairing Corvairs and restoring old cars.
https://www.facebook.com/tedsautorestoration/
Located in Snellville, Georgia
-
bbodie52
- Corvair of the Month
- Posts: 12141
- Joined: Mon Aug 06, 2012 12:33 pm
- Location: Lake Chatuge Hayesville, NC
- Contact:
Re: John’s 65 sedan
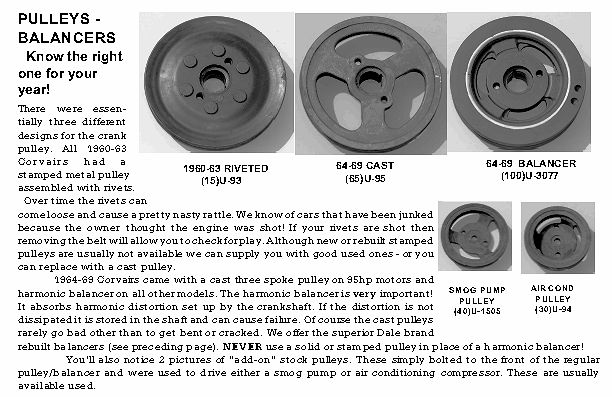
Replacing a camshaft on a Corvair is not as easy as replacing a camshaft in a Chevy V8. On a Corvair, you have to do a complete engine teardown and split the cases, so selecting the right cam for your application is an important step. As outlined in the attached 1965 Chevrolet Corvair GM Heritage Center Specs, the camshaft used in the 110hp and 140hp (4 carburetor, large valve heads, dual exhaust) engines are identical and is certainly a decent moderate performance grind for street use. If you have the 110hp, dual carburetor engine and do not plan on splitting the cases for crankshaft and main bearing work, you may decide to keep the stock 110/140hp camshaft. The 95hp engine has a milder camshaft and only 8:1 compression ratio, compared to the higher 9:1 compression ratio and stronger cam in the 110hp and 140hp engines. The 140hp engine achieved the high RPM performance increase with a large valve head, 2 secondary one-barrel carburetors in addition to the standard primary carburetors, larger exhaust port tubes, and dual exhaust. The 140hp engine also received a larger oil cooler, and both the 110hp and 140hp engines received a harmonic balancer. (Only the economy 95hp engine had a solid crankshaft pulley. GM engineers deemed a harmonic balance as necessary to protect the crankshaft on 180hp, 140hp, and 110hp engines).

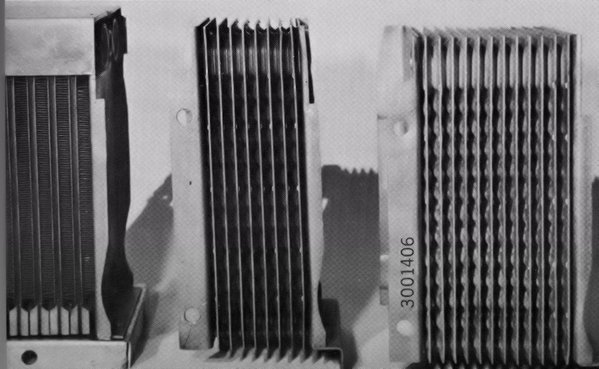
Corvair Oil Cooler Comparison


 https://ssl.corvair.com//user-cgi/catal ... nd_page=27
I see in your pictures that your Monza is equipped with a Powerglide automatic transmission. Corvairs fitted with a manual transmission transaxle must only using GL-4 gear lube in the transaxle. With an automatic, using GL-5 in the differential is OK because no manual transmission is involved. DEXRON automatic transmission fluid is separate and is isolated from the differential gear lube.
Here are a couple of Powerglide-specific tips that may be useful to you...
Some key points...
Corvair Oil Cooler Comparison
Clark's Corvair Parts wrote:INSTALLING CAM GEARS: Cam gears must be correctly installed or they can be permanently damaged and may even rotate on the shaft. We are equipped to install your cam gear so you are ready to install your complete camshaft.
I see in your pictures that your Monza is equipped with a Powerglide automatic transmission. Corvairs fitted with a manual transmission transaxle must only using GL-4 gear lube in the transaxle. With an automatic, using GL-5 in the differential is OK because no manual transmission is involved. DEXRON automatic transmission fluid is separate and is isolated from the differential gear lube.
Here are a couple of Powerglide-specific tips that may be useful to you...
bbodie52 wrote:The Corvair Powerglide has a good reputation for reliability, as long as the fluid levels are properly maintained. If the fluid levels have been neglected (indicated by a brown fluid color and a burned odor in the transmission fluid) you may find the bands and clutches have been slipping due to chronic low oil pressure and may be in poor condition, which can force a transmission overhaul. The transmission does not need a transmission cooler and does fine without one. The vacuum modulator on the right side of the Powerglide can fail after about ten years (watch for fluid in the vacuum hose indicating a ruptured diaphragm). It is only a two-speed transmission, so not a real performance transmission — but a good reliable unit.
Part number C876: PG MODULATOR VALVE GASKET-C877 HOSE-C3358 WRENCH=C5294
Weight: 0 lbs 8 oz
Catalog Pages(s): 135(59)
Price:
1 - 1 $ 26.30
2+ $ 24.20
Part number C5294: WRENCH-MODULATOR VALVE
Weight: 0 lbs 6 oz
Catalog Pages(s): T-10
Price: $ 18.50


Some key points...
- No periodic draining of the transmission oil is recommended. The fluid should be red in color and not have a burned odor or brown discoloring. If the fluid has an appearance of being discolored or contaminated, it is likely an indication of slipping or worn clutches or bands, which cannot be resolved by simply draining the fluid in the pan. Much of the transmission fluid is retained in the torque converter, which has no provision for draining.
- The oil pan does not need to be removed when draining and refilling for maintenance. They recommend loosening the filler tube to drain the pan.
- To refill the pan, they recommend starting with 4 pints and checking the level with the oil warm at operating temperatures. (Engine idling and transmission shifted to NEUTRAL).
- Approximately 6 pints will be needed, but this must be very carefully checked with the engine running. The manual is very specific about avoiding an overfill above the full mark.
- The Corvair Powerglide oil pan intake screen is not really considered to be a filter that is routinely replaced. Clark's Corvair Parts does list them, but unless yours is damaged it can normally be cleaned and reused. A good seal is needed at the oil pickup pipe. If the oil pickup pipe has split or not sealed it can cause air entrainment, which can induce air bubbles and foaming into the transmission fluid. You would have to remove the transmission oil plan to inspect this component, but there is nothing in the shop manual that I have seen that mandates periodic cleaning of the oil pickup screen.
1965 Corvair Shop Manual wrote:It is important that the oil level be maintained no higher than the "FULL" mark on the transmission oil level gauge. DO NOT OVERFILL, for when the oil level is at the full mark on the dipstick, it is just slightly below the planetary gear unit. If oil is added which brings the oil level above the full mark, the planetary unit will run in the oil, foaming and aerating the oil. This may cause malfunction of the transmission assembly due to improper application of the band or clutches.
Clark's Corvair Parts wrote:Why Change to High Stall Torque Converter?
All PG Corvairs should have one!!! I'll admit that I owe my education to Richard Jenkins. He feels that every PG Corvair benefits. Torque converters and stall can be confusing. There are several ways to measure "stall", but most of us probably think of it as the RPM that the engine must reach for the car to start moving. This is referred to as "flash" stall and probably will not match the listed stalls. The high stall torque converter will increase the "flash" stall so that your engine is revving a little higher before the car starts to move. (See the internet for many articles on stall.) We've offered the high stall torque converters for years, but never fully understood the benefits. Some of the benefits are listed below:
- No stalling or engine speed drop at stop lights; no creeping.
- Less apt to ping as the engine revs up a little before the load of the engine whether starting or moving and accelerating.
- After a few minutes of driving, you will probably be unaware of the high stall torque converter at all.A/C note: #1 above is especially important to air conditioned cars. Since there is no torque converter load on the engine at a stop, the slight drag of the A/C can hardly be felt.
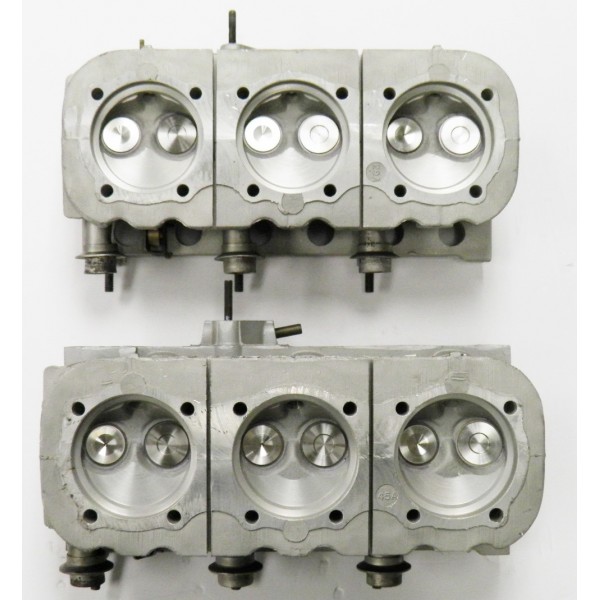
This will give you some idea of the differences between the 140 hp engine and the 110 hp engine.
140 hp vs. 110 hp...
140 hp Heads...
- Same high-performance camshaft on both 140 hp and 110 hp engines. Low performance camshaft in the 95 hp engine.
- Same 164 Cubic Inch displacement with same bore and stroke on all 1964-1969 engines.
- Stronger, nitrided crankshaft on the 140 hp and 180 hp turbocharged engines. (Nitriding is a heat treating process that diffuses nitrogen into the surface of a metal to create a case-hardened surface).
- On the 140 hp engine, a 4x1 carburetor arrangement, with two primary and 2 secondary 1-barrel carburetors, connected with a progressive linkage to open the secondary carburetors as you approach full throttle. (Equivalent to a 4 barrel carburetor on the 140 hp engine, vs. a 2 barrel carburetor (2x1) on the 110 hp and 95 hp engine).
- Dual muffler, dual exhaust with larger exhaust ports and larger exhaust manifolds on the 140 hp engine. Single exhaust on the 110 hp and 95 hp engine.
- 9.0:1 Compression Ratio in both 140 hp and 110 hp engines. 8.0:1 CR on the 95 hp engine.
It's all about better breathing at full throttle at the high RPM ranges. At lower RPM the big valves and dual exhaust don't make much difference, and the secondary carburetors are not open for business.
110 hp Heads...
- Attachments
-
- 1965 Chevrolet Corvair GM Heritage Center Specs.pdf
- 1965 Chevrolet Corvair GM Heritage Center Specs
- (2.01 MiB) Downloaded 331 times
Brad Bodie
Lake Chatuge, North Carolina
1966 Corvair Corsa Convertible
Lake Chatuge, North Carolina
1966 Corvair Corsa ConvertibleRe: John’s 65 sedan
Great information and advice on the engine and transmission. 
The Clark’s 304 cam sounds attractive. Any experience with the Clark’s high stall converter?
I recall from when I drove it as a teen, the car would give you the nice aroma of oil in the winter when you would run the heat. I also had to scrape the windshield with a credit card on the inside. (Ahhh….those pleasant Corvair memories from my youth.). It would also “use” some oil, but actually when I started it up here recently, the engine wasn’t smoking out the exhaust, but had some vapors at the pcv pipe.
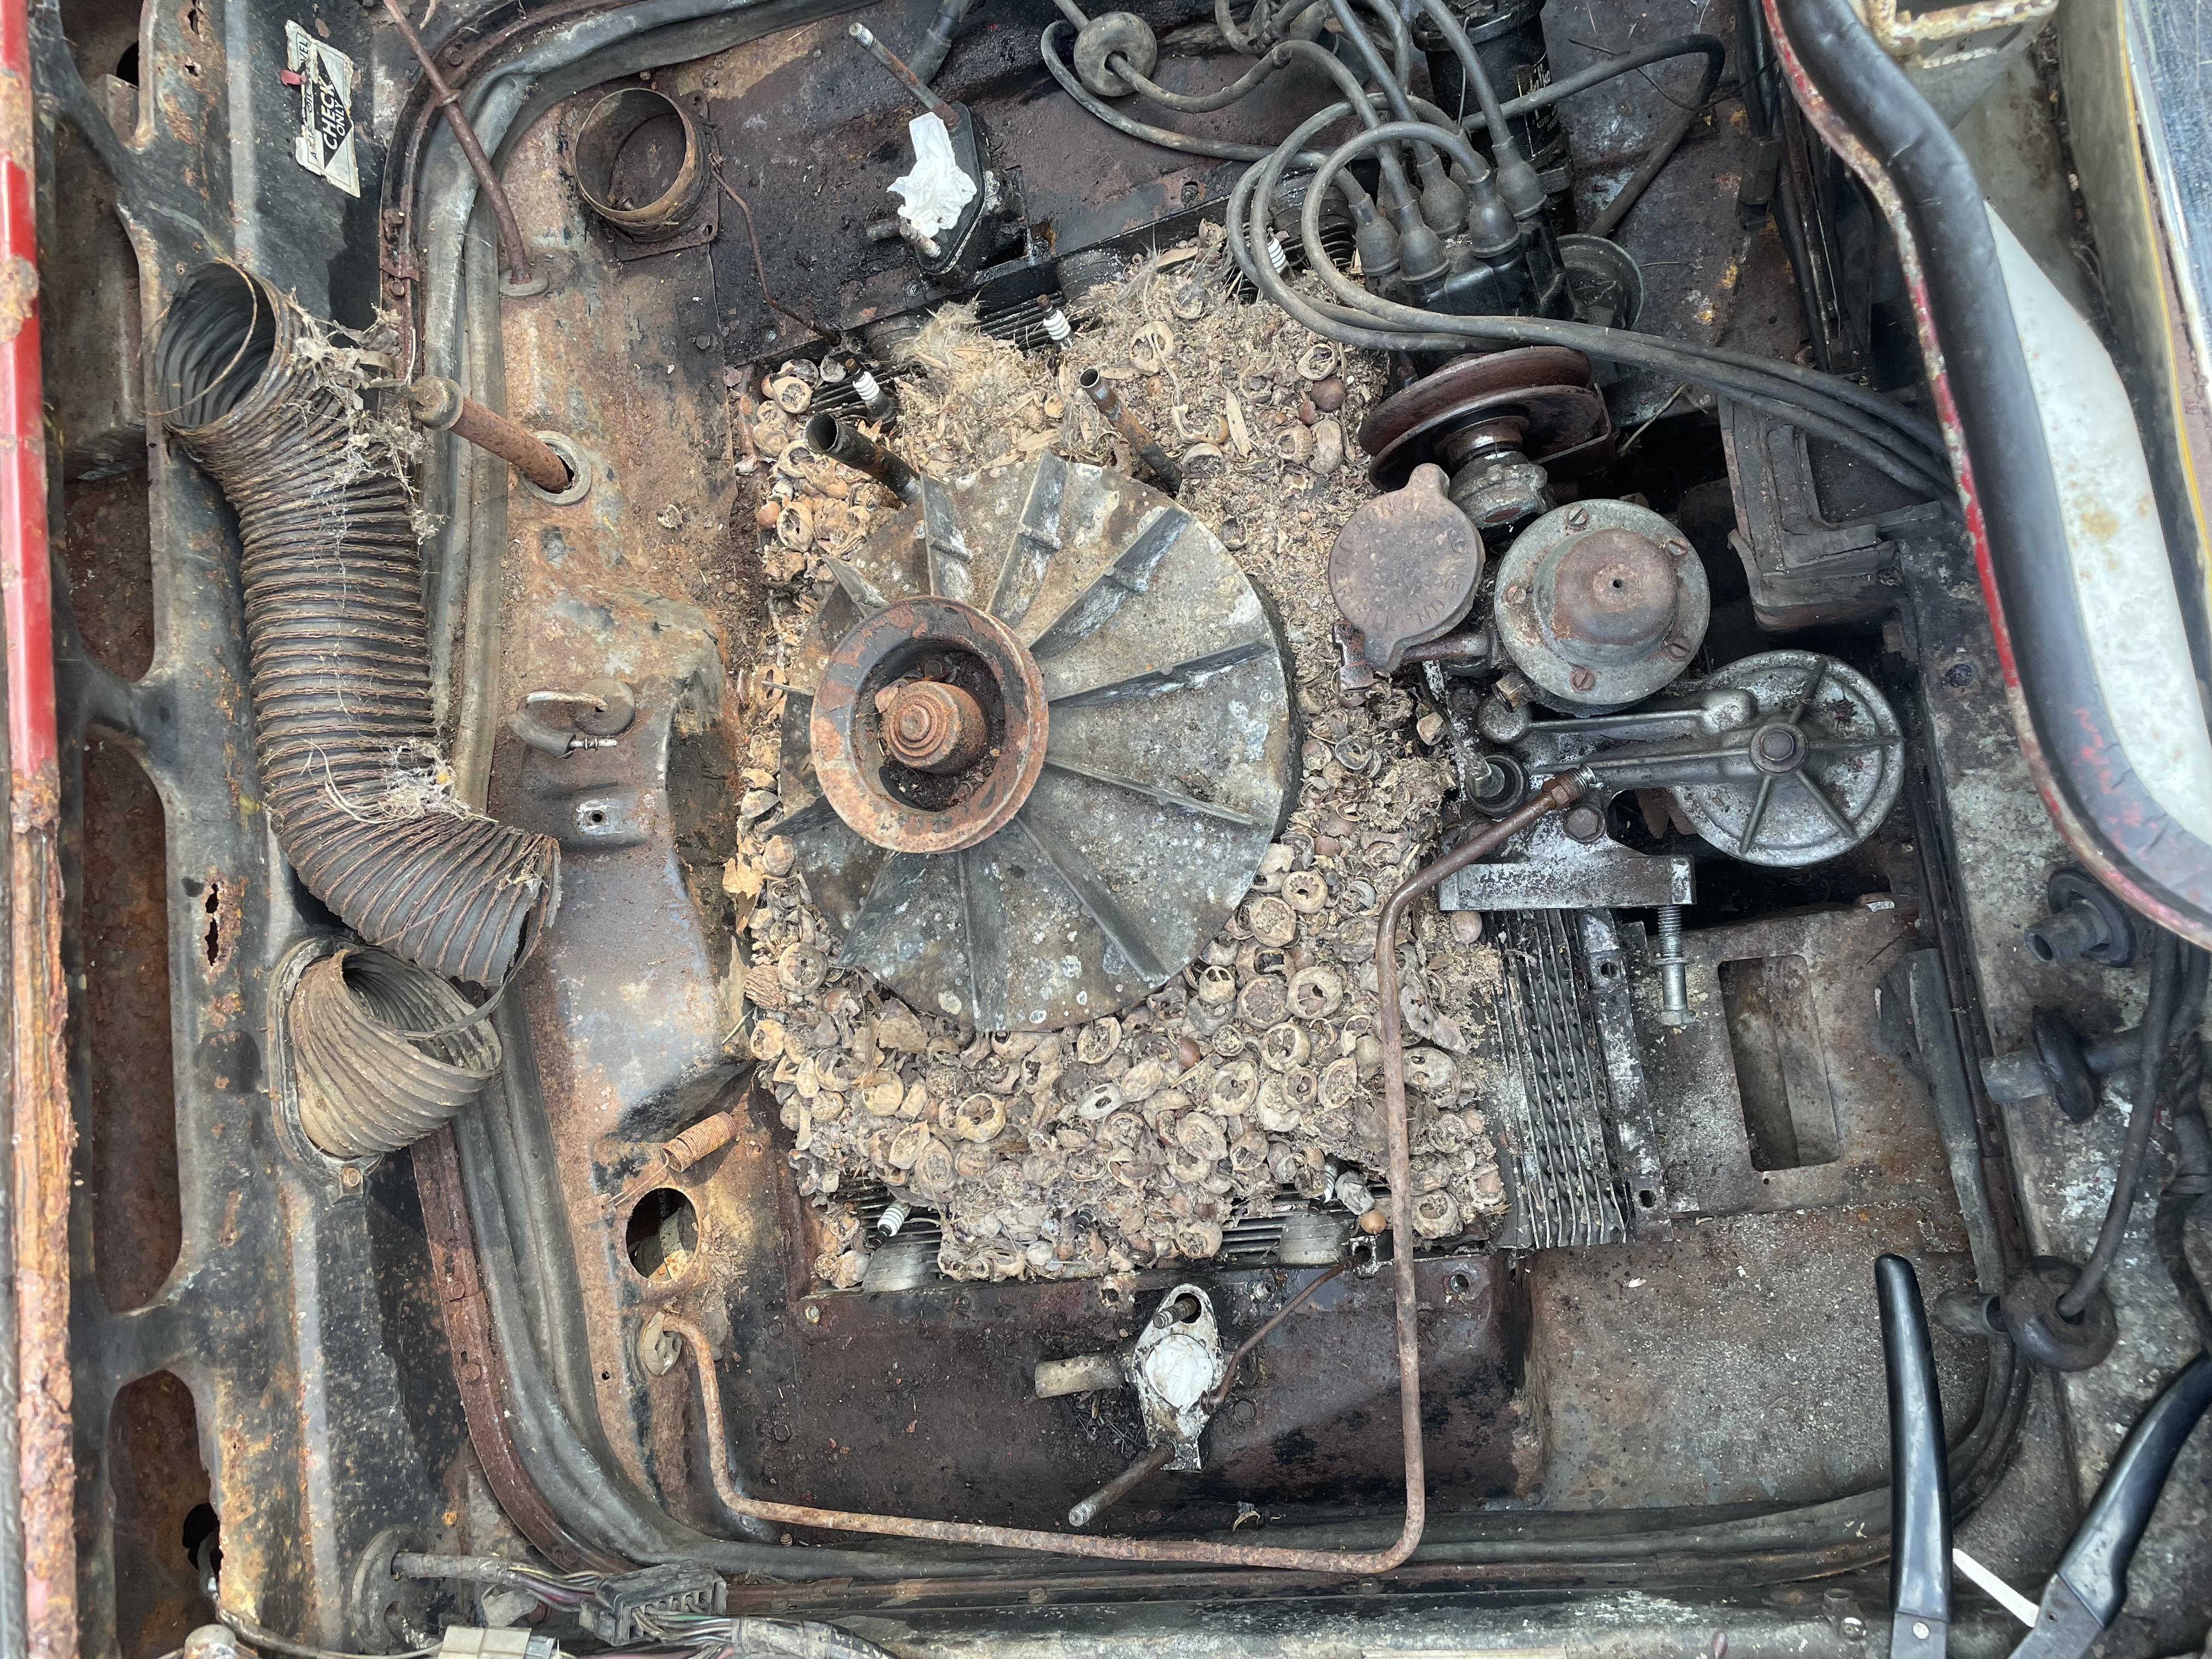
I’m afraid from sitting in the woods for 25 years that the lower engine areas are really rusty. Like the push rod tubes and the cylinder jugs. The thermostats in the shroud were pretty rusty. So I’m leaning towards a teardown to ensure it’s sound and fit for the long haul.
As I’ve begun working on my car and have researched, it’s obvious that it was redone previously. The car was originally maroon, but was red when we got it. It was patched in several areas by someone who brazed in patches. Bondo across the lower front and below the windshield, but not much elsewhere. I’m replacing and patching with as much steel as possible. I’ve looked at the engine code, the engine code is ZF. That is what’s shown as a code for 1964 as a 110 with a powerglide. I’m at this point believing it’s a 110 engine. The badge on the trunk is 110. There’s also a harmonic balancer on the crankshaft. I just wonder if the engine is original to the car? (Maybe not with the ZF code?). The car was built in March, 2nd week in 1965. It also has a posi differential. I’m not sure of the ratio, but I’m guessing the 3.55. I seem to recall it running at a higher rpm when I drove it 32 years ago. Won’t know until I pull it.
I videoed it running, just don’t think I can post it. I don’t know how to show a video here.
I “finished” the metal work on driver front fender well and gas filler box. The fender opening and along the inner edge is still needing repair, but am thinking a professional body shop could do better then me at that. Now I’m moving over to the passenger front fender well.
The Clark’s 304 cam sounds attractive. Any experience with the Clark’s high stall converter?
I recall from when I drove it as a teen, the car would give you the nice aroma of oil in the winter when you would run the heat. I also had to scrape the windshield with a credit card on the inside. (Ahhh….those pleasant Corvair memories from my youth.). It would also “use” some oil, but actually when I started it up here recently, the engine wasn’t smoking out the exhaust, but had some vapors at the pcv pipe.
I’m afraid from sitting in the woods for 25 years that the lower engine areas are really rusty. Like the push rod tubes and the cylinder jugs. The thermostats in the shroud were pretty rusty. So I’m leaning towards a teardown to ensure it’s sound and fit for the long haul.
As I’ve begun working on my car and have researched, it’s obvious that it was redone previously. The car was originally maroon, but was red when we got it. It was patched in several areas by someone who brazed in patches. Bondo across the lower front and below the windshield, but not much elsewhere. I’m replacing and patching with as much steel as possible. I’ve looked at the engine code, the engine code is ZF. That is what’s shown as a code for 1964 as a 110 with a powerglide. I’m at this point believing it’s a 110 engine. The badge on the trunk is 110. There’s also a harmonic balancer on the crankshaft. I just wonder if the engine is original to the car? (Maybe not with the ZF code?). The car was built in March, 2nd week in 1965. It also has a posi differential. I’m not sure of the ratio, but I’m guessing the 3.55. I seem to recall it running at a higher rpm when I drove it 32 years ago. Won’t know until I pull it.
I videoed it running, just don’t think I can post it. I don’t know how to show a video here.
I “finished” the metal work on driver front fender well and gas filler box. The fender opening and along the inner edge is still needing repair, but am thinking a professional body shop could do better then me at that. Now I’m moving over to the passenger front fender well.
- Attachments
-
- Before
-
- Holes all patched and Prepped with POR 15
-
- After. Box seams still need caulked.
-
- Drivers front top
-
- Passenger front. Cutting out the bad areas and showing the seam of the new floor and the new inner rocker.
-
- After 25 years in the woods. Didn’t leak out the oil!
-
John
1965 Monza Sedan “The Phoenix”. Rebuild in Progress.
1965 Monza Sedan “The Phoenix”. Rebuild in Progress.
Re: John’s 65 sedan
Days of welding has continued on the 65. I finally have the entire front subframe/trunk/front floor welded in. 
An interesting note is that my original subframe was only carbon steel and had single side supports to the rocker panels. My donor subframe was from a ‘66 convertible. The main rails are galvanized and had no rust! It also has dual side supports that weld to the rocker panels. It’s much stronger!
Now I’m prepping for welding in the new Clark’s front floor pans. The donor floor/subframe was previously coated with some kind of rubberized coating. Looks like good stuff, but a pain to remove. I’m using a 4-1/2” grinder with the coarse wire wheel to strip it off. Even with that it takes time. Need to get down to bare metal.
So far I’ve worn out one brand new grinder. They had a sale at harbor freight on them so I bought 4 of them. Figured I’d wear out a few doing this and sure enough, the first one died. It sputtered to an end and quit. It has spare brushes, but I’ll get to that later. Just cracked open the next grinder and put it to work.
I was also able to patch up the passenger fender well in various spots where rusted out. It’s a nice sound when you knock on it and it’s the sound of solid steel.
Fabrication with steel takes so much time, (a piece here and a piece there). but in the end, it’s so satisfying knowing that even though it’s patched up, it’s solid steel. One piece at a time, the rust bucket is turning into a TANK. I’ve never repaired a car like this ever. This is my first restoration. So far I’m estimating that I have close to 200 hours into the project. But watching the progress puts a smile on my face. Even after a 10 hour day.
An interesting note is that my original subframe was only carbon steel and had single side supports to the rocker panels. My donor subframe was from a ‘66 convertible. The main rails are galvanized and had no rust! It also has dual side supports that weld to the rocker panels. It’s much stronger!
Now I’m prepping for welding in the new Clark’s front floor pans. The donor floor/subframe was previously coated with some kind of rubberized coating. Looks like good stuff, but a pain to remove. I’m using a 4-1/2” grinder with the coarse wire wheel to strip it off. Even with that it takes time. Need to get down to bare metal.
So far I’ve worn out one brand new grinder. They had a sale at harbor freight on them so I bought 4 of them. Figured I’d wear out a few doing this and sure enough, the first one died. It sputtered to an end and quit. It has spare brushes, but I’ll get to that later. Just cracked open the next grinder and put it to work.
I was also able to patch up the passenger fender well in various spots where rusted out. It’s a nice sound when you knock on it and it’s the sound of solid steel.
Fabrication with steel takes so much time, (a piece here and a piece there). but in the end, it’s so satisfying knowing that even though it’s patched up, it’s solid steel. One piece at a time, the rust bucket is turning into a TANK.
- Attachments
-
-
-
-
- Passenger side. Galvanized with dual supports.
-
- Galvanized subframe with dual supports.
-
- Original rusted out carbon steel subframe with a single support.
John
1965 Monza Sedan “The Phoenix”. Rebuild in Progress.
1965 Monza Sedan “The Phoenix”. Rebuild in Progress.
Re: John’s 65 sedan
Shifted gears a bit today and focused on prepping for the Clark’s floor pan install. I thought the pans would fit a bit better, but I found that bending, hammering and trimming is required.
I also realized that I had better apply some rust preventative coating to the surfaces before I weld the pans down, so I broke open the POR15. Even though the subframe rails are galvanized, some surface rust in minor areas was present. I coated everything top and bottom, then just decided to keep on going. I need to install the gas tank soon, so I went up under there too.
Also degreased, primed, and painted the under side of the new floor pans.
Will not get back to work on the car for a few days, so there’s plenty of drying time.")
I also realized that I had better apply some rust preventative coating to the surfaces before I weld the pans down, so I broke open the POR15. Even though the subframe rails are galvanized, some surface rust in minor areas was present. I coated everything top and bottom, then just decided to keep on going. I need to install the gas tank soon, so I went up under there too.
Also degreased, primed, and painted the under side of the new floor pans.
Will not get back to work on the car for a few days, so there’s plenty of drying time.
- Attachments
-
-
-
John
1965 Monza Sedan “The Phoenix”. Rebuild in Progress.
1965 Monza Sedan “The Phoenix”. Rebuild in Progress.
Re: John’s 65 sedan
Tonight I started installing the Clark’s floor pans. I looked in the forum for tips and threads. Some of you guys out there have done some nice work!
How I’m installing mine began with trimming the outside edge first. (You begin with the passenger side first.) Then a lot of bending and hammering to rough it in and get it close. Then I put a 60 pound dumbbell on the pan to help hold it down as I hammer and shaped more. Then from underneath, I drilled up through the subframe flange and through the floor pan. Then I used self-tapping sheet metal screws and with an impact drill, screwed down the pans through the drilled hole until they sucked down tight to the subframe. I installed 9 screws to suck down the pan.
Then I began welding. I started on the outside edge by the rocker panel and hammered the pan edge tight to the inner rocker. Then stacked several spot welds to make the first stitch. Then right after the stitch, I hammered the edge of the pan tight to the inners rocker panel again. Then repeated….stitch weld with spots, then hammer, and repeat, again and again working my way around. It’s time consuming, but hey….it’s a labor of love as Mr. Brodie has said. I’m using a 1 pound ball peen hammer and various steel tools for the hammering and shaping at the edges. I’m 3/4 of the way around the first pan on the passenger side.
Once the perimeter is welded, I’ll begin to drill and spot weld the pans to the subframe rails from the top, then remove the screws and weld the holes shut.
How I’m installing mine began with trimming the outside edge first. (You begin with the passenger side first.) Then a lot of bending and hammering to rough it in and get it close. Then I put a 60 pound dumbbell on the pan to help hold it down as I hammer and shaped more. Then from underneath, I drilled up through the subframe flange and through the floor pan. Then I used self-tapping sheet metal screws and with an impact drill, screwed down the pans through the drilled hole until they sucked down tight to the subframe. I installed 9 screws to suck down the pan.
Then I began welding. I started on the outside edge by the rocker panel and hammered the pan edge tight to the inner rocker. Then stacked several spot welds to make the first stitch. Then right after the stitch, I hammered the edge of the pan tight to the inners rocker panel again. Then repeated….stitch weld with spots, then hammer, and repeat, again and again working my way around. It’s time consuming, but hey….it’s a labor of love as Mr. Brodie has said.
Once the perimeter is welded, I’ll begin to drill and spot weld the pans to the subframe rails from the top, then remove the screws and weld the holes shut.
- Attachments
-
- Screwed down the pan.
-
- Stitch welded and hammed the edge
-
- Tools for the job
-
- First pan in progress
John
1965 Monza Sedan “The Phoenix”. Rebuild in Progress.
1965 Monza Sedan “The Phoenix”. Rebuild in Progress.
Re: John’s 65 sedan
You are a human dynamo John! Keep up the good work. If you meet your goal of finishing that car by summer you should win some kind of reward! It takes me all day just to clean up a few bolts and brackets. I do hope you get that car off those cinder blocks though,it looks kind of scary to me.
Re: John’s 65 sedan
Thanks for the encouragement sparrow.
Tonight I completed welding the passenger front floor pan in on the top side. I’m pleased with the fit and finish. It seems really solid! Hoping to get the drivers side in this weekend.
I ordered the “deluxe” gas tank kit from Clark’s. Should come next week.
The car will be off the blocks soon. I had to do the blocks because I cut out the floor and subframe. Even so, the old floor and subframe was completely rusted out and wouldn’t even support the car if I used stands. The car will also need the rocker panels repaired, and I can’t do that when it’s on the blocks.
Also, I’m hoping to be pulling the drivetrain by the end of January. So the front end will be back on the floor for that.
Tonight I completed welding the passenger front floor pan in on the top side. I’m pleased with the fit and finish. It seems really solid! Hoping to get the drivers side in this weekend.
I ordered the “deluxe” gas tank kit from Clark’s. Should come next week.
The car will be off the blocks soon.
Also, I’m hoping to be pulling the drivetrain by the end of January. So the front end will be back on the floor for that.
- Attachments
-
-
John
1965 Monza Sedan “The Phoenix”. Rebuild in Progress.
1965 Monza Sedan “The Phoenix”. Rebuild in Progress.
Re: John’s 65 sedan
I was able to get the driver’s side front floor pan in today. What a good feeling to see the progress!  It’s come a long way since August.
My gas tank delivery was delayed a few days, so I’ll turn towards working on the front nose, trunk rim, and fender tops section. Once I get that on the car, that with open the other bay up and we can then again pull my wife’s car in.
Started cleaning up the nose piece and will begin patching up the bad spots. It’s from a ‘66 coupe, but will do the trick. Up until now, all of the welding has been on hidden areas, (floor, trunk, fender wells) but now, this is on the outer visible areas. I hope that I can make it look good.
- Attachments
-
-
-
John
1965 Monza Sedan “The Phoenix”. Rebuild in Progress.
1965 Monza Sedan “The Phoenix”. Rebuild in Progress.
-
flat6_musik
- Posts: 2659
- Joined: Sun Apr 04, 2010 10:03 am
- Location: Hesperia, CA
Re: John’s 65 sedan
Way to go!
Re: John’s 65 sedan
Got a few more hours in earlier today on the project and began repairs on one of the headlight openings on the donor. I tackled the worst one first. Even though the donor has some rusted out areas, it’s way better than what was on the car.
It looked like this was going to be challenging at first, but I just started cutting out the bad and went at it a little piece at a time.
I decided to use the scrap metal that I trimmed away from the Clark’s floor pans for the repair. It was a little thinner and I could shape it easily, yet thick enough for strength and easy to weld. I think it’s 19 gauge. I save all of my scraps and use them when I can. Using the slightly thinner metal made all the difference in how this repair went. Very easy to bend and shape, especially as the headlight opening curves.
It doesn’t have to be “perfect”, as the trim will cover it.
I’m liking how this is going….
- Attachments
-
- Before
-
- After
John
1965 Monza Sedan “The Phoenix”. Rebuild in Progress.
1965 Monza Sedan “The Phoenix”. Rebuild in Progress.
-
Cfinley2001

- Posts: 95
- Joined: Wed Apr 07, 2021 3:55 pm
- Location: Texas
Re: John’s 65 sedan
Hi John! I've got a lot of metal work to do on my car as well. I love seeing stories of people's original car being restored, I'm looking for my father's mustang, for instance. You've done some great work so far and I will certainly keep my eye on the thread.
1967 Corvair Monza 110 "Patches"
1965 Corvair Monza 110 "Fishbone"
1961 Corvair Greenbriar "Bremmer"
1962 Corvair 95 Panel "Electrovan"
1961 Corvair Monza Sedan "Joseph's"
Texan my whole life.
1965 Corvair Monza 110 "Fishbone"
1961 Corvair Greenbriar "Bremmer"
1962 Corvair 95 Panel "Electrovan"
1961 Corvair Monza Sedan "Joseph's"
Texan my whole life.
Re: John’s 65 sedan
More steady progress this week. I received the gas tank kit and was able to prime and paint the tank with good old rust oleum. Brush applied, it laid down good and thick. Before painting, I washed and wiped it down with solvent as well as giving it an internal rinse with gasoline.
Also I was able to make some final touch-up weld repairs on the donor nose piece, trunk rim, and fender tops. Then I coated the underside of the fender tops with the POR15. In preparation for the install on the car, I applied more POR15 down into all areas inside of the A-pillar and the tops of the outer-inner fenders.
Today, was a huge major milestone! I was able to install the donor nose, trunk rim, and upper fenders on the car and get it tack welded in place. It all lines up really nucę. Days like this are really exciting! I should be able to finish all of the welding on the section tomorrow. Possibly I’ll even get to the surface finishing of the weld?
Also I was able to make some final touch-up weld repairs on the donor nose piece, trunk rim, and fender tops. Then I coated the underside of the fender tops with the POR15. In preparation for the install on the car, I applied more POR15 down into all areas inside of the A-pillar and the tops of the outer-inner fenders.
Today, was a huge major milestone!
John
1965 Monza Sedan “The Phoenix”. Rebuild in Progress.
1965 Monza Sedan “The Phoenix”. Rebuild in Progress.