
Hi all from New Zealand. I have a ‘62 Spyder convertible without the turbo fitted. I am running it with twin carbs, both being refurbished from California Corvairs. The right hand side idles very evenly however the left side is less even and sort of puffs. The car runs and pulls ok. I have checked the idle jet and it is clean. I have checked and rechecked the valve settings. When I place my hand across the mouth of the right hand carb the engine labours and almost stalls without making any air sound. The left hand carb however is different. If I place my hand across the mouth of the carb, the engine certainly labour’s but not enough to stall. It is accompanied by a hissing sound reflective of sucking air from somewhere. I have checked the base gaskets and balance pipe connections and they look ok. I would have thought that this sound is a strong indicator of the problem.
What else is worth checking?? This seems to be quite a common problem but I can’t find a consistent solution on your site.
Any help is very much appreciated.
Cheers SeamusNZ
Sent from my iPhone using Corvair Forum mobile app
Not running evenly on one side
-
bbodie52

- Corvair of the Month

- Posts: 11975
- Joined: Mon Aug 06, 2012 12:33 pm
- Location: Lake Chatuge Hayesville, NC
- Contact:
Re: Not running evenly on one side
Possibly a leaking head gasket on one cylinder? Did you run a compression test on all cylinders?
Brad Bodie
Lake Chatuge, North Carolina
 1966 Corvair Corsa Convertible
Lake Chatuge, North Carolina
1966 Corvair Corsa Convertible

Re: Not running evenly on one side
You might have tried this already but if you think it might be a carb issue, then swap them side-to-side and see if the problem follows the carb swap.
Dave W. from Gilbert, AZ
66 Corsa 140/4 Yenko Stinger Tribute
66 Corsa 140 Coupe w/factory A/C
65 Monza 4DR 140/PG w/factory A/C
65 Monza 4DR EJ20T/5
64 Greenbrier 110/PG, Standard 6-Door
66 Corsa 140/4 Yenko Stinger Tribute
66 Corsa 140 Coupe w/factory A/C
65 Monza 4DR 140/PG w/factory A/C
65 Monza 4DR EJ20T/5
64 Greenbrier 110/PG, Standard 6-Door
-
terribleted

- Posts: 4584
- Joined: Sun Apr 18, 2010 2:36 pm
- Location: Atlanta, GA
- Contact:
Re: Not running evenly on one side
This for sure!! Then if issue stays on the same side do a compression test perhaps isolating a lower compression cylinder (causing the unevenness and puffing). If a low cylinder is found or even if it is not found the next thing I would try after that is a running valve adjustment. Possible that a valve is staying open a bit too long (over adjusted or lifter sticking) causing roughness and puff. Could of course be a more serious issue but this is a good place to start.
Corvair guy since 1982. I have personally restored at least 20 Vairs, many of them restored ground up.
Currently working full time repairing Corvairs and restoring old cars.
https://www.facebook.com/tedsautorestoration/
Located in Snellville, Georgia
Currently working full time repairing Corvairs and restoring old cars.
https://www.facebook.com/tedsautorestoration/
Located in Snellville, Georgia
-
66corsaguy

- Posts: 256
- Joined: Sat Apr 01, 2017 10:34 pm
Re: Not running evenly on one side
I bought restored carbs recently from someone else and had to send them back. Same issue you’re having but no puff puff. Mine was unable to balance and a chirp on one side. When i moved the carbs the problem followed.SeamusNZ wrote:Hi all from New Zealand. I have a ‘62 Spyder convertible without the turbo fitted. I am running it with twin carbs, both being refurbished from California Corvairs. The right hand side idles very evenly however the left side is less even and sort of puffs. The car runs and pulls ok. I have checked the idle jet and it is clean. I have checked and rechecked the valve settings. When I place my hand across the mouth of the right hand carb the engine labours and almost stalls without making any air sound. The left hand carb however is different. If I place my hand across the mouth of the carb, the engine certainly labour’s but not enough to stall. It is accompanied by a hissing sound reflective of sucking air from somewhere. I have checked the base gaskets and balance pipe connections and they look ok. I would have thought that this sound is a strong indicator of the problem.
What else is worth checking?? This seems to be quite a common problem but I can’t find a consistent solution on your site.
Any help is very much appreciated.
Cheers SeamusNZ
Sent from my iPhone using Corvair Forum mobile app
The guy who did my carbs said he saw one was warped and asked me to not screw the bolts down too tight. But quite honestly, if anything they’ve been under torqued so not really sure what to say about that. Anyway. He replaced and i am currently installing at the moment and hoping for perfection
My point, as Terribleted pointed out to me, just cos the carbs are rebuilds doesn’t mean they are good.
Anyway. Swap them see what happens. Good luck.
Sent from my iPhone using Corvair Forum mobile app
Re: Not running evenly on one side
Hi from New Zealand, thanks for all your feedback and advice. I swapped the carbs over and surprise, surprise the uneven running moved with the carb. The side that was running unevenly is now running smoothly with the other carb, so no hidden problems with the engine bank. What I can’t work out, is what is wrong with the other carb. I have checked the jets, float level and everything that I can think of, but no joy I’m afraid. The only difference that I can see with the carbs, that were supposed to match, is the Venturi cluster is a little different. One has four branches the other has three. Everything else including jets etc is identical. I think that there is air escaping from the bad carb somewhere. Any ideas??? Cheers SeamusNZ
Sent from my iPhone using Corvair Forum mobile app
Sent from my iPhone using Corvair Forum mobile app
-
terribleted
- Posts: 4584
- Joined: Sun Apr 18, 2010 2:36 pm
- Location: Atlanta, GA
- Contact:
Re: Not running evenly on one side
They sold you mismatched carbs? Sounds like a mistake was made. I would call them and discuss your problem requesting a replacement carb matching the good one. Issue is likely some small bit of debris stuck somewhere in the idle passages or perhaps the mismatched parts.
Corvair guy since 1982. I have personally restored at least 20 Vairs, many of them restored ground up.
Currently working full time repairing Corvairs and restoring old cars.
https://www.facebook.com/tedsautorestoration/
Located in Snellville, Georgia
Currently working full time repairing Corvairs and restoring old cars.
https://www.facebook.com/tedsautorestoration/
Located in Snellville, Georgia
-
bbodie52
- Corvair of the Month
- Posts: 11975
- Joined: Mon Aug 06, 2012 12:33 pm
- Location: Lake Chatuge Hayesville, NC
- Contact:
Re: Not running evenly on one side
Are you certain about the count? They all are supposed to have four branches. Only the distribution spacing changed in 1964.SeamusNZ wrote:...The right hand side idles very evenly however the left side is less even and sort of puffs. The car runs and pulls ok...The only difference that I can see with the carbs, that were supposed to match, is the Venturi cluster is a little different. One has four branches the other has three.
The venturi cluster is part of the MAIN METERING SYSTEM. I don't think this system would affect the engine at idle, so there may be more problems with the offending carburetor.
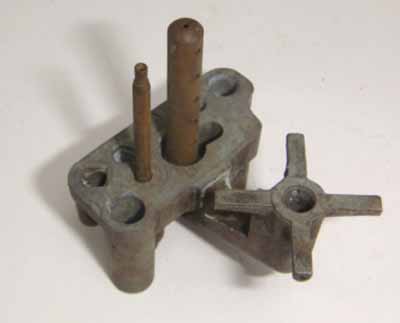
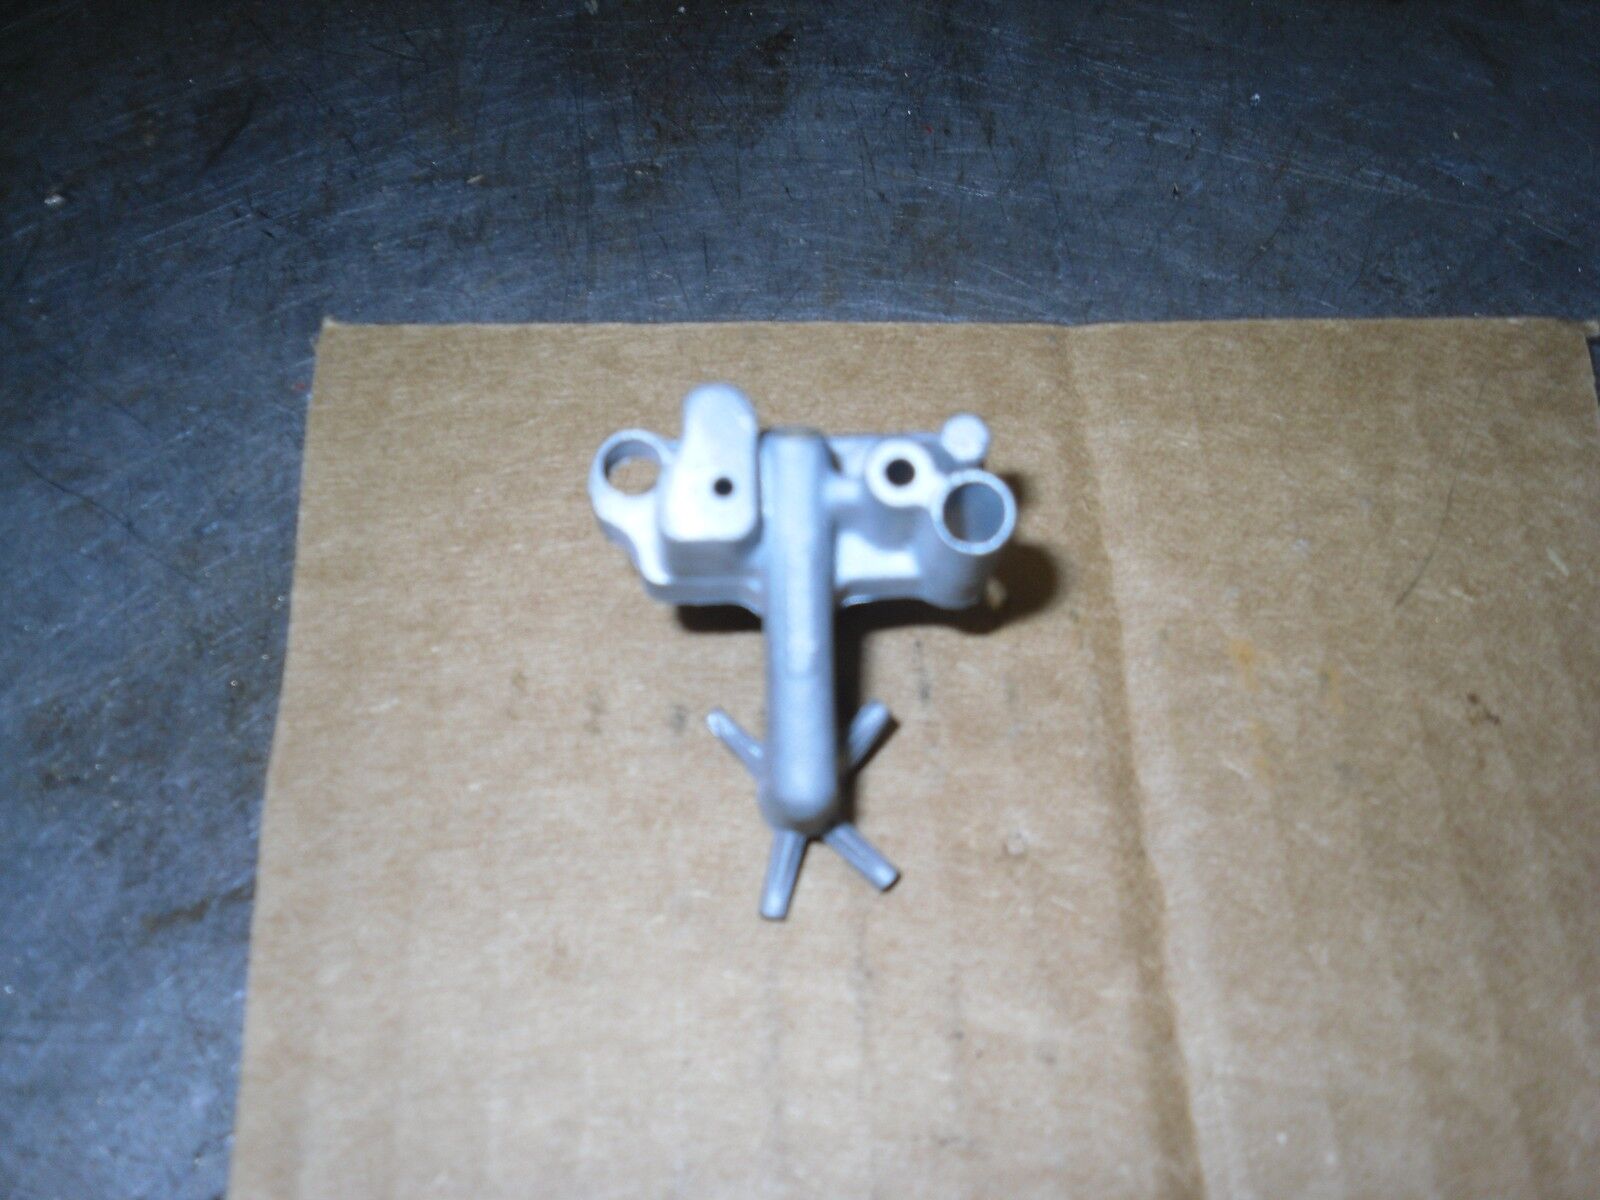
DELCO ROCHESTER - Models H, HV Carburetor Service Guide, page 6The venturi cluster was changed on 1964 and later models by offsetting the radial arms. This was done to further improve fuel mixture distribution in the engine intake manifold.
The main metering system in the carburetor is described starting on page 5 of the attached DELCO ROCHESTER - Models H, HV Carburetor Service Guide.
- Attachments
-
- DELCO ROCHESTER - Models H, HV Carburetor Service Guide.pdf
- DELCO ROCHESTER - Models H, HV Carburetor Service Guide
- (1.79 MiB) Downloaded 28 times
Brad Bodie
Lake Chatuge, North Carolina
1966 Corvair Corsa Convertible
Lake Chatuge, North Carolina
1966 Corvair Corsa ConvertibleRe: Not running evenly on one side
I would suggest buying Bob Helt's Rochester carburetor book. You can get it from Clark's Corvair to help identify the carburetors. Except for 62-63 the carburetors were revised every year from minor to major changes.
I've been rebuilding my own carburetors for a LONG time on various cars and sometimes they just won't work after a cleaning and gaskets (and probably a new throttle shaft). Issues arise from corrosion in passages, cracks, warped parts, worn parts, mismatched parts, etc.
You've identified a BAD carburetor with no obvious problems such as mis-adjustment or debris inside. Unfortunately your location makes getting another carburetor costly.
-
66corsaguy
- Posts: 256
- Joined: Sat Apr 01, 2017 10:34 pm
Re: Not running evenly on one side
My carb was warped. I wouldn’t be able to tell by looking. When i sent mine back that’s what he said. So it could be something that you will never be able to figure out. But if the problem followed the carb i would talk to who sold them to you.SeamusNZ wrote:Hi from New Zealand, thanks for all your feedback and advice. I swapped the carbs over and surprise, surprise the uneven running moved with the carb. The side that was running unevenly is now running smoothly with the other carb, so no hidden problems with the engine bank. What I can’t work out, is what is wrong with the other carb. I have checked the jets, float level and everything that I can think of, but no joy I’m afraid. The only difference that I can see with the carbs, that were supposed to match, is the Venturi cluster is a little different. One has four branches the other has three. Everything else including jets etc is identical. I think that there is air escaping from the bad carb somewhere. Any ideas??? Cheers SeamusNZ
Sent from my iPhone using Corvair Forum mobile app
Sent from my iPhone using Corvair Forum mobile app
Re: Not running evenly on one side
Problem solved. I completely disassembled the carburettor and cleaned it thoroughly. I then squirted high pressure down through each of the tiny holes in the carb body. I needed to push a thin piece of wire into some of them to make sure that they were all clear. Once completed reassembled the carburettor and clamped each vacuum hose to the appropriate connection point. The net result - both banks now run as smooth as the other. It’s only taken me 12 months.... lol. Thanks for all your help and advice. Cheers from sunny New Zealand. SeamusNZ
Sent from my iPhone using Corvair Forum mobile app
Sent from my iPhone using Corvair Forum mobile app
Re: Not running evenly on one side
Glad you got it all sorted out!
Dave W. from Gilbert, AZ
66 Corsa 140/4 Yenko Stinger Tribute
66 Corsa 140 Coupe w/factory A/C
65 Monza 4DR 140/PG w/factory A/C
65 Monza 4DR EJ20T/5
64 Greenbrier 110/PG, Standard 6-Door
66 Corsa 140/4 Yenko Stinger Tribute
66 Corsa 140 Coupe w/factory A/C
65 Monza 4DR 140/PG w/factory A/C
65 Monza 4DR EJ20T/5
64 Greenbrier 110/PG, Standard 6-Door
-
bbodie52
- Corvair of the Month
- Posts: 11975
- Joined: Mon Aug 06, 2012 12:33 pm
- Location: Lake Chatuge Hayesville, NC
- Contact:
Re: Not running evenly on one side

Thanks for sharing what proved to be your final solution! I will add this to my "lessons learned" stack of knowledge for future reference.SeamusNZ wrote: Tue Jun 19, 2018 4:47 am
Problem solved. I completely disassembled the carburettor and cleaned it thoroughly. I then squirted high pressure down through each of the tiny holes in the carb body. I needed to push a thin piece of wire into some of them to make sure that they were all clear. Once completed reassembled the carburettor and clamped each vacuum hose to the appropriate connection point. The net result - both banks now run as smooth as the other. It’s only taken me 12 months.... lol. Thanks for all your help and advice. Cheers from sunny New Zealand. SeamusNZ

Brad Bodie
Lake Chatuge, North Carolina
1966 Corvair Corsa Convertible
Lake Chatuge, North Carolina
1966 Corvair Corsa Convertible
Re: Not running evenly on one side
SO I have a question about this. I suspect a carb may be a bit dingy because it idles poorly on one side but seems to run fine. I'm concerned about pulling off the carb by myself. Can I pull it off and clean it all out with little disassembly or am I going to need to pull all the little parts etc off/out in order to give it a decent cleaning? Thanks
1962 Convertible Monza Powerglide w/ 64 differential and transverse spring and 65 carbs.
-
bbodie52
- Corvair of the Month
- Posts: 11975
- Joined: Mon Aug 06, 2012 12:33 pm
- Location: Lake Chatuge Hayesville, NC
- Contact:
Re: Not running evenly on one side
One of the key factors when working with Corvair carburetors is careful synchronization of both carburetors. If it has been some time since your carburetors have been overhauled, I would suggest that cleaning and rebuilding both carburetors would be appropriate, since this is the first step in ensuring that your fuel system is properly balanced and in good operating condition. The Rochester carburetors on the Corvair are relatively simple. I rebuilt my first carburetors at age 16 without difficulty. But I would suggest reading through the material below and browsing through the attached documents and manuals prior to tackling this project. If you have any questions you should ask them here on the Corvair forum prior to starting your carburetor cleaning, rebuilding, and engine tuneup. The training videos below should also help you with better understanding of the concepts behind properly maintaining and tuning your engine.
The carburetors must be completely disassembled to allow you to soak the metal components in carburetor parts dip. Rubber components and plastic items, and gasket material would not survive the chemical cleaner solution. All of these items are included in standard carburetor rebuild kits. The components you would need can be found in the Clark's Corvair Parts online catalog. I would suggest browsing through pages 55-59 of the catalog to familiarize yourself with the items that are available. I know that I've given you a lot of material to look at, and it is not my intent to overwhelm you with details. But if you take the time to review the manuals that are attached, watch the tuneup videos that were written by GM to train their mechanics, and then ask your questions here on the Corvair Forum, you should find yourself to be well prepared for the actual project.
 http://www.corvair.com/user-cgi/catalog ... ow_page=55
I hope that the material I write below will serve to clarify some things and not just overload you with technical information...
I wanted to start by making sure that some important insulators were not accidentally omitted when your car was worked on in the past…
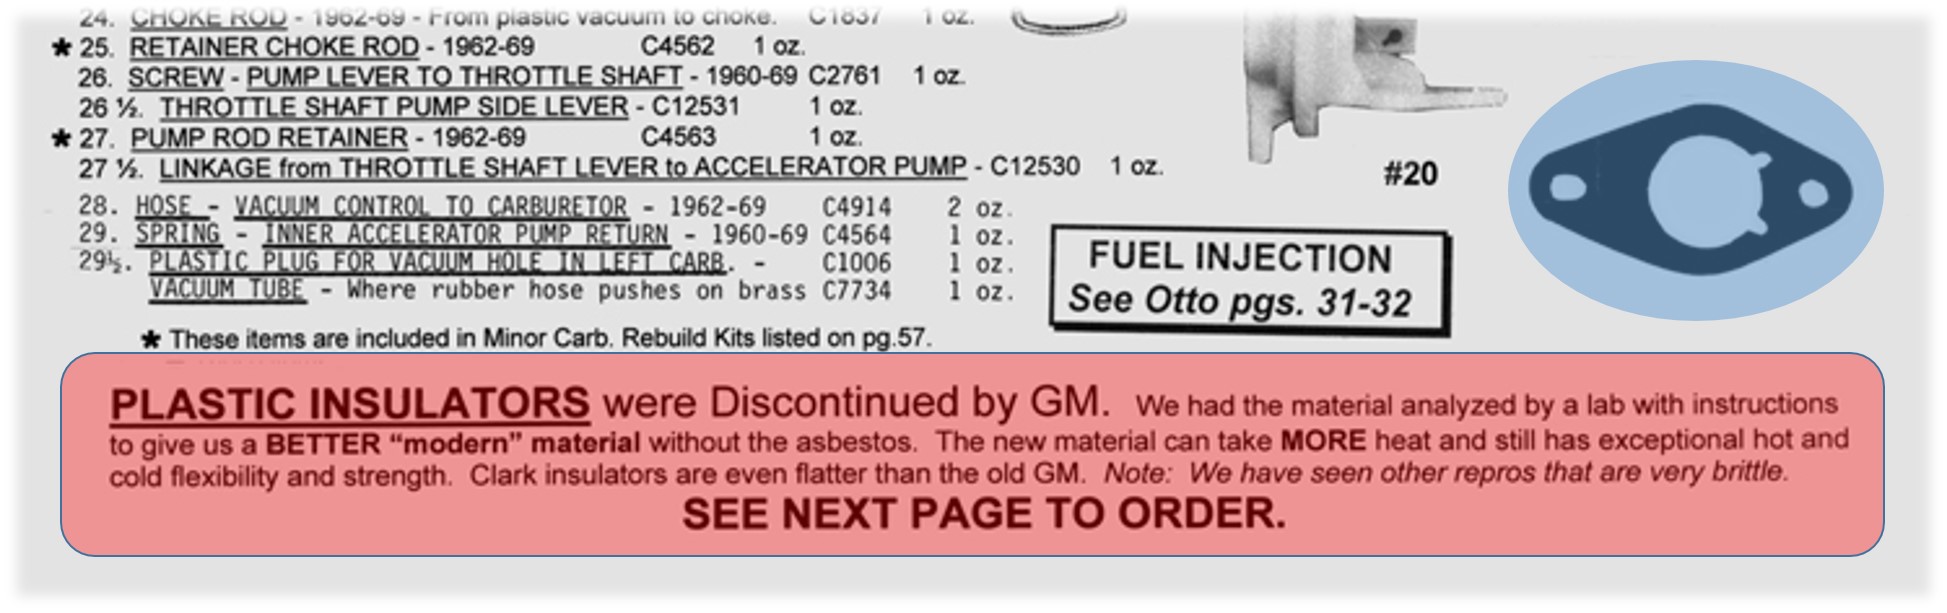
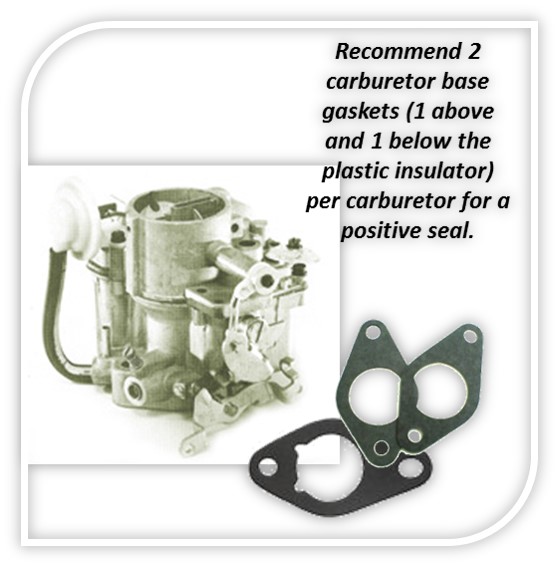
Carburetor rebuild kits often contain a thin gasket to seal the underside of the carburetor where it mounts on the intake manifold. The Corvair carburetors need a plastic insulator to isolate the base of the carburetor from the intake manifold, which prevents the gasoline inside the carburetor from boiling or vaporizing if excessive heat is allowed to transfer from the hot aluminum intake manifold on the cylinder head to the carburetor body. These plastic insulators can be easily damaged when removed. Clark's Corvair Parts bundles gaskets and insulators together. They are listed near the top of page 56 in the catalog http://www.corvair.com/user-cgi/catalog ... ow_page=56.
The carburetors must be completely disassembled to allow you to soak the metal components in carburetor parts dip. Rubber components and plastic items, and gasket material would not survive the chemical cleaner solution. All of these items are included in standard carburetor rebuild kits. The components you would need can be found in the Clark's Corvair Parts online catalog. I would suggest browsing through pages 55-59 of the catalog to familiarize yourself with the items that are available. I know that I've given you a lot of material to look at, and it is not my intent to overwhelm you with details. But if you take the time to review the manuals that are attached, watch the tuneup videos that were written by GM to train their mechanics, and then ask your questions here on the Corvair Forum, you should find yourself to be well prepared for the actual project.
I hope that the material I write below will serve to clarify some things and not just overload you with technical information...
I wanted to start by making sure that some important insulators were not accidentally omitted when your car was worked on in the past…
Carburetor rebuild kits often contain a thin gasket to seal the underside of the carburetor where it mounts on the intake manifold. The Corvair carburetors need a plastic insulator to isolate the base of the carburetor from the intake manifold, which prevents the gasoline inside the carburetor from boiling or vaporizing if excessive heat is allowed to transfer from the hot aluminum intake manifold on the cylinder head to the carburetor body. These plastic insulators can be easily damaged when removed. Clark's Corvair Parts bundles gaskets and insulators together. They are listed near the top of page 56 in the catalog http://www.corvair.com/user-cgi/catalog ... ow_page=56.
bbodie52 wrote:There is no simple, or compressed method to tune and troubleshoot a Corvair engine. A certain amount of knowledge or understanding is essential for the person doing the tuneup to interpret the results and then to be able to make logical adjustments accordingly. I would encourage you to do your homework, ask questions for clarification when needed. and follow the guidance below and in the shop manual to ultimately get the desired results with your Corvair.
bbodie52 wrote:Here is a fair amount of tune-up info, but if you can work your way through it the explanations may help with your understanding of how the various subsystems interact with each other, and why the proper sequence should be followed so you don't end up adjusting one area improperly to compensate for another area that isn't functioning properly.
The dwell tachometer and timing light are the most common items thought of when working with an older engine in a classic car. As previously mentioned, however, there are ways to work around the lack of these tools. Adjusting the ignition points gap with a flat feeler gauge is a substitute for having a dwell tachometer. Setting the dwell with an electronic instrument is more accurate, however. The tachometer portion is needed to measure idle speeds and possibly to perform other tests where engine speed measurement is needed. It is possible to static-time your ignition system with a strip of paper placed between the ignition points. The engine timing mark can be manually positioned to the desired setting on the crankshaft pulley, and the distributor can be slowly rotated until the points just start to open and release the strip of paper. The distributor is then tightened and the mechanic has established an initial static timing setting. Of course, having a timing light makes things much easier, improves accuracy, and permits visual confirmation that the centrifugal advance is functioning. A vacuum gauge can be used for carburetor synchronization and other carburetor tests, and most vacuum gauges also double as a pressure gauge for measuring fuel pump output pressure. A UniSyn gauge, as shown below, measures airflow through each carburetor throat, and is an accurate way for synchronizing multiple carburetors at idle speeds and at partial throttle. A multimeter is a useful tool for troubleshooting and diagnosing electrical and charging system problems.
Many ignition systems in Corvairs have been upgraded by fitting an electronic ignition system to the distributor. These electronic ignition systems eliminate ignition points and condenser, which makes engine tuning somewhat easier and eliminates the need to periodically replace worn ignition points. The breakerless ignition system utilizes an optical or magnetic trigger to control the ignition coil. The system eliminates the need for a dwell meter or flat feeler gauge for ignition points adjustments. (A wire-type feeler gauge is needed for adjusting spark plug gaps). The tachometer portion of a dwell-tachometer, however, is still useful.
The links, videos, and attachments below should help you to understand how to work with a dual carburetor engine. Try not to be intimidated by two physically separated carburetors. They really function very much like a single two-barrel carburetor, but are physically separated from each other out of necessity due to the layout of the flat air cooled engine with cylinders opposed to each other. The Corvair engine layout is in many ways similar to many motorcycle engine configurations. It usually takes an experienced automobile mechanic a little adjustment time to get used to the way things are done on a motorcycle. The aluminum, air cooled flat six Corvair engine often is seen as a challenge to an automobile mechanic, who is not used to the "strange configuration" found in a Corvair.
The entire shop manual and many other Corvair technical references can be downloaded at no cost using the following link...
Common and Useful Corvair Websites
Watching the video presentations below helps to provide insight and understanding about proper sequencing of the tuneup steps and procedures. Skipping around can insert obstacles and problems with getting the engine properly tuned.
The portion of the first video segment toward the end (Part 1, 5:10) and at the beginning of the second segment discusses throttle linkage adjustments and carburetor synchronization.
Tuning the Corvair Engine — Part 1
Tuning The Corvair Engine — Part 2
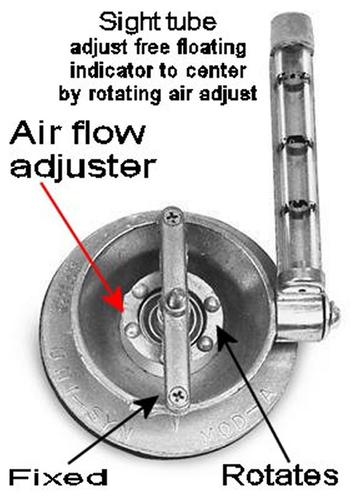
bbodie52 wrote: The Uni-Syn Carburetor Balancing Instrument is a tool that I remember as far back as the 1950s and 1960s. It was designed for use in multi-carburetor automobiles, motorcycles, etc. that were initially common in European vehicles, but were later found in American vehicles like the Corvair.
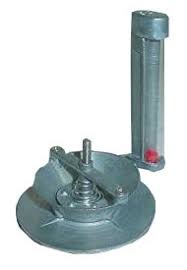

The Uni-Syn is an airflow gauge that must be calibrated to match the specific engine airflow moving through the carburetor throat. The flow control in the center of the Uni-Syn is mounted on a threaded pin. Rotating the flow control raises or lowers it, which increases/decreases the air gap, which impacts the air velocity passing the oriface that allows some airflow to pass through the gauge. With the Uni-Syn held firmly on the carburetor intake with the engine idling, the flow control is adjusted so that the plastic float is approximately centered in the glass sight tube. Once calibrated, the Uni-Syn can be moved back and forth between the two primary carburetors to compare airflow at idle. The goal is to play with the idle speed screws to get an even airflow level that matches between both carburetors, and at the same time produces the desired idle speed. Before fine-tuning this idle balance with a Uni-Syn, the ignition system, idle speed and idle mixture should have been adjusted following the standard procedures as described in the factory shop manual. The balancing step with the Uni-Syn gauge is added at the end of the tuning procedure to measure actual airflow though both carburetors at idle, and balancing that airflow using the airflow meter as a measuring tool, rather than simply relying on a physical balanced "calibration" using a strip of paper to detect initial contact between the idle speed adjustment screws and the carburetor linkage, followed by counting the screw turns needed to obtain the desired idle speed (and ensuring that the same number of screw turns are applied to each screw). That procedure achieves a fairly close initial setup. The use of the Uni-Syn airflow gauge as a final step ensures balance between the two carburetors by measuring actual airflow.
Once the balanced idle airflow and desired idle speed have been achieved, a similar procedure can be used to synchronize the airflow when the carburetors are held open at a faster engine speed by the throttle linkage. Again, the shop manual procedure can be used to set the initial mechanical balance between the two sides of the throttle linkage. The linkage segment connecting the accelerator pedal to the cross-linkage between the two carburetors is temporarily disconnected, and a turnbuckle is temporarily attached to hold the throttle opened against the pull of the throttle return spring.
The turnbuckle can be adjusted to hold the throttle open at approximately 1500 RPM. The Uni-Syn center flow control is readjusted to re-calibrate the float to a position somewhere in the center travel of the sight tube, based on the increased airflow through the carburetors at the higher steady RPM maintained by the turnbuckle arrangement. As with the idle synchronization procedure, the re-calibrated Uni-Syn is used to measure the airflow moving through the two carburetors. The goal is to fine-tune the threaded portion of the carburetor actuation linkage so that the same airflow reading is attained on each carburetor, but this time with the throttles held open by a pull on the throttle linkage, instead of by the setting of the idle speed screws. When the airflow has been balanced using the throttle linkage adjustment, the balancing procedure has been completed and the normal accelerator pedal throttle linkage can be reconnected.
TIPS & CLARIFICATION...
With the engine at idle, you want to open the Uni-Syn flow control as much as possible, but still keep the float in the sight glass at about mid-level. Then check the other carburetor, which you want to read the same flow rate. You may have to adjust the flow control a few times as you adjust the carburetor settings. Just remember to check each carburetor with the flow control set at the same point, and to keep the sight glass in the vertical to prevent the float from hanging up in the tube.
The wheel in the Uni-Syn venturi controls the flow through the tube, or in other words how high the bead is in the cylinder for a given engine speed. You need enough flow to not strangle the engine, and the bead works just as well in the lower third (which still lets good air flow through). Make sure the idle speed doesn't drop when you place the tool on the carb: if it does, open it up.
Before setting the carbs, make sure that the ignition is right: points and timing set, good wires and plugs. Rich running is often blamed on carbs when in fact it's a weak, retarded spark. Check the throttle shafts: loose ones let in air and lean the mixture, raising idle speed, as well as throw off the linkage action. Check the linkage that connects the carburetors. if it's loose, one will open before the other. Make sure there are no vacuum leaks.
With a twin carburetor set up, disconnect the linkage that connects one carburetor to the other. Set the idle speed with the linkage screws first. Use the Uni-Syn to check that each carburetor is drawing equally at idle. This may take a few tries until you get both drawing equally at the speed you want. Blip the throttle to see if they come back to those settings (worn throttle shafts can fool you). Set the idle mixture screws in accordance with the shop manual instructions. Check the balance again. Hook the linkage back up. If one carburetor now draws more, adjust the linkage until it's back to roughly equal.
Once the carburetors are drawing equally at idle, hold an engine speed: at about 1500 RPM. This checks that the mechanical linkage is pulling equally. You'll need to open up the Uni-Syn center wheel to draw more air and bring the bead down in the tube. If both carburetors are within a bead's thickness of each other, that's good. If one is definitely off from the other, the higher flow carburetor's linkage is being pulled more than the other. You'll need to figure out why that's happening mechanically to rectify it.
After reading through the above material please let me know if you need any further clarification. The attached DELCO ROCHESTER - Models H, HV Carburetor Service Manual may help you somewhat with the carburetor identification. It will also help you to understand each of the carburetor subsystems and many of the factory changes, so that you can better understand what the changes were and what they were intended to accomplish.

- Attachments
-
- 1961 Chevrolet Corvair Shop Manual - Section 7 - Engine Tune-Up.pdf
- 1961 Chevrolet Corvair Shop Manual - Section 7 - Engine Tune-Up
- (644.51 KiB) Downloaded 23 times
-
- 1961 Chevrolet Corvair Shop Manual - Section 9 - Fuel & Exhaust Systems.pdf
- 1961 Chevrolet Corvair Shop Manual - Section 9 - Fuel & Exhaust Systems
- (1.31 MiB) Downloaded 18 times
-
- 1962-1963 Supplement - Chevrolet Corvair Shop Manual - Section 7 - Engine Tune-Up.pdf
- 1962-1963 Supplement - Chevrolet Corvair Shop Manual - Section 7 - Engine Tune-Up
- (899.84 KiB) Downloaded 20 times
-
- 1962-1963 Supplement - Chevrolet Corvair Shop Manual - Section 9 - Fuel & Exhaust Systems.pdf
- 1962-1963 Supplement - Chevrolet Corvair Shop Manual - Section 9 - Fuel & Exhaust Systems
- (3.83 MiB) Downloaded 22 times
-
- Corvair H and HV Carburetor Rebuild Sheet.pdf
- Corvair H and HV Carburetor Rebuild Sheet
- (1.67 MiB) Downloaded 22 times
-
- DELCO ROCHESTER - Models H, HV Carburetor Service Manual.pdf
- DELCO ROCHESTER - Models H, HV Carburetor Service Manual
- (1.79 MiB) Downloaded 28 times
Brad Bodie
Lake Chatuge, North Carolina
1966 Corvair Corsa Convertible
Lake Chatuge, North Carolina
1966 Corvair Corsa ConvertibleRe: Not running evenly on one side
Glad you got it. Well as you learned a "cleaned" carburetor doesn't necessarily mean all the passages are open. I gave up on parts dip years ago. davemotohead suggested soda blasting (NOT bead blasting) and it works well, although I still use a bright light to check all the passages where accessible. Sometimes the careful use of a fine wire is needed on the clusters. A mix of 50/50 Simple Green and water will remove any soda in the carburetor along with pressurized air.SeamusNZ wrote: ↑Tue Jun 19, 2018 1:47 am Problem solved. I completely disassembled the carburettor and cleaned it thoroughly. I then squirted high pressure down through each of the tiny holes in the carb body. I needed to push a thin piece of wire into some of them to make sure that they were all clear. Once completed reassembled the carburettor and clamped each vacuum hose to the appropriate connection point. The net result - both banks now run as smooth as the other. It’s only taken me 12 months.... lol. Thanks for all your help and advice. Cheers from sunny New Zealand. SeamusNZ
Sent from my iPhone using Corvair Forum mobile app