
There has to be a spec on the shoes but just before the rivets grind into the drum is a good rule of thumb
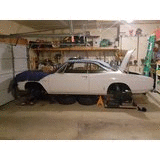
New-to-me 66 Corsa!
Re: New-to-me 66 Corsa!
I'm sure others are looking at the thread.
There has to be a spec on the shoes but just before the rivets grind into the drum is a good rule of thumb
There has to be a spec on the shoes but just before the rivets grind into the drum is a good rule of thumb
Jeremy (cad-kid)
Kronenwetter, WI (Central Wisconsin)
SOLD 9-2016 65 Monza 4spd/140
My 65 Monza thread
 My YouTube page
Kronenwetter, WI (Central Wisconsin)
SOLD 9-2016 65 Monza 4spd/140
My 65 Monza thread

Re: New-to-me 66 Corsa!
Unusual weeknight update - I was talking to one of our technicians at our shop today about fabricating a spring compressor - he loaned me his and I managed to get the springs, spindles, upper and lower control arms disassembled tonight. Off to the blaster in the morning for clean-up and epoxy prime...
I also checked my parts inventory - only needed upper arm bumpers and upper sway bar link bushings, made the order. Could I be reassembling this weekend?
From yesterdays post - WTB a ball nut and pitman arm shaft...
More to come...
More to come...
BobWitt - South East Michigan
Member: Corsa and DACC
1966 Corsa 140
Follow my build at: viewtopic.php?f=52&t=9082"
Member: Corsa and DACC
1966 Corsa 140
Follow my build at: viewtopic.php?f=52&t=9082"
-
GasDaddy140
- Posts: 327
- Joined: Tue Aug 19, 2014 1:57 pm
Re: New-to-me 66 Corsa!
Cool Corvair! The wheels smell.
Alan Duquette
Rohnert Park, CA
"When in doubt...Hit the gas!" A.J. Foyt.
1965 Corvair Corsa (field find) Project
1971 Dodge Sportsman "shorty" 318 van
2015 Nissan Juke S
Rohnert Park, CA
"When in doubt...Hit the gas!" A.J. Foyt.
1965 Corvair Corsa (field find) Project
1971 Dodge Sportsman "shorty" 318 van
2015 Nissan Juke S

Re: New-to-me 66 Corsa!
BobWitt wrote:I was talking to one of our technicians at our shop today about fabricating a spring compressor -
Many of us fab up a 7/16 all-thread rod with some washers and brackets. These pics are from Vairchet on CC.
Dave W. from Gilbert, AZ
66 Corsa 140/4 Yenko Stinger Tribute
66 Corsa 140 Coupe w/factory A/C
65 Monza 4DR 140/PG w/factory A/C
65 Monza 4DR EJ20T/5
64 Greenbrier 110/PG, Standard 6-Door
66 Corsa 140/4 Yenko Stinger Tribute
66 Corsa 140 Coupe w/factory A/C
65 Monza 4DR 140/PG w/factory A/C
65 Monza 4DR EJ20T/5
64 Greenbrier 110/PG, Standard 6-Door
Re: New-to-me 66 Corsa!
Dave – Is that the one that uses the shock mounting holes in the LCA? That was what I was going to Fab! I’ve seen that or another thread (Dave Motohead maybe) that I was going to copy… The tool I borrowed used the shock hole at the top, and had ‘claws’ that clamped the lower spring directly – worked like a charm and took no time to fab…
Alan (GasDaddy) said “The wheels smell”… Yeah, I agree, WTB a nice set of gray or as-cast Torq Thrust or Rocket Ignitor/Salt Flats or old Chevelle/Z28 Rally wheels – I think the natural as-cast or gray wheels would work with the current body color, or Marina Blue if and when I get back to that… Anyone have a nice set they want to let go of? Going to a good home!
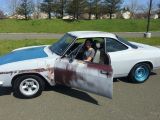
Well it has been a while from my last post. Everything takes about 4 times as long as I estimate. In my last post I had the front suspension disassembled and the big parts were off to the blaster. Once I received them back, I decided to prime and paint myself. But, in typical fashion, the Michigan weather was not cooperating. I needed the steel warmer to paint, so I came up with a ‘redneck paint oven”. This allowed me to preheat the steel after cleaning, and bake after paint. I had no problem keeping the box interior at ~120*F! the following shot after prime and topcoat.
I needed a set of tools to press the new bushings into the control arms, and found a good thread over at CC - http://corvaircenter.com/phorum/read.ph ... 222,402737 - with this guidance I made my own set of tools to do the control arm bushings. I had Home Depot cut the pipe to the correct length and then I split lengthwise with a cut-off wheel…
Worked like a charm. I also borrowed a ball joint press set from O’Reilly’s just to have a variety of spacers. After a lot of small parts clean-up and paint, this is where I’m at…
Still have some odds and ends to finish up on this assembly, but the big parts are done!
As this neared completion I began to look more closely at the brakes. I could not believe the ugly goop that came out of the wheel cylinders and continue to question the condition of the inside of my brake and fuel lines. As I took apart the right rear brake, the short steel tube nut at the hose (section to wheel cylinder) rounded. So now I need to replace this length. To get a feel of the interior condition I split this tube with a Dramel cut off wheel. This is what it looks like.
So, this short section does not look too bad to me! What do you think? As this is the furthest from the master, is it a good sample? Should this be a rusty spot, or the last to rust? There is some sludge in the lines, how do I best flush this? I’m thinking the lines are keepers and I already have Clark’s Dual Master kit to install. Wheel cylinders are soaking now in cleaner.
I’ve picked up a good used Pitman Shaft and Ball Nut (thanks Rafee) and Ken Hand pressed new bushings into my steering gear.
So, over the next week or so I should have my steering gear reassembled and know if I’m replacing the slave cylinders or doing a hone and rebuild… getting closer to my goal of making it steer and stop before I make it go!
As always, more to come…
Alan (GasDaddy) said “The wheels smell”… Yeah, I agree, WTB a nice set of gray or as-cast Torq Thrust or Rocket Ignitor/Salt Flats or old Chevelle/Z28 Rally wheels – I think the natural as-cast or gray wheels would work with the current body color, or Marina Blue if and when I get back to that… Anyone have a nice set they want to let go of? Going to a good home!
- My paint oven...
As this neared completion I began to look more closely at the brakes. I could not believe the ugly goop that came out of the wheel cylinders and continue to question the condition of the inside of my brake and fuel lines. As I took apart the right rear brake, the short steel tube nut at the hose (section to wheel cylinder) rounded. So now I need to replace this length. To get a feel of the interior condition I split this tube with a Dramel cut off wheel. This is what it looks like.
I’ve picked up a good used Pitman Shaft and Ball Nut (thanks Rafee) and Ken Hand pressed new bushings into my steering gear.
So, over the next week or so I should have my steering gear reassembled and know if I’m replacing the slave cylinders or doing a hone and rebuild… getting closer to my goal of making it steer and stop before I make it go!
As always, more to come…
BobWitt - South East Michigan
Member: Corsa and DACC
1966 Corsa 140
Follow my build at: viewtopic.php?f=52&t=9082"
Member: Corsa and DACC
1966 Corsa 140
Follow my build at: viewtopic.php?f=52&t=9082"
Re: New-to-me 66 Corsa!
New lines are the way to go. In that same thought  replace the whole system- cylinders, lines, hoses, & mc.
You don't want any failures
You don't want any failures
Jeremy (cad-kid)
Kronenwetter, WI (Central Wisconsin)
SOLD 9-2016 65 Monza 4spd/140
My 65 Monza thread
My YouTube page
Kronenwetter, WI (Central Wisconsin)
SOLD 9-2016 65 Monza 4spd/140
My 65 Monza thread
Re: New-to-me 66 Corsa!
I’ve been away for about a month working some household and family commitments – It’s all good… I managed to strip and replace the ‘deck’ of my deck which took almost 3 weeks even with the carpenter I hired to lead me through it. We stained tops, bottoms edges and ends of every piece of cedar we installed – should last longer than the one we removed. I have a little more to do but we were able to use it for a nice Mother’s Day Celebration yesterday. I have to invest a few more days and then it will be done…
Then, my daughter graduated from U of M – very excited for her – and to have no more tuition payments to U of M! In preparation for her homecoming my wife and I painted her room and moved in some new (to her) furniture into it. Next she wants me to help her recover a padded headboard and make a matching bed frame. All are good distractions…
So, all of the above conspired to delay progress on the Corvair. But…
Last Saturday I gave crinkle painting of the IP, glove box door and surround a try. Failed. My effort came out splotchy and with inconsistent grain. So I’m going to have to strip it all and try again. I think I did not get even and heavy enough coats of the VHT paint for success. Oh well, this one is new to me so I’m going to ring it up to experience and move on… Hopefully I’ll nail it next time.
About the brakes, I decided to replace the front lines and flush those to the rear, and replace all of the slave cylinders and of course the hoses. I have received all of these parts and this evening I decided to do something mechanical – so I decided to assemble the brakes onto the front suspension. When I finished the right front, I had one washer left over and am not sure where it goes! It is not the one for the star-wheel; it looks like it is the right size to go under one of the shoe retainers – not sure if it would go on the front (smaller) shoe between the shoe and spring, or if it nests on the top of the rear tube washer… Any thoughts or guidance would be appreciated!
I’m hoping to get back into the swing of things and getting some real progress going. I’ve already missed my goal of having it on the road in March or April… Still can hope for the DACC Homecoming and the Dream Cruse in August!
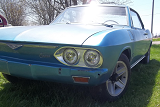
Oh, I forgot, In my month long hiatus, I also managed to find some wheels. 1971 Z28 5-spoke Rally wheels. What do you think in Corsa cove flat argent color?
This coming Thursday I’m going to the “Meet the Maker’s” event in Willow Run. Should be an interesting gathering!
More to come…
Then, my daughter graduated from U of M – very excited for her – and to have no more tuition payments to U of M! In preparation for her homecoming my wife and I painted her room and moved in some new (to her) furniture into it. Next she wants me to help her recover a padded headboard and make a matching bed frame. All are good distractions…
Last Saturday I gave crinkle painting of the IP, glove box door and surround a try. Failed. My effort came out splotchy and with inconsistent grain. So I’m going to have to strip it all and try again. I think I did not get even and heavy enough coats of the VHT paint for success. Oh well, this one is new to me so I’m going to ring it up to experience and move on… Hopefully I’ll nail it next time.
Oh, I forgot, In my month long hiatus, I also managed to find some wheels. 1971 Z28 5-spoke Rally wheels. What do you think in Corsa cove flat argent color?
More to come…
Last edited by BobWitt on Mon May 11, 2015 7:59 pm, edited 1 time in total.
BobWitt - South East Michigan
Member: Corsa and DACC
1966 Corsa 140
Follow my build at: viewtopic.php?f=52&t=9082"
Member: Corsa and DACC
1966 Corsa 140
Follow my build at: viewtopic.php?f=52&t=9082"
Re: New-to-me 66 Corsa!
Nice side projects 
On my brakes the washer went under the shoe retainer spring that coiled to a small diameter on one end.
On my brakes the washer went under the shoe retainer spring that coiled to a small diameter on one end.
Jeremy (cad-kid)
Kronenwetter, WI (Central Wisconsin)
SOLD 9-2016 65 Monza 4spd/140
My 65 Monza thread
My YouTube page
Kronenwetter, WI (Central Wisconsin)
SOLD 9-2016 65 Monza 4spd/140
My 65 Monza thread
Re: New-to-me 66 Corsa!
Jeremy (cad-kid) - that was my first guess... Thanks for the continued support...
BobWitt - South East Michigan
Member: Corsa and DACC
1966 Corsa 140
Follow my build at: viewtopic.php?f=52&t=9082"
Member: Corsa and DACC
1966 Corsa 140
Follow my build at: viewtopic.php?f=52&t=9082"
Re: New-to-me 66 Corsa!
I am really impressed with your project and the attention to detail you have. I am picking up my engine parts from the machine shop tomorrow to start rebuilding my engine. After that I will be doing the same thing you are doing. Great pics and information, thanks for posting and enjoy the restoration.
Happy Building all!
Re: New-to-me 66 Corsa!
Freejax - thanks for the kind words, for a while there I though Cad-Kid was my only reader...
Not much to add this week, I put that washer in its home and began assembling the shoes to the other 3 corners... And then everything came to a screeching halt...
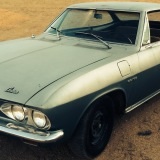
What is wrong with the following before-disassembly photo?
As I was putting the two rears together, I realized a part was missing on both sides. Worse yet, I cannot find in Clark's Catalog! So I've done all I can with corner assembly until I acquire these parts...
Moved on to removing the OE master cylinder and all 4 lines from the "X" block under the dash. I have the new pre-bent front lines "in inventory" ready to install once I finish cleaning up the undercarriage. I'm going to keep the OE lines to the rears (other than the one I cut open) and I obtained a pressure bleeder to flush the OE lines to the rear.
Began preparation to install the dual MC. I don't like how Clark's kit runs the lines, so I'm likely to modify to 1) not bend OE line to the rear, and 2) pass the two brake lines through the Dash close to each other.
That's all for now - More to come...
Not much to add this week, I put that washer in its home and began assembling the shoes to the other 3 corners... And then everything came to a screeching halt...
What is wrong with the following before-disassembly photo?
- Right Rear - before disassembly
Moved on to removing the OE master cylinder and all 4 lines from the "X" block under the dash. I have the new pre-bent front lines "in inventory" ready to install once I finish cleaning up the undercarriage. I'm going to keep the OE lines to the rears (other than the one I cut open) and I obtained a pressure bleeder to flush the OE lines to the rear.
Began preparation to install the dual MC. I don't like how Clark's kit runs the lines, so I'm likely to modify to 1) not bend OE line to the rear, and 2) pass the two brake lines through the Dash close to each other.
That's all for now - More to come...
BobWitt - South East Michigan
Member: Corsa and DACC
1966 Corsa 140
Follow my build at: viewtopic.php?f=52&t=9082"
Member: Corsa and DACC
1966 Corsa 140
Follow my build at: viewtopic.php?f=52&t=9082"
Re: New-to-me 66 Corsa!
Maybe I'm not seeing it, but what is missing here? If you mean the washers that are on the front brakes, the rears don't have them. At least mine don't anyways.
'66 Monza Coupe Project: viewtopic.php?f=52&t=7188" onclick="window.open(this.href);return false;
Re: New-to-me 66 Corsa!
I feel your pain on the gauge surround. 
My 1st attempt was splotchy and I was unhappy with how inconsistent the wrinkle looked. I'm on my 2nd attempt now. I already stripped and masked it again but, the weather turned and between cold days and rain I have not wanted to spray it again. I think you are right a thicker coat is needed and based on how my glove box surround came out a more constant heating (I'm happy with how it came out btw). I used a hair dryer at each coat during a 15min wait time before the next coat, and had them baking in direct sunlight with a rotation schedule. I user a thermal meter I have to measure the surface temp. and the best I saw was 136 degrees. The can says to get it up to 200. Since using the oven is out of the question I will be spending much more time with the hair dryer on round 2.
Love your wheels btw.
No stock parts were harmed during the on going restoration of this Corvair....ok, maybe a little bit.
1965 Corsa Coupe #5065
1965 Corsa Coupe #5065
Re: New-to-me 66 Corsa!
Blaze - what did you think of the Meet the Makers - good to meet a name from the forum? Edz - Good luck with round 2... I question how humidity plays in, I can get warm days now, but not without humidity! You had > 130 *F just from soaking in the sun??
No "Guide Plates" on either rear corner... And mine had all the washers at the shoe attachment springs like the front.
I cannot locate "Guide Plates" in Clark's Catalog - have an email into them...
More to come...
No "Guide Plates" on either rear corner... And mine had all the washers at the shoe attachment springs like the front.
More to come...
BobWitt - South East Michigan
Member: Corsa and DACC
1966 Corsa 140
Follow my build at: viewtopic.php?f=52&t=9082"
Member: Corsa and DACC
1966 Corsa 140
Follow my build at: viewtopic.php?f=52&t=9082"
-
bbodie52

- Corvair of the Month

- Posts: 12140
- Joined: Mon Aug 06, 2012 12:33 pm
- Location: Lake Chatuge Hayesville, NC
- Contact:
Re: New-to-me 66 Corsa!
Clark's lists used brake retainers, but they are also shown as out of stock.
 http://www.corvair.com/user-cgi/catalog ... ge=USED-22

You might be able to find them at the Corvair Ranch in Gettysburg, Pennsylvania...
http://www.corvairranch.com/
You might be able to find them at the Corvair Ranch in Gettysburg, Pennsylvania...
Brad Bodie
Lake Chatuge, North Carolina
 1966 Corvair Corsa Convertible
Lake Chatuge, North Carolina
1966 Corvair Corsa ConvertibleRe: New-to-me 66 Corsa!
My understanding is the rears don't use the retainers. They could but it is not needed. Mine doesn't have them-
Jeremy (cad-kid)
Kronenwetter, WI (Central Wisconsin)
SOLD 9-2016 65 Monza 4spd/140
My 65 Monza thread
My YouTube page
Kronenwetter, WI (Central Wisconsin)
SOLD 9-2016 65 Monza 4spd/140
My 65 Monza thread