Good day,
This post and attached photos are sequential to those posted in the "introductions" forum under the same heading, "Career Project." Hope you find them interesting...
 Viewed 6493 times")
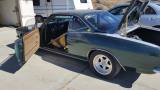
- After a chemical dip and red oxide coating on the underside, the body heads home for installation of a NOS rear cove from Clark's and repairs to the dented lft rear quarter.
Over the next several months an AutoCAD file was created to design and engineer a "back-bone" style chassis for attachment of the suspension, engine/transaxle, and as a stiffener to the Corvair's unibody. During this time I was working at an Industrial Design facility that provided contract design and engineering services to the OEM auto design studios located in central and southern CA. I had occasion to befriend an Engineer there by the name of Mark Visconte who had previously worked for Shelby American and was responsible for the suspension engineering on the Shelby Series One car. Fortunately for me, Mark offered to provide his expertise to my CAD file drawings to insure a performance oriented configuration to the suspension layout. The Shelby car used Corvette C4 front suspension components in both the front and rear. The Shelby rear took advantage of the later C4 front knuckles that incorporated ABS sensors that provided a hole through the knuckle that allows a half shaft to connect to a drive hub. Pretty neat arrangement and more geometrically and dynamically efficient than the standard rear configuration in the Corvette. At that time knuckle adapters were purchased from Shelby and hub adapters were machined by the folks at Mark Williams Enterprises to connect the C4 wheel hubs with the Porsche 930 CV jointed half shafts.
 Viewed 6493 times")
- C4 lower a-arm getting the forging flash removed.
 Viewed 6493 times")
- Upper control arms getting the same treatment. Before on the left, after on the right.
Simultaneously, the chassis was being fabricated and a reconditioned 930 Porsche transaxle was purchased through eBay.
 Viewed 6493 times")
- Chassis profile.
 Viewed 6493 times")
- Chassis, front view.
 Viewed 6493 times")
- Chassis, rear view.
The front and rear sections of the chassis attach to the Corvair's unibody frame members via additional tube links while the center crossmember attaches to the Corvair's sill boxes in line with the rear door jambs.
In addition, quickie epoxy FRP molds were taken from the Corvair's hood and decklid. From the molds we fabricated carbon fiber inner and outer panels that were then joined with structural adhesive. The result was as you'd expect, very light and very stiff.
 Viewed 6493 times")
- Epoxy FRP molds for the hood.
Unfortunately, I'm not diligent about taking photos in the quantity that I should so, as you may have noticed, there are huge blank spots in the build.