I have an 8-door Van that I've been wondering if I'll ever get around to. Looking at this gives me new inspiration.
Watching the Fire Brier project had me out looking for an Amblewagon that was around here 25 years ago but I couldn't find it and it may have been destroyed. The other Amblewagon from the Egil Twedt collection was nicer and went to Beloit, Wisconsin, then I think East Germany and Hungary. Both of them were originally in Minnesota communities.
I'm currently building a '64 110 FC engine, probably going to a camper conversion Van in Two Harbors, Minnesota.
Thanks for posting about these projects, it's always fascinating.
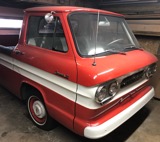
My '62 Greenbrier Camper Project
-
jimbrandberg
- Posts: 786
- Joined: Sun Feb 11, 2024 7:16 am
Re: My '62 Greenbrier Camper Project
Jim Brandberg
Isanti, MN
Corvair Repair LLC
Isanti, MN
Corvair Repair LLC
Re: My '62 Greenbrier Camper Project
Nice work Steve. Thank you for your detailed posts. I always learn something from your write ups. Look forward to seeing more of your progress and the finished product.
Craig T
Central NY - Where most people still use all their fingers when they wave to you
1961 Rampside “Tramp”
Central NY - Where most people still use all their fingers when they wave to you
1961 Rampside “Tramp”
-
SteveInMarietta
- Posts: 61
- Joined: Sun Sep 25, 2016 7:02 pm
Re: My '62 Greenbrier Camper Project
I decided I needed a break from body work, and the headlight buckets have been in the back of my mind. I've accumulated several of them, one is in decent condition but all the others look like this:
It's becoming increasing difficult, at least on the eastern seaboard, to find headlight buckets that aren't rotted, and usually most of the damage is around the directional light:
Since the rest of the bucket is usually in good shape it seems a shame to scrape these - eventually there won't be any rust-free buckets left. So I've decided to restore all of the buckets I have. Obviously, this requires replacing the rotted panel where the directional lamp mounts. Fortunately, the lamp housing is usually salvageable, and it can be reused. So using an angle grinder with flap disk, I removed the housing by grinding off the upper surface of the crimp:
Note that I have already cut off and removed the light socket. The housing surface surface could then be ground smooth and derusted as necessary.
The panel that needs to be replaced has a complex shape with a curved flange. To make a replica, the shape was patterned in two 1/4' steel plates. A piece of 20 ga steel was clamped between them and an exposed edge of the 20 ga steel was hammered flat to create the flange.
The inner side of the new panel was trimmed as necessary to fit and after scribing, the rotted old metal was removed.
The directional lamp housing hole was cut at 1 3/8" diameter, which is slightly smaller than the housing itself. So the hole was filed a bit and then the lamp housing was pressed in.
This places what was the lower side of the crimp on the upper side of the panel, which really doesn't matter. To secure the housing permanently, a few spot welds were added to the back edge.
A wooden jig was used to align and hold in place the replacement panel until a few spot welds could be applied.
Here's the finished bucket after planishing the welds
Next steps will be to prime and paint, attach new springs and light adjusters, and eventually new harnesses.
This actually took several attempts, some trial and error, but with the jigs now set, restoring several buckets will be reasonably straight forward.
Steve
The panel that needs to be replaced has a complex shape with a curved flange. To make a replica, the shape was patterned in two 1/4' steel plates. A piece of 20 ga steel was clamped between them and an exposed edge of the 20 ga steel was hammered flat to create the flange.
A wooden jig was used to align and hold in place the replacement panel until a few spot welds could be applied.
This actually took several attempts, some trial and error, but with the jigs now set, restoring several buckets will be reasonably straight forward.
Steve
-
SteveInMarietta
- Posts: 61
- Joined: Sun Sep 25, 2016 7:02 pm
Re: My '62 Greenbrier Camper Project
Before the bottom fell out of the thermometer, I made headway on a couple of fronts. This first one was another of those disappointing surprises. Stripping the paint from the bottom of the rear doors showed the severe rusting that had occurred, especially in the left-hand door:
Pretty much the whole bottom needed replacing. So without the benefit of even a metal bending break, I fabricated a replacement panel. The left side was tough to form, and was notched to fit around the mounting holes for the door bumper.
It fit in very well, and looks good with the weld planished. Hopefully an upturn in the weather will allow some priming.
The headlight buckets were finished working in the basement (with heat). I prefer to reinstall the everything to look as close to stock as possible which means using rivets; and not ugly-looking pop rivets. Here's an adjuster attached with semi-tubular rivets.
I add the reinforcing washer to prevent the bracket from breaking when the rivet is set. These are the rivets I use for the adjuster brackets (left) and the springs (right).
The adjuster rivets are set with a actual rivet setter, but that's not so easily done for the springs, So those rivets are set using an actual rivet setter, but that's not possible for the springs, so I used a broad center punch and a nail set to round over those rivets.
The rivets shown are really excellent for securing the springs because they fit into the spring rather tightly
These rivets are nice also because the heads are wide and flat like the originals.
Clarks provides harnesses for both the headlights and directionals. There's not much to installing the headlight harness. Just need to make sure the harness with the long wires goes to the right-side bucket. Although Clarks provides a bolt for connecting the ground wires to the bucket, but I prefer to use a hollow rivet that better resembles the original one
The directional harness is more work, the problems being the light socket and its boot. The prongs on the light socket break if bent all the way down, and the boot is poorly designed.
The original boot was like that of the tail light socket and securely cover the wires individually. That boot is available from Clarks. I substitute a Dorman 85803 socket instead, soldering the wires to new contacts
The prongs of the Dorman socket can be hammered flat with a nail set without breaking.
So the finished buckets look pretty nice and resemble the originals.
These will now need to be stored away for quite awhile.
The headlight buckets were finished working in the basement (with heat). I prefer to reinstall the everything to look as close to stock as possible which means using rivets; and not ugly-looking pop rivets. Here's an adjuster attached with semi-tubular rivets.
The rivets shown are really excellent for securing the springs because they fit into the spring rather tightly
These will now need to be stored away for quite awhile.
-
joelsplace
- Posts: 2610
- Joined: Wed Oct 13, 2010 12:51 pm
- Location: Northlake, TX
Re: My '62 Greenbrier Camper Project
The rivets look great! I've never liked using bolts/screws.
160 Corvairs, 5 Ultravans and counting
Northlake, TX
Northlake, TX
-
SteveInMarietta
- Posts: 61
- Joined: Sun Sep 25, 2016 7:02 pm
Re: My '62 Greenbrier Camper Project
Restoring the vent window assemblies was a project worth getting out of the way, considering the difficulty of doing a complete rebuild. Here they are ready to install
The problems began with the windows themselves. The ones I had on-hand either had good glass and a rust-rotted frame or poor glass and good frame, which necessitated for both sides moving glass into a different frame. This is a dreaded task since the rubberized fabric (Clarks C772) that holds the glass in the frame is so thick that the glass must be pressed into place with great force.
I began the process by using wood clamps to initially insert the glass far enough to assure the edges of the fabric were free (not tucked under the pane). Because the glass tends to distort (widen) the frame, it needs to be periodically pulled together top-to-bottom.
But wood clamps did not apply enough pressure to insert the glass completely, so I made a jig to hold the frame and glass flat so that a bench vise could be used
Which I used to apply as much pressure as possible to push the glass into frame – thank goodness this is tempered glass. As before, periodically the frame needs to be clamped top-to-bottom to make sure the frame conforms to the glass and seats fully in the base of the frame. Failure to do this is one reason the window may not close properly. One thing to note beforehand is that the pane actually extends slightly beyond the frame, and trying to press it in entirely is futile  After the glass was seated, the excess fabric was cut off.
Rebuilding the rest of the vent window assembly is always a challenge because it must be riveted together, which requires 1/8” dia and 3/16” dia rivets and rivet clinchers. First I drilled the holes in the long front window track that are the attachment points for the vent window trim piece, small rubber seal, outer frame, and lower mounting bracket. I used an original track as a template by clamping it to the replacement track, which gave me the exact placement of the holes.
Two 1/8” rivets with somewhat larger heads were used to first attach the trim piece and then the small rubber seal was riveted on top of it . Advice: put gasket cement under rubber seal and clamp down until it sets because it has a tendency to bow upward between the rivets. Note that the rivet clincher needs to be ground down to fit into the track.
The outer frame was first stripped of the old rubber, cleaned and painted, and then fitted with a new vent window rubber seal.
It was tricky to keep the outer frame and window track aligned while riveting together. My solution was to initially hold the two pieces together with small screws, and then replace one screw at a time with a rivet.
After inserting the window into the frame, 3/16 dia. rivets were used to join the window pivot arms and to attach the bottom bracket. In both cases the clincher was mounted in my bench vise, and the rivets were clinched by hammering the rivet head. For the pivot arms, this required using a ¼” nail set.
With adequate tension on the spring both windows open and close well.
All that’s left to do is to touch up the black paint that was damaged during this whole process.
After the glass was seated, the excess fabric was cut off.
Rebuilding the rest of the vent window assembly is always a challenge because it must be riveted together, which requires 1/8” dia and 3/16” dia rivets and rivet clinchers. First I drilled the holes in the long front window track that are the attachment points for the vent window trim piece, small rubber seal, outer frame, and lower mounting bracket. I used an original track as a template by clamping it to the replacement track, which gave me the exact placement of the holes.
Two 1/8” rivets with somewhat larger heads were used to first attach the trim piece and then the small rubber seal was riveted on top of it . Advice: put gasket cement under rubber seal and clamp down until it sets because it has a tendency to bow upward between the rivets. Note that the rivet clincher needs to be ground down to fit into the track.
The outer frame was first stripped of the old rubber, cleaned and painted, and then fitted with a new vent window rubber seal.
It was tricky to keep the outer frame and window track aligned while riveting together. My solution was to initially hold the two pieces together with small screws, and then replace one screw at a time with a rivet.
After inserting the window into the frame, 3/16 dia. rivets were used to join the window pivot arms and to attach the bottom bracket. In both cases the clincher was mounted in my bench vise, and the rivets were clinched by hammering the rivet head. For the pivot arms, this required using a ¼” nail set.
With adequate tension on the spring both windows open and close well.
All that’s left to do is to touch up the black paint that was damaged during this whole process.
- img2-prelimInst.jpg (159.26 KiB) Viewed 1458 times

- img4-trimFbc.jpg (155.86 KiB) Viewed 1458 times
-
SteveInMarietta
- Posts: 61
- Joined: Sun Sep 25, 2016 7:02 pm
Re: My '62 Greenbrier Camper Project
Minor correction: As noted above, I used Clarks item C722 to secure the glass to the vent window sash. Looking at the catalog again this morning I see that item C196AF is the material for the vent windows, which I assume would not be as thick and allow easier insertion of the glass.
Steve
Steve
-
Phil Dally

- Posts: 1469
- Joined: Thu Dec 10, 2009 4:47 am
Re: My '62 Greenbrier Camper Project
I dig your jig!!
-
caraholic4life
- Posts: 902
- Joined: Mon Mar 22, 2010 5:19 pm
- Location: Westminster, Maryland
Re: My '62 Greenbrier Camper Project
I like it too!
1962 95 FC Van
1964 Greenbrier Deluxe
1965 Monza Coupe
1965 Monza Convertible
1966 Kelmark Mid Engine Coupe
Mid Engine enthusiast &
Kelmark Owner once again. (Same car)
1964 Greenbrier Deluxe
1965 Monza Coupe
1965 Monza Convertible
1966 Kelmark Mid Engine Coupe
Mid Engine enthusiast &
Kelmark Owner once again. (Same car)
-
SteveInMarietta
- Posts: 61
- Joined: Sun Sep 25, 2016 7:02 pm
Re: My '62 Greenbrier Camper Project
I've been cleaning and restoring the heater box and two heat distributor ducts. The heater box had mild surface rust, was rather cruddy inside, but otherwise in serviceable condition. So I drilled out the spot welds to open it up and proceeded to strip it clean
The internal air flow control baffles were in pretty good shape; again some surface rust but the rubber edges were excellent. I primed and painted first the interior, using only weld-through primer along the edge flanges.
The two box halves were re-welded together and then, after planishing the welds, the exterior was primed and painted. Finally, a new fresh air intake boot was reinstalled, secured in place with a new metal band and staples (same staples that Clarks sells for the engine shroud seals).
The heater upper distribution duct was rebuilt as well. I had to make repairs to a few areas where the fiberglass box had been damaged by epoxying in replacement pieces from a donor box. I was surprised to find the interior lined with rigid foam rather than the usual fabric.
I'd be interested to know if other FC owners have also found this; I suspect that this lining was used because it could be molded into ridges that constrict air flow into the rear load area.
The constriction was added because Greenbrier owners complained that insufficient hot air made it to the cab. The foam lining was disintegrating so I replaced it with 1/4" EVA rubber attached with contact cement, curving it to constrict the opening like the original.
The duct was then reassembled using aluminum Chicago screws
The third duct worked on was the defroster/cab heat distributor. Again, I repaired a place where the box was damaged, such as around the hole on the top,
The air flow baffle in his box is a metal plate partially covered with thick fabric and can be removed without completely disassembling the duct. The metal was rusty, so I removed the baffle, stripped it of the fabric and rust, and repainted the plate. It was then recovered with extra-thick felt.
I'm looking forward to warm weather; at this point 32oF would seem comfortable.
Re: My '62 Greenbrier Camper Project
Steve: I found the same foam formed the same way inside the heater box of a 61 Rampside. In the Rampside application the area where those molded constrictions leads to is dead ended. I wondered at the time I took it apart the reason for them to be there. Everything appeared to be original, so I’m reasonably confident it is the original heater box. The foam easily crumbled apart and most of it could be removed just by rubbing it. I had also read somewhere about that material being something other than foam, but can’t recall where I read it. I didn’t give it a second thought until reading your comments.
I always learn something from your posts. Thanks for taking the time to do your write ups.
I always learn something from your posts. Thanks for taking the time to do your write ups.
- Attachments
-
-
Craig T
Central NY - Where most people still use all their fingers when they wave to you
1961 Rampside “Tramp”
Central NY - Where most people still use all their fingers when they wave to you
1961 Rampside “Tramp”
-
SteveInMarietta
- Posts: 61
- Joined: Sun Sep 25, 2016 7:02 pm
Re: My '62 Greenbrier Camper Project
I've been working with the door hinges on and off for a while, many of them were very loosey-goosey, especially those for the front and side doors, and needed to have the pins and bushings replaced. I had two sets of the front door hinges and I used the best from each. I'm guessing many people know what a pain it is to rebuild FC hinges. The pins are difficult and sometimes nearly impossible to extract, and if you do get get the hinge leaves apart, new pins and bushings are becoming unobtainium.
A hydraulic press and lots of heat are essential. I used my Smith mini-torch to supply the heat and my cheap Harbor Freight press for pressure. But for the front door hinges the cap of the pin leaves insufficient space to seat the hinge when pressing. So I cut it down (I probably could have just ground it off).
But lots of heat and pressure didn't always work. For a couple of rear hinges, the pins wouldn't budge, and pressing cause the end of the pin to mushroom out (thus becoming bigger than the hole, and I had to drill out the pins.
The above hinge was a complete loss. The outer hinge knuckles bent , which I tried to straighten causing the pin to snap at both knuckle joints (really weird). Turns out the pin was literally fused inside the center knuckle. Ultimately, I rebuilt 3 front , all 4 side, and 2 rear hinges. These were fully derusted and prepped when apart.
The pins are very hard to come-by, but Clarks has replacement bushings (very $$). The bushing GM part number is 3773704. Fortunately, I had fortunately acquired a handful of pins and a couple of packets of bushings - but I'd like to know which genius in the marketing department decided to package the bushings in groups of 5 (enough for 2 1/2 hinges!). The bushing are a real tight fit and needed to be pressed in.
Clarks also has a replacement for the front door bushing, but no pins. A brass bushing used in several other vehicles can be used and are available as a repro and occasionally NOS (GM 4110660). I acquired a bag of 20 sometime in the past The pins are basically unobtainium, but a longer PIN (GM 6271989) can be found occasionally on ebay. These just need to be shortened.
To insert a pin, I stuck pins partway from both sides to assure the holes were aligned and then tapped in one all the way, displacing the other; for some I had to use the press to insert the splines.
pic 4
It's easy to forget (I almost did twice) to insert the pin with the correct orientation - the pin caps face upwards on both sides of the vehicle and for the forward and rearward side doors .
ic 5
Here's the side and rear door hinges, I'm lacking 4 bushings so still need to finish the two rear door hinges. Even though the hinges, in theory, could be reassembled to work for either door, they are often bent and keeping track of original positions is a good idea. I decided to assemble the front hinges and then prime.
The front door hinges came in L- and R-hand versions, but the difference is very subtle and could easily be assembled with the pin cap on the wrong end. I noticed that there were two slightly different versions of the front door hinges, and the ones marked "M-200" had a center knuckle the was somewhat more substantial then the other hinges. These, I believe were introduced in late '63 or with the '64 model (when there is a part number change), which as we all know, also received a redesigned rear door hinge.
It will be interesting (or painful) to see how well the doors align after rebuilding (and for a couple, replacing) the hinges. I may need to do some hinge bending myself.
Steve
It's easy to forget (I almost did twice) to insert the pin with the correct orientation - the pin caps face upwards on both sides of the vehicle and for the forward and rearward side doors .
Here's the side and rear door hinges, I'm lacking 4 bushings so still need to finish the two rear door hinges. Even though the hinges, in theory, could be reassembled to work for either door, they are often bent and keeping track of original positions is a good idea. I decided to assemble the front hinges and then prime.
It will be interesting (or painful) to see how well the doors align after rebuilding (and for a couple, replacing) the hinges. I may need to do some hinge bending myself.
Steve
-
SteveInMarietta
- Posts: 61
- Joined: Sun Sep 25, 2016 7:02 pm
Re: My '62 Greenbrier Camper Project
Help! I'm having a problem getting the ignition switch cylinder out.
I have the key (not shown) so I can put the switch in the 'lock' position, and with a metal wire probe I can feel the little plunger push down, but the cylinder will not turn. I've tried this with and without the key in the place, turning clockwise and counter clockwise (which I believe is correct), initially without and then after spraying WD40, and with and without cursing. Even cursing didn't help!
Any suggestions?
Steve
Any suggestions?
Steve
Re: My '62 Greenbrier Camper Project
Great craftsmanship throughout. I didn't know you could get the springs that hold the headlight outer band to allow for pivot aiming.
I'm not sure if this will help you Steve, but on the LM cars sometimes I have to "jiggle" the lock in and out and back off on how far I push the pin in to release the metal spring tang. Also if the surround bezel is not down snug it can interfere with the lock/finger housing. Hope it works for you.
I'm not sure if this will help you Steve, but on the LM cars sometimes I have to "jiggle" the lock in and out and back off on how far I push the pin in to release the metal spring tang. Also if the surround bezel is not down snug it can interfere with the lock/finger housing. Hope it works for you.
-
caraholic4life
- Posts: 902
- Joined: Mon Mar 22, 2010 5:19 pm
- Location: Westminster, Maryland
Re: My '62 Greenbrier Camper Project
Having a good working key should be all you need along with something to push down through the retainer pin access hole as you are apparently doing.
There is a chance that even though your key works, it could be worn just enough that the sidebar is not fully retracting.
With that said, the only thing I can suggest would be to wiggle the key while at the same time pushing gently on the retainer pin and turning the key and cylinder counter clockwise. This action might help encourage the cylinder to turn enough to release the cylinder.
P.S.
I got interrupted while composing this reply and it wasn't until I posted it that I saw the above reply essentially suggesting the same method.....I hope it works for you.
1962 95 FC Van
1964 Greenbrier Deluxe
1965 Monza Coupe
1965 Monza Convertible
1966 Kelmark Mid Engine Coupe
Mid Engine enthusiast &
Kelmark Owner once again. (Same car)
1964 Greenbrier Deluxe
1965 Monza Coupe
1965 Monza Convertible
1966 Kelmark Mid Engine Coupe
Mid Engine enthusiast &
Kelmark Owner once again. (Same car)
-
SteveInMarietta
- Posts: 61
- Joined: Sun Sep 25, 2016 7:02 pm
Re: My '62 Greenbrier Camper Project
Thanks both for the suggestions, and the cylinder has been set free. While it could have been any number of factors - continued wiggling (i.e., persistence), the WD-40, pushing the button just the right amount, or maybe key wear was, well . . . the key!
I do have two keys, and I was using the other key when it came apart. You can see how worn are these keys. But I also observed after a closer inspection that if the release pin is pushed too far, the probe used to push it can actually block rotation of the cylinder. I think. At the moment I'm not inclined to reassemble the lock and try to open it again :)
Steve
Steve