
I made a comprehensive introductory post back in August. Please read it first. Here it is: viewtopic.php?t=17909
I'd like to update on the car since then. I now have all the parts I think I need to get it running. I've bought a gas tank, sending unit, muffler (with tail pipe), oil filter, air filter, battery strap (no bettery yet), new spare tire, new wipers, and lots of little miscellaneous hardware. Right now I'm working on sanding and painting the original muffler and gas tank straps so I can install those both. I can't really do much else until I get those in there. I think I've found a suitable battery, but I just haven't gotten to buying it yet. I plan on making sure the gas heater works and patching up some of the weatherstripping, since winter is approaching here in Indiana. I'm really eager to get it running so I can figure out what to do next. My overall goal is to have it daily-drivable by the start of next summer at the latest. I'm also trying to convince my mom to let us take it on a road trip down to Lexington, Kentucky next summer. Any questions/advice are welcome! Most of the pictures I have are not usable because they are .heic format. Eventually I'll take some good ones as I make progress
My '60 700 Sedan
-
bbodie52

- Corvair of the Month

- Posts: 11917
- Joined: Mon Aug 06, 2012 12:33 pm
- Location: Lake Chatuge Hayesville, NC
- Contact:
Re: My '60 700 Sedan
There are many things you will need to investigate to determine the true condition of your Corvair, Many of the things you mentioned that you are addressing are the superficial, visible items that have deteriorated. The functional condition of the internal engine, transmission, etc. must all be considered and inspected. When you connect the battery the entire function of the electrical system must be looked at. The brake system, including the parking brake mechanism, must be investigated. The mechanical condition of the engine must be carefully checked, before any attempt is made to crank it over or start it. Jumping ahead and assuming that all is well could cause damage.
Don't assume that everything is in serviceable condition, or will be easy/inexpensive to repair. Before you invest too much money on the deteriorated things you can see, try to do a more thorough, in-depth investigation so that you have a realistic view of the entire project — and the entire estimated cost to finish your project car. Hidden, unknown problem areas can make your car a real money pit!
Removing your car from storage/Reviving a Dead Corvair
 viewtopic.php?t=5030
The 1960 design was, in many ways, unique to that year only. Many of the parts are not interchangeable with later model years. I have always considered the 1960 model year to be something of a developmental prototype that was introduced to dealerships under GM management and marketing pressure, even though it might have been "not quite ready for prime time". The carburetor and choke system was all but abandoned in 1961 — replaced with a modified Rochester carburetor/manual choke substitute in 1961 and again revised into a more-refined automatic choke design in 1962. The brake master cylinder saw a major redesign in 1962, and a DOT mandated safety upgrade dual master cylinder introduction in 1967 (that can be retro-fitted to replace the single master cylinder design in 1962-1966 Corvairs, but not in the 1960-1961 Corvair). The 1960 140 CID engine displacement was changed in 1961 to a larger cylinder bore 145 CID, and the engine displacement was increased again in 1964 with a longer-stroke crankshaft that produced 164 CID, which remained the new Corvair standard through the end of production in 1969. In 1964 the Early Model Corvair front and rear suspension was revised with the addition of front and rear stabilizer components, and the cooling fan, which had been revised in 1962 to a new steel configuration, was significantly changed to a lightweight magnesium casting and included new fan belt guides to improve fan belt reliability, which remained the new standard through 1969. So the 1964 model year is considered to be the most-refined of the Early Model designs.
For example — unique 1960-only components...
 https://ssl.corvair.com/user-cgi/catalo ... ow_page=69
New Gas Tanks: 1961–69 Cars
https://ssl.corvair.com/user-cgi/catalo ... page=SUP-3
1960 Gas Tank
Don't assume that everything is in serviceable condition, or will be easy/inexpensive to repair. Before you invest too much money on the deteriorated things you can see, try to do a more thorough, in-depth investigation so that you have a realistic view of the entire project — and the entire estimated cost to finish your project car. Hidden, unknown problem areas can make your car a real money pit!
Removing your car from storage/Reviving a Dead Corvair
The 1960 design was, in many ways, unique to that year only. Many of the parts are not interchangeable with later model years. I have always considered the 1960 model year to be something of a developmental prototype that was introduced to dealerships under GM management and marketing pressure, even though it might have been "not quite ready for prime time". The carburetor and choke system was all but abandoned in 1961 — replaced with a modified Rochester carburetor/manual choke substitute in 1961 and again revised into a more-refined automatic choke design in 1962. The brake master cylinder saw a major redesign in 1962, and a DOT mandated safety upgrade dual master cylinder introduction in 1967 (that can be retro-fitted to replace the single master cylinder design in 1962-1966 Corvairs, but not in the 1960-1961 Corvair). The 1960 140 CID engine displacement was changed in 1961 to a larger cylinder bore 145 CID, and the engine displacement was increased again in 1964 with a longer-stroke crankshaft that produced 164 CID, which remained the new Corvair standard through the end of production in 1969. In 1964 the Early Model Corvair front and rear suspension was revised with the addition of front and rear stabilizer components, and the cooling fan, which had been revised in 1962 to a new steel configuration, was significantly changed to a lightweight magnesium casting and included new fan belt guides to improve fan belt reliability, which remained the new standard through 1969. So the 1964 model year is considered to be the most-refined of the Early Model designs.
For example — unique 1960-only components...
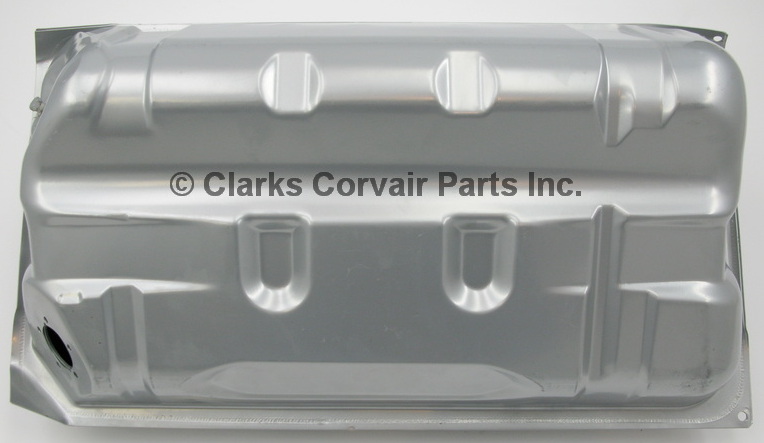
New Gas Tanks: 1961–69 Cars
Gas tanks usually rust from the inside and start to leak. These are EXACT REPROS made from "GAS TANK STEEL" that Is thicker than the originals. Pressure tested, wrapped and boxed. SEE FOR OTHER ITEMS USUALLY NEEDED. 1961–69 Car Gas Tank
Part number C151: 61-69 CAR GAS TANK-MUST ORDER NEW GASKET *C155 & RETAINER(C156) SEE CLARK TANK C151F
Weight: 40 lbs 0 oz
Catalog Page(s): 69,SUP-FC,TIS-16
Price:
1 - 1 $ 177.90
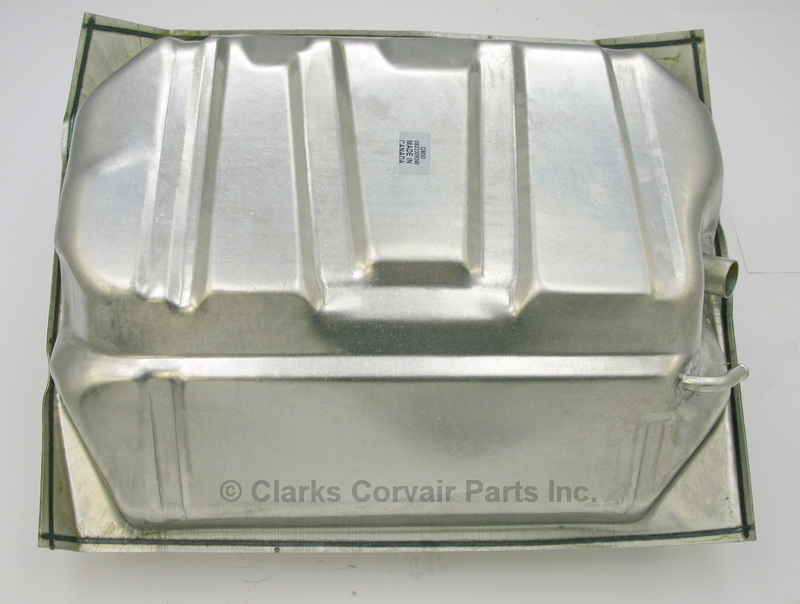
1960 Gas Tank
SUMMER 2022: We are reproducing the 1960 gas tank and we hope to have them in stock by Summer. After the initial production we may or may not be able to re-run, depending on demand and size of the re-order. You can add a 1960 gas tank to our multikits by adding X to the end of the part number. If also getting sealer add the A after the X. Example: C10407XA.
Part number C12804: 60 GAS TANK-EXACT REPRO C11239 & C12552F LINES IN STOCK
Weight: 40 lbs 0 oz
Catalog Page(s): SUP-3
Price: $ 349.00
Brad Bodie
Lake Chatuge, North Carolina
 1966 Corvair Corsa Convertible
Lake Chatuge, North Carolina
1966 Corvair Corsa ConvertibleRe: My '60 700 Sedan
bbodie52 wrote: ↑Tue Nov 01, 2022 10:12 pm There are many things you will need to investigate to determine the true condition of your Corvair, Many of the things you mentioned that you are addressing are the superficial, visible items that have deteriorated. The functional condition of the internal engine, transmission, etc. must all be considered and inspected. When you connect the battery the entire function of the electrical system must be looked at. The brake system, including the parking brake mechanism, must be investigated. The mechanical condition of the engine must be carefully checked, before any attempt is made to crank it over or start it. Jumping ahead and assuming that all is well could cause damage.
Don't assume that everything is in serviceable condition, or will be easy/inexpensive to repair. Before you invest too much money on the deteriorated things you can see, try to do a more thorough, in-depth investigation so that you have a realistic view of the entire project — and the entire estimated cost to finish your project car. Hidden, unknown problem areas can make your car a real money pit!
Removing your car from storage/Reviving a Dead Corvair
The 1960 design was, in many ways, unique to that year only. Many of the parts are not interchangeable with later model years. I have always considered the 1960 model year to be something of a developmental prototype that was introduced to dealerships under GM management and marketing pressure, even though it might have been "not quite ready for prime time". The carburetor and choke system was all but abandoned in 1961 — replaced with a modified Rochester carburetor/manual choke substitute in 1961 and again revised into a more-refined automatic choke design in 1962. The brake master cylinder saw a major redesign in 1962, and a DOT mandated safety upgrade dual master cylinder introduction in 1967 (that can be retro-fitted to replace the single master cylinder design in 1962-1966 Corvairs, but not in the 1960-1961 Corvair). The 1960 140 CID engine displacement was changed in 1961 to a larger cylinder bore 145 CID, and the engine displacement was increased again in 1964 with a longer-stroke crankshaft that produced 164 CID, which remained the new Corvair standard through the end of production in 1969. In 1964 the Early Model Corvair front and rear suspension was revised with the addition of front and rear stabilizer components, and the cooling fan, which had been revised in 1962 to a new steel configuration, was significantly changed to a lightweight magnesium casting and included new fan belt guides to improve fan belt reliability, which remained the new standard through 1969. So the 1964 model year is considered to be the most-refined of the Early Model designs.
For example — unique 1960-only components...
New Gas Tanks: 1961–69 Cars
Gas tanks usually rust from the inside and start to leak. These are EXACT REPROS made from "GAS TANK STEEL" that Is thicker than the originals. Pressure tested, wrapped and boxed. SEE FOR OTHER ITEMS USUALLY NEEDED. 1961–69 Car Gas Tank
Part number C151: 61-69 CAR GAS TANK-MUST ORDER NEW GASKET *C155 & RETAINER(C156) SEE CLARK TANK C151F
Weight: 40 lbs 0 oz
Catalog Page(s): 69,SUP-FC,TIS-16
Price:
1 - 1 $ 177.90
1960 Gas Tank
SUMMER 2022: We are reproducing the 1960 gas tank and we hope to have them in stock by Summer. After the initial production we may or may not be able to re-run, depending on demand and size of the re-order. You can add a 1960 gas tank to our multikits by adding X to the end of the part number. If also getting sealer add the A after the X. Example: C10407XA.
Part number C12804: 60 GAS TANK-EXACT REPRO C11239 & C12552F LINES IN STOCK
Weight: 40 lbs 0 oz
Catalog Page(s): SUP-3
Price: $ 349.00
Thanks for the info and sorry for the really late reply. The car runs, drives, shifts, and stops. I saw it all in person back in June. I have encountered no catastrophic issues as I keep poking around. The previous owner claims to have done "brake work." I have yet to check this, but I trust him. The right rear drum looks to be a '64 one, oddly enough. My biggest concern is a possible oil leak. There's old oil buildup (possibly just mud) on the front of the engine and fresher gunk on the bottom. The oil pan gasket probably needs replaced, if anything. The o-rings for the push rod tubes also probably need replaced, but that doesn't look like too hard of a job. When I saw it drive, the headlights and tail lights all appeared to work, as well as the interior light. The wiring looks to be in pretty good condition. I understand just looking at it isn't enough though, so once I get a battery I plan to test all of that. There are also three small spots on the frame that I'd like to get patched up at some point. I unfortunately do not have the tools or experience to weld it myself.
Re: My '60 700 Sedan
I've finally gotten back to working on the Corvair. So far, I've put the engine and muffler shrouds back on in preparation for installing the new muffler I got months ago. I've also de-rusted some parts, including the muffler strap, gas tank trap (in progress), gas tank filler line, spare tire clamp thingy, and some other miscellaneous hardware. My goal is to get the gas tank back in and hooked up so I can actually get the car running again. I'm on the fence about sealing the brand-new gas tank. Some say it's necessary and others say it does more harm than good, and at this point, I'm not sure who to listen to lol. I might coat the outside of the tank with POR-15 for longevity, as I doubt Clark's is going to make a '60 repro tank ever again. I also still need to get a battery, but I'll wait until I have everything back on before I get one. I also got a compression tester so I can diagnose the engine once it's running. I know for a fact that it has oil leaks.
As spring approaches, I plan to tear everything out (engine/transaxle, subframes, interior) and clean up everything I can. The floor pans need replaced as well as the frunk pan. The steering and suspension looks dry as a desert and the bushings are crumbling, so all of that will need to be replaced. The steering box also looks like it will need a rebuild. Hopefully I should be getting a new job soon so funds will start rolling in again, but I've also got other expenses to consider.
As spring approaches, I plan to tear everything out (engine/transaxle, subframes, interior) and clean up everything I can. The floor pans need replaced as well as the frunk pan. The steering and suspension looks dry as a desert and the bushings are crumbling, so all of that will need to be replaced. The steering box also looks like it will need a rebuild. Hopefully I should be getting a new job soon so funds will start rolling in again, but I've also got other expenses to consider.
- Attachments
-
- The shrouds had two pounds of mud and gravel stuck on each lol.
-
- I think the evaporust turned the rust green/yellow because of the leaded gasoline. Maybe.
-
Minferrera19
- Posts: 80
- Joined: Wed Jul 14, 2021 1:05 am
- Location: Massachussetts
Re: My '60 700 Sedan
got any more pictures of the floorboards, frunk, and framerail. I wanna see how bad the rust damage is.
Re: My '60 700 Sedan
Here's some pictures. It was hard to get a good angle in our tight garage. The pictures don't really do a good job, in my opinion. I'll try to take some better ones when I'm under the car in the near future. I keep all of my parts in the frunk so I don't lose them, and I didn't feel like pulling them all out just to get a picture of the frunk. It has some holes, but Clark's doesn't carry a '60 frunk pan, so I'm not sure what to do at this point.
On a side note, I was having doubts about this project yesterday and decided to look at used cars online. It was crazy. Cars I wanted in middleschool are three to four times the price now. Nothing is affordable right now. I did the math, and my Corvair will most likely still be cheaper than buying a newer used car lol. The car was $2000 and I plan to spend $2000-$3000 on parts (I've already spent $1000). This will put me at $5000-$6000 (maybe more) which is totally affordable for me and my family (my parents have been helping out with the cost now and then). I'm looking at getting a job that should pay about $1200 a month, and I have no other immediate expenses, so all my money can go to the car. My goal is to have it daily drivable before college (Fall 2024), but ideally before winter of this year.
On a side note, I was having doubts about this project yesterday and decided to look at used cars online. It was crazy. Cars I wanted in middleschool are three to four times the price now. Nothing is affordable right now. I did the math, and my Corvair will most likely still be cheaper than buying a newer used car lol. The car was $2000 and I plan to spend $2000-$3000 on parts (I've already spent $1000). This will put me at $5000-$6000 (maybe more) which is totally affordable for me and my family (my parents have been helping out with the cost now and then). I'm looking at getting a job that should pay about $1200 a month, and I have no other immediate expenses, so all my money can go to the car. My goal is to have it daily drivable before college (Fall 2024), but ideally before winter of this year.
- This is behind the beam that attaches the two framerails. The hole is where the gas line goes through.The flash on my phone kind of washed out the details.
- I don't know what happened to this support (the other ones is not as bad), but it will have to be replaced with the floorboards.
- The front lower panel will have to go.
- The rear lower panel is also toast. It looks like one of the previous owners tried to tow the car by the rear bumper and tore the already-compromised panel apart in the process.
Re: My '60 700 Sedan
PROGRESS!!
Finally got to working on the car some more. I didn't do much, but at least I did something. Removed and disassembled the carbs. Both are dirty but fully intact. It looks like the right one was opened at one point in its life, because the float does not match, and one of the bolts holding down the venturi cluster is a philips head. I'll check the floats for holes soon.
The the bolt-things that hold the fuel lines in in the filters were stripped (before I even touched them) on the heads and were hard to remove. I couldn't get the ones threaded into the four-way junction that comes out of the fuel pump at all. I might just have to replace the lines so I can actually remove them in the future. The carbs will be getting cleaned and rebuilt, of course. I'm also getting new wires, spark plugs, and points.
I also pulled a pillow's worth of fluff from under the engine shroud. I might try and blow the rest out, if I don't just remove the shroud altogether and clean it fully under there. I think the fan is not original, because the one in the shop manual looks really different. One of the previous owners also removed the weird air flow valve thing that would block the flow of air to the fan until the engine was up to temperature. That honestly seems over-engineered, in my opinion, but what do I know?! I'm working on another order from Clark's so I can get everything back together soon. I'm really itching to get it running in the coming weeks. The muffler and gas tank straps are coated (in POR-15) and ready, but I might also coat the outside of the gas tank because I want it to last.
I don't plan on leaving the engine as is for very long after getting it running. I really just want to see how it runs, check compression, leaks, etc. so I know what I'm getting into. It deserves a rebuild, which is what I plan on doing. It seems like an approachable engine to work on. I'm familiar with working with soft aluminum and the gentle hand it requires. Since it's the 80hp version, I have zero intentions of serious performance gains. My goals are efficiency and relative reliability. No hot-rodding here lol.
I'm looking for a part-time job, because funds are getting short. I've got nothing else going on all summer, so I'm going to try really hard to get as much as I can get done while it's sunny and warm. I feel like I say the same thing every post, but I'm trying to make some real progress now. I'm "getting the ball rolling."
- Attachments
-
- Note the fan and missing airflow valve.
-
- Left carb partially disassembled.

Re: My '60 700 Sedan
Progress is good, but sometimes we face delays. Mine's been stalled out for about a month while other priorities get taken care of. Looking forward to getting back on it in about a week. It does appear that you have the original engine because of the exhaust gas tube sticking up in front of your right carb pad. Apparently, the steel fan was replaced with an aluminum one - good upgrade for your belt, not so good for originality, which I wouldn't worry too much about. It also appears you have the original carbs (no chokes showing). Do you have the original air filter housing with the choke and the air intake hoses? Keep up the good work. Dennis
Re: My '60 700 Sedan
You have a good grasp of things. Like many old Corvairs your engine seems to be a combination of different years.
Unfortunately Chevy never did put a year date on engine blocks. The two letter suffix at the end of the engine number might determine about what model year the engine was made.
The 1960 Corvair is unique as so many changes were made on the 1961 model. Many call the 1960 the "Caveman" Corvair since it is the first and evolved a lot for 1961. It's not a put down and the 1960 has a strong following since it is so different.
In 1961 the engine thermostat was moved from the air intake to the air outlet doors (because of the new hot air heater). Chokes were installed on each carburetor and used a manual cable with a knob at the dash. Personally I like the 1960 gasoline heater since it gets hot quickly.
You mentioned two different carburetor floats. In 1964 (as I recall) the caburetor floats were made smaller and an assist spring was added. The books claim this was to reduce float bounce on rough roads. Fact is EVERY year the Corvair carburetors are different. Get Bob Helts Rochester book to identify carburetor parts. I think 62 to 63 was the only year only one thing was changed.
The engine cooling fans also changed a number of times and were steel through the 1963 model years. 1964 models got the first ONE YEAR ONLY magnesium fan that used the smaller 1960-64 fan bearing. In 1965 the magnesium fan was revised for a bigger bearing.
I can't figure out what is going on with the crankcase tube off the top cover. In 1960 a crankcase tube that pointed down to dump crankcase fumes was used - called a "road draft tube". The 1963 model years were the first with a Positive Crankcase Ventilation (PCV) system.
The distributor looks like the larger unit used in 1960. It was changed to the newer unit in 62.
If you like to figure things out then this will be fun. I like to keep a nice original car intact, but when I find one that is rough and has been modified I don't mind making improvements/changes.
Good luck with the car and enjoy. In some areas Corvair clubs have folks that can be helpful.
-
bbodie52
- Corvair of the Month
- Posts: 11917
- Joined: Mon Aug 06, 2012 12:33 pm
- Location: Lake Chatuge Hayesville, NC
- Contact:
Re: My '60 700 Sedan
I believe that you really need to do a careful assessment of your 1960 Corvair's true value and "restorability" — before you get trapped in a "money pit". It is all too easy to get caught up in dreams and enthusiasm, only to discover too late how much time and money it will cost to bring your car up to even a safe and drivable level! The 1960 Corvair may be rare, but it may also be the least-desirable year model — if for no other reason than a general lack of needed parts interchangeability with other Corvair model years. If you add a severe dose of decay and body rot, you have all of the makings of a "money pit" that can soak up your time and financial resources very quickly.  If there is a CORSA (Corvair Society of America) club anywhere near you, joining that Corvair group (and asking for advice on the Corvair Forum) may bring a lot of valuable experience and advice into your world.
I did manage to successfully rebuild the engine during that summer... only pausing to go into the house to watch Nell Armstrong step out of the lunar lander and walk on the moon!

When I got the engine overhauled and running well in the 1963 Corvair, I had come to realize that the rest of the Corvair was a real Junker and not worth trying to restore! So I had a good engine, a non-functional automatic transmission, and a car that was truly in poor condition.
When my father located a good house for us to move into in Southern California, we moved during the Christmas break in December 1969. My father hooked the 1963 Corvair up to his 1965 Corvair Corsa convertible with a tow bar, and we towed the car about 333 miles to our new home in Thousand Oaks.

As I struggled in January 1970 to adapt to new teachers and a different school in the 11th grade, I also took the time to overhaul the faulty Powerglide transmission (successfully!). But I still had a Junker of a Corvair 500. Fortunately, my father located a clean 1962 Corvair Monza coupe with a bad engine, good 4-speed transaxle, good body, good suspension, good brakes, and a clean interior that was in good shape. TRANSPLANT! I converted my rebuilt engine to work with a manual transmission, and a few weeks later I was driving my 1962 Monza coupe — fitted with a freshly overhauled 1963 engine — to school every day!
")
Several years later...

My point is... don't get trapped in your initial decisions. Ask questions and be willing to make adjustments as you travel down your Corvair path. You may find that there are better ways to reach your ultimate goals and desires, and those goals may change and evolve as you learn, gain experience, and talk to other Corvair enthusiasts. Changing your mind and adjusting your goals and objectives may help you to keep your enthusiasm high, and enthusiasm (along with time and money) can keep your project alive!

My first Corvair was a 1963 Corvair 500 with a non-functioning Powerglide automatic and a frozen engine that would not turn with a large wrench! My father bought it for me to learn on in 1969. He provided funding for parts and machine shop services, a garage with lots of tools and some Corvair shop manuals, and encouragement. There was no Clark's Corvair Parts or CORSA clubs yet, and no Internet. The Chevrolet dealer still sold Corvair parts in 1969, which helped. I began by removing the faulty powertrain during my summer vacation from high school. Since I had little experience, work went slowly. (I was really afraid of dropping the engine on my head as I learned to jack the car up on jack stands and then how to lower the powertrain safely while balanced on a floor jack!) I worked every day in the garage, and it took a long time as I had no experience and my father had been transferred to Southern California to work at Lockheed in Burbank, California. My mother, sister and I remained in Northern California (San Jose) and did not move to rejoin with my father until six months later, so he was not around to guide me in my Corvair work. I was on my own!bbodie52 wrote:This link will guide you to a section that lists parts sources, maintenance guides, and CORSA club chapters. A local club, if there is one, may help you to find a Corvair-qualified mechanic, or they may offer their experience and assistance to help you with a DIY repair.
Common and Useful Corvair Websites
I did manage to successfully rebuild the engine during that summer... only pausing to go into the house to watch Nell Armstrong step out of the lunar lander and walk on the moon!
When I got the engine overhauled and running well in the 1963 Corvair, I had come to realize that the rest of the Corvair was a real Junker and not worth trying to restore! So I had a good engine, a non-functional automatic transmission, and a car that was truly in poor condition.
When my father located a good house for us to move into in Southern California, we moved during the Christmas break in December 1969. My father hooked the 1963 Corvair up to his 1965 Corvair Corsa convertible with a tow bar, and we towed the car about 333 miles to our new home in Thousand Oaks.
As I struggled in January 1970 to adapt to new teachers and a different school in the 11th grade, I also took the time to overhaul the faulty Powerglide transmission (successfully!). But I still had a Junker of a Corvair 500. Fortunately, my father located a clean 1962 Corvair Monza coupe with a bad engine, good 4-speed transaxle, good body, good suspension, good brakes, and a clean interior that was in good shape. TRANSPLANT! I converted my rebuilt engine to work with a manual transmission, and a few weeks later I was driving my 1962 Monza coupe — fitted with a freshly overhauled 1963 engine — to school every day!
Several years later...
My point is... don't get trapped in your initial decisions. Ask questions and be willing to make adjustments as you travel down your Corvair path. You may find that there are better ways to reach your ultimate goals and desires, and those goals may change and evolve as you learn, gain experience, and talk to other Corvair enthusiasts. Changing your mind and adjusting your goals and objectives may help you to keep your enthusiasm high, and enthusiasm (along with time and money) can keep your project alive!
Brad Bodie
Lake Chatuge, North Carolina
1966 Corvair Corsa Convertible
Lake Chatuge, North Carolina
1966 Corvair Corsa Convertible-
bbodie52
- Corvair of the Month
- Posts: 11917
- Joined: Mon Aug 06, 2012 12:33 pm
- Location: Lake Chatuge Hayesville, NC
- Contact:
Re: My '60 700 Sedan
bbodie52 wrote:
To get a better handle on the nature of your major engine components, the cylinder head casting numbers and the engine serial number on the cases often provide major clues. There is also a distributor part number on the back of the distributor housing, but it is often difficult to see, since it is positioned facing the engine top shroud in the normal timing and vacuum advance orientation. The number gives some clue as to the centrifugal timing weights and springs, but — of course — those components could have been swapped out at some point in the engine "evolution cycle". The rear housing, for that matter, could have come from a turbocharged engine (24 degree timing plate extension). That may or may not reflect the camshaft grind, cylinder heads, crankshaft stroke configuration, etc. The presence of a harmonic balancer, the number of plates in the oil cooler, etc. may be further clues. The view of the cylinder head casting numbers is often obstructed by engine sheet metal components.
A harmonic balancer, magnesium fan with belt guides, 1964 turbo distributor 1110314, 8409 crankshaft, and the correct turbo cylinder head casting numbers would all point to the 1964 150 hp engine.
5607 signifies it from an early 145 CI engine.
7293 signifies it from an early 145 CI turbo engine.
8409 signifies it's from the late 164 CI engines, regardless of HP.


- Attachments
-
- CORSA Corvair Technical Guide 1+2 - Corvair Code Numbers.PDF
- CORSA Corvair Technical Guide 1+2 - Corvair Code Numbers
- (1.25 MiB) Downloaded 21 times
Brad Bodie
Lake Chatuge, North Carolina
1966 Corvair Corsa Convertible
Lake Chatuge, North Carolina
1966 Corvair Corsa ConvertibleRe: My '60 700 Sedan
Dennis66 wrote: ↑Sat May 06, 2023 4:47 am Progress is good, but sometimes we face delays. Mine's been stalled out for about a month while other priorities get taken care of. Looking forward to getting back on it in about a week. It does appear that you have the original engine because of the exhaust gas tube sticking up in front of your right carb pad. Apparently, the steel fan was replaced with an aluminum one - good upgrade for your belt, not so good for originality, which I wouldn't worry too much about. It also appears you have the original carbs (no chokes showing). Do you have the original air filter housing with the choke and the air intake hoses? Keep up the good work. Dennis
I do have the original filter housing, choke, hoses etc. They're very dirty but fully intact, except for a missing screw that holds on the little lever that connects the throttle linkage to the single choke assembly. The choke will not open without this, so I'm looking for a replacement. If I'm lucky, it' has just fallen somewhere under the shroud or something (this is unlikely though). As for originality- it is the least of my concerns. Enough components are already unoriginal that it would not be worth trying, and it would be too expensive if I even had enough original parts. This will probably be what some would call a "poverty build." My main focus is to get it running well. Cosmetics are secondary. The body panels are actually in very good condition structurally for the life this car lived. The front and rear panels below the bumpers are uniquely terrible, but you can hardly see them from a normal standing height.bbodie52 wrote: ↑Sat May 06, 2023 1:31 pmbbodie52 wrote:
To get a better handle on the nature of your major engine components, the cylinder head casting numbers and the engine serial number on the cases often provide major clues. There is also a distributor part number on the back of the distributor housing, but it is often difficult to see, since it is positioned facing the engine top shroud in the normal timing and vacuum advance orientation. The number gives some clue as to the centrifugal timing weights and springs, but — of course — those components could have been swapped out at some point in the engine "evolution cycle". The rear housing, for that matter, could have come from a turbocharged engine (24 degree timing plate extension). That may or may not reflect the camshaft grind, cylinder heads, crankshaft stroke configuration, etc. The presence of a harmonic balancer, the number of plates in the oil cooler, etc. may be further clues. The view of the cylinder head casting numbers is often obstructed by engine sheet metal components.
A harmonic balancer, magnesium fan with belt guides, 1964 turbo distributor 1110314, 8409 crankshaft, and the correct turbo cylinder head casting numbers would all point to the 1964 150 hp engine.
5607 signifies it from an early 145 CI engine.
7293 signifies it from an early 145 CI turbo engine.
8409 signifies it's from the late 164 CI engines, regardless of HP.
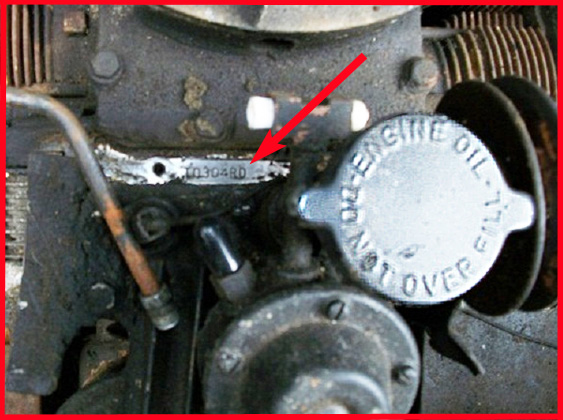
I checked the head, diff, and block, and the numbers are:
Diff: BT5?24
Head: 6256711
Block: T0406Z
I used Clark's non-exhaustive guide to identify these, and the diff and head are correct, but the block ends in a Z, which would mean it is for a PG car. I don't if this makes any actual difference, but it has me wondering about the history of this engine. I plan to investigate some more, based off this information. I also forgot to look at the transmission, as it had gunk covering half of the number and it was almost impossible to reach. I'll try to clean it off tomorrow and get that number. As for the fan, I'm 90% sure it's a '64 magnesium one by looking at it. I've heard that these can explode sometimes, so I'll inspect it before I ever start the engine again... just for peace of mind.
I'm looking to join my local-ish club (CORSA Indy) soon, but they meet quite a ways away from where I live. I'd like to go in my car (being as it's a Corvair club), so maybe that is a good goal to have (drivabilty-wise) idk. It seems like a very good club and they are seeking new members.
Re: My '60 700 Sedan
The magnesium fans can come apart, and this is mostly and issue in the "rust belt" states. Out West it is rare. The signs of a bad magnesium fan are white chalky deposits. This meats the original sprayed on sealer has failed and the magnesium is oxidizing. Unlike steel, the oxidation tends to penetrate on cast magnesium parts.
The steel fan was replaced with the magnesium in 64 to help stop fan belt issues as engine HP (and redline RPM) increased. Many use the LM magnesium fan with the bigger bearing now. You have to replace the engine top cover to do this.
If the fan looks good and the bearing is fine I would not worry about it as you have MANY other things to deal with.
As Brad said - you can end up putting more money into the car than it is worth.
Re: My '60 700 Sedan
It's always something...
I cleaned out the engine shroud last week (or maybe the week before) and am glad I did. It was pretty bad. I'm not done and will get the rest (including the oil filter) soon. I'm also going to de-flash the cylinders while I'm at it. The pictures tell all.
This evening I pulled off the fuel pump to inspect it and found that it had no spring, the valves were not seated, and the diaphragm rod might be from a '62-'69 pump (it measured 15/64" out of the pump body). I can't decide if I should replace the pump or use the electric one I already have. It needs more components to be usable (oil-pressure shutoff switch, microcontroller, inertia switch (maybe)). Also, the pump rod that goes to the crankshaft is correct for '60-'61 and in good condition. Here are some pictures:
I checked the carb floats for leaks, and they have none (which is good), but they do not match (which might be bad). It looks like one has a tab to contact the needle, while the other does not. It appears that someone at some point tried to set these floats and had to bend the one without the tab awkwardly to match with the other one. I could be misunderstanding this, but that's how it appears. I don't know if it's worth getting matching ones, as I've heard that the needle being pushed at an angle (other than perpendicular) by the float is not ideal.
I'm working on a Clark's order, but this recent development throws off my intention to get the car running before June (a previously realistic goal, I feel). I will update some more in the coming days hopefully.
I cleaned out the engine shroud last week (or maybe the week before) and am glad I did. It was pretty bad. I'm not done and will get the rest (including the oil filter) soon. I'm also going to de-flash the cylinders while I'm at it. The pictures tell all.
- Before
- After
- NO SPRING!!
- Correct ('60-'61) cap
- This valve is crumpled :(

Re: My '60 700 Sedan
Hope you're still around I'm doing a 1960 as well. Have a head gasket I'm going to fix here shortly, got the tin off etc.. in doing my research I have found yes there were improvements to the 60 but in a lot of ways changes that were done to support the later body styles (lakewood etc.) actually made things more problematic. The original choke design worked, the engine ran cooler as well, brakes were over engineered and the carbs I am rebuilding (for the 60) were simple and because the engine ran cooler didn't seem to have the venting issues. In anycase my point is don't let a late model owner give you a rough time about it being an incomplete car, if anything one could argue placing a manual choke on a 61, along with the issues and modifications the "improved" carbs needed (drilling in the side of it your own vent) it seemed like a half baked attempt to get the same power train in everything while sacrificing early decent engineering and testing. The 60 was a good car and it can be a good car for you as well if you have no problem learning and spending some time and money. They are right though there's not very many of us 60s out there, but that's a challenge to take on not to runaway from if you're a person who enjoys a challenge and can actually find joy in decent work and problem solving. I'm cheering you on so as I wrench away with my son as well. Hopefully you're still at it, sometimes the projects that mean the most to us in life are the ones we have to work the hardest at, not the ones that came easy.
1960 Mystery Monza Corvair (named Rusty) Engine ID: T0602YD
Jeremiah from QueenCreek, AZ
Jeremiah from QueenCreek, AZ
-
jimbrandberg
- Posts: 136
- Joined: Sun Feb 11, 2024 7:16 am
Re: My '60 700 Sedan
I found copper and asbestos head gaskets in my '60.
In both of my '60s I went with Gas Tank Renu for $165. They sandblast it inside and out, use a sealer inside and out, then bake it in an oven. Lifetime guarantee with a serial number and certificate.
It's sort of a toss up price-wise with a new 61-69 gas tank but cheaper for a '60 or FC.
I always thought 60s were weird and quirky, then one came my way. I found that I liked it because it was weird and quirky. Like Kevin Bacon in "Animal House" I said thank you sir, can I have another?
Jim Brandberg
Isanti, MN
CorvairRepair.com