A place to preserve the past, present and future of the Corvair. An ever evolving knowledge base made up of Corvair Enthusiasts from all over the world. (Note: no ads for logged in members). https://www.corvairforum.com/forum/
First of all, what a great site for information and Corvair spirit! I dig it.
Rebuilding the 140 engine in my garage, on a solid work table, having made more progress. A repair job really, no restoration beauty. New bearings, piston rings, valves look great, and so do springs. My 4 carbs are in the hands of a professional...so are my rear wheel hub assemblies. I inserted the pistons using a good ring compressor and a hammer's wooden handle.
So, that little spark plug looking temperature sending unit, if it actually works, can I wire it to an after market head temperature gauge? Any brand recommendations?
When I compression check it soon, will it reach 180 psi if all is well?
Re: 140 Motor Progress
Posted: Thu Feb 09, 2017 5:44 pm
by 66vairguy
The "spark plug thingy" is a thermistor with a temperature coefficient that (as far as anybody knows) was used ONLY with the Corvair temperature gauge (Delco also sold them for use in small aircraft). Most new gauges use a thermocouple design, BUT you have to make sure the gauge has "cold junction compensation". Early relatively inexpensive gauges DID NOT leading to errors at temperatures above or below about 70F ambient. Now cold junction compensation is becoming common on automotive cylinder head temperature gauges.
BTW - A few folks are working on a new driver for the Corvair gauge, but at the moment only USED thermistors are available so you could sell yours if it is intact.
Re: 140 Motor Progress
Posted: Thu Feb 09, 2017 10:08 pm
by GasDaddy140
Thanks! I'll take it out tomorrow, I don't have the Corsa dash. It's for sale.
I still want head temperature though. Are the real spark plug type with ring any good? 600F type seem to be aircraft, $$$.
Re: 140 Motor Progress
Posted: Wed Feb 15, 2017 12:17 pm
by GasDaddy140
I'm very happy that I've found a lot of parts that I stashed over 3 years ago when I dropped the engine and transmission out of my Corsa find and disassembled. I have some retro thick cast aluminum valve covers too. They're black with ribs and a couple of #s cast into the inside. This is my FIRST Corvair motor rebuild so it all seems a little weird at times, but touching all of the internal parts and recreating this American air-cooled flat six cylinder is fun. My cat hangs around me a lot, but also just sleeps on some metal parts like the flywheel. I'm trying to do a little each day.
Re: 140 Motor Progress
Posted: Wed Feb 15, 2017 12:30 pm
by Steve62
Slow progress is good progress. Congrats on finding all the parts!
Looks like a 'vairy happy cat!
Re: 140 Motor Progress
Posted: Fri Feb 17, 2017 10:13 am
by GasDaddy140
Rod cap ends and head bolts torqued. My friend Andy is a real hot rodder/mechanic and mostly a Ford guy, but has become fascinated with my Chevy air cooled flat six! I explained to him how we're going to run-it on the ground too. More progress...each and every...little bit counts.
Re: 140 Motor Progress
Posted: Fri Feb 17, 2017 1:04 pm
by County98
Very cool bud. Keep it up!
Re: 140 Motor Progress
Posted: Fri Feb 17, 2017 2:43 pm
by Steve62
We're watching! You're gonna love the sensation when it fires for the first time!
Re: Rocker adjustments-140 Motor Progress
Posted: Tue Feb 21, 2017 11:37 am
by GasDaddy140
Glad to announce that the crank bolt can be turned with pistons translating outward and inward sounding a little like sand paper against the honed cylinders and new piston rings. A piece of blue paper towel twisted into a spark plug hole "popped" across the garage with compression. All the valves are opening and closing. I adjusted each rocker with each piston at TDC with just a hair of wiggle. On a water cooled engine I would use a feeler gauge. I think that on these Corvair motors that I'm suppose to tighten them even more. Just checking in.
Re: 140 Motor Progress
Posted: Tue Feb 21, 2017 12:22 pm
by azdave
Was that a question?
With each piston at TDC on the compression stroke (both valves fully closed), most will adjust to zero lash and then 3/4 turn further in.
Re: 140 Motor Progress
Posted: Tue Feb 21, 2017 12:25 pm
by GasDaddy140
Yes, it was a question. Thank you!
Re: 140 Motor Progress
Posted: Tue Feb 21, 2017 2:52 pm
by bbodie52
GasDaddy140 wrote:...On a water cooled engine I would use a feeler gauge. I think that on these Corvair motors that I'm suppose to tighten them even more. Just checking in...
A feeler gauge is used to set a specified gap between the valve and the camshaft (rocker arm) on an overhead cam or solid lifter based engine. As the engine warms up to operating temperature the valve train components expand, so the clearances will change. Adjusted too tight, the clearances will disappear and may even cause the valves to never close completely on a warm engine.
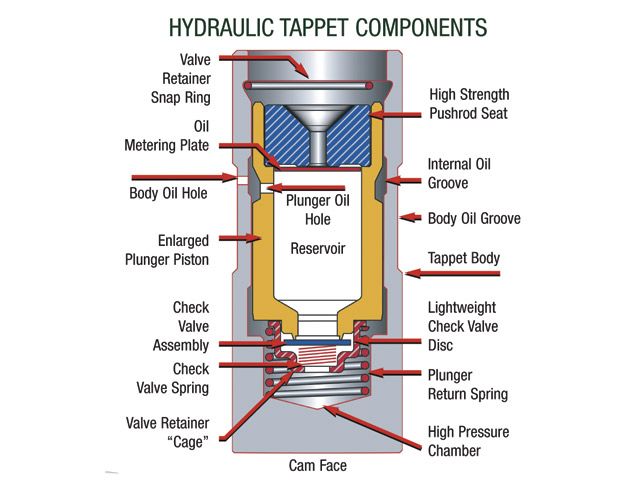
Many engines — the Corvair included — utilize hydraulic lifters. These lifters are filled with oil and a hydraulic piston system that automatically maintains zero valve train clearances without becoming too tight and preventing the valves from fully closing. An aluminum engine, such as the Corvair, has more extreme variations in expansion and contraction with temperature changes than would be found in a cast iron engine. The hydraulic lifters are ideal for compensating for these component variations associated with heat. The correct valve train adjustments in a Corvair adjust for zero clearance. Then the valve train is tightened further to center the piston in each hydraulic lifter so that it can automatically move up or down to compensate for component variations associated with engine temperature changes.
Doug wrote:...my Corvair engine has slight ticking after sitting for a few days...
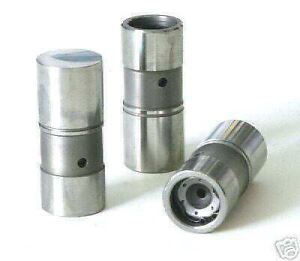
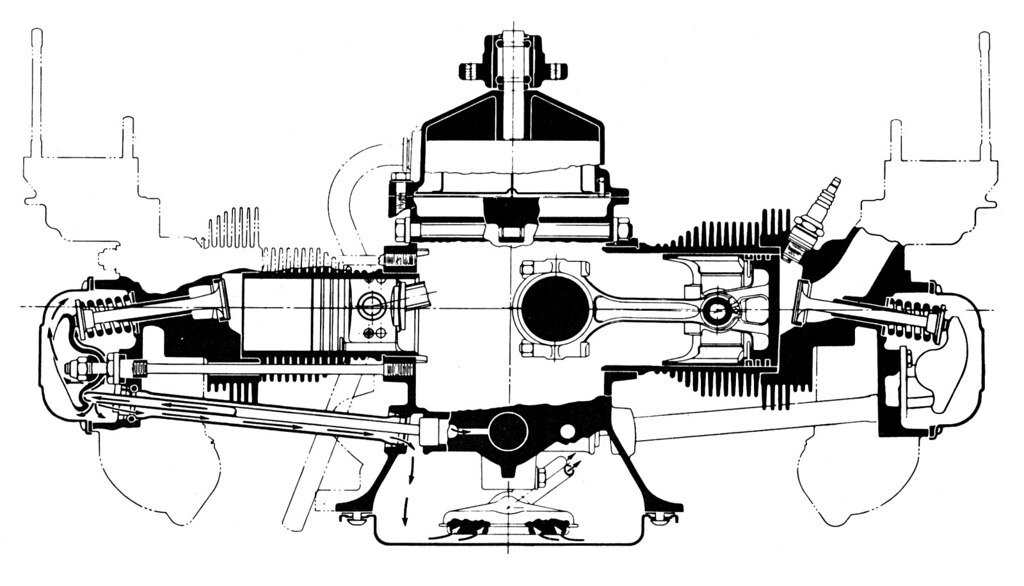
This is a somewhat normal "flaw" in the Corvair. The hydraulic lifters used in the Corvair are the same design used in the V8 Chevrolet engine. However, in the V8 the lifter orientation is somewhat more vertical, with its center-mounted camshaft and the heads above the lifters. In the Corvair, the orientation between the camshaft and the heads is horizontal, which means that the 12 lifters are all laying on their side. The lifters also rotate in their bore in normal operation, and randomly the oil hole in the side of each lifter may end up oriented downward when the engine is shut off. Time and gravity may allow some of the lifters to permit their oil reservoir to drain. When the engine is later restarted, one or more lifters may not be able to hydraulically take up the gap between the rocker arm and valve head until the engine oil pressure refills the oil reservoir in the lifter. Until that happens the engine will emit a tapping sound from each portion of the valve train that has been drained of the oil in its hydraulic lifter.
Corvair valves can be adjusted with the engine running, as shown in this video. (A cut valve cover catches dripping oil).
The procedure in the shop manual attachment below shows how to make a static adjustment...
Re: 140 Motor Progress
Posted: Tue Feb 21, 2017 8:17 pm
by 66vairguy
Alan - Glad things are moving along. A caution on the cold valve adjustment. This procedure is a bit tricky. The Corvair and SBC engines use individual rockers on balls. It makes finding zero lash difficult. If the lifter is dry only the lifter spring pushes on the pushrod with reduced tension. So finding zero lash takes some patience and a gentle touch. Also the rocker tends to "wobble" until a fair amount of pressure is put on it. Some folks over tighten the valve adjustment thinking a tight rocker is the start of zero lash, it isn't. The general consensus (and it's worked for me) is to "jiggle and spin" the pushrod and tighten the rocker nut until there is no play - it take a gentle touch. THEN tighten down the rocker - BUT how much depends on if the cam is new or used. With a new cam you can turn down 3/4 turn beyond zero lash. If the cam is used then 1/2 turn is recommended. BTW after you break in a new cam a hot adjust is recommended (engine running, cut valve cover in place). Back off rocker nut until CLICK CLACK and tighten until silent then SLOWLY turn down 1/2 (allow the lifter to bled down). Some suggest only going to 1/4 turn to prevent "lifter pump up". This suggesting has been around since the SBC was invented. The cause of lifter pump up is high RPM were the valve springs can't close the valve fast enough and the lifter pumps up, temporarily, trying to close the gap. The down side of only using 1/4 turn is the lifter pumps a little less oil up the push rod to the rocker assembly. So now the general consensus is to tighten 1/2 turn beyond zero lash on a broken in cam.
If you want to go racing - it's time for high tension valve springs to prevent valve float - and of course that puts the cam at higher risk.
Good luck on the first start up. OH - do prime the engine oil pump while rotating the engine before the first start. Also a good time to look for oil leaks around the cover, oil filter, oil cooler, etc.
Re: 140 Motor Progress
Posted: Wed Feb 22, 2017 9:03 am
by GasDaddy140
Thanks 66vairguy-I'll heed that good advice. I haven't really worked on any engine except my 71 Dodge van's 318 V8 in a long time, I'm a little rusty.
Re: More Stuff Completed 140 Motor Progress
Posted: Mon Feb 27, 2017 9:46 am
by GasDaddy140
A good weekend for Corvair motor work! My friend Andy hammered the oil pan back into shape pretty good, you can see the rear edges again. Exhaust logs are installed and awaiting new U-Pipes and gaskets. The valve covers I painted because they were very oxidized, the inside is how they looked when I tore the engine down, pretty clean. I have two starters, one was full of water and mud, turned out to be the best one for rebuild! My neighbor/friend/hot-rodder Andy, actually rebuilt both of them on top of his recycle bin, I'm OK with that. Slow steady progress continues..
Re: 140 Motor Progress
Posted: Mon Feb 27, 2017 1:55 pm
by joefarmer
Alan - Thanks for documenting your progress here. I just pulled my 110 out from under the car this weekend and will begin disassembly this coming weekend (after hitting everything with a pressure washer and some heavy duty degreaser). To be honest I am super nervous about the engine not going back together and running correctly. Any advice for someone who has never rebuilt an air-cooled engine???