Someone posted recently that they had checked the points, BUT NOT THE TIMING and the timing was off causing the engine to run poorly. Whenever you gap the points (setting dwell) you change the timing. It only takes about 4 degrees change and an engine won't run well, if at all.
Now with electronic ignition modules checking the timing is often overlooked. In the old days it was always checked when a car did not run well, especially after gaping or cleaning the ignition points.
Changing the points gap changes the timing, BUT changing the timing does NOT change the points gap (dwell). So gap the points, THEN check the timing. Also make sure the distributor isn't moving, but don't over tighten the clamp.
Good luck
New, new and new...

Re: New, new and new...
First: when it starts and then quits, can you start it right back up or does it have to sit a while?gilphilbert wrote: ↑Wed Sep 06, 2023 12:45 pm [*]Valve rockers are too tight, possibly they've bent a push rod or two. I really don't believe this is the case since I was careful, but I guess it's possible. It's also possible the valves are no good. I don't know if the previous owner (who replaced the push rods and tubes) also inspected or replaced the valves.
[*]The actual carbs need refurbishing. This is probably outside of something I want to do, but I could get some refurb ones from Clarks. There's some brown gunk inside the very top of passenger-side carb and I don't know what it is - I've also been unable to get it off with carb cleaner.
[*]I messed something up in the ignition system, although I've double-checked everything. Points are set to .019 as the manual says for new points
[*]The coil, maybe? But I would expect intermittent behavior (idling, etc.) rather than just not starting
[/list]
Along with that, with someone cranking and a plug removed, placed on a good ground, and the wire hooked up, What color spark are you getting?
Answer to these points towards, or away from the coil.
Second: have access to a timing light?
Third: have access to a compression gauge?
Finally, yes, good chance there is funk in your carbs. If it starts, then stalls and DOESN'T immediately restart, will it restart if a little gas is dribbled into the carbs (around an ounce).
Dennis
-
gilphilbert
- Posts: 23
- Joined: Sun Aug 13, 2023 9:13 pm
Re: New, new and new...
Yeah, looks like I did the same. Without the car running I've tried my hand at static timing adjustment to see if I can at least get the car to idle.66vairguy wrote: ↑Wed Sep 06, 2023 1:28 pm Someone posted recently that they had checked the points, BUT NOT THE TIMING and the timing was off causing the engine to run poorly. Whenever you gap the points (setting dwell) you change the timing. It only takes about 4 degrees change and an engine won't run well, if at all.
I used this guide from Brad. I'm fairly sure I got it right but I want to check before I start the car and destroy the engine.
I turned the crank anticlockwise until the timing marks lined up with the distributor rotor pointing at #1. I lined up between 12-16 degrees (manual says 110 PG is "12-16 BTDC")

Then I turned the distributor until the rubbing block was at the lowest point on the cam, with the distributor twisted as far clockwise as possible, to put the rubbing block on the left side of the lobe, as I understand the instructions:

I tightened the distributor bolt back down so the distributor wouldn't turn and put the rotor back on. As you can see it's pointing to one side of the support bracket for the vacuum advance valve.

Putting the cap on, the rotor no longer points directly at the #1 plug, it now points just before the #1 plug. Is that correct? Apologies for the basic question but I'm trying not to make things even worse!

It starts right back up (with a little persuasion).Dennis66 wrote: ↑Wed Sep 06, 2023 3:38 pm First: when it starts and then quits, can you start it right back up or does it have to sit a while?
Along with that, with someone cranking and a plug removed, placed on a good ground, and the wire hooked up, What color spark are you getting?
Answer to these points towards, or away from the coil.
Second: have access to a timing light?
Third: have access to a compression gauge?
As for spark color, It's late here and I'm pretty sure my neighbors won't appreciate me cranking the engine at midnight, so I'll try that in the morning and let you know what color I get.
Yes, I have access to a timing light, dwell meter and compression gauge.
'66 Monza Convertible 110
Re: New, new and new...
Not sure how much difference it would make, but the picture of your crank pulley MIGHT indicate that you have a 95 HP engine. That's a solid pulley found on the 95s. The 110s had a harmonic balancer. It's possible the balancer went bad and they swapped a solid 95 pulley onto it, but with age, it could be the whole engine was swapped.
It does sound like you have what you need for checking this out. I'll be off for a few days. Have to head O/O town for a funeral. Dennis
It does sound like you have what you need for checking this out. I'll be off for a few days. Have to head O/O town for a funeral. Dennis
-
belaraphon
- Posts: 36
- Joined: Sat Dec 03, 2022 9:00 pm
Re: New, new and new...
Depending on how ambitious you are about the rust in your car, I have a suggestion. I have a 1965 convertible with all of the usual rust spots in the windshield, A pillar, front bottom edge of the doors and some rust in the rocker panels. So I cut all of that out and repaired it all with sheet metal as suggested by those great photos above. I also treated the panels with Eastwood rust encapsulator on the rockers. It has a tube and spray head that allows you to spray inside the rocker and A panels. Next I shot chain saw bar oil into the A pillars and door panels.
Finally, since I have a convertible and I couldn't tell what the middle of the rockers looked like, I welded a 10 gauge sheet metal strip from the bottom of the rocker panel to the pinch weld under the car. It triangulates the rocker panel adding strength and is invisible outside the car. As a result I am confident of the rocker panel strength and the car drives very nicely. I measured the size of the metal strip and ordered it from an online metal shop and had it shipped to the house and MIG welded it on. To hide the welds I ground them down and used a little bondo before painting the car.
Finally, since I have a convertible and I couldn't tell what the middle of the rockers looked like, I welded a 10 gauge sheet metal strip from the bottom of the rocker panel to the pinch weld under the car. It triangulates the rocker panel adding strength and is invisible outside the car. As a result I am confident of the rocker panel strength and the car drives very nicely. I measured the size of the metal strip and ordered it from an online metal shop and had it shipped to the house and MIG welded it on. To hide the welds I ground them down and used a little bondo before painting the car.
-
gilphilbert
- Posts: 23
- Joined: Sun Aug 13, 2023 9:13 pm
Re: New, new and new...
At last... it's running!
I still need to tweak the dwell and timing a little, but for the first time it's idling on it's own (no throttle). It's not perfect but it's actually running. There's some smoke from the exhaust - I suspect it's where it's been sitting for a while. I'm going to try running to see if it'll free up and maybe try some SeaFoam cleaner spray to see if that helps.
The static timing wasn't even nearly close, in the the I backed off the distributor hold down bolt a little and slowly turned the distributor clockwise a little at a time between cranking until it started running consistently.
I also checked the stamp on the engine, it's a 110 PG. I'm not sure if it's the original engine but it is the correct one. It seems someone changed the harmonic balancer for a pulley. I'll replace that at some point but I have bigger things to fix right now.
Thank you to everyone for helping me get to this point!
Belaraphon, I've been considering this myself. I'm not sure if I'm ready to take on metal work just yet but I might tackle it myself later on. Do you have any pictures of the work you did? I'd be interested to see how you did it.
'66 Monza Convertible 110
-
gilphilbert
- Posts: 23
- Joined: Sun Aug 13, 2023 9:13 pm
Re: New, new and new...
...and I'm already bumping into more issues!
After I wrote the above I ran the engine for longer and the fast idle runs nicely. However, as the engine warmed and the idle slowed, the engine stalled. I also noticed the left exhaust is louder than the right, so I checked the right choke and it's not opening, turns out the right bank is cold - the engine is running on the left bank only. I've checked the gas line and the stone filter and they're clear (cranking the engine with the right gas line disconnected from the carb results in a healthy spurt of gas). So I'm definitely getting gas on the right, and spark seems good too (plus there are new spark wires and plugs). At this point, the only common thing on the right bank is the carb, so it seems likely that the right carb needs rebuilding.
On top of that, the right carb linkages are so loose that the tang slides off the throttle shaft, so adjusting seems a bit pointless.
I've also discovered that the left carb seems to be leaking gas - from the throttle shaft as far as I can tell.
So, a pair of rebuilt carbs is on the way from Clarks. I know I'll need some other parts too, but for now that should (hopefully) get the engine running... properly this time!
'66 Monza Convertible 110
-
gilphilbert
- Posts: 23
- Joined: Sun Aug 13, 2023 9:13 pm
Re: New, new and new...
OK, so I stopped procrastinating and finally did a compression test. I've been putting it off since the cost of a rebuild would likely be the amount I paid for the car and I was worried the readings would be way out... but actually it's not terrible:
1-160
2-185
3-185
4-165
5-150
6-180
I checked the plugs as I took them out: #2, #4 and #6 (left) were very sooty (but dry). I understand this likely means the mixture is too rich. Could this be because I haven't really got the engine past idle since I installed them? The carb probably wasn't very well set up either.
#3, #5 and #7 (right) are less sooty. #1 was also wet and smelled of gas. I'm not sure what the cause of that is though (obviously unused gas in the chamber, but I'm not sure what causes that)
I'll get a new set of plugs to go with the new carbs - hopefully some SeaFoam will help clear out the carbon buildup too.
'66 Monza Convertible 110
-
bbodie52

- Corvair of the Month

- Posts: 11974
- Joined: Mon Aug 06, 2012 12:33 pm
- Location: Lake Chatuge Hayesville, NC
- Contact:
Re: New, new and new...
As indicated in those GM tune-up training videos I posted in this thread back in mid-August, a compression test of all cylinders is one of the early steps with an unknown engine to ensure that there is sound basis mechanically for the subsequent tuning steps. The readings you found in your testing would certainly indicate that all seems to be well in each cylinder! 
")
The wet, or sooty buildup on the spark plugs might also indicate a sticking choke mechanism that could be causing a rich fuel/air mixture if the choke butterfly valve(s) are not fully opening when the engine is warm. Carburetor flooding do to a faulty needle/seat or a leaky float might also be a possibility. The possibility of a faulty fuel pump providing too much fuel pressure and overwhelming the needle/seat is not unheard of — especially if an aftermarket electric fuel pump or a poorly manufactured mechanical pump with too strong a pump pressure spring is in operation.
Overall, the Tuning The Corvair Engine — Part 1 & 2 training videos, although dated, try to place emphasis on not taking anything for granted, proceeding in a logical sequence, and performing a thorough evaluation of a Corvair in unknown condition.
Good luck with sorting the engine tuning out!
Brad Bodie
Lake Chatuge, North Carolina
 1966 Corvair Corsa Convertible
Lake Chatuge, North Carolina
1966 Corvair Corsa Convertible-
65Monza140
- Posts: 50
- Joined: Sat Aug 26, 2023 1:23 pm
Re: Where Ya At?
Gil,
Just checking on you to see how the rebuilt carbs changed the situation. Your compression check ruled out mechanical problems, which I read as real good. That leaves fuel and ignition issues which are very cheap compared to mechanical issues. You are fortunate!
Don't give up. Try to have fun with it so you don't get frustrated as much.
I'm not able to spend the time I want to on my two project cars right now but I'm planning to keep plugging away...I'd like to get one driveable by year's end. Then I will install the Brown EFI on the '65 four door, daily driver. I'm looking forward to that. I'm working on installing two '67 oem master cylinders, one in each car. THEN I will work on powerplant issues.....I am too experienced (old) to do it the other way!
Keep us posted on your progress, OK?
-
gilphilbert
- Posts: 23
- Joined: Sun Aug 13, 2023 9:13 pm
Re: New, new and new...
Funny you should ask, I actually (and finally) drove it yesterday!
I ordered the replacement carbs and throttle linkages. When they arrived, I replaced the carbs, started the car and it definitely seemed better but somehow still not right. I spent a while trying to fight timing, dwell and carb synchronization, none of which seemed to be easy. Eventually, I traced this down to the right rebuilt carb, which had a vacuum leak in the top bowl gasket. A quick call and I got a replacement in the mail. In the meantime, a neighbor came to see the car while I was under the engine cover and told me he's got a '64 Corvair. He told me the best thing to do was to replace the points-based ignition, so I got the XR700 electronic ignition and installed it, along with the replacement carb when they arrived. Some carb synchronizing later, carb linkage adjusting and idle adjustment and it's running at last!
I took a short video of the car shortly after I got it running nicely
I cannot thank the people on this forum enough for all the advice getting the car running - I couldn't have done it without all the help!
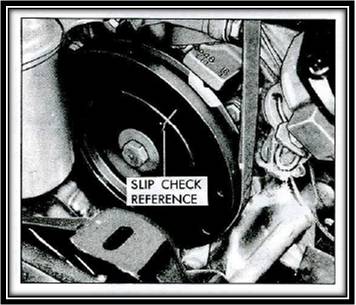
I do have one problem that I can't work out. I've had to set the timing by ear for now so there hasn't been much driving. I'm not sure why, but the timing mark on the flywheel (which needs replacing with a harmonic balancer) is quite far clockwise when using a timing light. It's hard to capture on a camera due to the speed of the timing light and shutter speed of the camera. You can see it's out this image, just above the top edge of the distributor.

Any advice on trying to work out why the timing mark would be so far out, especially with the electronic timing, would be greatly appreciated!
I ordered the replacement carbs and throttle linkages. When they arrived, I replaced the carbs, started the car and it definitely seemed better but somehow still not right. I spent a while trying to fight timing, dwell and carb synchronization, none of which seemed to be easy. Eventually, I traced this down to the right rebuilt carb, which had a vacuum leak in the top bowl gasket. A quick call and I got a replacement in the mail. In the meantime, a neighbor came to see the car while I was under the engine cover and told me he's got a '64 Corvair. He told me the best thing to do was to replace the points-based ignition, so I got the XR700 electronic ignition and installed it, along with the replacement carb when they arrived. Some carb synchronizing later, carb linkage adjusting and idle adjustment and it's running at last!
I took a short video of the car shortly after I got it running nicely
I cannot thank the people on this forum enough for all the advice getting the car running - I couldn't have done it without all the help!
I do have one problem that I can't work out. I've had to set the timing by ear for now so there hasn't been much driving. I'm not sure why, but the timing mark on the flywheel (which needs replacing with a harmonic balancer) is quite far clockwise when using a timing light. It's hard to capture on a camera due to the speed of the timing light and shutter speed of the camera. You can see it's out this image, just above the top edge of the distributor.
Any advice on trying to work out why the timing mark would be so far out, especially with the electronic timing, would be greatly appreciated!
'66 Monza Convertible 110
-
bbodie52
- Corvair of the Month
- Posts: 11974
- Joined: Mon Aug 06, 2012 12:33 pm
- Location: Lake Chatuge Hayesville, NC
- Contact:
Re: New, new and new...
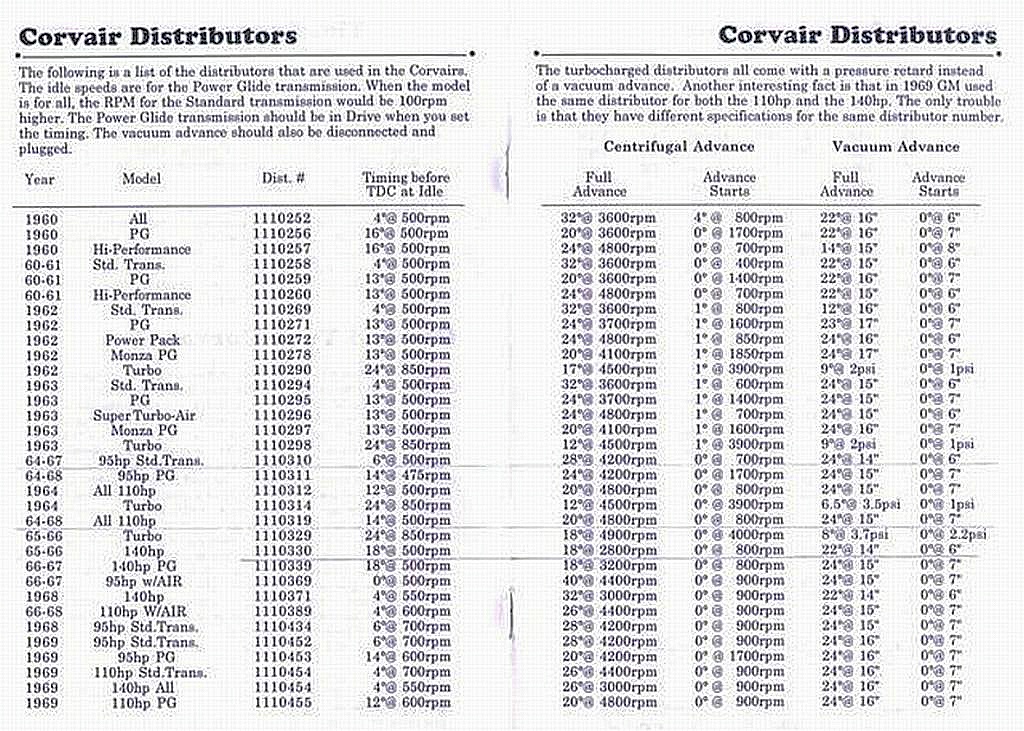
If the timing light shows the timing far to the right of the scale, your engine may be idling at too high an RPM to permit setting the base timing. The timing is supposed to be set with the vacuum advance hose disconnected from the distributor and the hose plugged. Also, your engine idle speed must be below the RPM speed at which the centrifugal timing advance starts. If you find your Corvair engine model on the chart below and then look to the right at the "ADVANCE STARTS" column, you will see the RPM speed when the centrifugal advance begins to advance the timing. Your engine must be running below that RPM setting, to allow you to set the base timing with a timing light.
Brad Bodie
Lake Chatuge, North Carolina
1966 Corvair Corsa Convertible
Lake Chatuge, North Carolina
1966 Corvair Corsa Convertible-
gilphilbert
- Posts: 23
- Joined: Sun Aug 13, 2023 9:13 pm
Re: New, new and new...
I had the vacuum advance hose disconnected and the carb port plugged, but I didn't know about the minimum RPM, nor that the PG should be in drive. I would imagine the RPM was around ~1,100 or more last time
I'll correct those two and try again in the morning. Thanks Brad!
I'll correct those two and try again in the morning. Thanks Brad!
'66 Monza Convertible 110
-
gilphilbert
- Posts: 23
- Joined: Sun Aug 13, 2023 9:13 pm
Re: New, new and new...
So, this afternoon I started the engine and let it warm and settle to an idle. I chocked the wheels, disconnected and plugged the vacuum advance tube and put the PG into drive. The revs dropped to around 750 according to my meter, but the timing mark still didn't line up. In fact, it disappeared entirely rather than just being advanced. The meter also shows 89 degrees of advance, although I'll be honest that I'm not entirely sure what to do with that figure.
The strange thing is, the timing mark was in the correct place before I switched to the electronic ignition. I correctly set the timing with the old points-based ignition. I have also replaced the old coil (OEM style to match the original, I know the XR700 doesn't like the high power coils), although I'm not sure if that's related.
With the car in drive there's an ominous "rumbling" sound coming from (I believe) either the alternator or the fan belt pulley - sounds like a bearing is on the way out, unless this sound is normal.
'66 Monza Convertible 110
Re: New, new and new...
The installation of the XR-700 optical sensor requires the timing to be reset. The XR-700 instructions explain this and describe how to mark the distributor so the rotor is at cylinder position #1.gilphilbert wrote: ↑Wed Oct 25, 2023 11:50 pm So, this afternoon I started the engine and let it warm and settle to an idle. I chocked the wheels, disconnected and plugged the vacuum advance tube and put the PG into drive. The revs dropped to around 750 according to my meter, but the timing mark still didn't line up. In fact, it disappeared entirely rather than just being advanced. The meter also shows 89 degrees of advance, although I'll be honest that I'm not entirely sure what to do with that figure.
The strange thing is, the timing mark was in the correct place before I switched to the electronic ignition. I correctly set the timing with the old points-based ignition. I have also replaced the old coil (OEM style to match the original, I know the XR700 doesn't like the high power coils), although I'm not sure if that's related.
With the car in drive there's an ominous "rumbling" sound coming from (I believe) either the alternator or the fan belt pulley - sounds like a bearing is on the way out, unless this sound is normal.
Basically -- rotate the engine until the pulley mark is at the static timing (in shop manual for your engine) and make sure the rotor is at spark plug wire #1 on the cap, if not then rotate the engine one more turn so the pulley timing mark is were you want it (per the Corvair spec.) and the rotor should point to spark plug wire #1 terminal. The XR-700 diagnostic light should be on, if not loosen the timing clamp and rotate the distributor base either way until the light is on. THEN rotate the distributor base clockwise so the light goes out, then back counter clockwise and STOP just as the light comes on. Tighten distributor clamp and you should be fairly close. Verify timing with the engine RPM below your distributors spec. for RPM BEFORE the mechanical advance comes in. Typically below 900RPM.
-
bbodie52
- Corvair of the Month
- Posts: 11974
- Joined: Mon Aug 06, 2012 12:33 pm
- Location: Lake Chatuge Hayesville, NC
- Contact:
Re: New, new and new...
The ultra "high-powered" cannister-type coils typically have a very low Primary resistance value of about 0.6 ohms. For example, the Pertronix Flame-Thrower II runs a 0.6 ohms primary resistance, which produces an advertised spark plug voltage of about 45,000 volts. The extra-high primary coil current drawn by this coil will quickly damage ignition points or the switching transistor in the Crane Cams/FAST XR-700 or the Pertronix Ignitor I. These electronic units (or the original ignition points) will handle a coil with a 1.5 ohm or 3.0 ohm primary, which reduces the amount of current flowing through the coil primary to the electronic switching transistor, and on to ground. These aftermarket 1.5 ohm or 3.0 ohm coils are designed to be powered by a full nominal 12 VDC source, without a ballast resistor, and produce a spark plug output voltage of approximately 40,000 volts. The original Corvair Delco coil has a primary resistance of about 1.42 ohms, and is intended to be powered by battery voltage reduced by an external resistor wire, which drops the voltage down to approximately 6-7 VDC and, of course, weakens the high voltage output to the spark plugs. The reduced spark plug voltage is deemed adequate for the Corvair engine, although GM designed the Primary feed circuit to boost the voltage to a full nominal 12 VDC while the engine is being cranked by the starter motor, to promote starting a cold engine. (The primary voltage drops back to the low 6-7 VDC produced through the ballast resistor wire when the key is released and the starter solenoid disengages).gilphilbert wrote:...I know the XR700 doesn't like the high power coils...
The Corvair engines have a moderate compression ratio of approximately 8:1 or 9:1. Maximum engine RPM speeds are also moderate, so most Corvairs don't really benefit from high performance coils. The moderate combustion chamber pressures and moderate maximum RPM speeds are not a real challenge to effectively firing the spark plugs. The turbocharged Corvair engine is possibly an exception, since the turbocharger boost raises combustion chamber pressures somewhat, making it mor difficult to fire the spark plugs.
Brad Bodie
Lake Chatuge, North Carolina
1966 Corvair Corsa Convertible
Lake Chatuge, North Carolina
1966 Corvair Corsa Convertible