A place to preserve the past, present and future of the Corvair. An ever evolving knowledge base made up of Corvair Enthusiasts from all over the world. (Note: no ads for logged in members). https://www.corvairforum.com/forum/
hrm2k wrote:Thank you Brad. Nice Cobra....that took a lot of work
I just wanted to point out that this car was never a Cobra. It started life as a 1958 AC Ace roadster with an in-line six cylinder engine. Carroll Shelby utilized the AC Ace aluminum body and tubular frame-based chassis as a basis for the 289 Ford-powered Shelby Cobra. The Carroll Shelby Ford project inspired my father to attempt a similar conversion utilizing a brand-new 327 cubic inch solid lifter Corvette engine. The year was 1962 and I was about 10 years old. The first I knew of the project was when I walked out into the garage one morning and discovered a brand-new engine sitting in the garage in its original crate. The photographs below show what the original AC Ace engine looked like.
Sorry that I don't have any engine compartment photographs showing the Corvette engine installation. My father passed away a few years ago and I'm still searching for and discovering old family photographs. As I find them I am gradually digitizing them to be incorporated into a family photo album on our computer. I recently located some black-and-white negatives that contain more pictures of the AC conversion – but I have not yet scanned them into the computer.
AC’s light-alloy overhead-cam engine, which had a mere 40 horsepower at 3000 rpm when introduced, was persuaded to produce 85 bhp at 4500 rpm for the AC Ace, enough to give the graceful new car a top speed of 103 mph. In the next few years, this remarkable old soldier would be tuned even more, to 90 bhp in 1955, and finally to 102 bhp in 1958.
With the open two-seater in production (later to become even more famous as the basis of the Shelby Cobra), AC decided to produce a fastback coupe version. This was the AC Aceca, its name, like Ace, revived from a famous AC of the Thirties. Revealed in late 1954 and in production by mid-1955, the AC Aceca, naturally enough, looked rather like Ferrari’s contemporary 166 and 212 models, a happy coincidence.
Once the AC Ace and AC Aceca were established, AC was up to building five cars a week. The chassis soon had such a good reputation that there were persistent demands for more power. With the AC engine near the end of its development life, alternative power had to be found, and AC eventually “bought in” the ex-BMW Bristol engine (see Ace- and Aceca-Bristol).
The AC Ace's 2.0-liter six gave it respectable go, and made it AC's first true sports car.
Nevertheless, and in spite of in-house competition from other derivatives, the AC-engined Ace and Aceca sold steadily until the autumn of 1963, by which time Thames Ditton was preoccupied with building engineless Cobras for Carroll Shelby in California.
Both models improved along the way. Front disc brakes were fitted from 1956-57, at which time an electrically actuated overdrive became optional. Later, the old Moss gearbox was dropped in favor of Triumph TR3A gears inside a case of AC’s own design. As a halfway measure between the two body types, a detachable hardtop was also made available for the AC Ace.
The styling of the AC Ace roadster, especially the nose, drew heavily from Touring’s early Ferrari Barchettas.
This Bristol-powered Aceca coupe looked little different from their AC-engine cousins.
My father also acquired an AC Aceca coupe that he intended to restore. He had purchased an aluminum block Buick V8 engine to install on that car. Unfortunately his employer, Lockheed, transferred him from San Jose to Lockheed Burbank in Southern California. That transfer and other family issues prevented the Aceca restoration and engine swap from ever taking place and the car was sold.
I remember that the original AC engine had an all aluminum block and a cast aluminum oil pan. The single overhead cam cylinder head was cast-iron. Each piston resided in its own "wet sleeve" cylinder barrel that were held in place between the aluminum block and the cast-iron cylinder head. With the head removed, the barrels could be pried out of the holes in the aluminum block. All six cylinder barrels sat in a cooling trough of water that circulated around the barrels. As you can see in the pictures tubular exhaust headers were utilized. Three British SU carburetors handle the intake.
Sister Denise and Brad in Dad's AC "Mongoose", Easter Sunday, 1963 at 2257 Fairhill Lane home. In San Jose, CA.
Brad and sister Denise in Dad's AC "Mongoose", Easter, 1963 at 2257 Fairhill Lane home. I believe that the black car in the backgroind is a 1961 or 1962 Italian-made Fiat 1500 sedan.
Re: The Spousal Avoidance Unit build
Posted: Fri Apr 26, 2013 10:25 am
by cad-kid
Thanks for the vid - sounds great!
Re: The Spousal Avoidance Unit build
Posted: Fri Apr 26, 2013 1:55 pm
by hrm2k
Brad.................I didn't mean anything other than cool car..............sort of like a copy off any machine is a xerox........ That body style will always be a Cobra in my old mind. Your Dad did a great job on it from what I can tell. All of the pictures and negatives that you are finding will only add to the history and the story of the car.
Please accept my apology................
thanks Jeremy.........I should have the entire exhaust finished this weekend
Re: The Spousal Avoidance Unit build
Posted: Fri Apr 26, 2013 5:36 pm
by bbodie52
There is no apology necessary. I simply used your comments as an opportunity for clarification – knowing that many readers may be unfamiliar with the Shelby Cobra and its relationship to the original AC Ace. I was pretty sure that you understood what I meant, but when I write on the Corvair Forum I also try to take into account that there are many other readers that may benefit from additional clarification. Besides, it gave me an opportunity to do a little research and find some pictures of the original AC Ace six-cylinder engine. I had not had my hands on one since the mid-1960s and my memory benefited from seeing old photographs that provided details that I have forgotten. I had even forgotten that AC provided a mount for a grease gun in the engine compartment! I assume that this was necessary because of the nature of the transverse leaf spring stack that was utilized on the front and rear of the car. Those springs were wrapped in something that looked like burlap. I always assumed that the cloth wrapping was there to help retain the grease that was utilized within the spring assembly to allow the components to slide back and forth smoothly. I'm guessing that these leaf springs needed to be re-greased periodically, and that was what the grease gun was there for. I do remember also that my father had to periodically remove the rear transverse leaf spring and have it professionally heated and re-arched. This was necessary because all of the additional torque applied by the Corvette engine tended to flatten the spring and remove its arch, which lowered the rear of the car. The differential provided by AC seemed to handle all of the additional power without any problem – but the rear suspension spring assembly was not quite up to the task. I'm sure that Carroll Shelby made many changes in the Shelby Cobra suspension configuration. I know that he added four-wheel disc brakes, and I seem to remember seeing a Cobra at a car show in the 1960s that utilized inboard disc brakes that were mounted on either side of the differential. I'm assuming that that configuration reduced unsprung weight on the suspension by moving the brake discs and calipers inboard and then applying rear braking force to the rear wheels through the half shafts. I do not know if that configuration was continued on later 289 Cobra production models.
Re: The Spousal Avoidance Unit build
Posted: Wed May 01, 2013 4:39 pm
by hrm2k
THE EXHAUST IS FINISHED...................ABOUT DAMN TIME !!!!
axles, brakes, shifter cable, rock guard for the radiator, cover for engine compartment
the list is getting shorter
Re: The Spousal Avoidance Unit build
Posted: Wed May 01, 2013 4:53 pm
by cad-kid
Sounds mean - I like it
Re: The Spousal Avoidance Unit build
Posted: Wed May 01, 2013 5:04 pm
by cvair4life
Those are Thrush exhaust without a shadow of a doubt - always loved that noise
Re: The Spousal Avoidance Unit build
Posted: Wed May 01, 2013 7:00 pm
by bbodie52
It takes a long time to achieve perfection. LOOKIN' GOOD!
Re: The Spousal Avoidance Unit build
Posted: Mon May 13, 2013 5:06 pm
by hrm2k
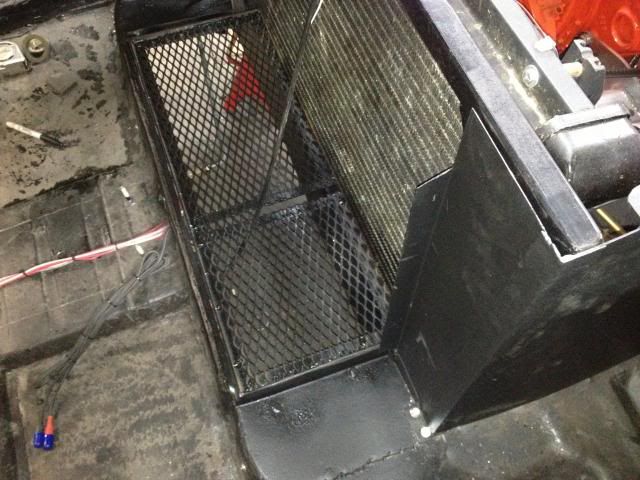
I have been caught up in some family stuff over the last couple of months so things are not progressing as they should. I did get to spend a couple of hours doing another needed piece today. I finished up my rock guard for the radiator. I'm not sure I ever saw any pics of how this was addressed before..............so here is how I handled it. Not any big deal, just some 13 gauge expanded metal along with some right angle. I had it made when I realized I needed to get the accelerator cable through it. NO problem seeing how that was handled.
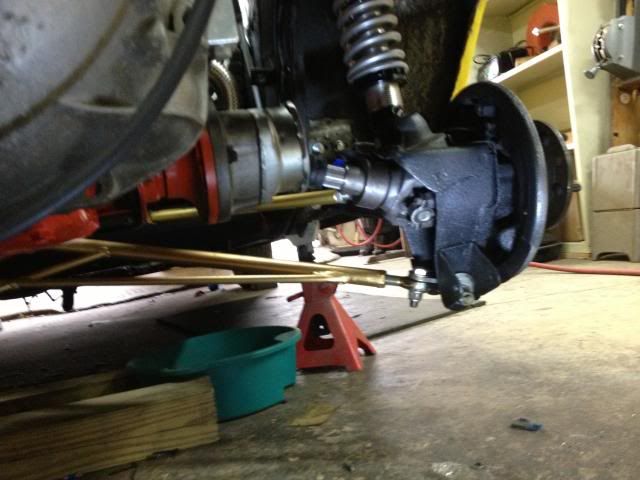
Big things are going to happen over the next 2 weeks...........reinstall the brakes; route the e-brake cables and assemble the axles
Re: The Spousal Avoidance Unit build
Posted: Tue Jun 04, 2013 5:14 am
by hrm2k
I just wanted to say that I am back and back at work. I will have some updates later this week. The family stuff that was using up my time is over. I hated to see my father in law pass as he was one of the good guys. He lived a great life and did more than most ever dream of. I will miss him and our conversations about planes and cars.
Anyway................look for the updates
John
Re: The Spousal Avoidance Unit build
Posted: Tue Jun 04, 2013 6:51 am
by azdave
Sorry to hear about your loss. Projects can be good therapy to get back in the game so to speak.
RE: Radiator rock guard. I never used one on mine and I'm okay so far. It will occasionally suck up some leaves but thats about it. They fall to the ground once the fans turn off.
Re: The Spousal Avoidance Unit build
Posted: Thu Jun 06, 2013 7:19 pm
by hrm2k
Another product test !!!!!!..............I know.......just what we need.
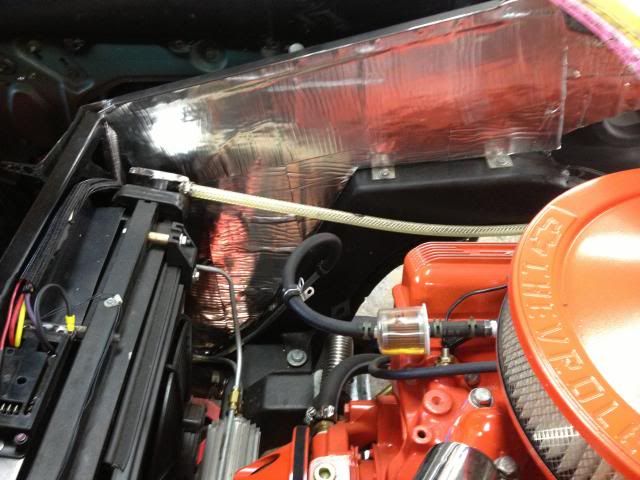
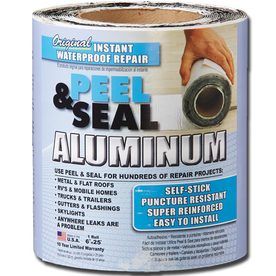
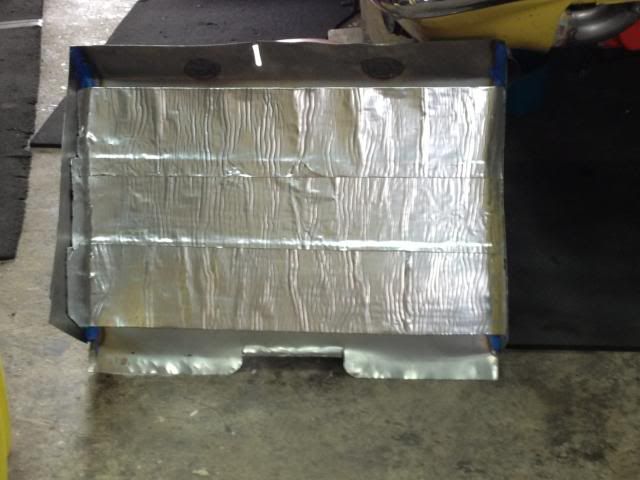
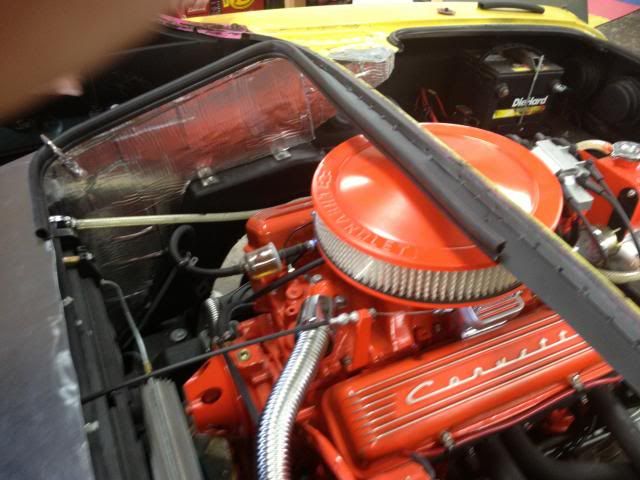
While I was not doing a lot, I got a chance to think and read. I have been a little concerned about noise inside the car ...........I can just hear the other Corvair guys saying.............stupid, leave it alone and noise will not be a problem...............I don't pay attention to them. I had thought about doing some dynomat or one of the other products like dynomat. While way cool, the stuff is very expensive. I read on a hot rod site that I frequent about a product used by roofers called peel and seal. It comes in a roll and I got it from Lowes fro about $16 a roll. It is an aluminum covered asphalt product that also has a pressure sensitive adhesive with a paper cover. I bought a few rolls and did the engine surround in the Corvair. The product cuts easily with sissors or utility knife. Over a clean surface, it is a very easy install. You need to make sure and put it where you want it to be as taking it loose is damn near impossible. I used a wooden wall paper roller to make sure it was down and stuck. Here is what it urned out like
I sort of hate having a product recommended to me with a name only and not knowing what it looks like..........this is what peel and seal looks like......a roll is 6 inches by 300 inches
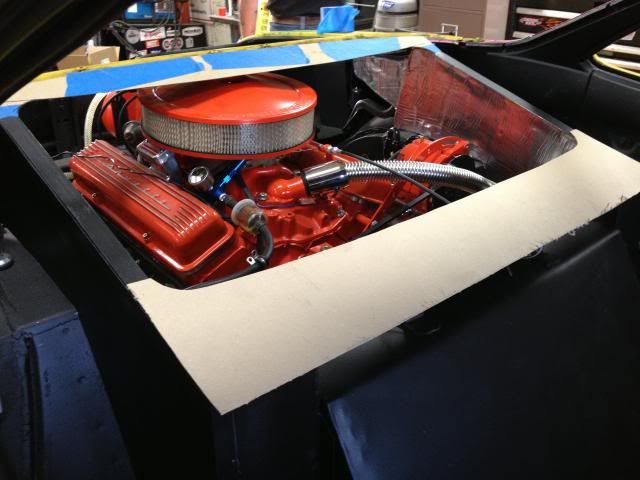
The only other thing I got done was the final mockup and templates for the engine cover area. I cut the 20 gauge metal this moring so I should have it installed the next time I got to the garage. If you squint your eyes and act like the entire thing is painted all one color ( black ), thiis will show you how big the Lexan cover will be. I found some rubber seal material that we had laying around that will get the job done. It slides over the edge of the metal all the way around the opening. The seal has a 3/4 inch hollow ball. The lexan panel will sit on the rubber ball and be held in place with 2 hood pin mounts on each side.
enough already...................here is the hole
more to follow over the weekend
Re: The Spousal Avoidance Unit build
Posted: Fri Jun 07, 2013 6:59 am
by azdave
Sound deadener?
I used a similar sound deadener (aluminum with asphalt-based backing) in one of my projects and wished I hadn't. After about a year it began weeping a tar-like sustance around all of the edges and it made quite a mess as it soaked into the light beige carpet that was above it. The staining did not come out of the carpet. It did not use the same brand as you plus I have very high ambient temps in the desert. Maybe you don't have this problem.
Top cover?
I think you will find yourself needing additional hold downs for the top cover unless it is very rigid. I have 9 Dzus fasteners around my flat aluminum sheet V8 cover and if only one is not fastened I get hot air inside the car quickly as the air pressure lifts up the cover easily. You will be surprised at how much air pressure builds in the rear of the Corvair when you have a V8 install. I also had to block the chassis holes below the rear widow as it allowed too much air pressure to go up the rear posts and inflate the headliner. The headliner was heated and bowed out while on the freeway.
Re: The Spousal Avoidance Unit build
Posted: Sun Jun 09, 2013 6:20 am
by hrm2k
Thanks for that information Dave. I have already found out what asphalt smells like on a hot day. I left the 3 rolls in my daily driver for a couple of days..............pretty stinky stuff. I only used this stuff inside the engine enclosure. We used the black windshield adhesive / sealer around the panels at the bottom of each panel. If anything leaks, it is not going to get by the seam of black goop between the panels and the floor. As I mentioned in my previous post, this will be a test for that peel and seal product...........I hope I have better luck than I did with the baffle inserts...........
I installed the peel and seal inside the airbox cover. It did a good job killing the metal noise of that panel. Here is how it looked just before I installed it on the car
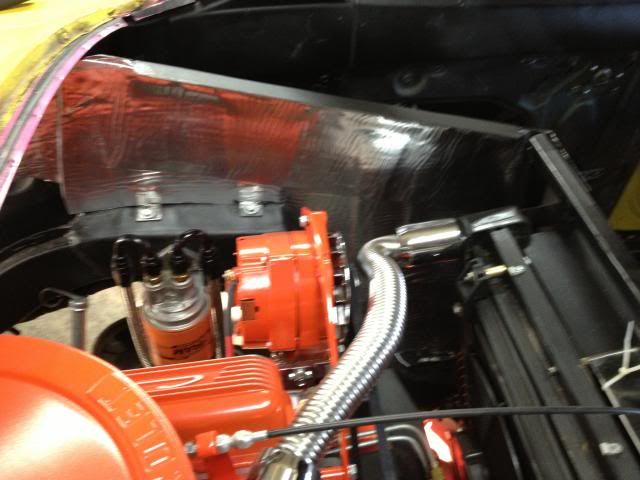
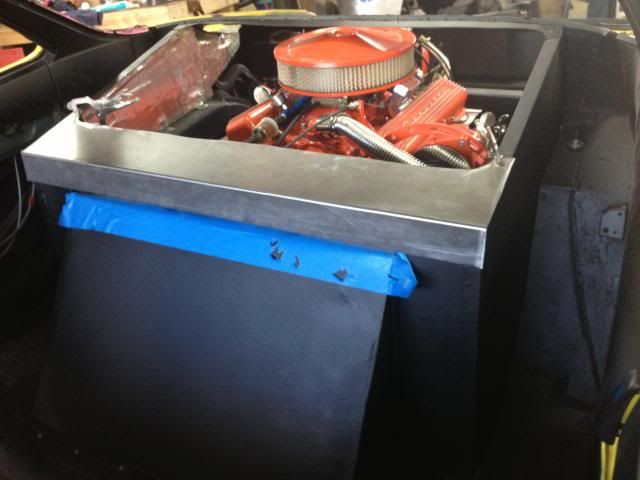
I had mentioned cutting another couple of pieces of metal in my previous post. These 2 pieces are to cover the engine area and allow a mount / seal for the lexan panel. Here is how the last piece looks before paint and final screwing into place.This entire engine enclosure will be covered in black carpet right up to the seal which I will show you in a minute
please excuse the blue tape.........didn't want to scratch the paint..................force of habit
The second piece of metal was smaller and easier to put into place. It actually slid under the rear window mount. I tacked the piece in place and sealed it from underneath with silicone. With both pieces in place, the Lexan opening becomes pretty clear. We also did a radius on each corner to facilitate the rubber seal. It might be just for pretty but I like the way it looks with the seal in place.
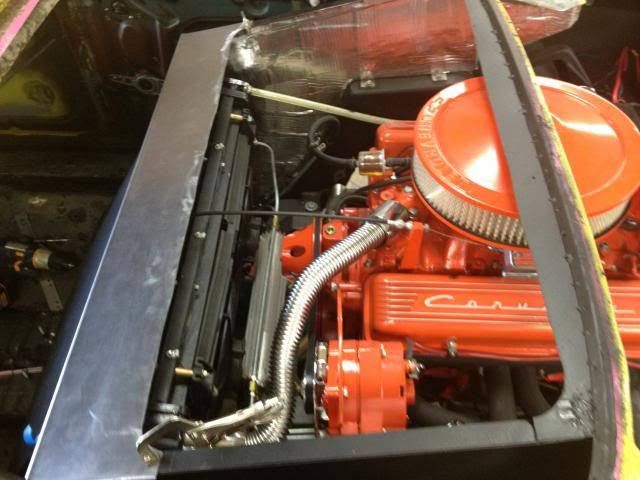
Take a peak at my hole
A lot of the hardware and pieces I have used on this car came from my friend's employer's dumpster. They throw away a couple of boxes of bolts and hardware, it ends up in our bench stock. They throw away a 3' X 5 ' piece of 14 gauge metal because it was cut wrong.........into my bench stock..........you get the picture. One reason I mention this is the type of ball seal they use on their machine doors. For some reason they chucked about 50 lbs of 5/8" ball seal rubber.
This will show you how the ball seal rubber will fit around the opening for the Lexan seal
The ball seal will collapse from 5/8" to about 1/16". This collapse is what we are using to make the lexan seal to keep the heat and air out of the inside of the car. I had mentioned using hood pins to attach and hold the lexan in place. We figure if we collapse the ball to around 1/4 inch, the hood pins should hold it so the seal does not blow out.
I also installed the emergency brake cable mounts so the cable sheaths can be run......It keeps getting closer
Re: The Spousal Avoidance Unit build
Posted: Sun Jun 09, 2013 6:45 am
by hrm2k
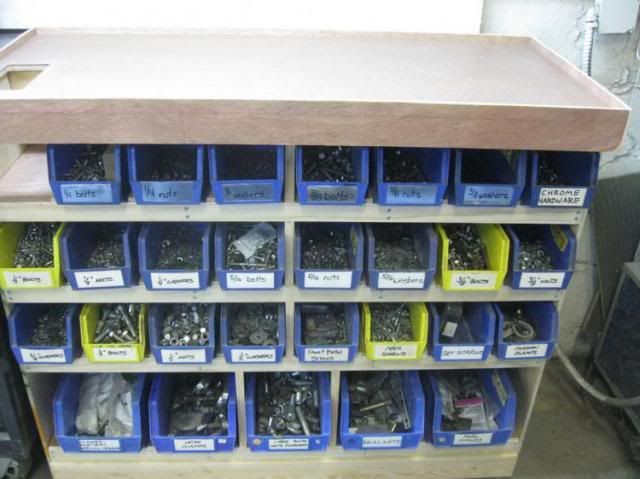
I mentioned Bench Stock in my last post. I feel very lucky to have all this hardware etc at my disposal. My buddy that I share my garage with had a great idea a couple of years ago regarding bench stock. He said there was nothing worst than trying to find a bolt in the middle of a project and having to dig through coffee cans so we built a nut and bolt storage bench. Since this is nothing but a bunch of friends here , I thought I might share it with you.
The containers shown in the photo were actually thrown away by my buddy's employer............we now have a bunch of these. We built the bench out of 2 by 4's, 1 x 2's and some 1/2 inch plywood. The construction is not anything out of the ordinary but the idea was. In the upper left of the picture, you will notice an open area with no bucket and a hole in the top of the bench........more on that in a minute. The buckets with the silver tags are stainless bins
When we need to find a 1/4-20 bolt, we pull the bin with 1/4" bolts and pour it out on top of the bench ( note side rails......keeps old guys from having to bend over and pick stuff up ). You can spread your inventory out over a wide area to sort through it.
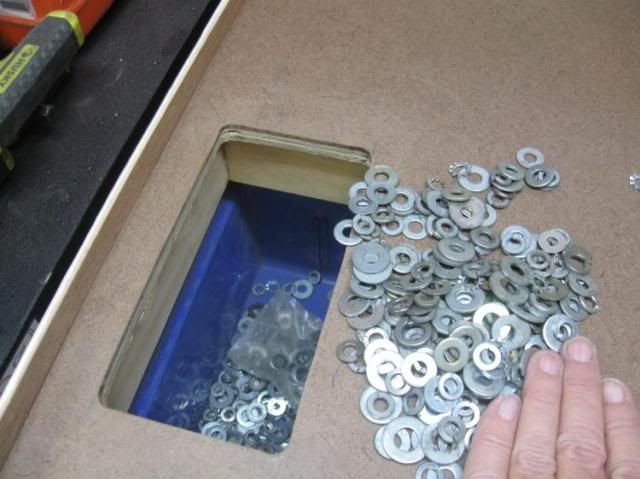
When you are done, you slide the bin into the opening in the upper left and............................
sweep the pieces into the hole where they fall back into the bucket. Once you have cleared the top, you put the bucket back into it's proper place for the next trip to the bench stock bins
I thought some of you might like this idea. It works like a champ for us