
Had to perform this a few weeks ago due to gas leaking from the filler tube hoses. Once I had the tank out I found the inside of the rubber hoses badly rotted. Here is what I ordered from Clarks prior to starting the repair:
Part# Quantity Description
C8207 4 ALL STAINLESS CLAMP
C8208 2 ALL STAINLESS CLAMP-GAS TANK FILLER
C1370 1 GAS TANK ANTI-SQUEAK MATERIAL-ENOUGH
C1494 1 BOLT-SS GAS TANK STRAP-SET 2-1960-
C1046 1 HOSE-GAS TANK OUTLET
C153R 1 60-69 REPRO GAS TANK STRAP
C156 1 GAS TANK SENDER UNIT RETAINER 61-69
C155 1 GAS TANK SENDER UNIT GASKET 61-69
C505A 1 HOSE-GAS TANK FILLER VENT-EXC TURBO
C1045 1 HOSE-60-69 GAS TANK FILLER NECK
C536R 1 FILLER NECK GROMMET
I didn't need much of the anti-squeak material, just a few inches as the rest was still intact in my car. If you need to replace it have some spray tack handy. Also, the Repro gas tank strap (CR153R) was too long, I had to re-use my original strap which was was in decent shape. Clarks does offer another P/N for a strap (C153E) described as "exact repro", if you need a strap try this option to see if it is a better fit.
Also, you will need to remove your stabilizer bar to drop the tank out, so don't forget a new bushing set (P/N C111K for '64-'69, P/N C10745 for '62-'63) if you have not recently replaced them as well as the hardware (most of mine snapped off) for re-installation.
A few observations:
1. Unless you can do this job on a hoist, you need to get the front end of the car up quite high to remove the tank. I thought I was high enough on my jack stands but still had to cut the filler tube hoses to get the tank out as it would not drop low enough to remove the tank & tube as one unit.
2. I was able to install the tank back in place and then attach the filler tube by orientating the clamps for easy access from under the car and through the LH wheel well. I attached the hoses to the tank for install (clamps tight on the tank end), then slide the filler pipe into the hoses once the tank was up in the car. You will need to have the filler tube held roughly in place (wife!) before sliding the tank up into its well. Don't install the tank tight! Leave it loose in the strap as you do need to push/pull the tank around a bit to get the filler tube into the hoses. Once the tube is in the hoses you can install the tank up tight, then adjust the filler tube height/position to line up with the gas body rubber grommet and finally tighten the remaining clamps.
3. The o-ring under my fuel level sender was basically rotten. Not leaking yet...but it would be crazy not to change this when the tank is out. Installing the lock ring on the sender is a challenge...it took the help of my wife to hold the sender down tight in the tank while I started the lock ring. Clarks does sell a $40+ tool for this, but it isn't worth the investment for "one time" use. Watch the install orientation! You can install the sender 180 degrees out and the outlet pipe will be pointing the wrong way (ask me how I know)!!!
4. The inside of my tank was in good condition...yours may need attention once removed. Clarks does sell some sealer to coat the inside of the tank. You can probably find someone locally as well to clean/descale/seal if necessary. Well worth the investment once it is out of the car.
5. My car had the in-tank strainer from the factory...but apparently not all came this way. It's up to you if you want to replace/install one. My was in excellent condition, just needed a cleaning.
6. Replacing the bushing set on the stabilizer bar seems complicated, but it quite simple. You will need to pry open the half clamps on the drop links to slide over the bushing. I dropped the bushings that slide onto the bar into hot water for 5 minutes to make them plyable and used some rubber lubricant to slide them on the bar. I used the same lubricant to install the new bushings in the drop link upper bores, then slid in the metal spacers using a vice clamp. Don't use too much lube as you don't want dirt/sand sticking to the rubber bushings later on, this will decrease their life drastically. Remove/wash off as much lube as possible after installing them on the bar.
Good luck with the project, if you have any further questions let me know!
Fuel Tank Removal & Installation
Fuel Tank Removal & Installation
Last edited by gbarron on Wed May 15, 2013 9:34 am, edited 1 time in total.
Glenn B.
Vancouver, BC
1966 Corvair Monza 110/PG in Chateau Slate "Survivair"
Vancouver, BC
1966 Corvair Monza 110/PG in Chateau Slate "Survivair"
-
bbodie52

- Corvair of the Month

- Posts: 11894
- Joined: Mon Aug 06, 2012 12:33 pm
- Location: Lake Chatuge Hayesville, NC
- Contact:
Re: Fuel Tank Removal & Installation
HERE IS SOME SUPPLEMENTAL MATERIAL TO ADD TO THE ABOVE EXCELLENT GUIDELINES AND PROCEDURAL ADVICE...
You may find this Dave Motohead video helpful...
OPTIONAL: In the above video, he mentioned that front suspension removal makes it easier. Here is his video on how to remove the front suspenson from a late model Corvair...
I had the same thing happen on my 1965 Corsa years ago -- the filler neck hose develops a leak, which is not noticeable except when the tank is full, which brings the fuel level to the point where the fuel is high enough to reach into the filler neck. Then you see signs of the fuel leak. Once you drive far enough for the fuel level to drop down below the filler neck, the leak disappears. The repair parts are cheap, but installing them is a pain!
If you are certain that the filler neck is the culprit, you might as well go ahead and order the hose, clamps, etc. from Clark's so that you have them on-hand when you are ready to perform the repair. You might also want to consider buying a few additional items to do a complete fuel tank service while you are going through the process anyway, such as Item 2A (C261 - Fuel Tank Strainer). You also might consider the condition of the fuel tank mounting strap, nuts and special bolts. If the old units are rusted, corroded or in poor condition, new stainless steel bolts, Item 5 (C1494) and possibly a new strap, Item 4 (C153E or C153R) might be appropriate. Also, if you intend to remove the gauge sending unit to finish draining the tank and to replace the probably decayed fuel tank strainer, you should order a replacement gauge gasket seal, Item 3 (C155).
 I have attached diagrams from the 1965 Corvair Assembly Manual to illustrate the tank installation, and also attached the section of the 1961 Corvair Shop Manual and 1964 Shop Manual Supplement, as well as the 1965 Corvair Chassis Shop Manual (in Adobe Reader format) that will provide you with procedures for removal and repair of the fuel tank.
If the hose is leaking, it requires a special size hose as shown on the second page of the Clark's Corvair Parts catalog, as shown below...
 http://www.corvair.com/user-cgi/catalog ... IN&page=69
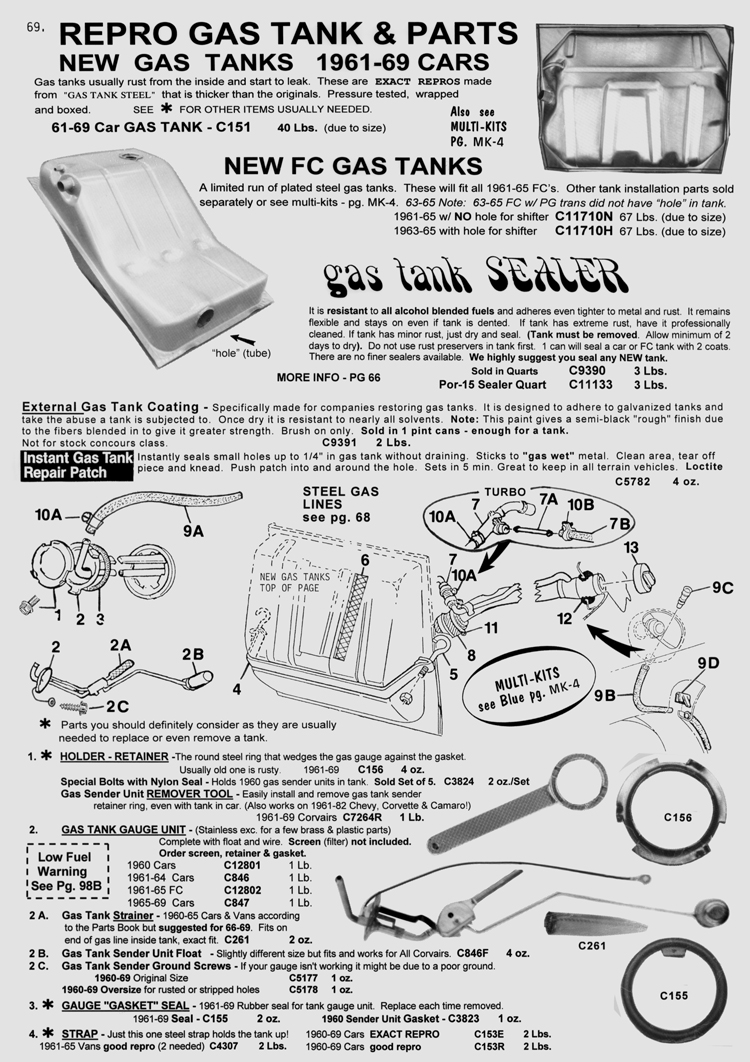
http://www.corvair.com/user-cgi/catalog ... IN&page=70

Part number C1045: HOSE-60-69 CARS GAS TANK FILLER NECK *ENOUGH FOR ONE TANK, CLAMPS=C1044 2 NEEDED
Weight: 0 lbs 2 oz
Catalog Pages(s): 70(8)
Price: $ 7.85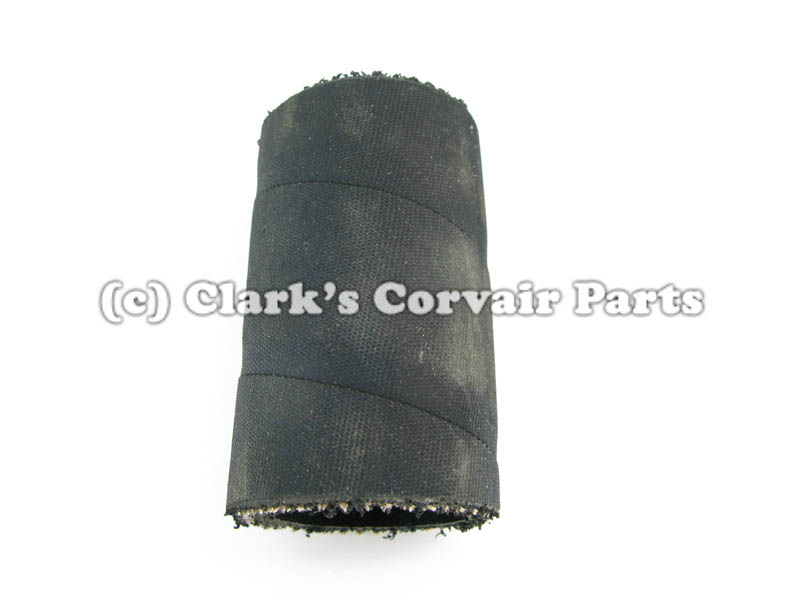
Part number C1044: CLAMP,GAS TANK INLET HOSE (ALL STAINLESS =C8208)
Weight: 0 lbs 2 oz
Catalog Pages(s): 36B,70(11)
Price: $ 1.30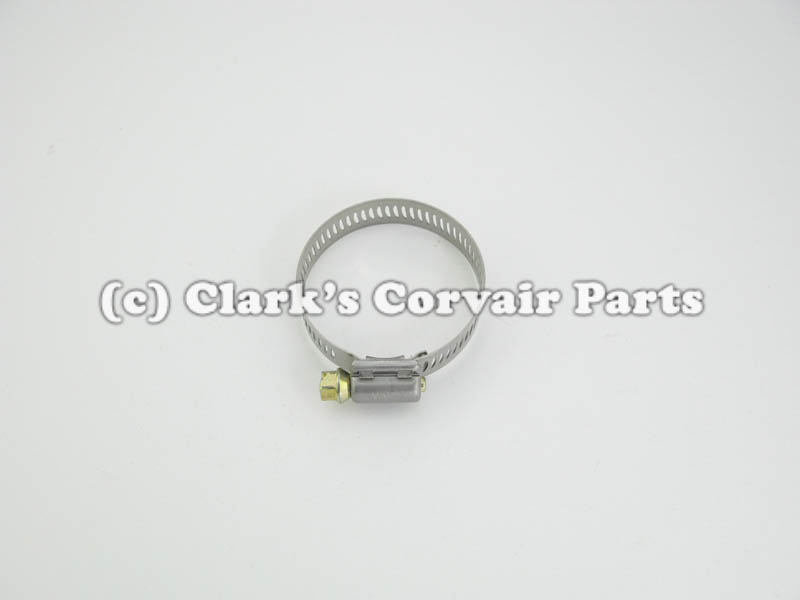
Left-click on each image to enlarge...
You may find this Dave Motohead video helpful...
OPTIONAL: In the above video, he mentioned that front suspension removal makes it easier. Here is his video on how to remove the front suspenson from a late model Corvair...
I had the same thing happen on my 1965 Corsa years ago -- the filler neck hose develops a leak, which is not noticeable except when the tank is full, which brings the fuel level to the point where the fuel is high enough to reach into the filler neck. Then you see signs of the fuel leak. Once you drive far enough for the fuel level to drop down below the filler neck, the leak disappears. The repair parts are cheap, but installing them is a pain!
If you are certain that the filler neck is the culprit, you might as well go ahead and order the hose, clamps, etc. from Clark's so that you have them on-hand when you are ready to perform the repair. You might also want to consider buying a few additional items to do a complete fuel tank service while you are going through the process anyway, such as Item 2A (C261 - Fuel Tank Strainer). You also might consider the condition of the fuel tank mounting strap, nuts and special bolts. If the old units are rusted, corroded or in poor condition, new stainless steel bolts, Item 5 (C1494) and possibly a new strap, Item 4 (C153E or C153R) might be appropriate. Also, if you intend to remove the gauge sending unit to finish draining the tank and to replace the probably decayed fuel tank strainer, you should order a replacement gauge gasket seal, Item 3 (C155).
If the hose is leaking, it requires a special size hose as shown on the second page of the Clark's Corvair Parts catalog, as shown below...
Part number C1045: HOSE-60-69 CARS GAS TANK FILLER NECK *ENOUGH FOR ONE TANK, CLAMPS=C1044 2 NEEDED
Weight: 0 lbs 2 oz
Catalog Pages(s): 70(8)
Price: $ 7.85
Part number C1044: CLAMP,GAS TANK INLET HOSE (ALL STAINLESS =C8208)
Weight: 0 lbs 2 oz
Catalog Pages(s): 36B,70(11)
Price: $ 1.30
Left-click on each image to enlarge...
- 1965-1969 Corvair Fuel Tank Diagram
- 1965-1969 Corvair Fuel Tank Straps and Filler Neck Detail Diagram
- 1965-1969 Gas Tank and Meter Diagram
- Attachments
-
- 1961 Chevrolet Corvair Shop Manual - Section 9 - Fuel & Exhaust Systems.pdf
- 1961 Chevrolet Corvair Shop Manual - Section 9 - Fuel & Exhaust Systems
- (1.31 MiB) Downloaded 157 times
-
- 1964 Supplement - Chevrolet Corvair Shop Manual - Section 9 - Fuel & Exhaust Systems (Includes Turbo).pdf
- 1964 Supplement - Chevrolet Corvair Shop Manual - Section 9 - Fuel & Exhaust Systems (Includes Turbo)
- (3.99 MiB) Downloaded 133 times
-
- 1965 Corvair Chassis Shop Manual - SECTION 8 - FUEL TANK AND EXHAUST SYSTEM.pdf
- 1965 Corvair Chassis Shop Manual - SECTION 8 - FUEL TANK AND EXHAUST SYSTEM
- (1.65 MiB) Downloaded 360 times
Brad Bodie
Lake Chatuge, North Carolina
 1966 Corvair Corsa Convertible
Lake Chatuge, North Carolina
1966 Corvair Corsa Convertible-
bbodie52
- Corvair of the Month
- Posts: 11894
- Joined: Mon Aug 06, 2012 12:33 pm
- Location: Lake Chatuge Hayesville, NC
- Contact:
Re: Fuel Tank Removal & Installation
NOTE: Chuck Roderique posted this inforemation on another thread, but they can get lost, or buried, over time. I thought this was good advice so I copied it over to this thread.
croderique (Chuck Roderique) wrote:Thought I would post about replacing another gas tank, this time on our 66 Monza convertible. From the previous experience on the 1965, I can give some hints.
1/ I put the car up on 4 standard ramps only. About a 7" raise in the car. That was plenty of room to drop the tank down and out. You do have to remove the drivers side wheel to access the hose clamps, but it doesn't have to be raised up high. Just use jack stands and leave the car level at about 7".
2/ After all the trouble removing one C type hanger for the stabilizer bar on the 65, to put new rubber bushings in it, I only removed the bolts for the stabilizer bar on the 66 and bent the C clamp back to remove the stabilizer bar and bolts.
3/ Buy and use a Clark's "Gas Tank Installation Kit". Also get the tank anti-squeak and glue it to the footwell and trunk. If you want new bushings for the stabilizer bar now is the time to order and install them. My 66 bushings were not bad so I reused them. If you get new bushings, use WD40 or soap to put them on as they are a pain to install due to the bends in the stabilizer bar.
4/ I used a new tank on the 1965. Beautiful, easy to install, etc. I used a refurbished tank for the 1966. Go with the new tank. Yes it is more expensive but a lot less trouble (i.e. it doesn't flake off when you install the sender!). If you do use a used tank or refurb yours, then install the sender unit BEFORE you install the tank. Reason, when you knock off flakes of rust or whatever when you install the sender, you can take it out and vacuum the tank easily. Get all the rust out and loose particles BEFORE you install the tank.
5/ MAJOR HINT. Pay close attention to the position of the upper tank clamps when you take them off. When putting new filler hose and vent hose, secure the clamps closest to the tank! You cannot reach the upper vent hose once the tank is in the car. The larger filler hose is difficult to reach close to the tank, so cinch those down before you install the tank. You can position the outer clamps and tighten them so they just stay on the hoses. Again, use WD40 or soap on the hoses and filler neck to make it easier to insert the filler neck as you work the tank into position.
6/ Clark's doesn't really recommend the POR-15 on the inside of a NEW tank. It is a 3 step process that is expensive and time consuming and not really needed.
7/ If your bolts are rusty and break off, like my 65, then order all bolts for the stabilizer bar and the tank hangers. The 66 was not rusty under the car so I didn't have to get new bolts, but I did anyway and source them locally, grade 8. If you need new hangers for the tank then get them from Clark's or other Corvair vendors.
The 66 tank came out in 30 minutes. Took much longer to reinstall due to the used tank with the prep. It would have gone back on in an hour with a new tank.
Chuck
Chuck Roderique
Brad Bodie
Lake Chatuge, North Carolina
1966 Corvair Corsa Convertible
Lake Chatuge, North Carolina
1966 Corvair Corsa ConvertibleRe: Fuel Tank Removal & Installation
I just finished up my tank removal/bushing replacement/new sending unit/new front front brake lines and filler neck hose replacement project. The info in this posting made the project go a lot easier. I found installing the sending unit locking ring pretty easy. When something goes that easy, I always think that I must have done something wrong. It isn't leaking so I guess its right.
I still don't want to do any part of this project again anytime soon. Bleeding brakes is my"favorite"aspect.
I still don't want to do any part of this project again anytime soon. Bleeding brakes is my"favorite"aspect.

Re: Fuel Tank Removal & Installation
I'm going to remove my tank too and I just tried to move the stabilizer bar unscrewing the 2 supports in the middle and loosening the external supports but the bar moved down only for few cm (maybe 1 inch)  How should I do to get ahead? Should I remove the bar? And how? By loosening all the bolts?
Thank you very much.
Thank you very much.
-
bbodie52
- Corvair of the Month
- Posts: 11894
- Joined: Mon Aug 06, 2012 12:33 pm
- Location: Lake Chatuge Hayesville, NC
- Contact:
Re: Fuel Tank Removal & Installation
Shop Manual Section 9, page 9-23 addresses fuel tank removal and installation. The 1964 Shop Manual Supplement, Section 3, page 2 covers removal of the stabilizer bar, which was a new addition to all 1964 Corvairs and is in the way when removing the fuel tank.
I have attached both Shop Manual sections for you to use to help you with the task.
I have attached both Shop Manual sections for you to use to help you with the task.
- Attachments
-
- 1964 Supplement - Chevrolet Corvair Shop Manual - Section 3 - Suspension.pdf
- 1964 Supplement - Chevrolet Corvair Shop Manual - Section 3 - Suspension
- (564.64 KiB) Downloaded 251 times
-
- 1961 Chevrolet Corvair Shop Manual - Section 9 - Fuel & Exhaust Systems.pdf
- 1961 Chevrolet Corvair Shop Manual - Section 9 - Fuel & Exhaust Systems
- (1.31 MiB) Downloaded 218 times
Brad Bodie
Lake Chatuge, North Carolina
1966 Corvair Corsa Convertible
Lake Chatuge, North Carolina
1966 Corvair Corsa ConvertibleRe: Fuel Tank Removal & Installation
Hello Brad, thank you for your quick and accurate response. I already saw and read the 1964 supplement and 1961 manual but they don't say too much about the bar. I hoped that unscrewing the center supports of the bar and loosening stamped brackets bolts was enough to move the bar down without removing it. I was wrong. Now I'm going to try to remove it but I'm wondering if it will move after the stamped brackets bolts are removed or should I open them somehow.
Re: Fuel Tank Removal & Installation
I completely unscrewed the stamped brackets of the stabilizer bar and I noticed they are in two pieces, then it was easy to remove them  . Here the answer to my doubts and why it was not enough to loosing them.
Re: Fuel Tank Removal & Installation
Hi. I read alot of your posts and have a couple of questions with the tank removal:
So I need to remove the stabilizer bar completely?
Once the strap is removed, will the tank drop low enough to undo the neck clamp?
If installing a new tank, is anyone soldering in a petcock to drain it?
So I need to remove the stabilizer bar completely?
Once the strap is removed, will the tank drop low enough to undo the neck clamp?
If installing a new tank, is anyone soldering in a petcock to drain it?
Re: Fuel Tank Removal & Installation
Bob, I changed the tank few months ago. You need to unbolt the stabilizer bar but it is quite easy. I was afraid that the bar was under tension but instead is easy to remove, without any effort. When the tank is free to move you should be able to disconnect the filler neck. I used an electric pump to empty the tank before dismounting.bobs1962 wrote:Hi. I read alot of your posts and have a couple of questions with the tank removal:
So I need to remove the stabilizer bar completely?
Once the strap is removed, will the tank drop low enough to undo the neck clamp?
If installing a new tank, is anyone soldering in a petcock to drain it?
Re: Fuel Tank Removal & Installation
I have done this job three times (don't ask why!). I know you have an LM but AFAIK the front suspension is very similar. On both LM and EM's at the factory the fuel tanks were installed prior to installing the front suspension, so go figure it's somewhat fidley to do this job with the suspension in place. Yes you do have to completely remove the front sway bar, its not difficult as stated above.
I painted my new tank with POR-15 after prepping it with the POR15 prep products. I also did the fuel filler neck. When I reinstall mine this time I will have the filler neck powdercoated. It got all scratched up on the way back in, despite properly doing the POR15.
I painted my new tank with POR-15 after prepping it with the POR15 prep products. I also did the fuel filler neck. When I reinstall mine this time I will have the filler neck powdercoated. It got all scratched up on the way back in, despite properly doing the POR15.
Nick
1964 Monza Spyder Convertible #435 - Rotisserie restored - SOLD ON BRING A TRAILER 4/30/2019 - Check out my restoration thread here: [corvaircenter.com]
Thanks to all the awesome CCF, CF, COG, and CORSA members who helped me with the restoration!
1964 Monza Spyder Convertible #435 - Rotisserie restored - SOLD ON BRING A TRAILER 4/30/2019 - Check out my restoration thread here: [corvaircenter.com]
Thanks to all the awesome CCF, CF, COG, and CORSA members who helped me with the restoration!
Re: Fuel Tank Removal & Installation
Thanks for the tips. I did the removal last night. Removing the sway bar was, indeed, a piece of cake. I, too, thought there'd be some ungodly tension on it.
While I was laying on my back jiggling the tank and filler neck, hoping it would drop low enough to undo any clamps, I felt the neck twisting. The twist was the hose tearing in half. Another good break. So everything is out.
I had planned on redoing all the brake lines and the fuel system. The gas tank had to be removed.
Are Clark tanks good? And I'm on the fence with the petcock-drain idea.
I'm about an hour west of Phila, PA if anyone wants to stop by. The fridge in the garage is always full.
I got some pics of the car on my camera, I'll have to get one and post it...
Re: Fuel Tank Removal & Installation
I see Clark's calls filler neck hose as special size. Does anyone know what size it actually is ?. Is it same size for all the year / model apps or is the large diameter different between models?OR what is diameter of metal fill pipe? I want to do some research first before I say why I'm asking?
Ross
Ross

Re: Fuel Tank Removal & Installation
I'm not telling.....it's a special size 
outside diameter >> 1.78 inches = 45 mm
inside diameter >> 1.35 inches = 35 mm
length = 3 inches (77 mm - or thereabouts)
and don't you dare try O'Reiley - they only sell it by the foot")
Regards,
Andy
outside diameter >> 1.78 inches = 45 mm
inside diameter >> 1.35 inches = 35 mm
length = 3 inches (77 mm - or thereabouts)
and don't you dare try O'Reiley - they only sell it by the foot
Regards,
Andy
Re: Fuel Tank Removal & Installation
The tank wasn't bad, but the hoses were. The next guy will find this to his liking. Don't be too pissed at me for doing this.
Also, I did install a plug in the bottom of the tank.
Whats the resistance value of the pot on the sending unit. Mine seems erratic and I'd like to replace just the resistor. I don't need (or want) a 55 dollar unit replacement, do I?
Also, I did install a plug in the bottom of the tank.
Whats the resistance value of the pot on the sending unit. Mine seems erratic and I'd like to replace just the resistor. I don't need (or want) a 55 dollar unit replacement, do I?
- Attachments
-
Re: Fuel Tank Removal & Installation
the sending unit is not available as a replaveable unit. try to clean it with brake cleaner. often that works. if you do re-use it. replace the filter sock. they are suposed to just press on but i have had them fall off. i use a small finger wipe of jb weld to secure them. jb weld does not get eaten by the fuel.bobs1962 wrote:The tank wasn't bad, but the hoses were. The next guy will find this to his liking. Don't be too pissed at me for doing this.
Also, I did install a plug in the bottom of the tank.
Whats the resistance value of the pot on the sending unit. Mine seems erratic and I'd like to replace just the resistor. I don't need (or want) a 55 dollar unit replacement, do I?
Sent from my SM-G930V using Corvair Forum mobile app