Hey y'all I thought I'd post a project thread. Maybe it'll help motivate me to do mor work.
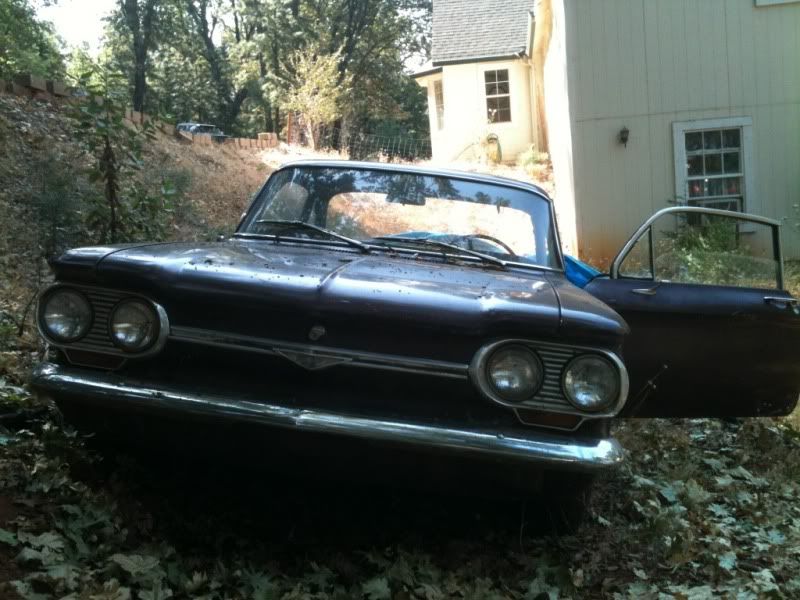
I got this car from my grandfather. It's been sitting for around ten years. It ran when it was parked. Mice have nested and torn up the carpet and seats. But she's mine. I posted some pics in my introduction thread. So far we dragged it out of the yard and onto some more stable ground. I picked up some used tires for 30 bucks to roll it around on. Took off the carbs and cleaned em. I was a little worried about reinstalling them, but it's all hooked back up. And sprayed a few pieces that were getting rusty. I still need to find keys for the ignition or get it rekeyed, sand and spray the floors, check and clean out the gas tank. Reinstall the starter and get a battery. But we're getting closer! I'll post pics as we go. Find a wife that'll work on the car with you. It's lots more fun! I'm hoping to have it drivable by spring.
Is there anyone in the area of Sacramento? I'd like to hear a Corvair running.
NorCal hoopty. 64 Monza Now with pics!
NorCal hoopty. 64 Monza Now with pics!
Last edited by DerekKim on Tue Jan 31, 2012 1:14 pm, edited 1 time in total.
Re: NorCal hoopty. 64 Monza
Pics to come when I can get on a computer.
Re: NorCal hoopty. 64 Monza
And now some pictures!
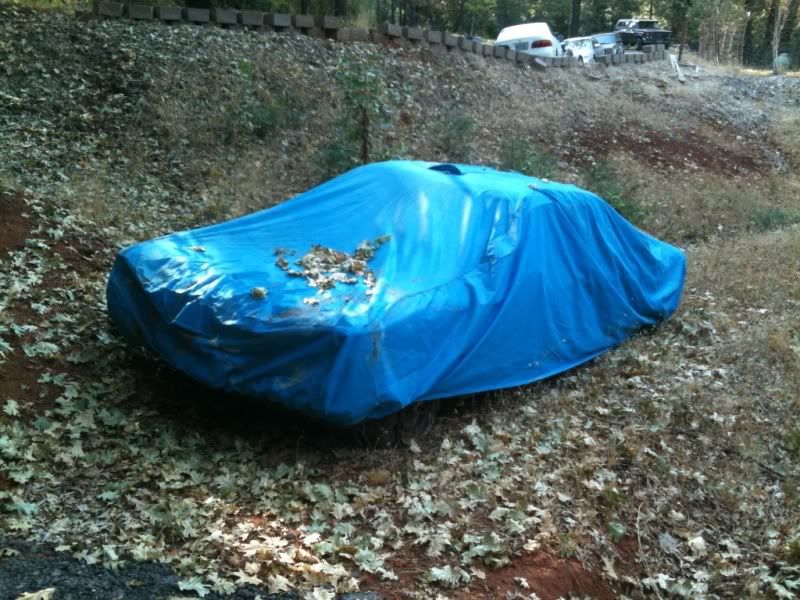
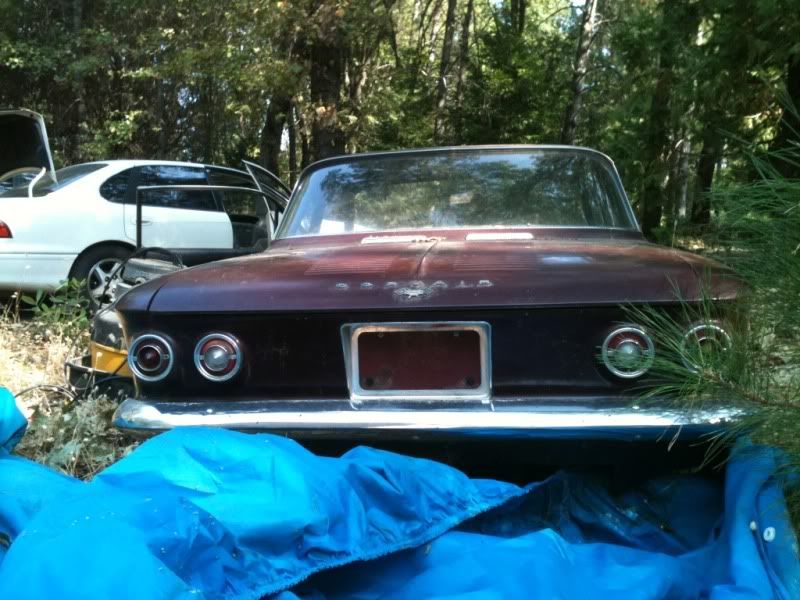
First glance. From day one when I started working on it again. Untarped and fell in love with it again.
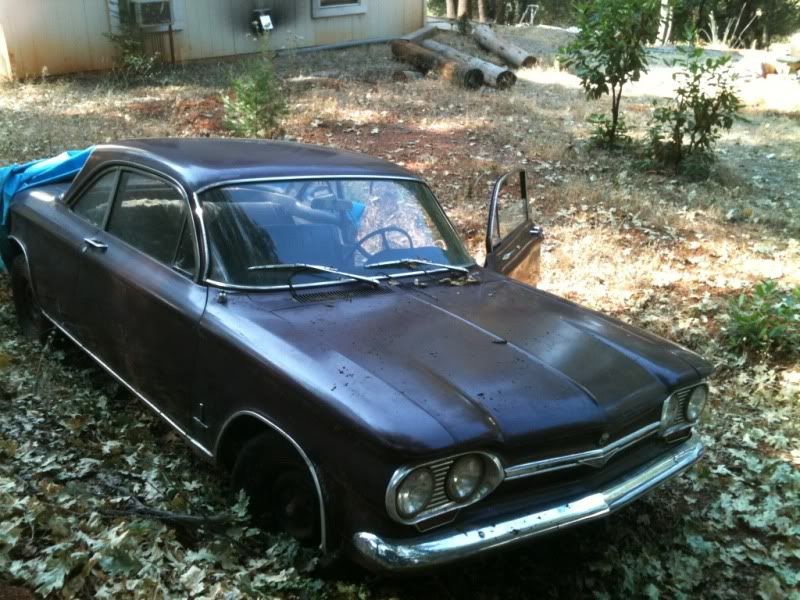
UP on jack stands to take off the old tires... turns out two of them held air. Returning one used tire and mounting two to replace the shredded two and it's rolling on it's own again! We also moved it out of the yard to another spot. Gonna get it on gravel soon so I can crawl under and re-install the starter.
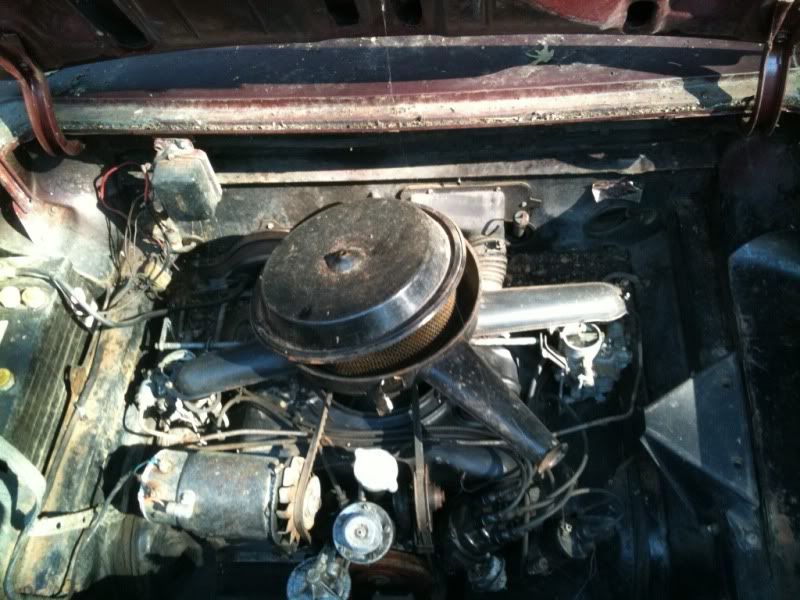
I also took off the carbs and cleaned them and sprayed the air intake with some rattle can to clean it up a bit.

I'm shooting soon to get back up there and get some more work done on it.
First glance. From day one when I started working on it again. Untarped and fell in love with it again.
UP on jack stands to take off the old tires... turns out two of them held air. Returning one used tire and mounting two to replace the shredded two and it's rolling on it's own again! We also moved it out of the yard to another spot. Gonna get it on gravel soon so I can crawl under and re-install the starter.
I also took off the carbs and cleaned them and sprayed the air intake with some rattle can to clean it up a bit.
I'm shooting soon to get back up there and get some more work done on it.
-
TikiRalf

- Corvair of the Month

- Posts: 621
- Joined: Tue May 24, 2011 1:07 am
- Location: Valkenswaard - Netherlands - Europe
- Contact:
Re: NorCal hoopty. 64 Monza Now with pics!
Some love - parts & tender and it will be back on the road, keep those pictures posted from the project !!!! ENJOY IT :-)

Re: NorCal hoopty. 64 Monza Now with pics!
Love is a powerfull motivator! Keep up the good work.
Jeremy (cad-kid)
Kronenwetter, WI (Central Wisconsin)
SOLD 9-2016 65 Monza 4spd/140
My 65 Monza thread
 My YouTube page
Kronenwetter, WI (Central Wisconsin)
SOLD 9-2016 65 Monza 4spd/140
My 65 Monza thread
Re: NorCal hoopty. 64 Monza Now with pics!
Well it's been a minute since I have worked on the corvair. I got tired of working on gravel. Have since moved and I now have a garage to work in. The wifey will be out of town for a week so I'll have time to work on it after school and work.
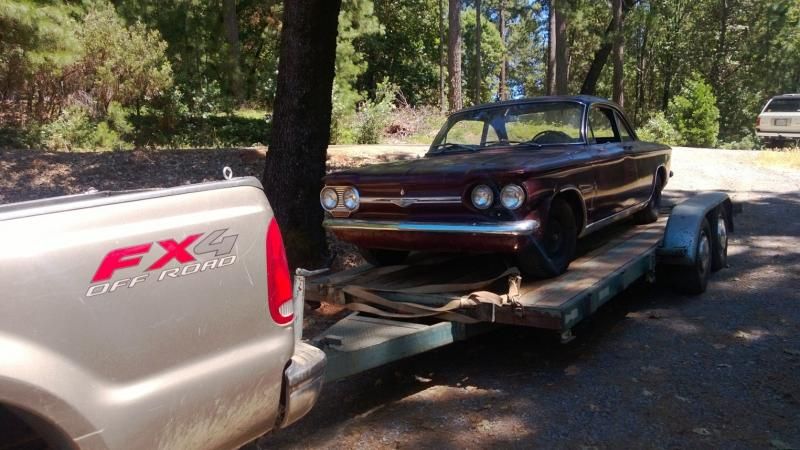
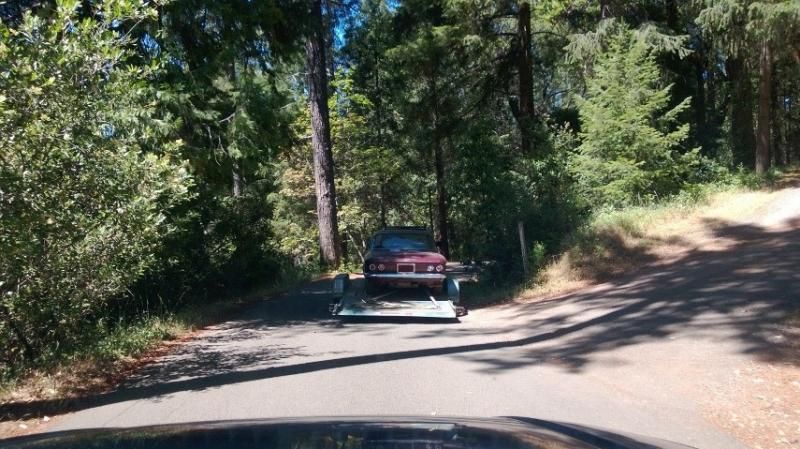
First time in 15 years on the road... Sort of...
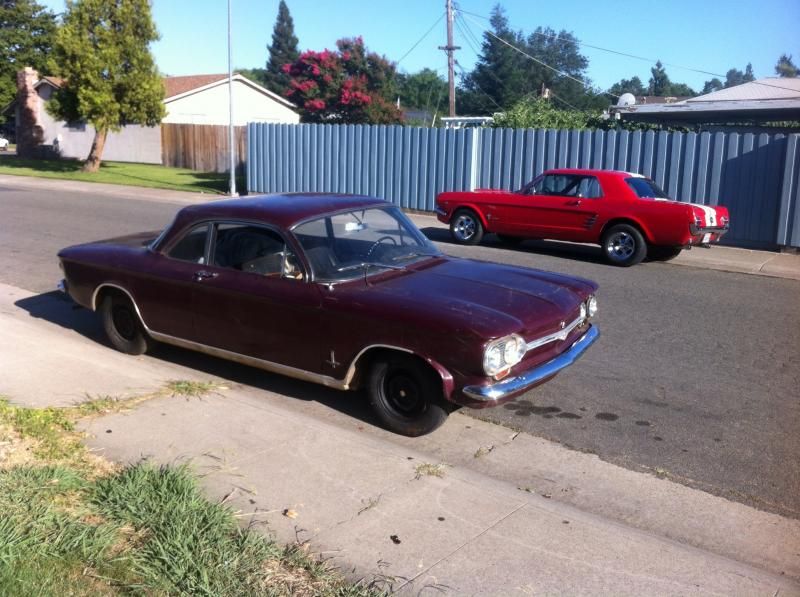
New home. That is my cousin's mustang.
First time in 15 years on the road... Sort of...
New home. That is my cousin's mustang.
Re: NorCal hoopty. 64 Monza Now with pics!
Some updates.
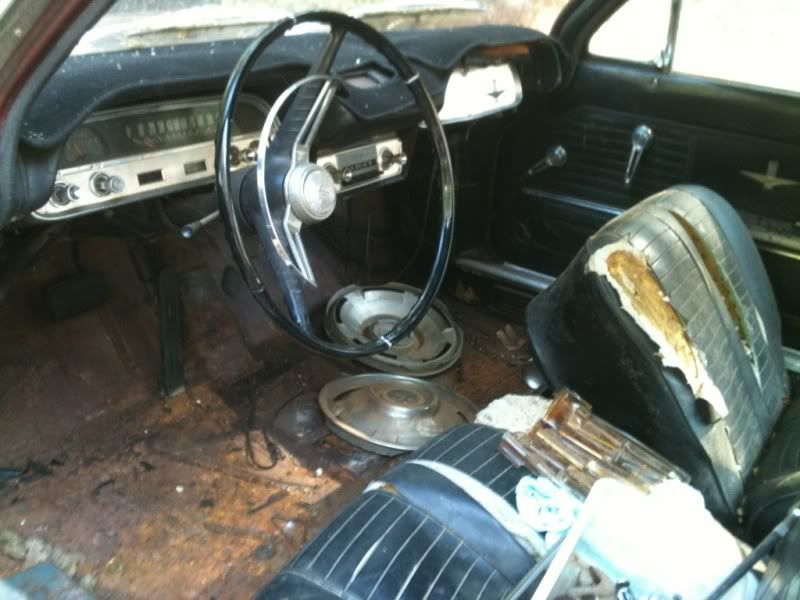
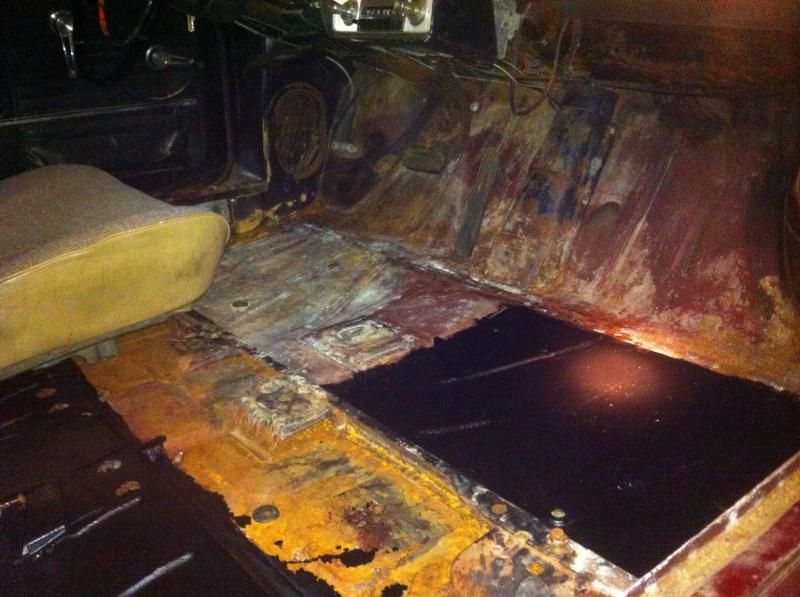
I drilled out the lock in the front trunk. It looks pretty good. Just lots of debris. Vacuumed and cleaned it all out. What is the mechanism to the left of the brake master?
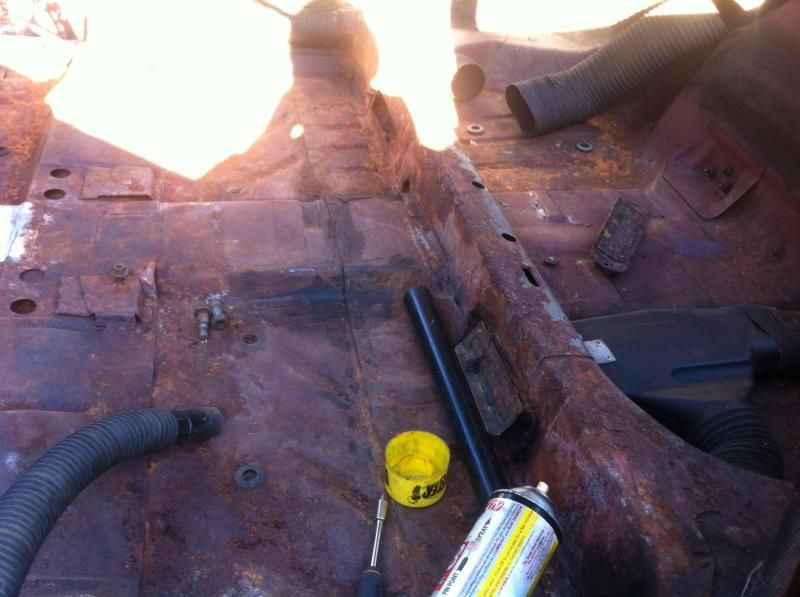
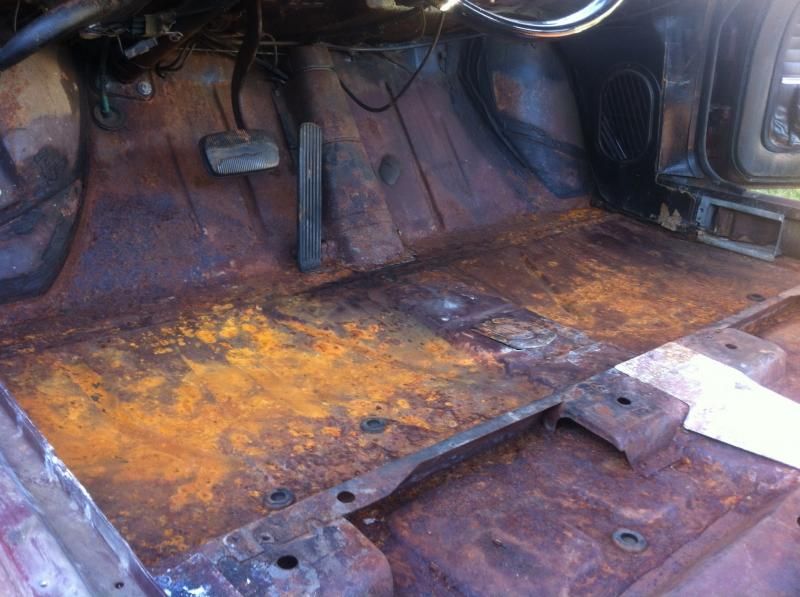
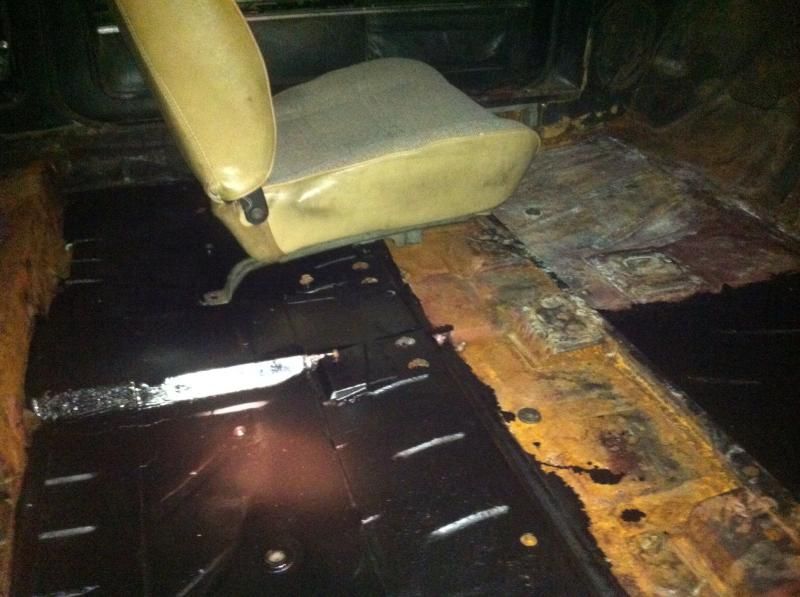
I also started on the floors. Took out everything I saw fit. POR 15'd what I could. I ran out of the stuff though. I am satisfied with the metal prep. I'm going to OSPHO the rest. I also test fitted the blazer seat I'm going to mount in. Feels great. Just have to make a spacer block under one tab. I'm going to vinyl spray it black. We are going to test run it this next week.
Before
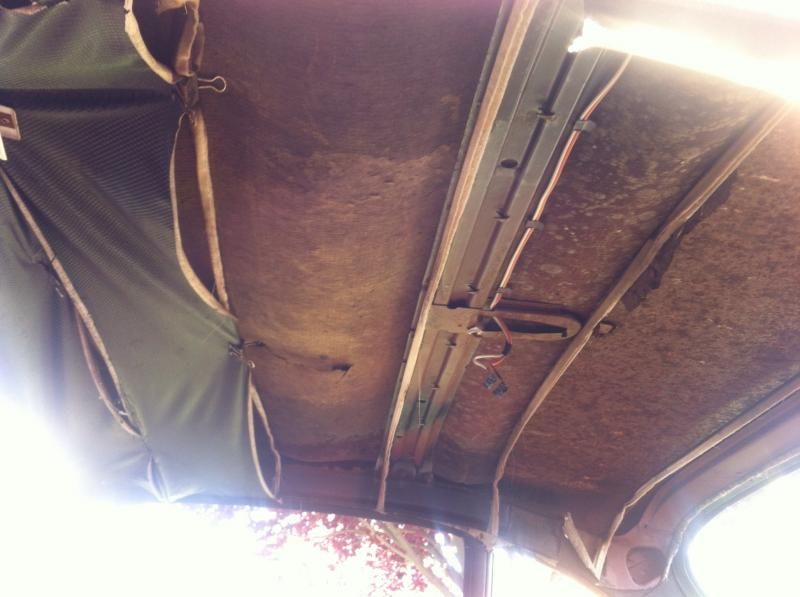
Still not sure what to do with the roof. Ides? I'm on a low budget.
After

This is my first car doing anything this major. It is a great learning experience.
I drilled out the lock in the front trunk. It looks pretty good. Just lots of debris. Vacuumed and cleaned it all out. What is the mechanism to the left of the brake master?
I also started on the floors. Took out everything I saw fit. POR 15'd what I could. I ran out of the stuff though. I am satisfied with the metal prep. I'm going to OSPHO the rest. I also test fitted the blazer seat I'm going to mount in. Feels great. Just have to make a spacer block under one tab. I'm going to vinyl spray it black. We are going to test run it this next week.
Before


Still not sure what to do with the roof. Ides? I'm on a low budget.
After


This is my first car doing anything this major. It is a great learning experience.
Re: NorCal hoopty. 64 Monza Now with pics!
Wow nice progress! And 
Scott
1960 Monza Coupe
1965 Evening Orchid Corsa Turbo (project)
1961 Rampside (project)
1964 Spyder coupe (patina car, running)
1964 faux Spyder (project/parts car)
1964 Monza (parts car)
1963 Monza (parts car)
1960 Monza Coupe
1965 Evening Orchid Corsa Turbo (project)
1961 Rampside (project)
1964 Spyder coupe (patina car, running)
1964 faux Spyder (project/parts car)
1964 Monza (parts car)
1963 Monza (parts car)
-
bbodie52

- Corvair of the Month
- Posts: 11897
- Joined: Mon Aug 06, 2012 12:33 pm
- Location: Lake Chatuge Hayesville, NC
- Contact:
Re: NorCal hoopty. 64 Monza Now with pics!
It looks like you are well on your way! The sound of the engine running is a great motivator, when you get to that point.DerekKim wrote:...I got this car from my grandfather. It's been sitting for around ten years. It ran when it was parked. Mice have nested and torn up the carpet and seats. But she's mine. I posted some pics in my introduction thread. So far we dragged it out of the yard and onto some more stable ground. I picked up some used tires for 30 bucks to roll it around on. Took off the carbs and cleaned em. I was a little worried about reinstalling them, but it's all hooked back up. And sprayed a few pieces that were getting rusty. I still need to find keys for the ignition or get it rekeyed, sand and spray the floors, check and clean out the gas tank. Reinstall the starter and get a battery. But we're getting closer! I'll post pics as we go. Find a wife that'll work on the car with you. It's lots more fun! I'm hoping to have it drivable by spring.
Is there anyone in the area of Sacramento? I'd like to hear a Corvair running.
I will try to address each of your comments or questions below. Also, this Corvair Forum link wil provide you with a list of useful Corvair websites:
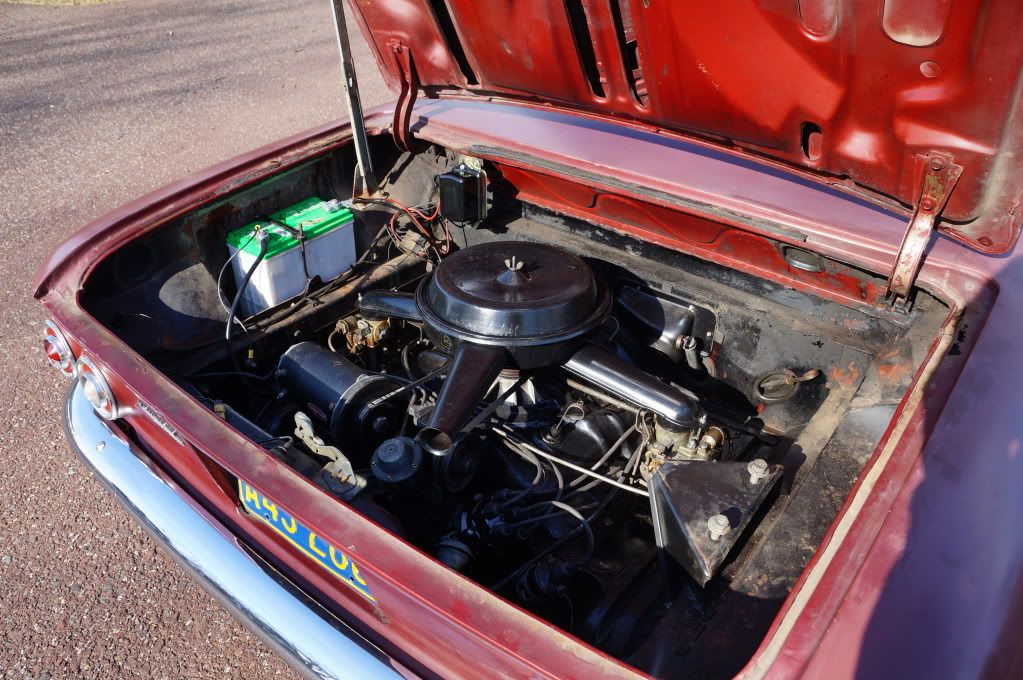
You wrote that you have had a problem with mice nesting in your car. It is not uncommon to have rodent nests appear uner the engine sheet metal, on the engine cooling fins. You may want to have a look, to ensure you don't have any nest buildups under the engine top shroud that could cause some overheating problems.
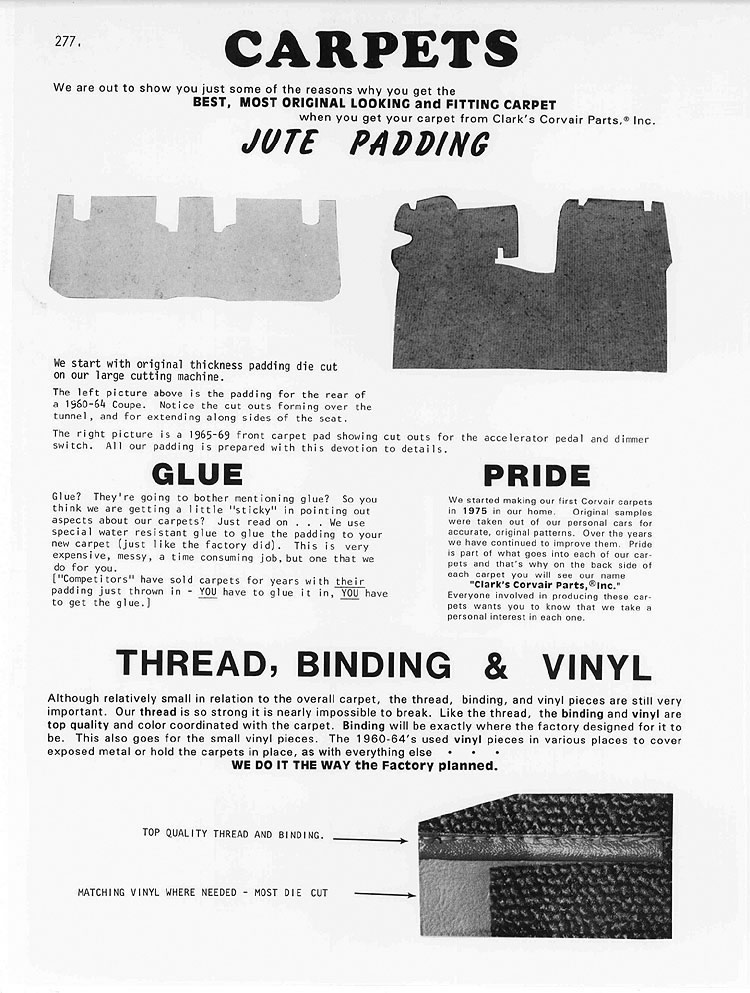
Clark's Corvair Parts is the best at providing reproduction upholstery and carpeting for you Corvair. Browsing their online catalog may give you some idea of just what is available. Click on any part number on the actual online catalog pages to view pricing iand ordering information. Pages 262-273 covers upholstery, and pages 277-282 describes carpet items. That should help you to undo the mouse and age damage to the interior.

I believe that on Early Model Corvairs a single key fits everything. You might remove the glove compartment door at take it to a locksmith. If he can read the existing code in the glove compartment door lock and make a key for it, it should also fit the ignition, doors and trunk. Key and lock information can be found on the following Clark's online catalog page...

Make sure you change out all the old fluids (automatic transmission fluid, engine oil, brake fluid). Check the old transmission fluid for a burned smell and brown discoloration. This can be an indication of problems with band and clutch slippage in the Powerglide transmission. Fluid quality and prober levels in the automatic transmission are critical. Do not overfill or underfill. The Powerglide has a good reputation for reliability, as long as the transmission fluid is properly maintained.
Dont try to start your engiine until the old contents of the fuel tank has bee purged. You don't want to draw whateve is in the fuel tank into the fuel lines, fuel pum or carburetors! It is common to have to replace an old, rusty fuel tank. If you r inspection leads you to that conclusion, see the following Corvair Forum link for detailed information on the fuel tank...
Brake fluid can soak up moisture from the air over time, which can lower the brake fluid boiling point (causing unexpected premature brake fade as the brakes get hot). Moisture in the brsake fluid can also cause rust and corrosion in the master cylinder, wheel cylinders, and steel brake lines. Replacement of the original single master cylinder with a dual master cylinder conversion is a good idea. Inspect all brake systems, cylinders, flexible brake lines, etc for signs of age-related damage, leaks, etc. Clark's can provide pre-bent brake lines, a dual master cylinder conversion kit, and all replacement components, as needed, starting around page 141-150A.

The Early Model 1961-1964 battery box is an odd size, and the original sized battery can be hard to fins and expensive. This information may help you to locate a suitable cheaper alternative...
It appears that the only difference between the Interstate MT-51R and the MT-51 is the location of the positive and negative battery terminals...
MEGA-TRON 51-R AUTOMOTIVE BATTERY 75 MONTHS 500 CCA

MEGA-TRON 51 AUTOMOTIVE BATTERY FIVE-YEAR PERFORMANCE 500 CCA

As shown in the picture below, the correct battery appears to be the Interstate MT-51R, which places the positive terminal correctly on the right when the battery is placed in the battery area with the terminals facing the engine.
 '
'There is a CORSA (Corvair Society of America) Corvair club chapter in Sacramento. You might want to contact them, attend some meetings, and get to know the "Corvair Locals". Talking with experienced Corvair Owners face-to-face can hel a lot in motivating you to work on your Corvair, and in teaching you more about them.
you might want to consider contacting a local chapter of CORSA (Corvair Society of America). There are a lot of CORSA chapters in California, and at least two of them are in the Sacramento area. We can provide assistance to some extent on the Corvair Forum, but there is nothing like face-to-face contact with local Corvair enthusiasts. Their expertise can help you a lot. They might even be willing to go with you to look over the Corvair you are considering. Their experienced eyes can provide a valuable assessment of the car, and give you a much better evaluation of the Corvair you are considering. This link will provide you with a list of CORSA chapters in your area:

CORSA (Corvair Society of America) Chapter Locator
Locating a local CORSA chapter near you can be very helpful, and attending meetings, parties, Corvair shows, etc. can greatly add to the enjoyment of your Corvair
https://www.corvair.org/index.php?optio ... crmSID=3_u
CORSA Chapter Locator - Classic Corvairs of River City
Sacramento, California
Mailing Address: Classic Corvairs of River City, c/o: Larry Forman, 6300 Surfside Way, Sacramento, CA 95831
CLUB OFFICERS
President: Chris Medeiros, Phone: 916-992-3198
Vice President: Carl Funk, Phone: 916-783-5070
Treasurer: Finn Halbo, Phone: 530-747-6323
Secretary: Bill Moore, Phone: 530-333-2063
Membership: Larry Forman, Phone: 916-216-9801
Historian: Christy Barden, Phone: 530-263-1001
Editor: Harry Spence, Phone: 530-272-5239
For information please call or Email Larry Forman (916) 216-9801 or Cell (916) 216-9801
Email: larry@forman.net
And finally...
DerekKim wrote:What is the mechanism to the left of the brake master?
Having the proper reference materials – including the factory shop manual – is important. You can download all of these references at no cost onto your computer in Adobe Reader format from the links below. You can then read through the procedures and print the appropriate pages that you will need to refer to as you go through the procedure on your Corvair. Of course, you can also purchase hard copies of the shop manual from Clark's Corvair Parts or other sources. I hope you will find some useful references at these websites to add to your personal technical library.
The first link I listed above will provide you with the URL addresses for downloading these valuable Corvair references.
Last edited by bbodie52 on Mon Jun 24, 2013 4:42 pm, edited 2 times in total.
Brad Bodie
Lake Chatuge, North Carolina
 1966 Corvair Corsa Convertible
Lake Chatuge, North Carolina
1966 Corvair Corsa Convertible-
bbodie52
- Corvair of the Month
- Posts: 11897
- Joined: Mon Aug 06, 2012 12:33 pm
- Location: Lake Chatuge Hayesville, NC
- Contact:
Re: NorCal hoopty. 64 Monza Now with pics!
With regard to contacting other Corvair owners in the Sacramento area, you might follow this link to read an article about Corvair of the Month winner TonyL and his Corvair. He lives near Sacramento, in Yuba City, and may be able to answer some of your questions about Corvair activities in the Sacramento area. After looking over the article, you can scroll down and click on the link for TonyL and send him a Private Message (PM) to ask your Corvair-related questions. He might have some suggestions about Corvairs in the Sacramento area.
viewtopic.php?f=15&t=626&p=12332&hilit= ... ing#p12332
viewtopic.php?f=15&t=626&p=12332&hilit= ... ing#p12332
Brad Bodie
Lake Chatuge, North Carolina
1966 Corvair Corsa Convertible
Lake Chatuge, North Carolina
1966 Corvair Corsa ConvertibleRe: NorCal hoopty. 64 Monza Now with pics!
Lots and lots of reading to do! I'm on a real low budget. I'm just trying to enjoy it until I get out of college, but I'm gonna do as much as I can. Thanks for the fluid change idea. I think I'm gonna flush all the fluids before I try to start it. I may wait a week or two to try and start it. I'll try to keep the updates going. I ran Ito a guy from river city corvairs. Having corvair local buddies is going to be amazing. Thanks for the info!
Re: NorCal hoopty. 64 Monza Now with pics!
Well unfortunately I'm in school for the summer and working so time is a little shorter. I managed to get into the garage and finish grinding the floors, and sprayed down the ospho. It's already turning. I'll probably paint on Wednesday, then mount up the seats. After that I'm going to work on getting it turned over by hand and firing it up.
Re: NorCal hoopty. 64 Monza Now with pics!
you wrote "After that I'm going to work on getting it turned over by hand and firing it up"
I may have missed it somewhere but does the motor not turn by hand? If not you need to pull the plugs and put
some kind of oil or trans. fluid in there and let it soak, then try to turn it. GOOD LUCK Jimbo
I may have missed it somewhere but does the motor not turn by hand? If not you need to pull the plugs and put
some kind of oil or trans. fluid in there and let it soak, then try to turn it. GOOD LUCK Jimbo
Re: NorCal hoopty. 64 Monza Now with pics!
I'm trying to do the process in some sort of order. So I'm going to pull the tin to make sure there are no nests, replace the plugs, and turn it over by hand. Does it matter which way I rotate it?
Re: NorCal hoopty. 64 Monza Now with pics!
I did a little bit of searching, but I couldn't find exactly what I was looking for. What all needs to be removed/ unbolted to get the top tin off? Is it a fairly quick process or should I expect it to take a few hours the first time?
-
bbodie52
- Corvair of the Month
- Posts: 11897
- Joined: Mon Aug 06, 2012 12:33 pm
- Location: Lake Chatuge Hayesville, NC
- Contact:
Re: NorCal hoopty. 64 Monza Now with pics!
Also, when reinstalling the top shroud attachment bolts, remember that they are screwed into soft aluminum threads. Be careful not to cross-thread or over-tighten them.When disconnecting steel brake lines, it is often best to use flare nut wrenches, as shown in the picture below. You cannot use a box-end wrench, because there is no way to get it over the brake line (unless you cut the line). Also, a standard box-end wrench is a 12-point design that grips only the corners of the fitting. A flare nut wrench, like a six-point socket, uses fewer flat surfaces that provide a better grip – distributing the pressure more-evenly on the fitting surfaces. And a standard open-end wrench may slip and damage the flat sides of the brake line fitting. A flare-nut wrench provides the best-possible grip and is least-likely to round-off or damage the brake line fitting.

For top shroud removal and installation procedures, see page 6a-14 of the attached Corvair Shop Manual section. In addition, the opening pages of the 1964 Supplement - Chevrolet Corvair Shop Manual - describes removing the carburetors and linkage as an assembly and then removal of the top sheet metal.
When you reassemble things, be sure you reconnect the spark plug wires to the correct spark plugs.
You may also want to review the following reference for potential vacuum leak areas. Check all vacuum hoses and connections to make sure they are not brittle or split, and check the condition of the gaskets and insulators at the base of each carburetor. If anything is old, cracked or in poor condition you may want to order replacements from Clark's Corvair Parts or some other source listed on the last link below.
CHECK FOR VACUUM LEAKS (Diagram)
Having the proper reference materials – including the factory shop manual – is important. You can download all of these references at no cost onto your computer in Adobe Reader format from the links below. You can then read through the procedures and print the appropriate pages that you will need to refer to as you go through the procedure on your Corvair. Of course, you can also purchase hard copies of the shop manual from Clark's Corvair Parts or other sources. I hope you will find some useful references at these websites to add to your personal technical library.
Common and Useful Corvair Websites
- Attachments
-
- 1961 Chevrolet Corvair Shop Manual - Section 6a - Engine.pdf
- 1961 Chevrolet Corvair Shop Manual - Section 6a - Engine
- (3.53 MiB) Downloaded 53 times
-
- 1964 Supplement - Chevrolet Corvair Shop Manual - Section 6a - Engine.pdf
- 1964 Supplement - Chevrolet Corvair Shop Manual - Section 6a - Engine
- (1.6 MiB) Downloaded 56 times
Brad Bodie
Lake Chatuge, North Carolina
1966 Corvair Corsa Convertible
Lake Chatuge, North Carolina
1966 Corvair Corsa Convertible