Removing Corvair Cylinder Heads

Need to know how? Want to show how?
User avatar
bbodie52
Corvair of the Month
Posts: 11981
Joined: Mon Aug 06, 2012 12:33 pm
Location: Lake Chatuge Hayesville, NC
Contact:

Removing Corvair Cylinder Heads

Post by bbodie52 »

:dontknow: :doh:

:helpsos: Removing Corvair cylinder heads can sometimes be a real pain! I wrote some comments about this on the CORSA Facebook Web site, in response to another Corvair fan who was about to tear down his first Corvair engine (dirty and well-worn) and was asking for some tips. I felt that what I wrote might be useful here too, so, for what it's worth, here it is...

One engine dis-assembly problem area I discovered in my first engine tear-down was with the upper cylinder head nuts (above the valve cover area and under the intake manifold). Years of exposure, heat and rust can make them hard to remove. The heat can also soften the metal, and the nut can easily "round off" if the socket slips. Once the flat surfaces round off the nut it is very hard to remove! :pray: I recommend using a good-quality six-sided socket to remove these nuts, rather than a 12-point socket that has less surface-area to "grab" each flat surface on the head nuts. The latter 12-point sockets are more-likely to slip or damage the soft nuts and round them off.

A six-point socket usually gives a better grip on a bolt head than a 12-point socket.
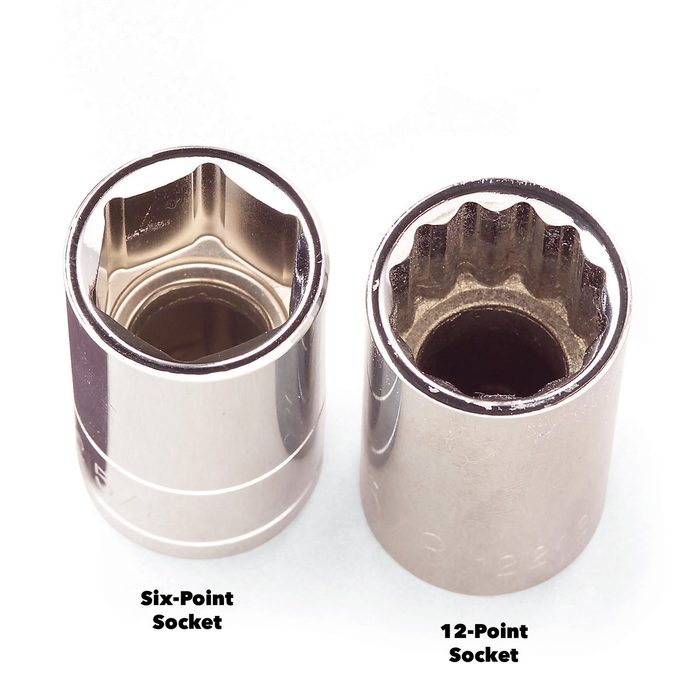
Image

:banghead: If a nut does become damaged, I've found two methods to remove the damaged nut. Both methods will destroy the stud that protrudes from the engine case, so that stud will later have to be removed and replaced. Since access to most of these nuts is limited under the intake manifold, it is hard to split the nut and chisel it off with a hammer and chisel. However, you can try center-punching the center of the stud (to guide the drill bit and keep it centered when you start drilling), and then using a drill bit that is about the diameter of the stud to drill-out the center of the stud within the nut. (Sometimes it might work better if you start with a smaller drill bit to drill a "pilot hole", and then move up to a drill bit that is approximately the same diameter as the stud threads.) Once you have "hollowed-out" the material within the center of the nut (to the depth of the nut) a chisel can be used to knock off the nut from the end of the damaged stud. The other method of removal uses a hacksaw blade. (A hacksaw frame will not fit in the cutting area near the cylinder barrel). Tape one end of the blade to protect your hand, and perhaps wear a protective glove. Then cut the stud where you can get to it in the area between the cylinder head and the engine cases. A whole-lot of short strokes with the hacksaw blade will (eventually) cut through the stud to allow you to finish removing the head. Once the head and cylinder barrels have been removed, the damaged stud can be carefully extracted and unscrewed from the cases with a stud removal tool. Cutting the stud or drilling and chiseling the nut is no real fun, so try to carefully remove each nut with a six-point socket in the first place and hopefully you will be able to remove all of the head nuts without damaging them. Using new, high-quality head nuts for reassembly later might also be a good idea!

Another contributor wrote: "As for Brad's comments and suggestions on the head nuts- these were a complete PITA to get off on my car. I removed the head while it was still in the car, making the task all the more difficult. I ended up hammering them w/a 3lb. sledge and various chisels, splitting them. DO THIS RATHER THAN LETTING THE HEAD STUD TURN! They tell you that only if no other choice exists or your stud breaks, as mine did, do you remove these head studs. Let the nuts soak in PB blaster and Kroil for a few days, reapplying every few hours. As for all the parts,- 'tag'em and bag'em' -DO THIS, because you will for sure forget where stuff went. Good luck"

My final comment was as follows:

:fingerscrossed: It's just a theory, but when removing the heads it might help to remove the lower row (under the rocker arms) before removing the upper row of nuts. This MIGHT have the effect of reducing tension on the upper row by eliminating the torque and tension on the lower part of the cylinder head FIRST. This might have the effect of reducing tension on the upper row of nuts by allowing the head to tilt just slightly -- forced by the already existing tension on the upper row. This might make it easier to remove the upper nuts, if less tension is being applied against the threads on top. Once the lower row has been removed, use a six-point socket to carefully remove the upper row of nuts. (The lower row is usually easier to remove because they are made of a hardened steel and are larger in size than the top row. Also, there will be no rust to deal with on the lower row.) You will need a deep, six-point socket for the bottom row. :checkeredflag:


NOTE: Heat-treated replacement nuts, acorn cap nuts, and anti-seize compound are all listed on the following Clark's Corvair Parts online catalog page (13).

:link: https://ssl.corvair.com/user-cgi/catalo ... ow_page=13
Brad Bodie
Lake Chatuge, North Carolina
Image 1966 Corvair Corsa Convertible
larry202br
Posts: 92
Joined: Wed Sep 15, 2010 2:54 pm

Re: Removing Corvair Cylinder Heads

Post by larry202br »

Would a six-point and an impact wrench be best?
User avatar
bbodie52
Corvair of the Month
Posts: 11981
Joined: Mon Aug 06, 2012 12:33 pm
Location: Lake Chatuge Hayesville, NC
Contact:

Re: Removing Corvair Cylinder Heads

Post by bbodie52 »

I would not recommend an impact wrench for that job! The problem is not that the nuts are so tight that it would take an impact wrench to get them off (by repeatedly banging away to turn the nut). The problem is that the nuts are not really heat treated or hardened. If anything the years of exposure to engine heat and rust makes them more-prone to rounding off the corners on the six flats. A 12 point socket has an increased number of flats to make it easier to remove a socket and reapply it without having to rotate the wrench very much in a tight working area. The drawback with a 12 point socket is that it "grabs" less surface area of the nut. It really only applies pressure to the corner of each "flat" on the nut. A six point socket is a more-exact fit for the six-sided nut, so the pressure applied is distributed more evenly on each flat surface and the socket is less-prone to slip or round-off the corners of the nut.

The other problem is that the threads of the stud protrude past the fully-tightened nut, and are exposed to rust and dirt damage. The dirty, rusty threads almost seem to "weld" the nut in place. Soaking the exposed threads with WD-40 and brushing the exposed threads and nut with a wire brush or a rotary wire brush attachment on an electric drill prior to removal may help to get the nut to "break loose" and rotate.

I would try a six-point deep socket, or a standard six-point socket with a short extension and carefully, slowly apply counter-clockwise pressure while attempting to maintain proper alignment with the nut. Hopefully it will break free and unscrew. Sometimes the entire nut and stud will turn. If that happens just keep going and unscrew the nut/stud combination from the engine cases and try to separate the nut from the loosened stud later. You may end up having to replace the stud if the nut and stud threads are too badly rusted or damaged.

Anti seize compound will help prevent threads from rusting and seizing. Clark's sells this anti seize compound, the proper heat-treated replacement nuts, and also sells an acorn nut that they recommend to "cap" the end of the stud on top of the primary nut (to protect the threads that protrude and are normally left exposed to rust). Clark's recommends replacing the top row of head nuts every time they are removed, and installing new nuts with anti seize compound, proper torque, and an acorn nut to cap and protect the threads. :chevy:
Brad Bodie
Lake Chatuge, North Carolina
Image 1966 Corvair Corsa Convertible
mart
Posts: 928
Joined: Tue Sep 14, 2010 9:55 am

Re: Removing Corvair Cylinder Heads

Post by mart »

I would not recommend the use of anti seize compound on nuts/bolts that need to be torqued ,as the lubrication effect will cause over tightening even though your torque wrench says its OK ,heat from the engine will then burn away the compound and leave you with over tightened nuts in the case of the cylinder heads. Its much the same way with restrictive, dirty threads which will cause you to under tighten .Manufacturers torque settings are based on clean, dry components. I tend to use a small amount of engine oil applied with a rag just to ease the threads on old parts, but new parts are always done dry. The manufacturers dont factor in the fact they need to come apart .
User avatar
bbodie52
Corvair of the Month
Posts: 11981
Joined: Mon Aug 06, 2012 12:33 pm
Location: Lake Chatuge Hayesville, NC
Contact:

Re: Removing Corvair Cylinder Heads

Post by bbodie52 »

:goodpost:

This does bring up a good point. I attempted to research this further via Google, and after browsing through seven screens of opinions, data, theories, etc. the consensus is unclear. It does appear that the lubricating properties of anti seize compound does reduce torque friction and increase the possibility of applying too much stretching torque to a given fastener. In the case of Corvair cylinder head nuts, potentially increasing tension on the studs and the anchoring aluminum threads in the engine cases beyond design specs because of the application of anti seize compound to the threads would be a bad idea.

The original goal was to lubricate the threads with anti seize compound with the intent of preventing rusting and corrosion damage to the exposed stud threads. But if using the anti seize compound increases the probability of over-torquing the studs, the protective coating could actually result in damage to the engine!

Perhaps the best compromise to prevent rusting exposed threads would be the use of the acorn nuts suggested by Clark's Corvair Parts, and NOT using anti seize compound on these threads at all. Torquing the NEW cylinder head nuts onto clean, dry threads using a good torque wrench will meet the original GM factory specification conditions. Then installing an acorn nut on the end of the remaining exposed stud threads will eliminate exposure of the threads to water, dirt, rust, etc. so that future removal of the upper row of cylinder head nuts from clean fastener threads will be improved, without risking overtightening the head nuts when they are installed, due to the lubricating properties of anti seize compound.

I would still use anti seize compound on all bolts that are screwed into aluminum threads, and perhaps on non-critical exposed threads like those used on the exhaust manifold to attach mufflers. But on cylinder head nuts? Probably not a good idea due to the risk of over-tightening these nuts.
Brad Bodie
Lake Chatuge, North Carolina
Image 1966 Corvair Corsa Convertible
mart
Posts: 928
Joined: Tue Sep 14, 2010 9:55 am

Re: Removing Corvair Cylinder Heads

Post by mart »

I would apply this theory to any tapered items too, like VW bug rear hubs, which have been known to split when tightened to the correct torque because of anti seize or grease applied to the taper reducing the torque friction.
larry202br
Posts: 92
Joined: Wed Sep 15, 2010 2:54 pm

Re: Removing Corvair Cylinder Heads

Post by larry202br »

My GM manual recommends anti-sieze on all threads in dis-similar metals.
mart
Posts: 928
Joined: Tue Sep 14, 2010 9:55 am

Re: Removing Corvair Cylinder Heads

Post by mart »

larry202br wrote:My GM manual recommends anti-sieze on all threads in dis-similar metals.
the head stud and nut are both steel , does it mention head studs into Corvair aluminium block specifically,or is it a modern GM manual? maybe thats an exception to the rule? My 5 year training under the watchfull eye of Ford UK was carried out when aluminium was rarely used in engines, and never used in stressed items like engine blocks , the material was too troublesome at the time. Nowadays , Im guessing modern materials are better quality. I would have thought using some sort of loctite would be reccomended in use with studs screwed into aluminium to prevent them turning / stripping when the nuts at the other end are torqued.....this of course makes removing them a nightmare...You must do as you think best
User avatar
bbodie52
Corvair of the Month
Posts: 11981
Joined: Mon Aug 06, 2012 12:33 pm
Location: Lake Chatuge Hayesville, NC
Contact:

Re: Removing Corvair Cylinder Heads

Post by bbodie52 »

:chevy: :tu: This video by Dave Motohead does a great job in illustrating the installation of a Corvair Cylinder Head. It is loaded with great tips and good practices!

Replacing a Corvair Head/Cold valve adjustment/compression check
:link: https://www.youtube.com/watch?v=NmqHUNFtFno

Brad Bodie
Lake Chatuge, North Carolina
Image 1966 Corvair Corsa Convertible
User avatar
UNSAFE
Corvair of the Year
Corvair of the Year
Posts: 2006
Joined: Fri Dec 11, 2009 1:19 pm

Re: Removing Corvair Cylinder Heads

Post by UNSAFE »

Lube the nuts !!!!!!!!!!!!!!!!!!!!!!!!!!!!!!!!!!!!!!!!!!!!!!!!!! Without lube you will get an inaccurate torque reading .

The nuts and studs may be steel but the head that the nuts seats on is aluminum and two dissimilar metals especially in a place that gets wet will cause electrolysis which corrodes the parts .

Same principle as a battery .

You can get non-copper anti-seize . Use motor oil if nothing else .

I use anti-seize on the head nuts and have never noticed it being burnt off when I dis-assembled it .

Even if it did I can't see how that could change the torque ?

Never use an impact wrench to remove head nuts !!!!!!

When possible - hold the stud with vise grips to prevent turning which will quickly auger out the case threads .

I stop at 32 Ft Lbs on head nuts !
Kevin Willson
1965 Monza 3.1
Juneau Alaska
Post Reply

Return to “DIY - Explanations and Demonstrations”