Corvair Lakewood 61 - NL

Re: Corvair Lakewood 61 - NL
It's been so long ago, but I remember something about having to polarize the generators when they had been out and were put back. Something about grounding a wire? I'm sure some first genner here knows. Dennis
-
bbodie52

- Corvair of the Month

- Posts: 11981
- Joined: Mon Aug 06, 2012 12:33 pm
- Location: Lake Chatuge Hayesville, NC
- Contact:
Re: Corvair Lakewood 61 - NL
The recommendation on how to polarize a charging system is the following: After the installation of a battery, generator or voltage regulator follow these procedures. The terminals on the voltage regulator are labeled with letters and this is where you will do the polarizing procedure. Both of the components will have battery power so do not start the vehicle or turn on the ignition switch before polarizing them. You will need a small piece of wire fourteen or sixteen gauge with alligator clips on the ends. Find the "Batt" terminal on the regulator and attach one of the alligator clips, find the "Armature" terminal and touch the terminal with the other alligator clip. You can touch the terminals a few times and it will produce a soft light spark.
Under no circumstances touch the "Field" terminal or any other part of the regulator or you could damage the regulator.
http://www.vv.corvair.org/pipermail/vir ... 13475.html
IT IS IMPORTANT TO POLARIZE A NEW GENERATOR BY FOLLOWING THE PROCEDURES IN THE CORVAIR SHOP MANUAL. THIS PROCEDURE IS DESCRIBED ON PAGE 8-18 OF THE ATTACHED SHOP MANUAL SECTION. This polarizing procedure applies ONLY to vehicles equipped with a GENERATOR. It does not apply to vehicles equipped with an alternator.What you want to do is polarize the generator. If in fact it ran with reverse polarity, everything should be fine after this process. You should not have damaged anything yet.
With key off, use a piece of 14 gage or larger wire to jump between the battery and armature terminals of the voltage regulator. I am at work without a shop manual, so I forget the actual writing on the terminals. BUT, it is the top and middle terminal on Corvairs (with the regulator mounted stock position, red wires on top terminal).
It will spark! Hold for 1 or 2 seconds. The wire may also get warm, be prepared.
Start engine again and check for red light going out.
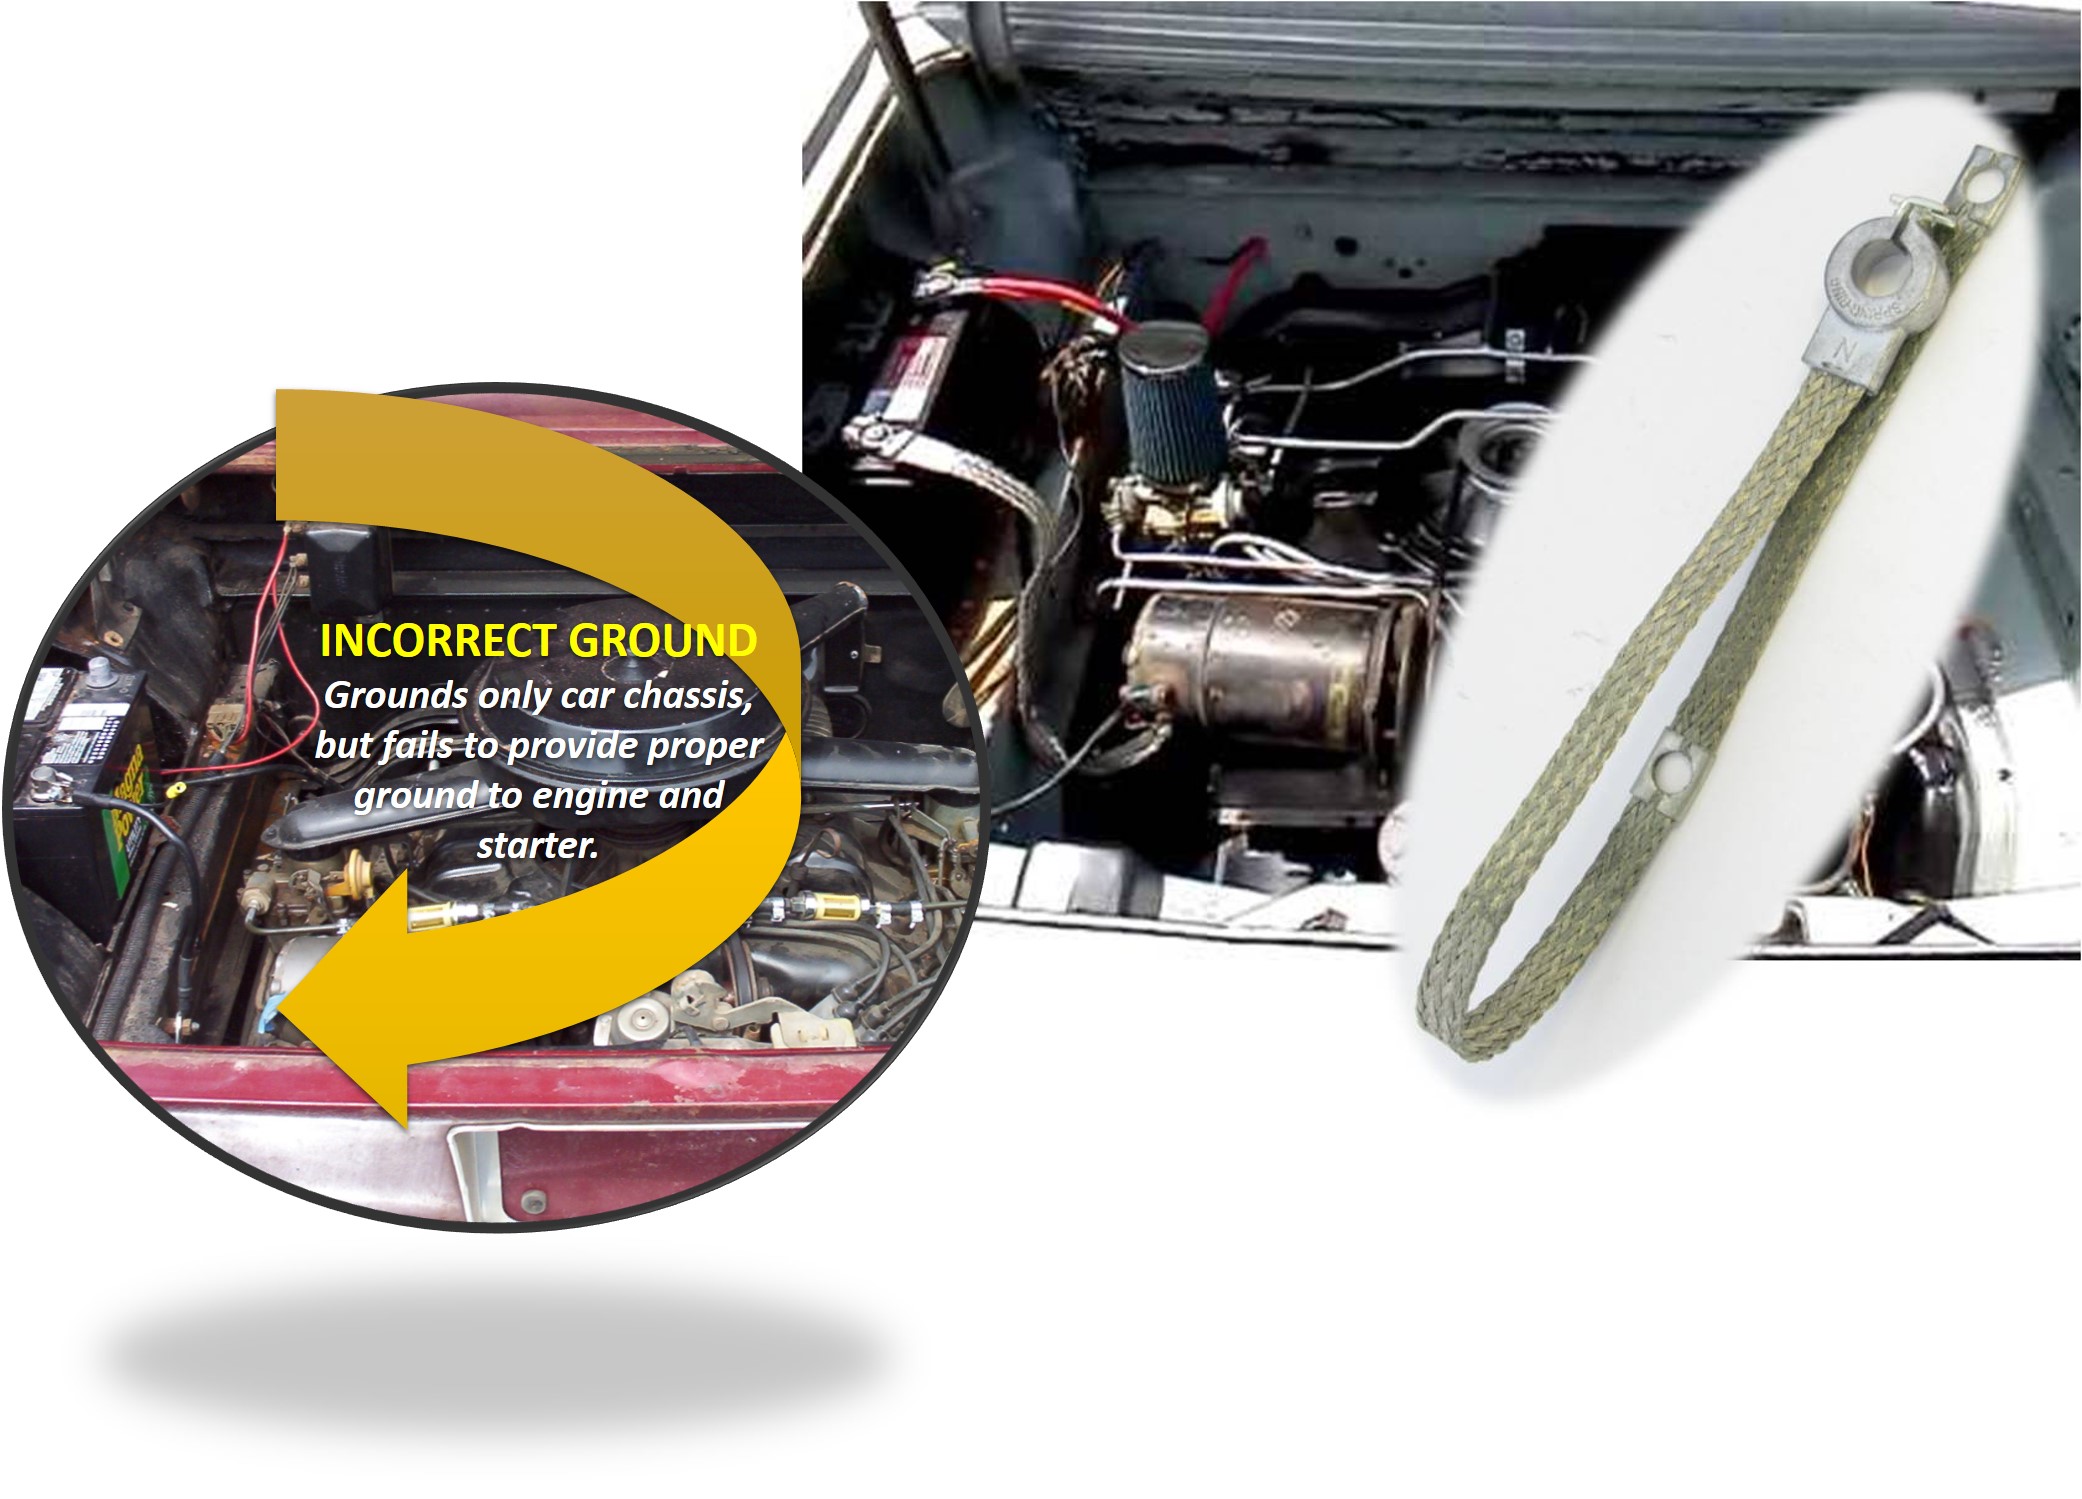
Ensure that the ground cable is attached to BOTH the car chassis AND the engine, as shown in the diagrams below. The engine and transaxle are physically and electrically isolated from the car chassis because of the three rubber engine mounts. If a single battery ground cable is only connected to the chassis, the starter, generator and engine may not be adequately grounded. This could cause starter or generator problems.
Brad Bodie
Lake Chatuge, North Carolina
 1966 Corvair Corsa Convertible
Lake Chatuge, North Carolina
1966 Corvair Corsa ConvertibleRe: Corvair Lakewood 61 - NL
Thank you. That clears it up. Been a LONG time ago. Dennis
-
TikiRalf

- Corvair of the Month
- Posts: 622
- Joined: Tue May 24, 2011 1:07 am
- Location: Valkenswaard - Netherlands - Europe
- Contact:
Re: Corvair Lakewood 61 - NL
It is working 
Finaly, after checking all the wires, we switched 2 of the wires at the Generator.
We made better ground
And we bought a new Voltmeter to check what the volts are doing on the battery, the old voltmeter was not reliable we figured out. But with the new one, we hit good charging volts!
It took some times but it is done, me happy, back to the to do list!
-
TikiRalf
- Corvair of the Month
- Posts: 622
- Joined: Tue May 24, 2011 1:07 am
- Location: Valkenswaard - Netherlands - Europe
- Contact:
Re: Corvair Lakewood 61 - NL
Yeahhhhhh the steering wheel is in.
All restored and painted (multiple times).
The cone of the steering wheel was not cooperate with us. It was done painted well and than we dropped it about 1,5 feet. It looked like a truck run over it. Back to make it all round again, again paint it and hopefully done. The paint dried up crap (it was the same paint). so we removed the paint again, and did it again. this time all went well and the finishing result are the pictures below. Also the Horn, and blinker lights are working. Another thing of the list, one down more to go!
This was how it looked before. We sanded it down, fill the cracks, made the steering wheel in shape again, primer, paint and clear coat. The cone 3 times
*i dont know why this picture is showing upside down, just click on it, and it enlarge good
Thank you
All restored and painted (multiple times).
The cone of the steering wheel was not cooperate with us. It was done painted well and than we dropped it about 1,5 feet. It looked like a truck run over it. Back to make it all round again, again paint it and hopefully done. The paint dried up crap (it was the same paint). so we removed the paint again, and did it again. this time all went well and the finishing result are the pictures below. Also the Horn, and blinker lights are working. Another thing of the list, one down more to go!
This was how it looked before. We sanded it down, fill the cracks, made the steering wheel in shape again, primer, paint and clear coat. The cone 3 times
Thank you
Re: Corvair Lakewood 61 - NL
Nice job.
A buddy used JB Weld cauld in the tube to fill the cracks and it didn't hold up. I grind out all the old loose plastic, then fill with the old liquid JB Weld (you have to use tape to make dams to hold it in place) then after a couple days I sand it down. So far it has held up very well, no cracks.
Some paints won't hold up to the skin oil from one's hands. I found using a base coat, the painting over with a two part urethane automotive clear coat is very durable and has ultraviolet ray resistance so it won't discolor in the sun over the years.
-
TikiRalf
- Corvair of the Month
- Posts: 622
- Joined: Tue May 24, 2011 1:07 am
- Location: Valkenswaard - Netherlands - Europe
- Contact:
Re: Corvair Lakewood 61 - NL
66vairguy wrote: ↑Tue Mar 14, 2023 2:08 pm Nice job.
A buddy used JB Weld cauld in the tube to fill the cracks and it didn't hold up. I grind out all the old loose plastic, then fill with the old liquid JB Weld (you have to use tape to make dams to hold it in place) then after a couple days I sand it down. So far it has held up very well, no cracks.
Some paints won't hold up to the skin oil from one's hands. I found using a base coat, the painting over with a two part urethane automotive clear coat is very durable and has ultraviolet ray resistance so it won't discolor in the sun over the years.
I use Por 15 - Epoxy Putty, wierd stuff but it works out. It was a lot of work but the result is awesome.
-
terribleted

- Posts: 4584
- Joined: Sun Apr 18, 2010 2:36 pm
- Location: Atlanta, GA
- Contact:
Re: Corvair Lakewood 61 - NL
Epoxy putty is the recommended and best answer!!TikiRalf wrote: ↑Wed Mar 15, 2023 1:08 pm66vairguy wrote: ↑Tue Mar 14, 2023 2:08 pm Nice job.
A buddy used JB Weld cauld in the tube to fill the cracks and it didn't hold up. I grind out all the old loose plastic, then fill with the old liquid JB Weld (you have to use tape to make dams to hold it in place) then after a couple days I sand it down. So far it has held up very well, no cracks.
Some paints won't hold up to the skin oil from one's hands. I found using a base coat, the painting over with a two part urethane automotive clear coat is very durable and has ultraviolet ray resistance so it won't discolor in the sun over the years.
I use Por 15 - Epoxy Putty, wierd stuff but it works out. It was a lot of work but the result is awesome.
Por 15.jpg
Corvair guy since 1982. I have personally restored at least 20 Vairs, many of them restored ground up.
Currently working full time repairing Corvairs and restoring old cars.
https://www.facebook.com/tedsautorestoration/
Located in Snellville, Georgia
Currently working full time repairing Corvairs and restoring old cars.
https://www.facebook.com/tedsautorestoration/
Located in Snellville, Georgia
-
TikiRalf
- Corvair of the Month
- Posts: 622
- Joined: Tue May 24, 2011 1:07 am
- Location: Valkenswaard - Netherlands - Europe
- Contact:
Re: Corvair Lakewood 61 - NL
Good to hear!
-
TikiRalf
- Corvair of the Month
- Posts: 622
- Joined: Tue May 24, 2011 1:07 am
- Location: Valkenswaard - Netherlands - Europe
- Contact:
Re: Corvair Lakewood 61 - NL
Beside the steering wheel we had another "small"project.
We got an idea for extra gauges (oil temp / pressure and volt).
What i had in mind took some time to figure out how to make. Thank to my buddy Hugo for helping / making it real!!
We took a 2nd radio bracket and cut it up smaller to fit 3 gauges. they way it was cut up, it fits under the radio bracket!
After some trial and error getting the cut up pieces together we figure out what worked and put is all together and decide the position of the unit under the radio bracket. We made it all smooth and blocked it straight, ready for paint.
Primer and the seafoam green paint
Gauges unit and radio unit done! and fully installed under the Lakewood dash! Wires all connected and working (Y)
One idea is come to life!! very proud and happy with the result!

We got an idea for extra gauges (oil temp / pressure and volt).
What i had in mind took some time to figure out how to make. Thank to my buddy Hugo for helping / making it real!!

We took a 2nd radio bracket and cut it up smaller to fit 3 gauges. they way it was cut up, it fits under the radio bracket!
One idea is come to life!! very proud and happy with the result!
-
TikiRalf
- Corvair of the Month
- Posts: 622
- Joined: Tue May 24, 2011 1:07 am
- Location: Valkenswaard - Netherlands - Europe
- Contact:
Re: Corvair Lakewood 61 - NL
After some other projects on the house, moving of my parents and the Texas vacation we are back on the Lakewood. Improvements of the new parts, bearings, gas pedal and some improvement on the wiring and lights. we did a lot of little things!
Gaspedal back in place, after we broke it. Weld it back in place, and connect it to the carbs.
Steering bearing was worn out, When we were in Texas i got a new one.
Out with the old, in with the new!
Soon more little updates on the way!
Gaspedal back in place, after we broke it. Weld it back in place, and connect it to the carbs.
Out with the old, in with the new!
Re: Corvair Lakewood 61 - NL
Impressive work making the gauge pod. Craftsmanship.
Re: Corvair Lakewood 61 - NL
Looking good!!
If you got the gas pedal from Clark's, they all seem to break. Mine broke and the replacement wasn't much better. I plan to weld it better before installing.
If you got the gas pedal from Clark's, they all seem to break. Mine broke and the replacement wasn't much better. I plan to weld it better before installing.
65 Monza
Cincinnati, OH
Cincinnati, OH
-
TikiRalf
- Corvair of the Month
- Posts: 622
- Joined: Tue May 24, 2011 1:07 am
- Location: Valkenswaard - Netherlands - Europe
- Contact:
Re: Corvair Lakewood 61 - NL
Thank you, it was a long side project but turned out well, i'm real happy with the result!
Yes it was a new one from CLarks, and it already broke with the test runs. We position the pedal and weld it to the connection piece.
Hopefully it wil work this way otherwise we need to find something new, / construct it better.
-
TikiRalf
- Corvair of the Month
- Posts: 622
- Joined: Tue May 24, 2011 1:07 am
- Location: Valkenswaard - Netherlands - Europe
- Contact:
Re: Corvair Lakewood 61 - NL
I finished up the electric parts, and made some brackets so the wiring runs straight and not toughing other (hot) parts.
I also put an extra wire in just in case (the big bundle of wires) it goes to the front, kust in case i need some extra wire / power.
Closed up the bottom
And the best part, put it back on her wheels after a lot of months!
Soon it will go outside, to finishing up some last paint (inside the front vents), and hopefully it will run, brake and shift in gears like it should, fingers crossed 
I also put an extra wire in just in case (the big bundle of wires) it goes to the front, kust in case i need some extra wire / power.
-
TikiRalf
- Corvair of the Month
- Posts: 622
- Joined: Tue May 24, 2011 1:07 am
- Location: Valkenswaard - Netherlands - Europe
- Contact:
Re: Corvair Lakewood 61 - NL
It's been a while since the last update. Beside a vacation and my wife's health that is not going well at the moment, i found some time to work on some things in the Lakewood and the workshop (to improve working on the Lakewood)
We made an attic above the Corvair, to store our camping gear. It was laying around in the workshop and I was not happy to work around it. Nice place to store it, and i can walk again in the workshop
I also had the room to put the Lakewood outside, and hang up the memorabilia on the wall.
The Lakewood looks good in the sun, even with dust on it
I have been annoyed by the water gutter near the front window for years. When the grille is in place, you can still look through the screen and you see: primer yellow, seafoam green and a mixture of those two colors. In decided to pack everything well and time to spray it so that it gets a nice even color, seafoam green when you look through the screens. Next step spray-paint!
We made an attic above the Corvair, to store our camping gear. It was laying around in the workshop and I was not happy to work around it. Nice place to store it, and i can walk again in the workshop