64 Greenbrier Restoration

Show of your ride, keep track of your project, watch as others progress on their projects
User avatar
TimeMachineParadox
Posts: 65
Joined: Wed Oct 16, 2019 7:23 pm
Location: Louisville, Kentucky, US

64 Greenbrier Restoration

Post by TimeMachineParadox »

Hello all, a while ago I introduced myself on the new member section. If you didn't see it I'll give the abridged version: I bought a 64 Greenbrier deluxe 95hp, 4 spd off of craigslist for relatively cheap. It's mostly complete and the interior is decent for it's age, although it's got some rust issues. While the mainly complete engine was there it was seized.

I figured I'll start a collection/chronicle of my restoration here and post what I've done so far. I'll probably have some lack of pictures because I forget to take them once I get to working.

So to start: this is my first restoration project and I didn't really know where to start first so I decided on getting the engine out and rebuilding that since it's the easy part. I also had the added logic that in case the rest of the car decides to be a no-go for some reason I'd have a good engine I could at least sell and recoup some money.
IMG_20190310_113351.jpg
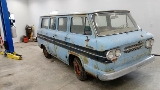
Here's the best picture I have of the engine before I took it out, the PO told me his son bought it with the intentions of restoring it but never did. Looks like he'd done something with the engine before though because parts had been removed and some like the generator adapter and fan were missing, along with that he left me a tin can full of assorted unlabeled bolts and screws he'd removed.

The interior of the engine compartment was greasy and oily and everything including the carbs were covered in it, luckily it meant nothing in there was very corroded or rusted. Unsure though where it all came from, has anyone seen something like it/is it normal for cars this age?

Getting the engine out was it's own kind of fun, I can't really remember how I did it but somehow I managed to drop the drivetrain with an engine hoist and a supporting jack on the end and pull it out. Of course soon after doing that I learned the easy way of doing it with a jack and some wood :banghead: .

Here's the car sometime in post drivetrain removal if you were interested
IMG_20190409_161757.jpg
Being caked in dirt and grease most of the stuff was pretty well preserved however moisture managed to really get into the bellhousing, fusing the clutch together and corroding the aluminum. The engine was in pretty good shape with the only suspicious thing being a couple loose rocker arms where the push-rods fell out of their "nub". The crankcase was in decent shape and the only reason it had seized was that the piston rings had slightly rusted to the cylinders.
IMG_20190409_161740.jpg
Here's a picture of the engine out when I was soaking the jugs with diesel and ATF in vain attempts to free it up. After about 2 days of soaking for each side I worked on pounding the pistons in with wood and a deadblow and luckily got one to move in its cylinder which freed everything up enough that I could sequentially move the pistons with the cylinders and unbolt them from the crank as a whole. I was able to get 5/6 pistons out of their individual cylinders, the last one need a poor man's hydraulic press to free itself.
IMG_20191024_183551.jpg
That thing was really fused in there. The rings are essentially fused into the pistons and I still haven't managed to get them out, does anyone have any input on getting those out? Are these pistons possibly FUBAR'D if I do manage to get them out?

I'll break the story off here for now and add more on tomorrow.
~Nick
Louisville, Kentucky, US

64 Greenbrier
joelsplace
Posts: 2122
Joined: Wed Oct 13, 2010 12:51 pm
Location: Northlake, TX

Re: Nick's 64 Greenbrier Restoration

Post by joelsplace »

Original pistons tend to crack anyway so you'll probably want to get new ones. With that much rust and corrosion there is no way the cylinders don't need to be bored oversize anyway.
157 Corvairs, 5 Ultravans and counting
Northlake, TX
SteveInMarietta
Posts: 34
Joined: Sun Sep 25, 2016 7:02 pm

Re: Nick's 64 Greenbrier Restoration

Post by SteveInMarietta »

Hi Nick,
Be sure to check out the Corvanatics web site for lots of useful information. I maintain the website and the FC Registry and would like to add your Greenbrier - can you post the VIN and the paint and trim codes (from the data plate below the fuse box). I would be happy to decode them for you.
[url]http://www.corvair.org/chapters/corvanatics/[/url]
http://www.corvair.org/chapters/corvana ... gistry.php
Steve
User avatar
TimeMachineParadox
Posts: 65
Joined: Wed Oct 16, 2019 7:23 pm
Location: Louisville, Kentucky, US

Re: Nick's 64 Greenbrier Restoration

Post by TimeMachineParadox »

Thanks Steve, I'm aware of Corvanatics and am actually also a member. I happen to have registered my FC already. I'll attach the VIN and body ID anyway though.
IMG_20190310_111542.jpeg
IMG_20190310_112952.jpeg
~Nick
Louisville, Kentucky, US

64 Greenbrier
User avatar
TimeMachineParadox
Posts: 65
Joined: Wed Oct 16, 2019 7:23 pm
Location: Louisville, Kentucky, US

Re: Nick's 64 Greenbrier Restoration

Post by TimeMachineParadox »

To continue on the Pistons / Cylinders. The piston I showed was the worst of the lot, it somehow got a lot of lead oxide stuck inside it. The other ones are clean save for that they have the rings completely stuck inside them, I don't really know what could have caused this except maybe that the rings rusted, expanded, and seized.

However, with all this mention of rust, you might think the cylinders are in atrocious condition. In fact they're not, or at least as far as my moderately trained eye can tell. Here's the bore that the worst cylinder came out of.
IMG_20191207_164935.jpeg
It's got rougher spots where the rings were but everything else is fine and doesn't show excessive wear or damage. And on the topic of wear, all the cylinders don't seem overly worn, I measured all for taper/out of round/ wear and they were still nicely within spec. Which means that for now I'm going to hone them without having them bored over. Once I get to actual final assembly (likely a few years down the line) I'll measure them again to see what I think and move from there.

Yesterday I managed to blast the outsides of the cylinders (with casting flash removed from the fins) and put on a light coat of high temp paint to keep the rust off a bit.
IMG_20191207_173630.jpeg
Here's a picture of the before and after. Overall they cleaned up pretty well and I'm happy with the result.

I'll leave the post here for now, I still have a good bit of backlog progress to post but I'll try to post when I get the time to.

~Nick
Louisville, Kentucky, US

64 Greenbrier
SteveInMarietta
Posts: 34
Joined: Sun Sep 25, 2016 7:02 pm

Re: Nick's 64 Greenbrier Restoration

Post by SteveInMarietta »

Nick,
Thanks for posting the codes. Yep, already in the registry. But please send me a picture after the restoration; I like to include before and after restoration pics.
Steve
User avatar
TimeMachineParadox
Posts: 65
Joined: Wed Oct 16, 2019 7:23 pm
Location: Louisville, Kentucky, US

Re: Nick's 64 Greenbrier Restoration

Post by TimeMachineParadox »

I'll move onto the heads. They were pretty crudded up like everything else, some degreaser scrubbing, power washing, and ultrasonic cleaning cleaned them up relatively well. I'm considering alumina blasting or at least walnut blasting them.
IMG_20190918_204852_01.jpeg
IMG_20190929_122407.jpeg
One of the exhaust tube flanges was rusted out so that will be replaced

I checked all of the valve guide and valve lashes and all except for one were within or right at the 5 thou worn spec. The one that wasn't had a 10 thou ! lash, it's accompanying valve stem showed some galling as well. So I'll at least be replacing those two. Does anyone have opinions on replacing only one guide and valve as opposed to doing the valve pair for that cylinder/ doing all of them?

Since I'll need to replace at least one guide, I made the removal/installation tool for these valve guides. I didn't want to buy one and I didn't really like the design of it either because there was no definitive way to determine the install height. The GM tool has a groove to line up with the seat by eye, I don't like that either because when installing the cold guides in a hot head there isn't much time for realignment. So I made one with a hard stop that can "shove" in the guide and be done.
IMG_20191214_194348.jpeg
The dowel pin is easily removable from the reamed hole but also fits snuggly enough that it doesn't easily fall out. The dowel is set to give an install depth of about an inch between the top of the guide and the seat, which is what my 64 95hp heads have. I did notice that the intake and exhaust guides were installed at different heights with the exhaust at about an inch and the intake at about 0.8". Has anyone else noticed this with theirs? I figured since GM didn't mention anything about it and since their tool is meant to line up by eye that the install depth can't be all too critical.


~Nick
Louisville, Kentucky, US

64 Greenbrier
User avatar
TimeMachineParadox
Posts: 65
Joined: Wed Oct 16, 2019 7:23 pm
Location: Louisville, Kentucky, US

Re: 64 Greenbrier Restoration

Post by TimeMachineParadox »

I wish I had more pictures on hand so I could post some more with more substance. Although I'll post a short bit about the transmission.

The previous owner told me it was a 4spd and I hadn't looked to critically at it until now. Turns out it's a 3spd, what a bummer. I'll try to track a 4 down and swap it in eventually. Nevertheless, I rebuilt the 3spd anyway. I haven't actually finished it fully yet since I haven't ordered parts, but it's ready for reassembly as is.
IMG_20191215_224231.jpeg
Here's what it looked like before, nicely gunked and rusted. The top cover also rusted through in a pinhole and nicely dumped some rust inside.
IMG_20191215_212145.jpeg
Here's me removing the clutch gear, I figured some might find my method funny. I used a retaining ring plier with a 1/4 hex bit and part of a piston ring taped to it so it'd be wide enough to fully open the retaining ring. Then just massaged the bearing out the back.
IMG_20191219_195402.jpeg
Here's the case after ultrasonic cleaning, sandblasting, and some paint. Almost like new. Now it just needs new gaskets, thrust washers, and a top cover and it'll be done.
~Nick
Louisville, Kentucky, US

64 Greenbrier
User avatar
TimeMachineParadox
Posts: 65
Joined: Wed Oct 16, 2019 7:23 pm
Location: Louisville, Kentucky, US

Re: 64 Greenbrier Restoration

Post by TimeMachineParadox »

I'll move to the flywheel real quick because I have some weirdness going on that I need some input on. I'm in the process of bolting it.

So before I started the bolting process I took my flywheel to a local clutch rebuilder that seemed pretty reputable and had them grind my flywheel. After it was all done they informed me that they had some trouble doing it because they mounted the wheel by the crank flange and had real bad chatter (which I heard). So to solve that they ground the rivet heads on the back flat and then mounted the flywheel directly on the table and ground the surface.

This sounded a bit unorthodox but I figured that since the outer "ring" is parallel to the recessed clutch contact face and that that should be reasonably parallel to the crank flange the rivet heads, which were referenced off the outer ring, should be parallel enough to the clutch surface and crank flange.

Well once I started the bolting process I found that they'd done something wrong. I made a tool/fixture to measure the surface runout (Which I'll post about once I remember to take a picture) and found the runout to be real bad.

I measured a surface run-out of ~13 thou on the small diameter of the clutch face and ~21 thou on the larger Diameter of the clutch face. The outer ring (non-recessed part) runs out up to 29 thou. In addition to this they somehow managed to put a slope as bad as 8 thou going from the smaller to larger diameter of the contact face. I also measured the recess step and found it to be 0.161" which as far as I could find should be 0.125", that's a fair bit of difference given that the shop said they took equal off both surfaces.

Regretibly I didn't measure the flywheel before having it ground but given the milage (93k if I remember right) on the car and how everything else looked, I think it hadn't been touched since the factory. So my question is, does anyone have numbers on what the step should be and also how much the flywheel can be ground before I can't have it be reground?

Tldr; flywheel ground by seemingly good clutch shop, I checked work and found bad run-out. Need advise on flywheel spec of step height and max allowable grind depth.
~Nick
Louisville, Kentucky, US

64 Greenbrier
bmwtodd1
Posts: 119
Joined: Sat Sep 13, 2014 5:47 pm
Location: Caldwell ID
Contact:

Re: 64 Greenbrier Restoration

Post by bmwtodd1 »

Wow! Thanks for posting.
64 Monza Convertible
61 Loadside
66 Mustang Fastback
54 ea BMW motorcycles
1 TR6 Special Competition Triumph
32d Free Mason, Scottish Rite Mason
rcavictor
Posts: 66
Joined: Fri Apr 22, 2016 5:12 am

Re: 64 Greenbrier Restoration

Post by rcavictor »

Bumping an old thread… How is your resto going?
Rob

- Cornucopia of Corvairs
Ocklawaha FL
User avatar
TimeMachineParadox
Posts: 65
Joined: Wed Oct 16, 2019 7:23 pm
Location: Louisville, Kentucky, US

Re: 64 Greenbrier Restoration

Post by TimeMachineParadox »

rcavictor wrote: Thu Nov 11, 2021 4:19 am Bumping an old thread… How is your resto going?
Well I'm not dead yet, so that's a plus! I'm still not done, and no one could have possibly predicted this, but it's taking longer than expected. In the process I also found out I'm not a super big fan of "blogging" what I'm doing, but I did remember to take some pictures from time to time so I might try to post some stuff at some point in the future.

In regard to my flywheel issues, I realized in the shower one day that my issue was that I'm measuring with the flywheel mounted on the central flexible "backing" plate. Which is a problem because I also realized that in my inexperience I probably slightly distorted the backing plate in the process of freeing it (was rusted on) from the crank. I ended up just getting a good used flywheel and pressure plate that was already bolted.

I'll tell myself that I'll try to log the stuff I've already done in the meantime:
Rebuilt Diff
Rebuilt 4spd transmission
Rebuilt suspension (mostly)
Rebuilt steering gearbox and linkages
Cleaned up and repaired all sheetmetal and external components that bolt to engine
Cleaned up and repaired all air heater components
Cleaned all interior components
Cleaned and rejuvinated window mechanisms
Put together disk brake kit with dual master
Put together electric fuel pump kit

Engine rebuild is still underway and has experienced multiple snags. Funnily enough it would've been far easier and cheaper to buy a good used engine, but how else am I gonna learn that lesson and learn to know the engine inside out

The real big hurdle now is the rust repair that I've started with the help of a parts van. I started where I thought might be a good easy start in the back of the driver's wheel-well by the jacking point. It's just my luck that this turned out to be the hardest and worst spot (so far), and I'm still chasing bad rust that would show itself when I cut something out. It is what it is.
~Nick
Louisville, Kentucky, US

64 Greenbrier
User avatar
bbodie52
Corvair of the Month
Posts: 11983
Joined: Mon Aug 06, 2012 12:33 pm
Location: Lake Chatuge Hayesville, NC
Contact:

Re: 64 Greenbrier Restoration

Post by bbodie52 »

per·sist·ence
/pərˈsistəns/

noun

firm or obstinate continuance in a course of action in spite of difficulty or opposition.
...must have patience and persistence, but the rewards are there
:banghead:
ImageOften seen among those restoring very rusty Corvair Greenbrier vans! :tongue:

Similar: perseverance · tenacity · determination · resolve · resolution

:clap: :woo:

ImageImage


He shall know your ways as if born to them.

“What’s in the box?”
“Pain.”

If you have a large quantity of rust, can you form a Image out of it?
Image
Image Corvair restorers sometimes cling to the remains of their project Corvair, hoping to one day restore it to its original glory!
Image
Brad Bodie
Lake Chatuge, North Carolina
Image 1966 Corvair Corsa Convertible
rcavictor
Posts: 66
Joined: Fri Apr 22, 2016 5:12 am

Re: 64 Greenbrier Restoration

Post by rcavictor »

Way to go on your progress! Slow and steady… I get it on easier to buy a running/rebuilt engine but it sure is a good education process (and satisfaction) to do it yourself.

Hang in there!

Still working on my 62 8-door. And now about to embark on a complete restoration of a the 62 Loadside (with two other donor FCs) .

Thanks for the update.

Rob
Rob

- Cornucopia of Corvairs
Ocklawaha FL
Post Reply

Return to “Member's Rides, Projects, and Builds”