All,
Another "newbie" question...
My distributor vacuum advance module is hosed... (literally, put a hose on it and sucked... no resistance). Should have a replacement soon... the question is... do I have to remove the distributor to replace ? I pulled the cap, pulled the rotor (man that was a pain) but haven't removed the base plate yet... (it may become apparent once I do) but better safe than sorry. From what I can see on diagrams, it looks like 2 screws hold it on. Anything I should be aware of ? (always cautious when dealing with a distributor)... Any advice is appreciated...
1966 Corsa 140 4 speed...
Replacing distributor vacuum advance
Replacing distributor vacuum advance
Jeff M. in Phoenix, AZ
1966 Corsa 140 4-speed
1966 Corsa 140 4-speed
Re: Replacing distributor vacuum advance
Put a rag underneath to catch the screws WHEN you drop them. Don't ask how I know [emoji41]
Sent from my [device_name] using Corvair Forum mobile app
Sent from my [device_name] using Corvair Forum mobile app
-
Jerry Whitt
- Posts: 887
- Joined: Thu Sep 26, 2013 2:42 pm
Re: Replacing distributor vacuum advance
Having a hand held vacuum pump is a tool well worth the purchase. Most parts stores carry them. Mighty Vac is well known brand and works good.
The 2 screws you will probably drop, are about all you need to remove the vac advance unit. ( I use a magnetic pick up) Once the screws are out, just wiggle the advance unit a little, and the breaker plate will move so you can take the advance unit completely out.
When you get the new vac advance, use the vac pump to test before installation. Then install, putting in those little screws. Now test the advance again and you will see how the breaker plate moves.
While you have it apart, eyeball the points. If they show burnt points, now is the perfect time to replace. The point gap is usually set at .018 of an inch. When installed and the car is started, check the ignition dwell with a dwell meter.
A Dwell Meter measures the number of degrees of crankshaft rotation while the points are closed. (this is called coil saturation time). The dwell reading should be about 30 degrees. If this setting is about right, now is time to set the initial timing, be sure the vacuum advance hose is not connected. Initial timing of about 17 degrees usually works pretty good.
Now hook up the vacuum hose. It should attach to the primary carburetor, passenger side. The vacuum source only will open as the throttle plates move off idle, and then cause the vacuum advance to advance the spark. You should be able to see the breaker plate move as the throttle is moved.
Last step is to set idle speed, usually about 700 rpm with the engine warmed up.
Good luck.
Jerry Whitt
ASE CERTIFIED MASTER TECHNICIAN
Retired
Hemet, Callifornia
65 Monza, purchased new
65 Corsa convertible
ASE CERTIFIED MASTER TECHNICIAN
Retired
Hemet, Callifornia
65 Monza, purchased new
65 Corsa convertible
Re: Replacing distributor vacuum advance
Thanks ever so much for the quick reply, so the screws that hold in the vacuum advance module are located underneath the distributor? Hence the fact that they drop out. I used a mirror but couldn’t see much underneath.
Jeff M. in Phoenix, AZ
1966 Corsa 140 4-speed
1966 Corsa 140 4-speed
-
Jerry Whitt
- Posts: 887
- Joined: Thu Sep 26, 2013 2:42 pm
Re: Replacing distributor vacuum advance
The screws are on the side of the distributor, holding the vacuum advance unit to the distributor housing.
Jerry Whitt
ASE CERTIFIED MASTER TECHNICIAN
Retired
Hemet, Callifornia
65 Monza, purchased new
65 Corsa convertible
ASE CERTIFIED MASTER TECHNICIAN
Retired
Hemet, Callifornia
65 Monza, purchased new
65 Corsa convertible
Re: Replacing distributor vacuum advance
Nope -- those little screws (and they do like to get away from you) go through the vacuum can bracket on the side of the distributor housing about 75 degrees from each other.
It's debatable if it's easier to work on the distributor in the car, or just take it out and change the vacuum canister on the bench. Of course if you pull the distributor you'll have to adjust the timing again on install. --- Your call.
BTW - the Harbor Freight metal hand vacuum pump works a lot better than the plastic Mighty Vac. After three Mighty Vacs I gave up on them.
-
Jerry Whitt
- Posts: 887
- Joined: Thu Sep 26, 2013 2:42 pm
Re: Replacing distributor vacuum advance
Harbor Freight generally has lower prices on the tools it supplies. It has a reason for lower prices. The quality level is generally not up to par with the Brand name products.
But sometimes, a brand name product does show up there.
But sometimes, a brand name product does show up there.
Jerry Whitt
ASE CERTIFIED MASTER TECHNICIAN
Retired
Hemet, Callifornia
65 Monza, purchased new
65 Corsa convertible
ASE CERTIFIED MASTER TECHNICIAN
Retired
Hemet, Callifornia
65 Monza, purchased new
65 Corsa convertible
Re: Replacing distributor vacuum advance
Thanks again for the quick and informative responses, Corvair people are the best. I’ll drape everything to make sure nothing goes lost. I’m really looking forward to getting this fixed. I’ve always wondered why my timing is always been off. Thanks again
Jeff M. in Phoenix, AZ
1966 Corsa 140 4-speed
1966 Corsa 140 4-speed
-
bbodie52

- Corvair of the Month

- Posts: 11894
- Joined: Mon Aug 06, 2012 12:33 pm
- Location: Lake Chatuge Hayesville, NC
- Contact:
Re: Replacing distributor vacuum advance
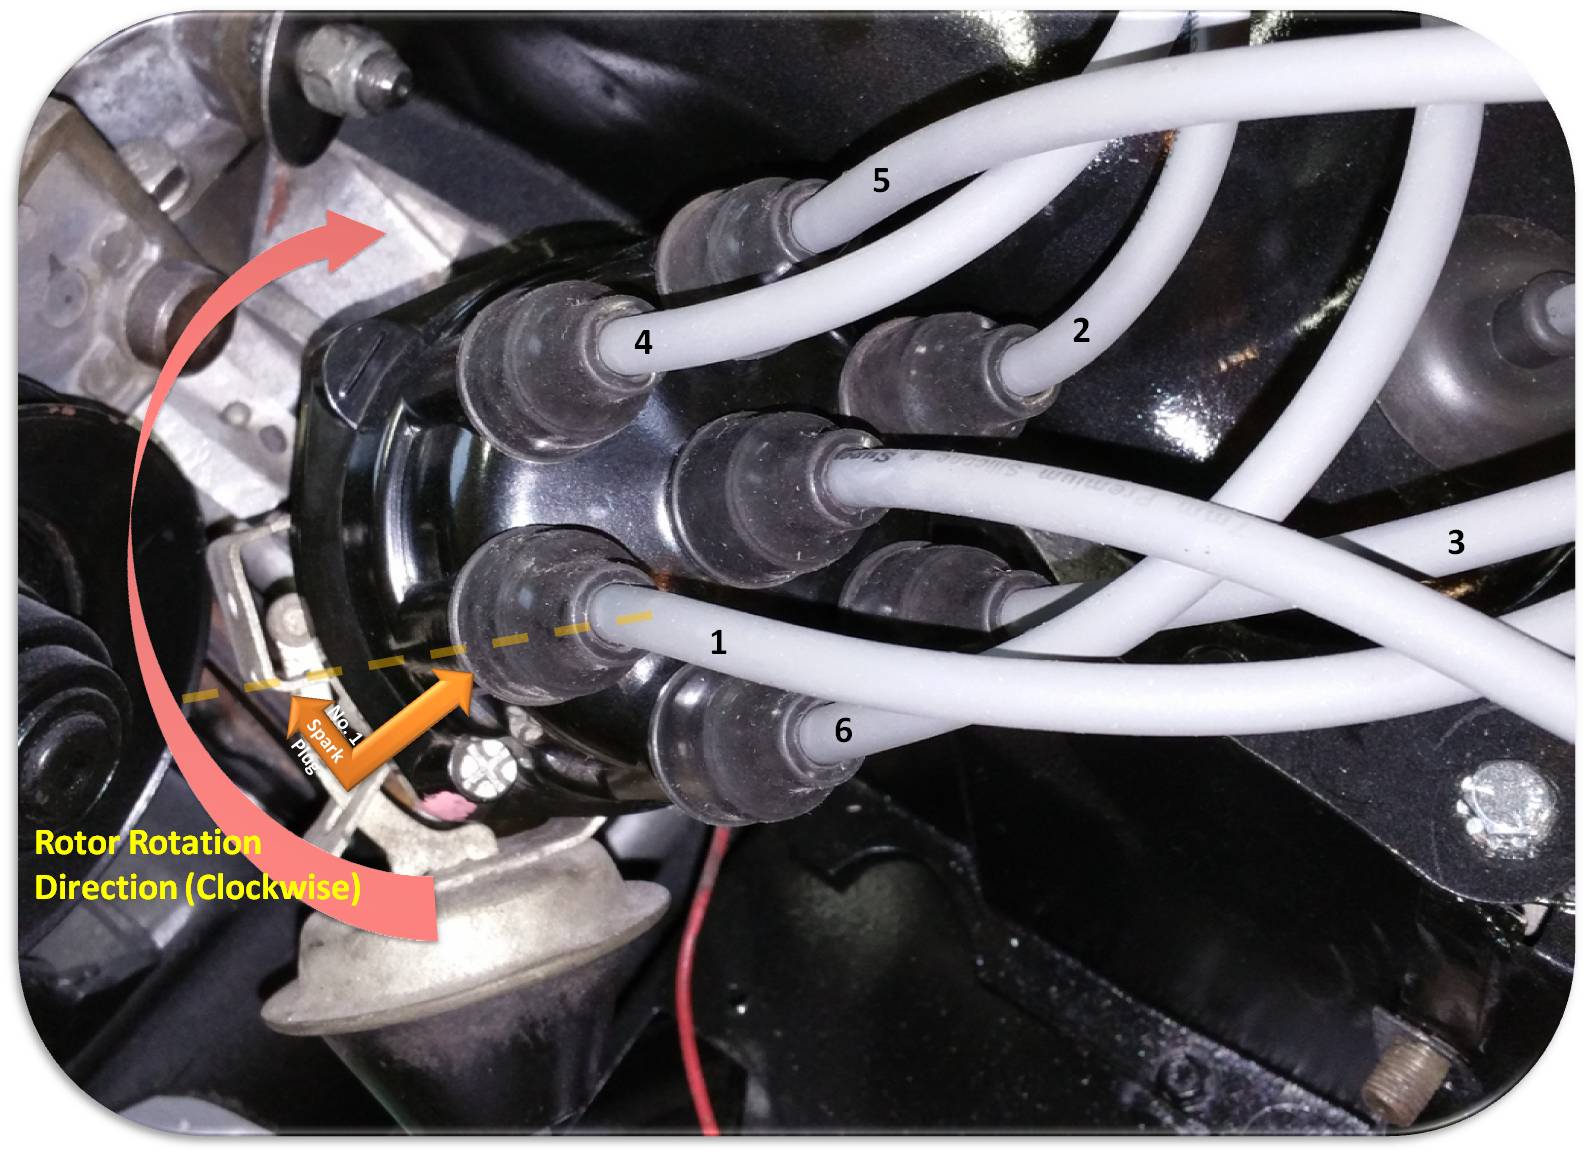
It is really not hard to remove and reinstall the distributor and set the static timing. The easiest way is to turn the engine crankshaft so that the timing mark on the pulley aligns with desired timing setting. At this point the rotor should be pointing to the number one distributor cap tower position. (If it is pointing in the opposite direction, the number 1 piston is at top dead center on the EXHAUST stroke. Simply rotate the crankshaft CCW one more time to bring the rotor around to the correct orientation, which is with the number one piston at top dead center on the COMPRESSION stroke (Intake and exhaust valves both closed).

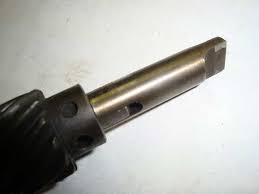
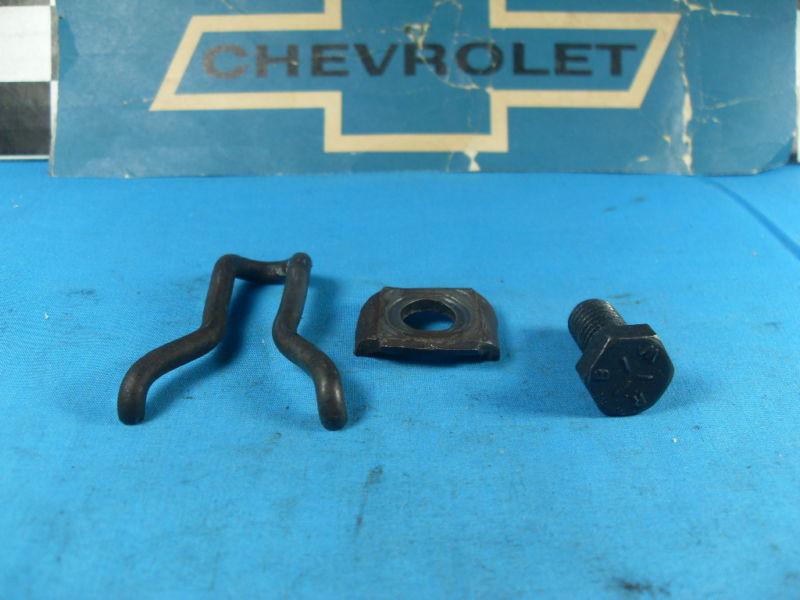
The distributor hold-down clamp components can then be removed, and the distributor housing can be pulled from the engine. (One nut — not a bolt — as in this photo holds the clamping components down. Remove the nut and the other two pieces, and the distributor lifts right out). Then replace your vacuum advance by removing the two screws. Then point the rotor toward the number one distributor cap tower position and reinsert the distributor with the same orientation it had when you pulled it out. (DON'T TURN OR CRANK THE ENGINE WITH THE DISTRIBUTOR OUT OF THE ENGINE). Properly inserted, the distributor housing will bottom out as the tang at the bottom of the shaft engages with the oil pump drive. Then reinstall the hold-down components but do not fully tighten them yet. (See static timing below).
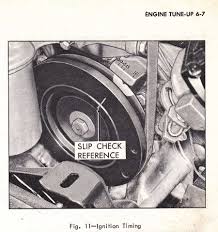
STATIC TIMING: It is possible to static-time your ignition system with a strip of paper placed between the ignition points. The engine timing mark can be manually positioned to the desired setting on the crankshaft pulley (as it was before you removed the distributor), and the distributor can be slowly rotated CCW until the points just start to open and release the strip of paper (when the ignition points rubbing block just comes into contact with the high point on the distributor cam). The distributor is then tightened and the mechanic has established an initial static timing setting. Of course, having a timing light makes things much easier, improves accuracy, and permits visual confirmation that the centrifugal advance is functioning. So double check your timing with a timing light after you start the engine (at proper idle speed, with the vacuum advance hose disconnected and plugged).
The distributor hold-down clamp components can then be removed, and the distributor housing can be pulled from the engine. (One nut — not a bolt — as in this photo holds the clamping components down. Remove the nut and the other two pieces, and the distributor lifts right out). Then replace your vacuum advance by removing the two screws. Then point the rotor toward the number one distributor cap tower position and reinsert the distributor with the same orientation it had when you pulled it out. (DON'T TURN OR CRANK THE ENGINE WITH THE DISTRIBUTOR OUT OF THE ENGINE). Properly inserted, the distributor housing will bottom out as the tang at the bottom of the shaft engages with the oil pump drive. Then reinstall the hold-down components but do not fully tighten them yet. (See static timing below).
STATIC TIMING: It is possible to static-time your ignition system with a strip of paper placed between the ignition points. The engine timing mark can be manually positioned to the desired setting on the crankshaft pulley (as it was before you removed the distributor), and the distributor can be slowly rotated CCW until the points just start to open and release the strip of paper (when the ignition points rubbing block just comes into contact with the high point on the distributor cam). The distributor is then tightened and the mechanic has established an initial static timing setting. Of course, having a timing light makes things much easier, improves accuracy, and permits visual confirmation that the centrifugal advance is functioning. So double check your timing with a timing light after you start the engine (at proper idle speed, with the vacuum advance hose disconnected and plugged).
Brad Bodie
Lake Chatuge, North Carolina
 1966 Corvair Corsa Convertible
Lake Chatuge, North Carolina
1966 Corvair Corsa ConvertibleRe: Replacing distributor vacuum advance
I never thought about paper in the points. I always use a regular test light on the coil post (I can’t remember if it is + or -) and turn the distributor until it comes on with key on the run position. Then tighten down the distributor
Sent from my iPhone using Corvair Forum mobile app
Sent from my iPhone using Corvair Forum mobile app
Frank Metasavage
65 Corsa 140 4 speed with Weber IDAs
66 Corsa 140 4 speed Stock
65 Corsa 140 4 speed with Weber IDAs
66 Corsa 140 4 speed Stock
-
terribleted

- Posts: 4584
- Joined: Sun Apr 18, 2010 2:36 pm
- Location: Atlanta, GA
- Contact:
Re: Replacing distributor vacuum advance
Changing the vacuum advance is pretty easy. Remove the cap so you can see better. Remove the rubber boot from the vacuum advance if present and unplug vacuum advance hose. Note that there is a little hole in the vacuum advance arm and that the pin pointing down off the point plate is in it.Take the 2 flat head screws that hold the advance unit to the outside of the distributor and remove it Install new unit by putting it into place so that the pin is engaged in the hole and reassemble parts removed...done.
Corvair guy since 1982. I have personally restored at least 20 Vairs, many of them restored ground up.
Currently working full time repairing Corvairs and restoring old cars.
https://www.facebook.com/tedsautorestoration/
Located in Snellville, Georgia
Currently working full time repairing Corvairs and restoring old cars.
https://www.facebook.com/tedsautorestoration/
Located in Snellville, Georgia
Re: Replacing distributor vacuum advance
Success, no drop screws, actually works… Man that makes a big difference… Now I’m able to advance my timing to where it supposed to be nice… Thank you all
Jeff M. in Phoenix, AZ
1966 Corsa 140 4-speed
1966 Corsa 140 4-speed