SOS from Italy: cylinder head nuts

All Models and Years
User avatar
alexbert
Posts: 92
Joined: Mon Jun 24, 2013 8:34 am
Location: Turin - Italy - Europe - WORLD

SOS from Italy: cylinder head nuts

Post by alexbert »

I have the motor on the floor and proceed with disassembly. I already opened the upper cover and the verdict is: con-rod #2 destroyed. I have not yet pics because i want to have the crank case opened.
now I have the problem with cylinder head nuts.
A couple of studs have the thread completely rusted. Here is a pic.
IMG-20131125-00337.jpg
I gave some spray lubricant and tried very slowly to loose the nut in the pic above. At the beginning the stud turned, then the nut alone just a bit (some degrees only...) then the stud once more, and I stopped to avoid any damage.
What should I do now????
And if any of the damaged stud turns together with the nut???

Thanks for any support.

Alex.
When you see a Corvair
and your heart goes with her
that's Amore!
User avatar
terribleted
Posts: 4584
Joined: Sun Apr 18, 2010 2:36 pm
Location: Atlanta, GA
Contact:

Re: SOS from Italy: cylinder head nuts

Post by terribleted »

Sometimes the only way they come apart is for the stud to come out also. This is not ideal, but, still is sometimes the case. New standard and oversized studs are available for replacement. These should be tight in the block. Hopefully when a stud pulls out it does not bring most of the aluminum threads with it. Some studs you can grab with a locking pliers behind the head to help hold them to remove stubborn nuts. Access is terrible and may not be possible on all of them.
Corvair guy since 1982. I have personally restored at least 20 Vairs, many of them restored ground up.
Currently working full time repairing Corvairs and restoring old cars.
https://www.facebook.com/tedsautorestoration/

Located in Snellville, Georgia
Scott V
Posts: 707
Joined: Wed Jun 30, 2010 2:31 am

Re: SOS from Italy: cylinder head nuts

Post by Scott V »

split the nut w/a cold chisel. it will come off of the stud & the stud wont move from the block.

sometimes you clean the rust w/a wire brush & then spray lubricant - the nut will come off. sometimes heat from a small torch works good also.

-Scott V.
User avatar
flat6_musik
Posts: 2659
Joined: Sun Apr 04, 2010 10:03 am
Location: Hesperia, CA

Re: SOS from Italy: cylinder head nuts

Post by flat6_musik »

Don't give up! Do your best to clean out the threads of rust and baked crud. Then work the nut back and forth. It may take you hours......it did for me.
User avatar
alexbert
Posts: 92
Joined: Mon Jun 24, 2013 8:34 am
Location: Turin - Italy - Europe - WORLD

Re: SOS from Italy: cylinder head nuts

Post by alexbert »

Thanks for suggestions.
However, if I split the nuts, how can I re-screw new nuts on such un-existing thread?
shall I have to re-create the thread?
Alex
When you see a Corvair
and your heart goes with her
that's Amore!
User avatar
bbodie52
Corvair of the Month
Posts: 11981
Joined: Mon Aug 06, 2012 12:33 pm
Location: Lake Chatuge Hayesville, NC
Contact:

Re: SOS from Italy: cylinder head nuts

Post by bbodie52 »

If you have a sharp chisel and a lot of patience you might be able to chisel a damaged nut off of a stud by splitting the relatively soft nut. You must take care not to damage the aluminum cylinder head. You might even be able to split the nut and get it off without damaging the stud threads! :pray: :dontknow:

Problems in this area are common, since the upper row of nuts and atud threads are subject to years of engine heat and exposure to the elements. There are several possibly useful comments on the Clark's Corvair Parts catalog page below, and several stud and nut replacement suggestions are offered that might prove useful. Sometimes there is no option but to replace a damaged stud by unscrewing it from the cases. Over-sized studs are offered, and in the worst case if the aluminum threads are damaged in the cases an insert can be installed to replace the damaged threads. Anti-seize compound, high-quality replacement nuts, and caps to protect the exposed stud threads are all recommended.

Here is something I wrote in August 2012 that might help a little...
Brad Bodie wrote: :dontknow: :doh:

:helpsos: Removing Corvair cylinder heads can sometimes be a real pain! I wrote some comments about this on the CORSA Facebook Web site, in response to another Corvair fan who was about to tear down his first Corvair engine (dirty and well-worn) and was asking for some tips. I felt that what I wrote might be useful here too, so, for what it's worth, here it is...

One engine dis-assembly problem area I discovered in my first engine tear-down was with the upper cylinder head nuts (above the valve cover area and under the intake manifold). Years of exposure, heat and rust can make them hard to remove. The heat can also soften the metal, and the nut can easily "round off" if the socket slips. Once the flat surfaces round off the nut it is very hard to remove! :pray: I recommend using a good-quality six-sided socket to remove these nuts, rather than a 12-point socket that has less surface-area to "grab" each flat surface on the head nuts. The latter 12-point sockets are more-likely to slip or damage the soft nuts and round them off.

:banghead: If a nut does become damaged, I've found two methods to remove the damaged nut. Both methods will destroy the stud that protrudes from the engine case, so that stud will later have to be removed and replaced. Since access to most of these nuts is limited under the intake manifold, it is hard to split the nut and chisel it off with a hammer and chisel. However, you can try center-punching the center of the stud (to guide the drill bit and keep it centered when you start drilling), and then using a drill bit that is about the diameter of the stud to drill-out the center of the stud within the nut. (Sometimes it might work better if you start with a smaller drill bit to drill a "pilot hole", and then move up to a drill bit that is approximately the same diameter as the stud threads.) Once you have "hollowed-out" the material within the center of the nut (to the depth of the nut) a chisel can be used to knock off the nut from the end of the damaged stud. The other method of removal uses a hacksaw blade. (A hacksaw frame will not fit in the cutting area near the cylinder barrel). Tape one end of the blade to protect your hand, and perhaps wear a protective glove. Then cut the stud where you can get to it in the area between the cylinder head and the engine cases. A whole-lot of short strokes with the hacksaw blade will (eventually) cut through the stud to allow you to finish removing the head. Once the head and cylinder barrels have been removed, the damaged stud can be carefully extracted and unscrewed from the cases with a stud removal tool. Cutting the stud or drilling and chiseling the nut is no real fun, so try to carefully remove each nut with a six-point socket in the first place and hopefully you will be able to remove all of the head nuts without damaging them. Using new, high-quality head nuts for reassembly later might also be a good idea!

Another contributor wrote: "As for Brad's comments and suggestions on the head nuts- these were a complete PITA to get off on my car. I removed the head while it was still in the car, making the task all the more difficult. I ended up hammering them w/a 3lb. sledge and various chisels, splitting them. DO THIS RATHER THAN LETTING THE HEAD STUD TURN! They tell you that only if no other choice exists or your stud breaks, as mine did, do you remove these head studs. Let the nuts soak in PB blaster and Kroil for a few days, reapplying every few hours. As for all the parts,- 'tag'em and bag'em' -DO THIS, because you will for sure forget where stuff went. Good luck"

My final comment was as follows:

:fingerscrossed: It's just a theory, but when removing the heads it might help to remove the lower row (under the rocker arms) before removing the upper row of nuts. This MIGHT have the effect of reducing tension on the upper row by eliminating the torque and tension on the lower part of the cylinder head FIRST. This might have the effect of reducing tension on the upper row of nuts by allowing the head to tilt just slightly -- forced by the already existing tension on the upper row. This might make it easier to remove the upper nuts, if less tension is being applied against the threads on top. Once the lower row has been removed, use a six-point socket to carefully remove the upper row of nuts. (The lower row is usually easier to remove because they are made of a hardened steel and are larger in size than the top row. Also, there will be no rust to deal with on the lower row.) You will need a deep, six-point socket for the bottom row. :checkeredflag:


NOTE: Heat-treated replacement nuts, acorn cap nuts, and anti-seize compound are all listed on the following Clark's Corvair Parts online catalog page (13).

:link: http://www.corvair.com/user-cgi/catalog ... IN&page=13
Image
Brad Bodie
Lake Chatuge, North Carolina
Image 1966 Corvair Corsa Convertible
User avatar
azdave
Corvair of the Year
Corvair of the Year
Posts: 2127
Joined: Fri Dec 11, 2009 1:27 pm
Location: Phoenix, AZ

Re: SOS from Italy: cylinder head nuts

Post by azdave »

alexbert wrote: However, if I split the nuts, how can I re-screw new nuts on such un-existing thread?
The short answer is that even though the threads you can see on the outside before you remove the nut may be corroded bady, the threads remaining under the nut are usually okay. Careful splitting of the nut usually does not hurt the threads.
Dave W. from Gilbert, AZ

66 Corsa 140/4 Yenko Stinger Tribute
66 Corsa 140 Coupe w/factory A/C
65 Monza 4DR 140/PG w/factory A/C
65 Monza 4DR EJ20T/5
64 Greenbrier 110/PG, Standard 6-Door
Wagon Master
Posts: 479
Joined: Thu Jul 28, 2011 6:36 pm

Re: SOS from Italy: cylinder head nuts

Post by Wagon Master »

Just to be clear, I don't split the nut at a right angle to the stud. I always hold the chisel parallel to the stud and split/cut along side the threads. As stated, the threads inside the nut are no doubt in usable condition. If you happed to ding up a few simply run a 3/8" fine thread die over them and be done. Try not to move (rotate) the studs if at all possible.
User avatar
alexbert
Posts: 92
Joined: Mon Jun 24, 2013 8:34 am
Location: Turin - Italy - Europe - WORLD

Re: SOS from Italy: cylinder head nuts - 2nd question

Post by alexbert »

I was thinking about cutting the rusted tip of the stud.
could this help in some way?
Stud head.jpg
If I have to split the nuts, shall I point the chisel on the side (like the green arrow) or from top down (like the yellow one)???

thanks

Alex
When you see a Corvair
and your heart goes with her
that's Amore!
User avatar
azdave
Corvair of the Year
Corvair of the Year
Posts: 2127
Joined: Fri Dec 11, 2009 1:27 pm
Location: Phoenix, AZ

Re: SOS from Italy: cylinder head nuts - 2nd question

Post by azdave »

alexbert wrote:I was thinking about cutting the rusted tip of the stud.
could this help in some way?
Stud head.jpg
If I have to split the nuts, shall I point the chisel on the side (like the green arrow) or from top down (like the yellow one)???

thanks

Alex
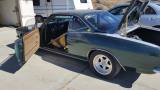
No need to cut the stud shorter. Strike the chisel onto the nut in the direction of the yellow arrow.
Dave W. from Gilbert, AZ

66 Corsa 140/4 Yenko Stinger Tribute
66 Corsa 140 Coupe w/factory A/C
65 Monza 4DR 140/PG w/factory A/C
65 Monza 4DR EJ20T/5
64 Greenbrier 110/PG, Standard 6-Door
User avatar
alexbert
Posts: 92
Joined: Mon Jun 24, 2013 8:34 am
Location: Turin - Italy - Europe - WORLD

Re: SOS from Italy: cylinder head nuts

Post by alexbert »

Situation is the following:
- 3 nuts went off easily (all of them on the right side which is in better condition);
- 1 I could cut away with chisel
- 1 is incredibly difficult to cut : too much sticked on the washer side ... dont know what to do...
all the other unfortunately are turning with the stud. As soon as i saw them turning for some degrees i stopped and turned back.
I will cut them away (I'll buy a nut splitter which should go in such narrow place like under the exhaust manifold).
Yet question is: should I change them anyway?

Thanks for supporting...

Alex
When you see a Corvair
and your heart goes with her
that's Amore!
Post Reply

Return to “Ask your Mechanical Questions here”