U-Joint / Half Shaft Restoration Part 1: Corsa GT Project

Need to know how? Want to show how?
User avatar
65Ragtop
Posts: 465
Joined: Fri Jul 30, 2010 5:45 pm
Location: Arizona

U-Joint / Half Shaft Restoration Part 1: Corsa GT Project

Post by 65Ragtop »

I have been working on the Corsa on and off every now and then. Here is a bit on my Half Shaft Restoration with new HD U-joints. Part 1 is the removal of the U-Joints and clean up of the shaft.

Part 2 will be U-Joint installation. Link to Part 2: viewtopic.php?f=55&t=2149


My 7 year old son is the photographer on this project! We are both learning a lot and having a blast! :chevy:
Attachments
I like to soak the shafts with penetrating lube the day before I try to remove the shafts and U-joints.  Mark the shafts before you remove them.  PT (Passenger side Transaxle), DT (Drivers side).  After you get the shaft out you can use a punch to permanently mark each shaft.  Why?  Go to part 2 for the U-joint install for an explanation.
I like to soak the shafts with penetrating lube the day before I try to remove the shafts and U-joints. Mark the shafts before you remove them. PT (Passenger side Transaxle), DT (Drivers side). After you get the shaft out you can use a punch to permanently mark each shaft. Why? Go to part 2 for the U-joint install for an explanation.
After 45 years, the clips can be a bit stubborn, but they will come out fairly easily if you persist.
Using lots of lube, press the old U-Joint 90% of the way out.  I don't like to press it all the way out as it still won't make enough room for the joint to come out of the shaft and you will have to restart the cap when you press it the other way.  It can get troublesome sometimes.  Don't worry if it comes all the way out though, just restart it again after you get the cap out.  You can do this with a vise if you don't have a press.
Using lots of lube, press the old U-Joint 90% of the way out. I don't like to press it all the way out as it still won't make enough room for the joint to come out of the shaft and you will have to restart the cap when you press it the other way. It can get troublesome sometimes. Don't worry if it comes all the way out though, just restart it again after you get the cap out. You can do this with a vise if you don't have a press.
Grab the exposed end cap with a pair of vise grips and twist the cap out.  Once again, after 45 years it can sometimes get a little hard to get it to move. I had to press one back and forth a time or so with a lot of lube to get it loose enough to come out finally.
Grab the exposed end cap with a pair of vise grips and twist the cap out. Once again, after 45 years it can sometimes get a little hard to get it to move. I had to press one back and forth a time or so with a lot of lube to get it loose enough to come out finally.
All of mine came out fairly easily with the exception of one.  There is always ONE, right?  I put that one in a large vise and it came right out.
All of mine came out fairly easily with the exception of one. There is always ONE, right? I put that one in a large vise and it came right out.
With the end cap out, press the U-joint back through the shaft using a receiver or appropriate hole in your arbor so that the other end of the U-joint begins to protrude from the other end of the shaft as the first one did.
The U-Joint should pull right out now.
Press out the second end cap.
Repeat.  Here is the shaft with the old and new U-joints side by side
Repeat. Here is the shaft with the old and new U-joints side by side
I clean the parts first with a degreaser to get the big crud off.  This helps make my blasting medium last longer.  Then I glass bead blast the part (shaft) making sure to get into the small areas such as the clip grooves.  Once this is done, I debur the piece with a file to remove any nicks, scratches or welding splash.
I clean the parts first with a degreaser to get the big crud off. This helps make my blasting medium last longer. Then I glass bead blast the part (shaft) making sure to get into the small areas such as the clip grooves. Once this is done, I debur the piece with a file to remove any nicks, scratches or welding splash.
A very light coat of primer and a coat of Hammer Grey Rustoleum clean it up nicely.  Be sure to mask off the U-joint press surfaces, we don't want paint there.
A very light coat of primer and a coat of Hammer Grey Rustoleum clean it up nicely. Be sure to mask off the U-joint press surfaces, we don't want paint there.
Before and after, this is where we are going.  See part 2 for the U-Joint installation.
Before and after, this is where we are going. See part 2 for the U-Joint installation.
Mike S.
65 Corsa 140 Ragtop
CORSA member
User avatar
Scott H
Site Admin
Posts: 4191
Joined: Tue Nov 17, 2009 5:21 pm
Location: Hesperia, CA

Re: U-Joint / Half Shaft Restoration Part 1: Corsa GT Projec

Post by Scott H »

oooh, thats purrrty
Scott
1960 Monza Coupe
1965 Evening Orchid Corsa Turbo (project)
1961 Rampside (project)
1964 Spyder coupe (patina car, running)
1964 faux Spyder (project/parts car)
1964 Monza (parts car)
1963 Monza (parts car)
User avatar
bbodie52
Corvair of the Month
Posts: 11956
Joined: Mon Aug 06, 2012 12:33 pm
Location: Lake Chatuge Hayesville, NC
Contact:

Re: U-Joint / Half Shaft Restoration Part 1: Corsa GT Project

Post by bbodie52 »

:thumbsupwink: :wrench: :typing: :ty:
Brad Bodie
Lake Chatuge, North Carolina
Image 
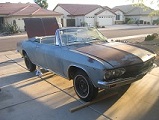
1966 Corvair Corsa Convertible
Post Reply

Return to “DIY - Explanations and Demonstrations”