You are supposed to crank until it stops rising on every pulseflat6_musik wrote: ↑Thu Aug 06, 2020 4:30 pmWOW......that is some serious compression! I'm curious to see how high it would go if you keep cranking.edherba wrote: ↑Thu Aug 06, 2020 11:00 am Oh, I also re did the compression check. Took all the spark plugs out, held open throttle plate and choke, cranked 5-6 times and got 170 to 180psi. I think the more times I crank the higher and higher the pressure indicates. Or does it level off after a certain number of cranks?
1963 Corvair Engine detonation
-
terribleted

- Posts: 4584
- Joined: Sun Apr 18, 2010 2:36 pm
- Location: Atlanta, GA
- Contact:
Re: 1963 Corvair Engine detonation
Corvair guy since 1982. I have personally restored at least 20 Vairs, many of them restored ground up.
Currently working full time repairing Corvairs and restoring old cars.
https://www.facebook.com/tedsautorestoration/
Located in Snellville, Georgia
Currently working full time repairing Corvairs and restoring old cars.
https://www.facebook.com/tedsautorestoration/
Located in Snellville, Georgia
-
bbodie52

- Corvair of the Month

- Posts: 11891
- Joined: Mon Aug 06, 2012 12:33 pm
- Location: Lake Chatuge Hayesville, NC
- Contact:
Re: 1963 Corvair Engine detonation
Brad Bodie
Lake Chatuge, North Carolina
 1966 Corvair Corsa Convertible
Lake Chatuge, North Carolina
1966 Corvair Corsa Convertible-
terribleted
- Posts: 4584
- Joined: Sun Apr 18, 2010 2:36 pm
- Location: Atlanta, GA
- Contact:
Re: 1963 Corvair Engine detonation
The good thing is that the readings are all close to each other, but yes 170-180 is on the high side. I have seen these compression readings on Corvair engines a number of times (and even a little higher). I believe it results from head machining not compensated for with head or base gasket thickness. The engines I have seen compression this high on all seemed to run ok, and I did not hear of them blowing up or anything.
A high compression like this needs great fuel (Premium only 92 or better octane) and careful timing especially if the car is an automatic in order to avoid detonation. The higher the compression the more likely for detonation to occur. If the problem can not be solved by tuning I would remove the heads and increase the head gasket thickness or head and cylinder base gasket thickness to drop the compression.
Another possibility is carbon build up on the pistons increasing the compression.
You should certainly verify your test with another gauge if possible.
Corvair guy since 1982. I have personally restored at least 20 Vairs, many of them restored ground up.
Currently working full time repairing Corvairs and restoring old cars.
https://www.facebook.com/tedsautorestoration/
Located in Snellville, Georgia
Currently working full time repairing Corvairs and restoring old cars.
https://www.facebook.com/tedsautorestoration/
Located in Snellville, Georgia
Re: 1963 Corvair Engine detonation
Hi Guys. So I was working on trying to resolve the very low vacuum on the RHS carburator. I changes the base gaskets and plastic spacer with new ones. The old plastic spacer had some small cracks but not all the way through. I also changed the short rubber hose from the crossover tube to the carb base. I sprayed carb cleaner at it and it had a slight fluctuation but hard to say since the idle is not steady anyway. +/- 100 rpm. Then I hooked up the vacuum gauge with a T to the spark ports on both carbs Still the same problem. At 1100-1200 rpm I get 4 inHg. When I pinch the RHS hose I get 10inHg. When I pinch the left hose, I get zero. I then connected the vacuum gauge directly to the RHS spark port and at 1200 rpm there was zero vacuum. Only when I revved it to 1400 rpm did I get vacuum. Running out of ideas here.
Re: 1963 Corvair Engine detonation
another things I just realized. Bbodie52 mentioned "The vertical port only applies vacuum to the vacuum advance mechanism as the throttle is opened"
I am connecting my vacuum gauge to the vertical spark port which goes to the distributor vacuum advance. Therefore, I would not get vacuum on the RHS if the throttle plate is closed. So if I adjust the linkage so the the RHS opens the throttle plate a bit, it would give vacuum. Then balance it with the LHS. Could this all just be a throttle plate adjustment issue?
I am connecting my vacuum gauge to the vertical spark port which goes to the distributor vacuum advance. Therefore, I would not get vacuum on the RHS if the throttle plate is closed. So if I adjust the linkage so the the RHS opens the throttle plate a bit, it would give vacuum. Then balance it with the LHS. Could this all just be a throttle plate adjustment issue?
-
joelsplace
- Posts: 2004
- Joined: Wed Oct 13, 2010 12:51 pm
- Location: Northlake, TX
Re: 1963 Corvair Engine detonation
You'll never get it adjusted correctly if you connect your gauge to the vertical ports. You must use the horizontal ports.
157 Corvairs, 5 Ultravans and counting
Northlake, TX
Northlake, TX
-
bbodie52
- Corvair of the Month
- Posts: 11891
- Joined: Mon Aug 06, 2012 12:33 pm
- Location: Lake Chatuge Hayesville, NC
- Contact:
Re: 1963 Corvair Engine detonation
Balancing the two carburetors at idle would be done by fine-tuning the idle speed screws. Balancing the two carburetors at part throttle is done by adjusting the throttle linkage on the left carburetor, which has an adjustment to lengthen or shorten the throttle rod so that the butterfly valve openings can be matched for equal airflow at a steady part-throttle opening held with a turnbuckle.
With the throttle fully closed on a running engine, the intake manifold vacuum level is at maximum. The horizontal vacuum pot is drilled so that it taps into the carburetor bore BELOW the throttle butterfly valve. The vertical spark port taps into the carburetor bore slightly ABOVE the throttle butterfly valve, so it is not exposed to intake manifold vacuum until the butterfly valve begins to open. (If the vacuum aadvance mechanism on the distributor were to be connected to the horizontal vacuum port, maximum intake manifold vacuum would pull the vacuum advance mechanism to FULL ADVANCE when the engine is only idling. At idle you don't want any vacuum advance being added to the timing — you only want the vacuum advance to begin dialing in timing advance as you start to accelerate — as the throttle butterfly begins to open. As acceleration begins to take place, the vacuum advance system is adding timing advance to the distributor. At higher throttle settings, the butterfly valve opens further to bring in more fuel/air mixture to the intake manifold. Increasing exposure to the air intake because of the opening throttle butterfly cause intake manifold vacuum to decline, which reduces vacuum to the vacuum advance mechanism, so timing begins to drop from the vacuum advance, while at the same time increasing engine RPM speed has more affect on the CENTRIFUGAL ADVANCE mechanism inside the distributor, so it begins to take over the job of advancing the timing. This is a process of handing the job of managing engine timing advance from te initial vacuum advance at low engine speeds to centrifugal advance at higher engine speeds. The two distributor advance mechanisms (VACUUM and CENTRIFUGAL) work together, continually transferring timing advance resonsibility back and forth betwern the two systems as engine speeds rise and fall.
Since you realise that you are measuring vacuum levels at the vertical spark port on each carburetor, the vacuum at these ports can only be equalized by matching the amount that the throttle is opened on each side at 1200 RPM. The accelerator pedal pulls the throttles open from the center. The link to the right carburetor throttle is fixed in length and is not adjustable, BUT THE LENGTH OF THE LINK TO THE LEFT CARBURETOR THROTTLE BUTTERFLY IS ADJUSTABLE! There is a swivel at the bottom of that link where it clips to the carburetor. By disconncting the top of that link from the main throttle linkage, you can rotate te link in the swivel connector to screw or unscrew the link, which lengthens or shortens the throttle link rod. This is how you balance the opening of the throttle butterfly valves on both sides while maintaining a constant engine speed at open throttle (approximately 1200 rpm as a sample point). The goal is to see equal amounts of vacuum at the spark port as you compare the readings while you pinch off one side or the other. You then adjust the length of the left side throttle rod so tht the vacuum readings on both sides are the same.
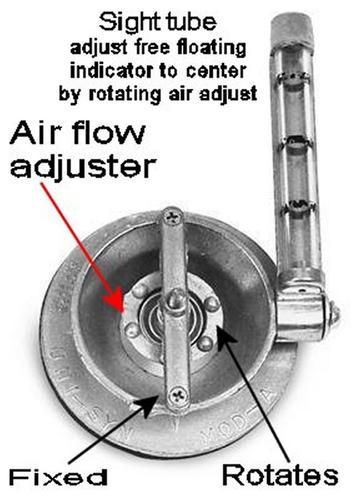
The Uni-syn gauge does much the same thing, except is measures total airflow through each carburetor intake instead of using a vacuum gauge connected to the spark port. I prefer the use of the Uni-syn gauge because it permits an actual air flow through the carburetor throat to be measured and both sides to be equalized based on that reading instead of relying on a simple mechanical static measurement at the carburetor linkage and a manifold vacuum reading. Also the Uni-syn gauge can be used to visually measure the air flow at both the engine idle and at a steady-state partial throttle, so that air flow balance can be obtained at idle and at open throttle.
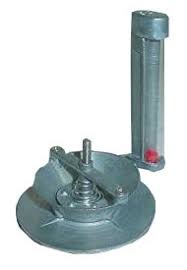
The Uni-syn gauge has been around since the late-1950's or early 1960's and is one of the fastest and easiest ways to synchronize multiple carburetors. It was originally intended for British multi-carburetor engines, motorcycles, etc. and was a natural addition to the Corvair mechanic's tool box. It can usually be found for $20-$40. Only one is needed.
This balancing process is done twice — once with the idle speed screws (Pages 8-9 of the attached Tuning the Corvair Engine) and again at 1200 RPM using the vacuum gauge, as shown on pages 11-13.
The Uni-syn gauge can be used to synchronize both carburetors at idle — first physically synchronizing them as shown in the attached guide by adjusting the screws for first contact with the throttle mechanism, and then adjusting the screw on each side an additional 2½ turns. Then with this mechanical preset established, the Uni-syn is used to measure the air velocity through each carburetor, and the speed screws are balanced to achieve the desired idle speed and a balanced airflow through each carburetor. The process is then repeated with the Uni-syn — but this time a turnbuckle is used to hold the throttle open at 1200 RPM, and the link on the left carburetor is adjusted to achieve equal airflow through each carburetor.
TIPS & CLARIFICATION...
With the engine at idle, you want to open the Uni-Syn flow control as much as possible, but still keep the float in the sight glass at about mid-level. Then check the other carburetor, which you want to read the same flow rate. You may have to adjust the flow control a few times as you adjust the carburetor settings. Just remember to check each carburetor with the flow control set at the same point, and to keep the sight glass in the vertical to prevent the float from hanging up in the tube.
The wheel in the Uni-Syn venturi controls the flow through the tube, or in other words how high the bead is in the cylinder for a given engine speed. You need enough flow to not strangle the engine, and the bead works just as well in the lower third (which still lets good air flow through). Make sure the idle speed doesn't drop when you place the tool on the carb: if it does, open it up.
Before setting the carbs, make sure that the ignition is right: points and timing set, good wires and plugs. Rich running is often blamed on carbs when in fact it's a weak, retarded spark. Check the throttle shafts: loose ones let in air and lean the mixture, raising idle speed, as well as throw off the linkage action. Check the linkage that connects the carburetors. if it's loose, one will open before the other. Make sure there are no vacuum leaks.
With a twin carburetor set up, disconnect the linkage that connects one carburetor to the other. Set the idle speed with the linkage screws first. Use the Uni-Syn to check that each carburetor is drawing equally at idle. This may take a few tries until you get both drawing equally at the speed you want. Blip the throttle to see if they come back to those settings (worn throttle shafts can fool you). Set the idle mixture screws in accordance with the shop manual instructions. Check the balance again. Hook the linkage back up. If one carburetor now draws more, adjust the linkage until it's back to roughly equal.
Once the carburetors are drawing equally at idle, hold an engine speed: at about 1200 RPM. This checks that the mechanical linkage is pulling equally. You'll need to open up the Uni-Syn center wheel to draw more air and bring the bead down in the tube. If both carburetors are within a bead's thickness of each other, that's good. If one is definitely off from the other, the higher flow carburetor's linkage is being pulled more than the other. You'll need to figure out why that's happening mechanically to rectify it.
With the throttle fully closed on a running engine, the intake manifold vacuum level is at maximum. The horizontal vacuum pot is drilled so that it taps into the carburetor bore BELOW the throttle butterfly valve. The vertical spark port taps into the carburetor bore slightly ABOVE the throttle butterfly valve, so it is not exposed to intake manifold vacuum until the butterfly valve begins to open. (If the vacuum aadvance mechanism on the distributor were to be connected to the horizontal vacuum port, maximum intake manifold vacuum would pull the vacuum advance mechanism to FULL ADVANCE when the engine is only idling. At idle you don't want any vacuum advance being added to the timing — you only want the vacuum advance to begin dialing in timing advance as you start to accelerate — as the throttle butterfly begins to open. As acceleration begins to take place, the vacuum advance system is adding timing advance to the distributor. At higher throttle settings, the butterfly valve opens further to bring in more fuel/air mixture to the intake manifold. Increasing exposure to the air intake because of the opening throttle butterfly cause intake manifold vacuum to decline, which reduces vacuum to the vacuum advance mechanism, so timing begins to drop from the vacuum advance, while at the same time increasing engine RPM speed has more affect on the CENTRIFUGAL ADVANCE mechanism inside the distributor, so it begins to take over the job of advancing the timing. This is a process of handing the job of managing engine timing advance from te initial vacuum advance at low engine speeds to centrifugal advance at higher engine speeds. The two distributor advance mechanisms (VACUUM and CENTRIFUGAL) work together, continually transferring timing advance resonsibility back and forth betwern the two systems as engine speeds rise and fall.
Since you realise that you are measuring vacuum levels at the vertical spark port on each carburetor, the vacuum at these ports can only be equalized by matching the amount that the throttle is opened on each side at 1200 RPM. The accelerator pedal pulls the throttles open from the center. The link to the right carburetor throttle is fixed in length and is not adjustable, BUT THE LENGTH OF THE LINK TO THE LEFT CARBURETOR THROTTLE BUTTERFLY IS ADJUSTABLE! There is a swivel at the bottom of that link where it clips to the carburetor. By disconncting the top of that link from the main throttle linkage, you can rotate te link in the swivel connector to screw or unscrew the link, which lengthens or shortens the throttle link rod. This is how you balance the opening of the throttle butterfly valves on both sides while maintaining a constant engine speed at open throttle (approximately 1200 rpm as a sample point). The goal is to see equal amounts of vacuum at the spark port as you compare the readings while you pinch off one side or the other. You then adjust the length of the left side throttle rod so tht the vacuum readings on both sides are the same.
The Uni-syn gauge does much the same thing, except is measures total airflow through each carburetor intake instead of using a vacuum gauge connected to the spark port. I prefer the use of the Uni-syn gauge because it permits an actual air flow through the carburetor throat to be measured and both sides to be equalized based on that reading instead of relying on a simple mechanical static measurement at the carburetor linkage and a manifold vacuum reading. Also the Uni-syn gauge can be used to visually measure the air flow at both the engine idle and at a steady-state partial throttle, so that air flow balance can be obtained at idle and at open throttle.
The Uni-syn gauge has been around since the late-1950's or early 1960's and is one of the fastest and easiest ways to synchronize multiple carburetors. It was originally intended for British multi-carburetor engines, motorcycles, etc. and was a natural addition to the Corvair mechanic's tool box. It can usually be found for $20-$40. Only one is needed.
This balancing process is done twice — once with the idle speed screws (Pages 8-9 of the attached Tuning the Corvair Engine) and again at 1200 RPM using the vacuum gauge, as shown on pages 11-13.
The Uni-syn gauge can be used to synchronize both carburetors at idle — first physically synchronizing them as shown in the attached guide by adjusting the screws for first contact with the throttle mechanism, and then adjusting the screw on each side an additional 2½ turns. Then with this mechanical preset established, the Uni-syn is used to measure the air velocity through each carburetor, and the speed screws are balanced to achieve the desired idle speed and a balanced airflow through each carburetor. The process is then repeated with the Uni-syn — but this time a turnbuckle is used to hold the throttle open at 1200 RPM, and the link on the left carburetor is adjusted to achieve equal airflow through each carburetor.
TIPS & CLARIFICATION...
With the engine at idle, you want to open the Uni-Syn flow control as much as possible, but still keep the float in the sight glass at about mid-level. Then check the other carburetor, which you want to read the same flow rate. You may have to adjust the flow control a few times as you adjust the carburetor settings. Just remember to check each carburetor with the flow control set at the same point, and to keep the sight glass in the vertical to prevent the float from hanging up in the tube.
The wheel in the Uni-Syn venturi controls the flow through the tube, or in other words how high the bead is in the cylinder for a given engine speed. You need enough flow to not strangle the engine, and the bead works just as well in the lower third (which still lets good air flow through). Make sure the idle speed doesn't drop when you place the tool on the carb: if it does, open it up.
Before setting the carbs, make sure that the ignition is right: points and timing set, good wires and plugs. Rich running is often blamed on carbs when in fact it's a weak, retarded spark. Check the throttle shafts: loose ones let in air and lean the mixture, raising idle speed, as well as throw off the linkage action. Check the linkage that connects the carburetors. if it's loose, one will open before the other. Make sure there are no vacuum leaks.
With a twin carburetor set up, disconnect the linkage that connects one carburetor to the other. Set the idle speed with the linkage screws first. Use the Uni-Syn to check that each carburetor is drawing equally at idle. This may take a few tries until you get both drawing equally at the speed you want. Blip the throttle to see if they come back to those settings (worn throttle shafts can fool you). Set the idle mixture screws in accordance with the shop manual instructions. Check the balance again. Hook the linkage back up. If one carburetor now draws more, adjust the linkage until it's back to roughly equal.
Once the carburetors are drawing equally at idle, hold an engine speed: at about 1200 RPM. This checks that the mechanical linkage is pulling equally. You'll need to open up the Uni-Syn center wheel to draw more air and bring the bead down in the tube. If both carburetors are within a bead's thickness of each other, that's good. If one is definitely off from the other, the higher flow carburetor's linkage is being pulled more than the other. You'll need to figure out why that's happening mechanically to rectify it.
- Attachments
-
- Tuning the Corvair Engine.pdf
- Tuning the Corvair Engine
- (4.6 MiB) Downloaded 79 times
Brad Bodie
Lake Chatuge, North Carolina
1966 Corvair Corsa Convertible
Lake Chatuge, North Carolina
1966 Corvair Corsa ConvertibleRe: 1963 Corvair Engine detonation
Thanks for all the information. I will start the process again. During the tuning, the fan belt snapped. Had to push the car a mile back home because I thought it was a smart idea to work in a parking lot away from the neighbors. Luckily some sympathetic neighbors an my wife helped push it back home. Didn't have the tools to change to belt. I am determined to get this car running properly.
-
bbodie52
- Corvair of the Month
- Posts: 11891
- Joined: Mon Aug 06, 2012 12:33 pm
- Location: Lake Chatuge Hayesville, NC
- Contact:
Re: 1963 Corvair Engine detonation
Of course it is always wise to carry a spare fan belt and the needed tools in the trunk. But if you only have the spare belt and no tools, this video shows how to get the belt on the pulleys without tools. (This works because the pulley on the alternator side is shallow and somewhat easy to get the belt to rif up over the edge without tools. The idler pulley is too deep with tall sides to prevent the belt fro riding over the edge.
It is not a good idea to try to reuse a belt that has flipped off on its own. The belt may appear to be intact, but the internal metal wire strands that strengthen the belt may have snapped. The physical damage may be internal and hidden within the belt. Such a belt will stretch easily and will usually flip off again if you try to reuse the weakened belt.

Changing a Corvair fan belt without tools
It is not a good idea to try to reuse a belt that has flipped off on its own. The belt may appear to be intact, but the internal metal wire strands that strengthen the belt may have snapped. The physical damage may be internal and hidden within the belt. Such a belt will stretch easily and will usually flip off again if you try to reuse the weakened belt.
Changing a Corvair fan belt without tools
The belts do fatigue with age and should be replaced every few years as a precautionary measure. It is usually not a good idea to reuse one after it has flipped — even if it looks OK and seems to be intact. Internal damage to the hidden tensile support strands can occur if the belt flips and is forced to ride up over the pulley structure. If a new belt flips it may have stretched with "break-in" mileage and might have needed to be re-adjusted. If you repeatedly have such problems with your Corvair there may be a problem with excessive drag in a faulty fan or idler pulley bearing, or a problem with the alternator bearings. A failing harmonic balancer can also cause belt problems.
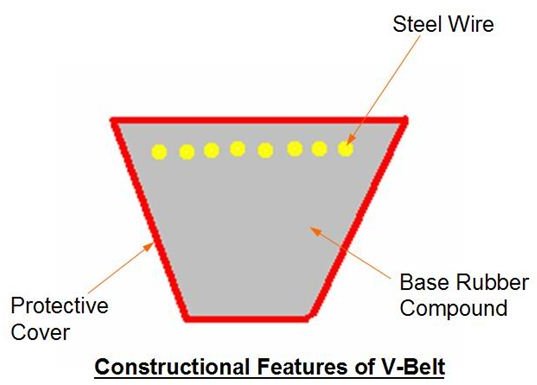
The image above displays the support strands that are embedded around the perimeter of the belt to provide it with tensile strength. A belt that has flipped off from the Corvair pulleys on its own may have suffered damage to these support strands that are internal and hidden from view. However, one or more damaged strands within the belt can severely weaken its overall tensile strength, which means it is likely to flip off again as it stretches if a damaged belt is reused.

Brad Bodie
Lake Chatuge, North Carolina
1966 Corvair Corsa Convertible
Lake Chatuge, North Carolina
1966 Corvair Corsa Convertible-
joelsplace
- Posts: 2004
- Joined: Wed Oct 13, 2010 12:51 pm
- Location: Northlake, TX
Re: 1963 Corvair Engine detonation
I've never seen a belt with steel in it.
157 Corvairs, 5 Ultravans and counting
Northlake, TX
Northlake, TX
-
bbodie52
- Corvair of the Month
- Posts: 11891
- Joined: Mon Aug 06, 2012 12:33 pm
- Location: Lake Chatuge Hayesville, NC
- Contact:
Re: 1963 Corvair Engine detonation
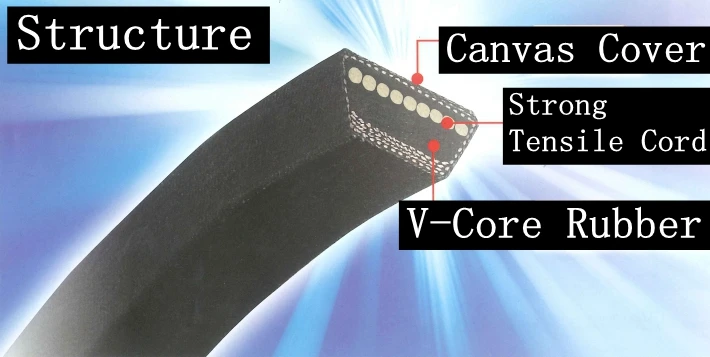
V-belts are often made from Kevlar or are reinforced with steel, polyester, or Twaron.
I do remember handling a faulty belt that had some strands of steel protruding from the edge. i remember some of those steel strands penetrating my finger as I handled the belt.Steel
Steel has an impressive tensile strength of 360,000 lbs/sq.in., as well as a low elongation rate. This makes steel an excellent option for rapid start/stop operations. Because of its excellent dimensional stability, steel is also a good choice for extreme temperature environments, both high and low. However, it should be noted that steel has low vibration absorption capabilities.
Kevlar
Kevlar reinforced belts offer positive, nonslip, accurate power transmission without any unwanted vibration, chatter, or backlash. They have impressive shock resistance capacities and a very high load capacity. Kevlar boasts a tensile strength of 400,000 lbs/sq.in., and also has a fairly low elongation, making Kevlar reinforced belts durable and flexible. Kevlar is an excellent option for applications that involve high intermittent shock loading.
Polyester
When compared to Kevlar and Steel, polyester does not have as high of a tensile strength. The tensile of polyester is roughly 160,000 lbs/sq.in., less than half of that of Kevlar. However, the major advantage of polyester is its low modulus of approximately 2,000,000 lbs/sq.in. This means that polyester reinforced timing belts rotate more smoothly, making polyester reinforcement an ideal option for timing belts in applications such as small diameter pulleys or any kind of high-speed application. Polyester is also quite elastic, meaning it has excellent shock absorption capabilities and can minimize unwanted vibration.
Fiberglass
Fiberglass has a tensile strength comparable to that of steel, at 350,000 lbs/in2. It is high-strength, low-stretch, and boasts a 100 percent elongation recovery. It also has excellent dimensional stability and an excellent chemical resistance, which make it a good option for corrosive environments.
Brad Bodie
Lake Chatuge, North Carolina
1966 Corvair Corsa Convertible
Lake Chatuge, North Carolina
1966 Corvair Corsa ConvertibleRe: 1963 Corvair Engine detonation
Hi again, I followed pages 8-9 of the "Tuning the Corvair Engine" where I reset the idle setting. Then again at 1200 RPM using the vacuum gauge (pages 11-13), I checked it and the vacuum is 10 inHg with no change when I pinch the left and right side. That's progress. I then connected the vacuum gauge to the choke ports on the carbs (put back the hoses on the spark ports). It says to adjust mixture screw until peak steady vacuum is achieved. I unscrewed each side gradually. RPM went up to 800 and steady vacuum achieved. I then connected everything back and went for a test drive. Took it on the highway and engine temp got to 250F. When I stopped at a light, the engine would detonate (spark knock) when I stepped on the accelerator or go up a hill, but not occur under any other conditions. I could pass on the highway with no knocking. It seems that the vacuum advance is maybe advancing it too much. It is very difficult to check timing when the car is in drive (powerglide) and it tends to bog down. I checked timing in neutral at 700 rpm with vacuum line to advance mechanism plugged, and I get around 13 deg BTDC. Is 250F too hot and should I retard the timing and then cause other issues?
Re: 1963 Corvair Engine detonation
also forgot to mention:
The damper doors open fully. No leaves or dirt around cylinder cooling fins either.
Engine temp is from oil temp gauge I added.
Engine does not detonate when it is cooler, say around 180F.
The damper doors open fully. No leaves or dirt around cylinder cooling fins either.
Engine temp is from oil temp gauge I added.
Engine does not detonate when it is cooler, say around 180F.
-
bbodie52
- Corvair of the Month
- Posts: 11891
- Joined: Mon Aug 06, 2012 12:33 pm
- Location: Lake Chatuge Hayesville, NC
- Contact:
Re: 1963 Corvair Engine detonation
On the open highway (70 mph average) on hot summer days in a fully loaded car, 140 hp Corsa seemed to hold but not exceed around 400°. Never experienced a problem with engine pinging.
What grade gasoline are you using? Spark plug type and heat range? 250° seems plenty cool. Is it possible that the advance mechanism is sticking and not permitting return to normal idle timing? When stopped, does the idle speed return to normal, or does it seem to be high?
Brad Bodie
Lake Chatuge, North Carolina
1966 Corvair Corsa Convertible
Lake Chatuge, North Carolina
1966 Corvair Corsa ConvertibleRe: 1963 Corvair Engine detonation
I am using 94 octane. Spark plugs NGK BR5HS. Yes, the idle returns to normal when stopped.
-
terribleted
- Posts: 4584
- Joined: Sun Apr 18, 2010 2:36 pm
- Location: Atlanta, GA
- Contact:
Re: 1963 Corvair Engine detonation
An oil temp of 250 sounds like it is too hot or certainly getting there. Where the sender is located might make a difference but that is quite hot. Are you sure the top of the cylinders and heads, and oil cooler are clean? Sounds like you might actually be overheating or getting close to overheating. As engine temp rises detonation becomes more likely. Combine that with a very high compression engine which also increases probability of detonation.....
Corvair guy since 1982. I have personally restored at least 20 Vairs, many of them restored ground up.
Currently working full time repairing Corvairs and restoring old cars.
https://www.facebook.com/tedsautorestoration/
Located in Snellville, Georgia
Currently working full time repairing Corvairs and restoring old cars.
https://www.facebook.com/tedsautorestoration/
Located in Snellville, Georgia