Hey guys! First post here,excited to hang around here and learn! appreciate the help in advance.
Just purchased a 63 Corvair Monza 900. Need to do a clutch replacement. Its my first project so Im working in garage with limited tools at the moment. Any info you can point me to in terms of what I would need to get the job done tool/equipment wise as well as instructional?
I will sift around the forums and see what I can dig up. I appreciate any help and direction you guys could offer me.
Thank you!
Corvair Clutch Replace Question
-
bbodie52

- Corvair of the Month

- Posts: 11908
- Joined: Mon Aug 06, 2012 12:33 pm
- Location: Lake Chatuge Hayesville, NC
- Contact:
Re: Corvair Clutch Replace Question
In performing a clutch repair/replacement on a Corvair you are taking on one of the more advanced mechanical jobs on a Corvair. In a conventional front-engine, rear differential vehicle, a clutch repair often simply means removing the driveshaft, disconnecting the shift linkage, and removing the transmission to gain access to the clutch. On a Corvair, the entire engine, differential and transmission (powertrain/transaxle) must be removed and then the heavy transaxle is separated from the engine. The job can also be hazardous and dangerous if you lack the correct tools and experience. You did not mention where you live, but if there is a local club chapter of CORSA (Corvair Society of America) in your area, you may find it advantageous to you to join a local club chapter and discuss your anticipated project with the members. You may find some who will volunteer to assist you and perhaps loan you some tools. Look over the material I have attached to get some idea of the tasks involved. Ask any questions you may have here on the Forum, and seek whatever help you may need at a CORSA club, if one is available.
I would recommend obtaining four jackstands and a good hydraulic service station-type floor jack or transmission jack. Thoroughly review the attached documents to familiarize yourself with the process, and if possible recruit some assistants to help ensure a safe outcome.
I have attached several documents that may be helpful to you. The first, Corvair and Corvair 95 Power Train Removal & Installation, is a good supplement to the information in the shop manual. Page 10 (bottom) illustrates the balance point (front to back). The oil pan drain plug is a good side-to-side reference point. After you have removed and disconnected everything around the perimeter of the powertrain and engine compartment that links the engine and transaxle to the car, you can position the jack (and a piece of plywood, if needed, to protect the underside of the engine), in the "best guess" balance position. Remove the three attaching nuts that secure the front transmission mount to the two rubber mounts, and the rear center rubber mount to the engine. As you slowly lower the powertrain, observe the front and rear attachment points to see of the powertrain appears to be coming down evenly. If the rear or front comes down first, you can raise the powertrain again, temporarily reinstall the three attaching nuts, and then make an adjustment to the jack position. After a little trial and error you should see the entire assembly coming down evenly so that it can be slowly lowered to ground level and wheeled from under the car. The shift linkage at the front of the manual transmission tends to hang up on the transmission mount, so you many have to maneuver the hardware a bit to clear the two components on the way down. (One or two safety observers/assistants is nice to have around, but I did manage to remove the powertrain by myself for the first time in 1969 when I was sixteen and survived to tell the tale! I was definitely sweating a lot and showing signs of being nervous at the time, but it can be done).
Use caution when separating the heavy transaxle from the engine. If the input shaft remains embedded in the clutch, you must pull the transaxle straight back about 24 inches until the other end clears the transaxle. If you have an assistant, the assistant may be able to reach between the differential face and the bell housing to grab the input shaft and pull it free from the clutch assembly — reducing the risk of damaging the input shaft, clutch disc, or throw-out bearing shaft.
With the engine and transaxle separated, be sure to inspect the throwout bearing shaft completely for cracks or fractures. The input shaft seal should be replaced when doing a clutch job, to ensure that no gear lube will leak onto the clutch assembly during operation. Also, when prying the input shaft retaining ring and seal out, be careful not to apply leverage against the end of the throwout bearing shaft, as excess leverage with a screwdriver or similar tool could conceivably cause a crack to form on the throwout bearing shaft.
The link below will provide you with a list of useful websites that are Corvair-related. Some of the links will lead you to an extensive technical library that will allow you to download shop manuals and other technical references in Adobe Reader (.pdf) format at no cost. There is also a link that will help you to locate nearby CORSA (Corvair Society of America) club chapters. While the Corvair Forum can be very helpful as you work on your Corvair, having local friends and contacts in your region who are knowledgeable about the Corvair can also be very helpful. These family-friendly CORSA club chapters often offer picnics, group scenic drives, technical training and assistance, car shows, and competition events that can greatly enhance your enjoyment of Corvair ownership. You will also find a list of essential Corvair parts suppliers.
Common and Useful Corvair Websites
- Attachments
-
- Corvair and Corvair 95 Power Train Removal & Installation.pdf
- Corvair and Corvair 95 Power Train Removal & Installation
- (3.35 MiB) Downloaded 49 times
-
- 1961 Chevrolet Corvair Shop Manual - Section 6 - Power Train.pdf
- 1961 Chevrolet Corvair Shop Manual - Section 6 - Power Train
- (704.51 KiB) Downloaded 32 times
-
- 1961 Chevrolet Corvair Shop Manual - Section 6a - Engine.pdf
- 1961 Chevrolet Corvair Shop Manual - Section 6a - Engine
- (3.53 MiB) Downloaded 26 times
-
- 1961 Chevrolet Corvair Shop Manual - Section 6b - Clutch.pdf
- 1961 Chevrolet Corvair Shop Manual - Section 6b - Clutch
- (459.77 KiB) Downloaded 31 times
-
- 1962-1963 Supplement - Chevrolet Corvair Shop Manual - Section 6 - Power Train.pdf
- 1962-1963 Supplement - Chevrolet Corvair Shop Manual - Section 6 - Power Train
- (34.01 KiB) Downloaded 27 times
-
- 1962-1963 Supplement - Chevrolet Corvair Shop Manual - Section 6a - Engine.pdf
- 1962-1963 Supplement - Chevrolet Corvair Shop Manual - Section 6a - Engine
- (1.26 MiB) Downloaded 21 times
-
- 1962-1963 Supplement - Chevrolet Corvair Shop Manual - Section 6b - Clutch.pdf
- 1962-1963 Supplement - Chevrolet Corvair Shop Manual - Section 6b - Clutch
- (128.83 KiB) Downloaded 37 times
Brad Bodie
Lake Chatuge, North Carolina
 1966 Corvair Corsa Convertible
Lake Chatuge, North Carolina
1966 Corvair Corsa ConvertibleRe: Corvair Clutch Replace Question
Wow!! Thank you so much! I have alot of reading to do! Haha!
I seriously cannot thank you enough for taking the time to send that info!
I am going to grab some equipment after reading and give it a shot! Hopefully I survive to tell the tale as you did. lol...
I will most definitely be back to read along these forums and try my best to soak up some knowledge from all of you!
Thank you gain, off to work I go!
-
bbodie52
- Corvair of the Month
- Posts: 11908
- Joined: Mon Aug 06, 2012 12:33 pm
- Location: Lake Chatuge Hayesville, NC
- Contact:
Re: Corvair Clutch Replace Question
Corvair Powertrain (Engine plus Transaxle) Weight: around 600 lbs.
Differential Weight: 80 lbs.
Manual Transmission Weight: 70 lbs.
Powerglide Weight: 70 lbs.
(All transaxle estimates use Clark's Corvair Parts catalog shipping weights).


When I was a young 17 year old teenager, I remember removing a Corvair powertrain with my floor jack, and placing the engine section on a couple of stacks of 2x4's. Feeling strong and confident, I unbolted the transaxle from the bell housing, and attempted to separate it from the engine by straddling the transaxle while facing the engine. I cupped my hands under the transaxle, and lifted it while pulling it away from the engine. Unfortunately, the two-foot input shaft remained stuck in the clutch, so I could not set the approximately 150 lb. transaxle on the floor. While I stood bent over and straddling the transaxle, I was forced to continue waddling backward until the small end of the input shaft finally popped out of the differential. Sweating profusely I placed the heavy transaxle on the garage floor and staggered into the house to lay down on the couch for awhile...
 Perhaps placing the differential on the floor jack lifting cradle and having an assistant wheel the floor jack straight backward, while steadying the transaxle and observing/maintaining the alignment as the transaxle separates from the engine would be a better approach!
Even Better...
Differential Weight: 80 lbs.
Manual Transmission Weight: 70 lbs.
Powerglide Weight: 70 lbs.
(All transaxle estimates use Clark's Corvair Parts catalog shipping weights).
When I was a young 17 year old teenager, I remember removing a Corvair powertrain with my floor jack, and placing the engine section on a couple of stacks of 2x4's. Feeling strong and confident, I unbolted the transaxle from the bell housing, and attempted to separate it from the engine by straddling the transaxle while facing the engine. I cupped my hands under the transaxle, and lifted it while pulling it away from the engine.
Even Better...
Here are some pictures and a link to the "BobWitt" post...
...I made 4x guide pins from 5 or 6" bolts, I had the engine on a cart and used the floor jack to manage the trans...
viewtopic.php?f=52&t=9836&p=82601&hilit ... ins#p82601
Brad Bodie
Lake Chatuge, North Carolina
1966 Corvair Corsa Convertible
Lake Chatuge, North Carolina
1966 Corvair Corsa ConvertibleRe: Corvair Clutch Replace Question
That story there may just save my life! lol!
Such a great learning tool to learn from others experiences. Ordered the clutch kit from Clark's and now I can eagerly await its arrival to begin!
Cannot wait to get her on the road!
I live in Ontario, CA.
I am not a mechanic but have done small jobs on other vehicles and consider myself pretty good with tools and such. Worked many trade skill jobs.
I will post some photos of her as well soon!
I went ahead and joined CORSA as well.
Any idea what jack cradle would be suitable for the job?
-
bbodie52
- Corvair of the Month
- Posts: 11908
- Joined: Mon Aug 06, 2012 12:33 pm
- Location: Lake Chatuge Hayesville, NC
- Contact:
Re: Corvair Clutch Replace Question
Both ends of the input shaft are splined, and since the clutch end of the shaft is larger and is also inserted into the pilot bushing, it offers a greater friction area and often remains embedded in the clutch while pulling free of the transmission/differential (transaxle). The greatest difficulty (and hazard) with this is that the differential "snout" that contains the differential seal can be damaged if the angle between the clutch housing and the face of the differential is not maintained until the input shaft is completely out of the differential. If it levers against the side of the "snout", the machined metal casting can crack. Replacing a damaged "snout" requires a complicated dismantling of the differential, as a new component must be installed from inside the differential case!

 Below are a few possibilities that I found when using Google to search for "craftsman transmission jack". Some adaptation may be needed to safely balance a Corvair powertrain on one of these and to properly protect the underside of the engine's "soft underbelly".
I like the 2nd jack shown below. It appears to be identical to the jack pictured in ENGINE CART AND TRANSAXLE CRADLE PHOTOS and INSTRUCTIONS, which is attached at the end below. It has a wide stance for steady use and to avoid tip over.

PITTSBURGH AUTOMOTIVE
800 Lbs. Low Lift Transmission Jack

https://www.harborfreight.com/800-lbs-L ... gL-VPD_BwE
PITTSBURGH AUTOMOTIVE
1500 Lb. Capacity ATV / Motorcycle Lift

https://www.harborfreight.com/1500-lb-C ... gLjG_D_BwE
Extreme Max Hydraulic Motorcycle/ATV Jack, 1700 lb. Capacity
Item #2372735Model #5001.5038
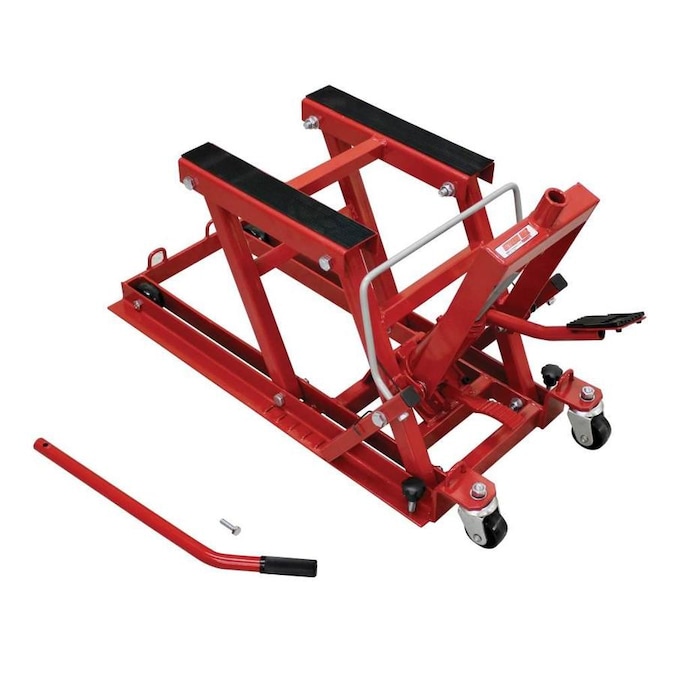
https://www.lowes.com/pd/Extreme-Max-Hy ... lsrc=aw.ds
Powerbuilt 620422E Heavy Duty 4000 lb Triple Lift Jack

https://www.amazon.com/exec/obidos/ASIN ... ckb3080-20
I believe you will find a lot of support and encouragement here on the Forum! However, joining one of many local CORSA (Corvair Society of America) club chapters in Los Angeles area can add the kind of local support that is difficult to find on the Internet. I would strongly suggest that you check out the websites and consider joining a club.
 https://www.corvair.org/index.php?optio ... crmSID=3_u
http://www.corvair.org/chapters/southcoast/

MEETING LOCATION:
COCO'S RESTUARANT, 18120 Hawthorne Blvd., Torrance CA 90504, (Corner of Hawthorne Blvd. and 182nd.)
54 min (54.1 mi) via CA-91 W
bbodie52 wrote:If you have never pulled the powertrain from a Corvair before it may take you a little longer. Unless you have access to a special dolly, most people perform the job using a hydraulic floor jack and a piece of plywood to protect the underside of the powertrain as you lower it from the car. It is something of a balancing act as you carefully locate the correct lifting point under the clutch housing and oil pan area. I have attached a GM publication Corvair and Corvair 95 Power Train Removal & Installation that you should review to supplement the information found in the factory shop manual. The picture at the bottom of page 10 should give you an idea of where you would find the balance point. Once you position your jack and have disconnected all of the hardware around the perimeter of the powertrain and in the engine compartment, you can remove the three nuts that attach the front and rear of the powertrain to the mounting points. As you slowly begin to lower the transaxle, you can monitor whether or not it is coming down evenly from all three points. This can help you to judge whether or not you need to reposition the jack. If you determine that an adjustment is needed you can raise the powertrain back up, temporarily reinstall the three nuts, reposition the jack, and then try again.
Once the powertrain has been lowered the engine can be positioned on some two by fours to support the load. The next significant task is to separate the transaxle from the engine. The transaxle is quite heavy, and it is important that the alignment between the differential face and the clutch housing be maintained as you separate them. The input shaft that links the transmission with the clutch disc is about 2 feet long, and it is splined at both ends. The larger spline is embedded in the clutch disc and pilot bushing. As you pull the two components apart the small splined end tends to pull free from the transmission, which leaves a 2 foot rod protruding from the clutch back into the transaxle. I would suggest using the floor jack to support the weight under the differential, and have your assistant(s) help you to maintain the alignment between the two components as you withdraw the transaxle from the engine. As the gap between the two opens up you may be able to reach in and grasp the input shaft and pull it free from the clutch disc. The concern here is to avoid any lateral tension on the long steel shaft that might be caused by misalignment between the transaxle and the engine. The concern also is to avoid not only damage to the input shaft, but any lateral tension that might be applied by it to the "snout" that protrudes from the differential and provides a support for the throw out bearing. That component is made of a steel casting that has been machined. Lateral tension on it from the input shaft could cause it to crack or fracture. Since it is installed from the inside of the differential, replacing it means dismantling the differential! It is certainly preferable to carefully separate the two components in avoid any damage that might be incurred if the heavy transaxle were to shift position and apply lateral pressure via the long input shaft.
I like the 2nd jack shown below. It appears to be identical to the jack pictured in ENGINE CART AND TRANSAXLE CRADLE PHOTOS and INSTRUCTIONS, which is attached at the end below. It has a wide stance for steady use and to avoid tip over.
PITTSBURGH AUTOMOTIVE
800 Lbs. Low Lift Transmission Jack
PITTSBURGH AUTOMOTIVE
1500 Lb. Capacity ATV / Motorcycle Lift
Extreme Max Hydraulic Motorcycle/ATV Jack, 1700 lb. Capacity
Item #2372735Model #5001.5038
Powerbuilt 620422E Heavy Duty 4000 lb Triple Lift Jack
Well-suited to general automotive use in addition to transaxles and transfer cases, the Powerbuilt Heavy Duty (about $176) is relatively inexpensive, so it's good for home mechanics. It has tie-down points for securing large equipment, though it doesn't include straps or chains.
- Rated for 4000 pounds
- Removable center saddle
- Padded lifting rails
I believe you will find a lot of support and encouragement here on the Forum! However, joining one of many local CORSA (Corvair Society of America) club chapters in Los Angeles area can add the kind of local support that is difficult to find on the Internet. I would strongly suggest that you check out the websites and consider joining a club.
MEETING LOCATION:
COCO'S RESTUARANT, 18120 Hawthorne Blvd., Torrance CA 90504, (Corner of Hawthorne Blvd. and 182nd.)
54 min (54.1 mi) via CA-91 W
- Attachments
-
- ENGINE CART - Al Lacki's Engine Cart Isometric Drawing & Assembly Notes.pdf
- ENGINE CART - Al Lacki's Engine Cart Isometric Drawing & Assembly Notes
- (122.34 KiB) Downloaded 35 times
-
- ENGINE CART AND TRANSAXLE CRADLE PHOTOS and INSTRUCTIONS.pdf
- ENGINE CART AND TRANSAXLE CRADLE PHOTOS and INSTRUCTIONS
- (812.77 KiB) Downloaded 26 times
-
- Corvair and Corvair 95 Power Train Removal & Installation.pdf
- Corvair and Corvair 95 Power Train Removal & Installation
- (3.35 MiB) Downloaded 27 times
Brad Bodie
Lake Chatuge, North Carolina
1966 Corvair Corsa Convertible
Lake Chatuge, North Carolina
1966 Corvair Corsa Convertible-
MtnVairMike

- Posts: 148
- Joined: Mon Oct 24, 2016 11:31 am
- Location: Black Mountain, NC
Corvair Clutch Replace Question
Weight of total powerpack is appx 465lbs
Mike
Sent from my iPad using Tapatalk
Mike
Sent from my iPad using Tapatalk
1966 Monza Convertible, 140HP-4 speed, Ermine White
1969 Monza Convertible, 110HP-PG, Frost Green, #3753
1969 Monza Convertible, 110HP-PG, Frost Green, #3753