I'm disassembling my engine and just came in for lunch I got to the part where I'm removing the connecting rods from the crank as I look at it I can get to the one bolt easily enough but the one on the cam side seems like it'll be a tight squeeze should the block be split and then take it off the crank which doesn't seem to make sense and I wondered about reassembling when it comes time to torque them in perhaps it's just not as easy as I hoped it would be hopefully some food will stimulate the brain cells and when I go back out there I'll be like duh now it makes sense
Sent from my [device_name] using Corvair Forum mobile app
Connecting Rod Removal
-
terribleted

- Posts: 4584
- Joined: Sun Apr 18, 2010 2:36 pm
- Location: Atlanta, GA
- Contact:
Re: Connecting Rod Removal
1/4" ratchet and sockets are your friend here. 1/4" drive deep socket works well with a 1/4" drive ratchet. You may have success with a 3/8 drive ratchet using 1/4 drive adapter and 1/4 drive socket. Rotating the crank to opportune positions is also key for each rod nut. There is a sweet spot where I can get my sockets on to both nuts without moving the crank. Once the nuts are off a rod I rotate the crank so that the rod is pointing straight out and then I separate the rod and cap and remove them. They caps can be annoying to get free from the rod studs. They need to be dead straight and even then they catch sometimes. Holding your mouth right and tapping them loose when they bind are key (never use heavy force as it will not help). They will come off after a bit. For setting the torque I use a 3/8" drive torque wrench, a 3/8 to 1/4 adapter, and a short 1/4 drive socket to torque the rod nuts. I install a rod to the crank, rotate the crank throw up to a good spot to install the cap and nuts. After possibly slightly repositioning the crank I then torque that rod. Best to torque in steps as well...I start at 15FTLBs on each nut and then step up 5 FTLBs torqueing both nuts each time until I reach the proper torque of 25FTLBS.
Corvair guy since 1982. I have personally restored at least 20 Vairs, many of them restored ground up.
Currently working full time repairing Corvairs and restoring old cars.
https://www.facebook.com/tedsautorestoration/
Located in Snellville, Georgia
Currently working full time repairing Corvairs and restoring old cars.
https://www.facebook.com/tedsautorestoration/
Located in Snellville, Georgia
Re: Connecting Rod Removal
Thanks for the info. That's what I thought, but always good to have the "voice" of experience.terribleted wrote:1/4" ratchet and sockets are your friend here. 1/4" drive deep socket works well with a 1/4" drive ratchet. You may have success with a 3/8 drive ratchet using 1/4 drive adapter and 1/4 drive socket. Rotating the crank to opportune positions is also key for each rod nut. There is a sweet spot where I can get my sockets on to both nuts without moving the crank. Once the nuts are off a rod I rotate the crank so that the rod is pointing straight out and then I separate the rod and cap and remove them. They caps can be annoying to get free from the rod studs. They need to be dead straight and even then they catch sometimes. Holding your mouth right and tapping them loose when they bind are key (never use heavy force as it will not help). They will come off after a bit. For setting the torque I use a 3/8" drive torque wrench, a 3/8 to 1/4 adapter, and a short 1/4 drive socket to torque the rod nuts. I install a rod to the crank, rotate the crank throw up to a good spot to install the cap and nuts. After possibly slightly repositioning the crank I then torque that rod. Best to torque in steps as well...I start at 15FTLBs on each nut and then step up 5 FTLBs torqueing both nuts each time until I reach the proper torque of 25FTLBS.
Sent from my [device_name] using Corvair Forum mobile app
Re: Connecting Rod Removal
What Ted said. If the cap jams coming off, then LIGHTLY tap it with a plastic hammer to reseat it and try again. PATIENCE, PATIENCE.
-
terribleted
- Posts: 4584
- Joined: Sun Apr 18, 2010 2:36 pm
- Location: Atlanta, GA
- Contact:
Re: Connecting Rod Removal
LOL sometimes one or more rod caps can be stinkers to get all the way off:)
Corvair guy since 1982. I have personally restored at least 20 Vairs, many of them restored ground up.
Currently working full time repairing Corvairs and restoring old cars.
https://www.facebook.com/tedsautorestoration/
Located in Snellville, Georgia
Currently working full time repairing Corvairs and restoring old cars.
https://www.facebook.com/tedsautorestoration/
Located in Snellville, Georgia
Re: Connecting Rod Removal
First 5 came out nicely. Last one didn't want to go easily.
Which drawer is that balancer puller. Oh yeah, the last one I look in. That's where everything gets put.
Sent from my [device_name] using Corvair Forum mobile app
Which drawer is that balancer puller. Oh yeah, the last one I look in. That's where everything gets put.
Sent from my [device_name] using Corvair Forum mobile app
Re: Connecting Rod Removal
Be sure to keep each cap with their associated rod. I usually put the nuts on partially to keep the "set" together
Sent from my [device_name] using Corvair Forum mobile app
Sent from my [device_name] using Corvair Forum mobile app
Re: Connecting Rod Removal
I know, they are marked but I like to be organized.
Sent from my [device_name] using Corvair Forum mobile app
Sent from my [device_name] using Corvair Forum mobile app
-
Wagon Master
- Posts: 476
- Joined: Thu Jul 28, 2011 6:36 pm
Re: Connecting Rod Removal
If reusing, some go as far as to insure the rod nut go back on the same direction as they were. They're worried about threads being stretched one way, then the other. 
-
terribleted
- Posts: 4584
- Joined: Sun Apr 18, 2010 2:36 pm
- Location: Atlanta, GA
- Contact:
Re: Connecting Rod Removal
Wagon Master wrote: ↑Sun Dec 31, 2017 7:38 am If reusing, some go as far as to insure the rod nut go back on the same direction as they were. They're worried about threads being stretched one way, then the other.
Both are excellent advise. I do this as well.dave t wrote: ↑Sun Dec 31, 2017 7:02 am Be sure to keep each cap with their associated rod. I usually put the nuts on partially to keep the "set" together
Sent from my [device_name] using Corvair Forum mobile app
Corvair guy since 1982. I have personally restored at least 20 Vairs, many of them restored ground up.
Currently working full time repairing Corvairs and restoring old cars.
https://www.facebook.com/tedsautorestoration/
Located in Snellville, Georgia
Currently working full time repairing Corvairs and restoring old cars.
https://www.facebook.com/tedsautorestoration/
Located in Snellville, Georgia
-
bbodie52

- Corvair of the Month

- Posts: 11897
- Joined: Mon Aug 06, 2012 12:33 pm
- Location: Lake Chatuge Hayesville, NC
- Contact:
Re: Connecting Rod Removal
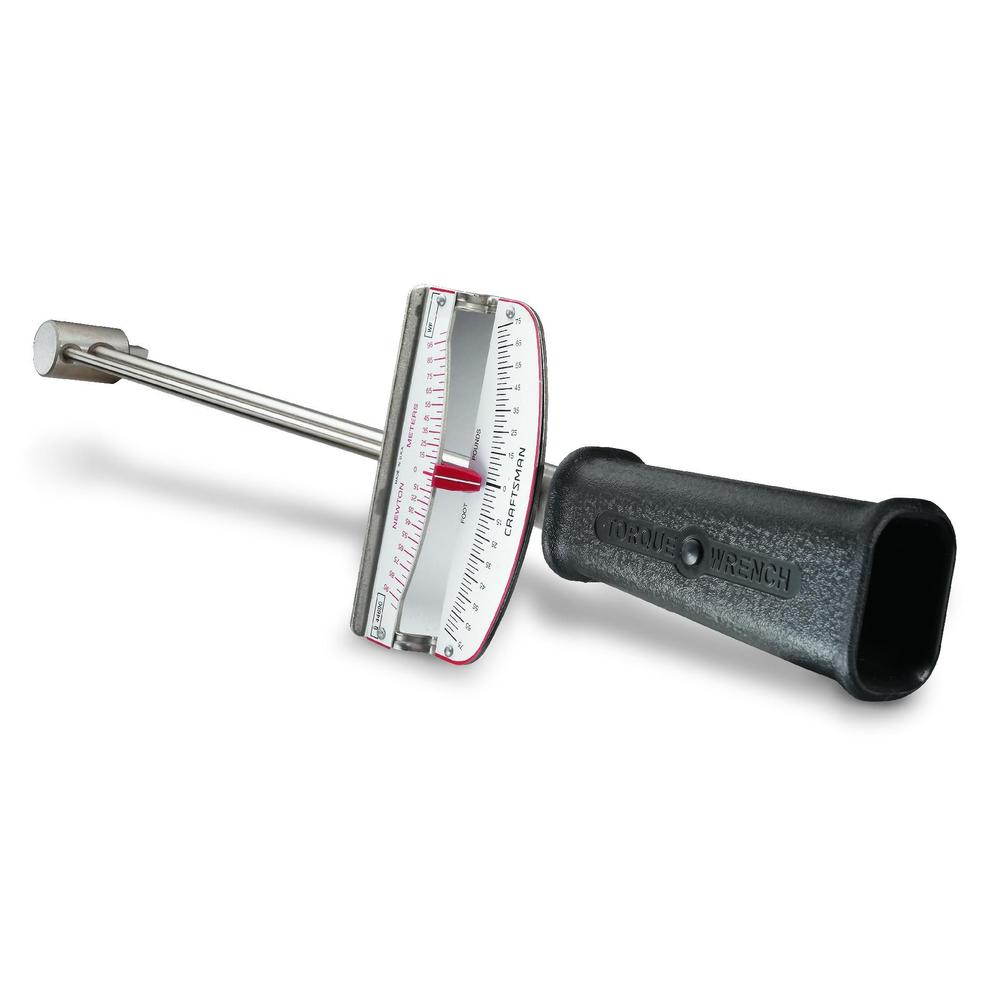
I found that using the Craftsman 3/8-in. Dr. Beam Style Torque Wrench, 0-75 ft. lbs. worked well when torquing the connecting rods. The small 3/8 drive head cleared well in that tight fit area.
Brad Bodie
Lake Chatuge, North Carolina
 1966 Corvair Corsa Convertible
Lake Chatuge, North Carolina
1966 Corvair Corsa Convertible