fuel line issues
fuel line issues
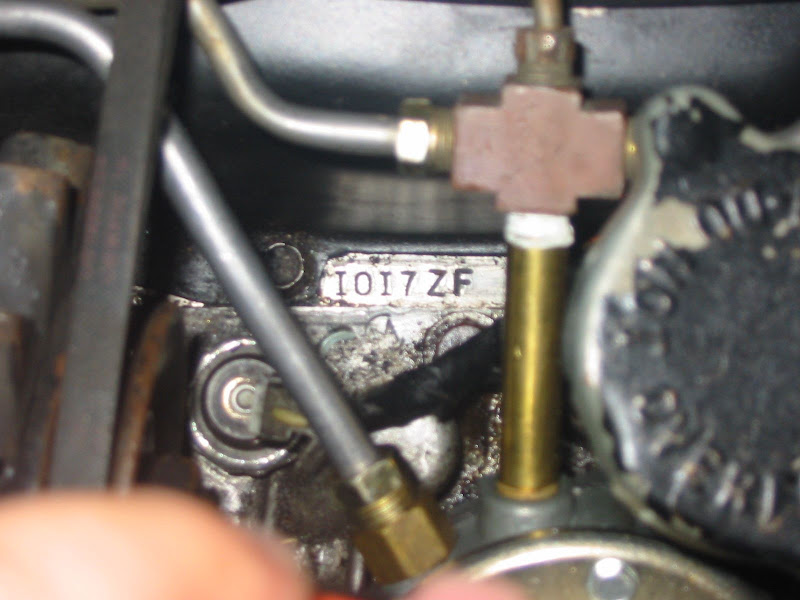
Hey guys need some help, I'm doing new fuel line on the engine and I have the line from the fuel pump to the carbs done. I'm having issues with the line from the tank to the pump specify in the engine bay, so where the inlet line is suppose to go into the fuel pump there a shaft as you can see in the picture coming up from the case. Unfortunately its right in the way so it making extremely difficult to bend the line how I need it, and I have absolutely no idea what its for. I've look at hundreds of photo and diagrams of engine bay and not one had this set up. All I can say is that the line goes through the firewall to the passenger side and has a oil pressure indicator. I would appreciate help if anyone knows what this is.
- Attachments
-
-
-
-
-
-
-
-
bbodie52

- Corvair of the Month

- Posts: 11894
- Joined: Mon Aug 06, 2012 12:33 pm
- Location: Lake Chatuge Hayesville, NC
- Contact:
Re: fuel line issues
EbAvery wrote:Wed Aug 02, 2017 1:42 am
Hey guys name is Ethan Avery live in Duluth, Minnesota. I practically stole a 1962 Corvair Monza for $700, its in really good shape, It actually came from Texas so rust is very minimum and other then some hail damage the body is in great shape. Engine runs just need tuning and the interior needs some work. Working on the fuel system right now, needed a fuel pump and I decide to change the sending unit and tank. I really hope I can turn too this community for advice as I try to fix her up.
I rebuilt my first Corvair engine during my high school summer vacation in 1969. I was 16 years old and my father had purchased a well-worn 1963 Corvair 500 for me to learn with. The engine was frozen, and I slowly learned to remove the powertrain and dismantle the engine. By the end of summer I completely rebuilt the engine and it was running well. I transplanted it into a 1962 Corvair Monza coupe like yours, and that was my primary transportation for the next few years. As it turned out, that car — powered by my first engine rebuild — was my transportation on the day that I was married in April 1972. My new bride and I drove it from Southern California to the San Francisco Bay Area for our honeymoon, and it was our primary transportation until I joined the Air Force in November 1972. Upon graduation from tech school the following summer my father gave us a gift of a 1965 Corvair Corsa convertible, and he kept the 1962 Monza. But we have fond memories of our 1962 Monza. I hope you have a good time learning to work on your 1962 Monza, and I hope that members of the Corvair Forum can provide you with useful information along the way!

Your "plumber's nightmare" to the right of the generator is basically an extension tube that was installed to elevate the oil pressure warning light switch and to provide a tee connection to connect a line to a mechanical oil pressure gauge. This type of connection is hazardous because it places the tubing extension in the path of the fan belt. A broken or flipped fan belt can easily snag the tubing and snap it off, which can cause a massive oil spray and leak all over the engine. For the time being I would recommend removing the mechanical oil pressure gauge and its connection to the engine. Also, you should carefully remove all of the plumbing extension so that the oil pressure warning light switch can be returned to its original location at the bottom of the tubing extension. The second picture below shows how the warning light switch was originally installed. You need to be careful whenever you are screwing a bolt, fitting, or in this case the oil pressure sending unit into aluminum threads. Aluminum threads are a soft metal and can be easily damaged if the bolt or sending unit is cross-threaded or over-tightened. The results can be stripped or damaged threads that would require a thread repair procedure before you can proceed. The use of a light touch, anti-seize compound to protect threads, and sometimes a torque wrench to avoid over tightening and damaging threads are procedures you need to become familiar with when working on the Corvair engine. In most cases you should thread the bolt or fitting by hand and screw it into place using only your hand to help you avoid cross-threading into the aluminum component. With the oil pressure sending unit, the sending unit should be hand tightened and not much more. There is a special socket available that fits the oil pressure sending unit, but if you use a light touch on the metal portion of the sending unit you can get away with using a pair of pliers or channel lock pliers to snug the sending unit into its home without over-tightening or damaging the sending unit (which could cause leaks). The sending unit is simply a switch that provides a ground connection to the warning light circuit and illuminates the oil pressure warning light when the switch is closed by providing a ground connection. The switch is closed whenever there is no oil pressure, as when the engine is not running, or if there was an oil pressure loss when the engine is running. Once you return the switch to its original location it will no longer be blocking access to the mechanical fuel pump.
With access to the mechanical fuel pump inlet restored, the question is: what is the status of that mechanical fuel pump? It looks new — did you replace it? If the pump is new you should test its operation. I have attached a copy of the section of a Corvair shop manual that covers engine fuel systems. In this case the manual was written for 1965 Corvairs, but much of the information is applicable to your 1962 engine as well. The fuel pump section begins on page 6M-26. It shows you how to test the pump and evaluate it for proper operation.
You indicated that the engine is running, but you did not indicate how fuel was being delivered to the carburetors without the mechanical fuel pump. Is there an electric fuel pump somewhere in the system? Is the tank and ending unit new? The fuel line between the tank and the fuel pump inlet is not pressurized, but it must be completely airtight and leak-free to allow the mechanical fuel pump to create the necessary vacuum in the fuel line to draw fuel all the way from the tank to the pump inlet. Any cracked hoses or loose connections that would permit air to leak into the fuel line between the tank and the pump would prevent the pump from functioning. If the pump appears to be operational and is able to draw fresh fuel from the tank, you will want to check both pressure and volume delivery from the fuel pump outlet following the procedures in the shop manual. It is important to have both proper pressure and adequate fuel volume delivery to properly feed the carburetors.
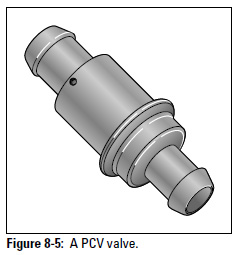
Your Positive Crankcase Ventilation (PCV) system is a mess. The crankcase is supposed to be a sealed system, but someone has installed a hose from the oil filler tube cap to vent excess crankcase pressures to the air. This hose should be eliminated. The opening where the tube is connected should be blocked or the oil filler cap should be replaced. The upper close-up photograph focuses on the PCV system. As shown in the shop manual figure 10 illustration, there is supposed to be a PCV valve in the line that is connected to the vacuum balance tube. I cannot see a PCV valve in the photograph of your engine (but it might just be dirty). In any case these PCV valves can become dirty and clogged over time. You should be able to purchase the proper PCV valve (part number: AC-CV584) at a local auto parts store. The PCV system and maintenance is described in the attached 1962-1963 Supplement - Chevrolet Corvair Shop Manual - Section 7 - Engine Tune-Up shop manual section beginning on page 7-6. The illustration shows how the PCV system is connected to the vacuum balance tube with a PCV valve properly inserted to control airflow. There is a secondary connection on the side of the PCV tube that connects to the right air cleaner. Both connections and a sealed oil filler cap are important to the proper operation of the PCV system. You should restore this system to its original design configuration.
It is possible that excessive crankcase pressures prompted a previous owner to try to make these modifications. A normally running engine and a standard PCV system should be able to handle normal crankcase pressures. If you discover that excess pressure is forcing oil from the dipstick tube, this could be an indicator of excessive wear in the cylinders, pistons and piston rings. Excessive wear in this area can result in excessive blow-by that leaks past the pistons and into the crankcase. If this is the case the excessive pressure can overwhelm a properly operating PCV system, and pressure buildup can result in oil being forced from the crankcase out of the dipstick tube, as the excess pressure tries to find a path to escape from the sealed crankcase. It would be a good idea for you to remove the spark plugs and run a compression test as outlined in the shop manual. This will give you a reading for each cylinder that establishes the mechanical condition of each cylinder, piston, piston rings, intake and exhaust valves, etc. A low reading on one or more cylinders may indicate the need for engine overhaul, but bypassing and modifying the PCV system is not the way to deal with excessive engine wear.

The link below will provide you with a list of useful websites that are Corvair-related. Some of the links will lead you to an extensive technical library that will allow you to download shop manuals and other technical references in Adobe Reader (.pdf) format at no cost. There is also a link that will help you to locate nearby CORSA (Corvair Society of America) club chapters. While the Corvair Forum can be very helpful as you work on your Corvair, having local friends and contacts in your region who are knowledgeable about the Corvair can also be very helpful. These family-friendly CORSA chapters often offer picnics, group scenic drives, technical training and assistance, car shows, and competition events that can greatly enhance your enjoyment of Corvair ownership. You will also find a list of essential Corvair parts suppliers. Clark's Corvair Parts is the biggest and oldest Corvair supplier in the world. You will find a link that can provide you with a series of videos that amount to a tour of the Clark's Corvair Parts facilities. I think you will be amazed at the quality of the reproduction components they offer — particularly the interior carpeting and re-upholstery items. Parts suppliers such as this truly make our Corvair hobby possible.
Common and Useful Corvair Websites
There is one CORSA club chapter in Minnesota. It is located in St. Louis Park, Minnesota, which is about 161 miles southwest of your location. While this is a significant distance from you, you might still want to check them out and consider joining this group. If it is an active club with a wide range of members you may find support and advice from experienced Corvair owners who can help you to get a handle on working with your Corvair.

Corvair Minnesota
Jim's Corvair Repair (123 Miles)
Corvair only repair shop in Isanti, Minnesota.
Jim Brandberg, Phone: 763-444-9334, eMail: Jim@Corvairrepair.com
In addition to the above Corvair-related contacts in your home state, I have discovered an CORSA club chapter that is much closer to you in Superior, Wisconsin! Apparently this is only about 8 miles from your location in Minnesota. If you are interested, here's the contact information…

Head of the Lakes Corvair Assn.
704 E 5th St, Superior, WI
I'm not sure what you will find with his Corvair club in Superior Wisconsin. The website appears to be out of date, the most recent information dating back to 2012. However, the primary contact is listed as Edwin E Lampi, eMail: Irene.Lampi@juno.com. I looked him up on the Internet and it turns out that he apparently lives in Duluth Minnesota! I will include his contact information here but it is not verified and only obtained from a white pages website on the Internet. You might try contacting him in your hometown to determine if he is still associated with this Corvair club.
Edwin E Lampi
4221 Willard Rd
Duluth MN 55803-1236
Phone: (218) 724-1182
Peter W Prudden
5115 Howard Gnesen Rd
Duluth, MN 55803
Phone: (218) 728-2408
eMail: corsa@aol.com
- Attachments
-
- 1965 Corvair Chassis Shop Manual - SECTION 6M - ENGINE FUEL.pdf
- 1965 Corvair Chassis Shop Manual - SECTION 6M - ENGINE FUEL
- (8.87 MiB) Downloaded 57 times
-
- 1962-1963 Supplement - Chevrolet Corvair Shop Manual - Section 7 - Engine Tune-Up.pdf
- 1962-1963 Supplement - Chevrolet Corvair Shop Manual - Section 7 - Engine Tune-Up
- (899.84 KiB) Downloaded 16 times
Brad Bodie
Lake Chatuge, North Carolina
 1966 Corvair Corsa Convertible
Lake Chatuge, North Carolina
1966 Corvair Corsa Convertible-
bbodie52
- Corvair of the Month
- Posts: 11894
- Joined: Mon Aug 06, 2012 12:33 pm
- Location: Lake Chatuge Hayesville, NC
- Contact:
Re: fuel line issues
(The picture of the Body Tag is distorted, so I may have misread some of the data).
BODY TAG INFO:
06E
Body Build Date: 06 = June, E = Fifth Week
The first two digits are numbers 01 through 12, indicating the month of manufacture. The letter is A-E, indicating the week of the month. If the letter is an "E" it indicates the fifth week of the month.
STYLE 62-0927 BODY OA 14325
62 = 1962
Model 0927: 09 = Monza, 27 = 2-Door Coupe, OA = Oakland, California
Production Sequence No: 14325
1962 Chevrolet Corvair (900 Series) Monza 2-Door Club Coupe - 4 Passenger, Total Production: 144,844
TRIM 3-755 29 = AQUA
This 3 digit code represents the interior color and seat type (755 applies to 900 Series Monza only, which is fitted with Bucket Seats).
Interior: The 1962-63 Corvairs have an extra digit on the trim or paint section of the tag. WRN has the extra digit for interior paint on the Paint section. Ex. 922-7 = Red with black interior paint. Oakland cars have the code on the trim line.
Interior paint codes: (Interior paint codes do not appear on Los Angeles built cars)
The 29 on the trim tag is the actual 'DAY" of the month, so... specifically your car was built on June 29th 1963. Oakland was kind enough to stamp the "day" where Willow Run did not.

Example: A 1962 Corvair Monza coupe interior with the Aqua color scheme

1962: 2= Blue 3= Aqua 4= Fawn 5= Red 7= Black 8= Saddle R = White/Red.
PAINT 936 = White "Ermine White"
Lucite No. 4024L, Rinshed-Mason No. A1199, Ditzler No. DDL 8259
Example: 1962 Corvair Monza coupe in Ermine White

ACC = Accessory line
When decoding ACC line on the Fisher body tags, be aware that body tags do not include any options that did not require any body modification be done by Fisher. Fisher was only concerned with items that required modifications during the assembly of the body. A good example is that you won’t find Telescopic column listed on the body tag. Although this is a major option, it did not require any special consideration during body assembly.
E P A 5926
Oakland bodytags (It appears that the 1962 OA codes carried over to 1963)
Does not use group numbers
E = RPO 398 — Tinted Glass (all windows)
P = RPO 427 — Padded Dash
A = RPO 114 — Air Conditioning
Oakland also stamped a 4 digit number they used for tracking body orders, the stamp 5926 was that number and it means it was number 5926 out of an order sequence between the production plant and Fisher Body.
Although you did not provide it, the VIN tag is located in the driver's side door frame. This guide will show you how to decode it...
I have attached a copy of the 1962 Chevrolet Corvair GM Heritage Center Specs for your model year Corvair.
- Attachments
-
- 1962 Chevrolet Corvair GM Heritage Center Specs.pdf
- 1962 Chevrolet Corvair GM Heritage Center Specs
- (3.07 MiB) Downloaded 21 times
Brad Bodie
Lake Chatuge, North Carolina
1966 Corvair Corsa Convertible
Lake Chatuge, North Carolina
1966 Corvair Corsa ConvertibleRe: fuel line issues
Wow I was not suspecting such a thorough answer to my question, thank you very much. So to try and answer some of your question, my name is Ethan, I'm 26 years old,. I've always been interested in corvairs because there such interesting cars for their time. I've been looking for a project car for the last year or so and stumble across this on on craigslist and it was exactly what I've been looking for. The plan for it is strictly a summer car running errands and going to work, that said I do want to fix it up. I want to make it a quick car, nothing crazy like 200 hp, i just want something that can overtake other cars easily and get out of its own way. I was thinking something like 150-175 hp, maybe a sleeper but I haven't gotten that far into it. I am mechanical inclined, aircraft mechanic by trade, I unfortunately don't have much experience with car engines I just have never really had the opportunity to work on them. I understand the different component and what the do...for the most part. So I installed a new fuel tank and new sending unit, and a new fuel pump. I had the engine running for 5 minutes or so the other day but I had the fuel line just connect to a fuel jug, so I know the pump actually pulls the fuel.