
Wow - it looks in the photo like you could lower the seat back and pull the bottom forward a little - then mount the upper back to the package shelf and bed done! Looking good...
Keep up the great updates, and VOTE for Corvair of the month!
County98's Learn as I Go Thread
Re: County98's Learn as I Go Thread
BobWitt - South East Michigan
Member: Corsa and DACC
1966 Corsa 140
Follow my build at: viewtopic.php?f=52&t=9082"
Member: Corsa and DACC
1966 Corsa 140
Follow my build at: viewtopic.php?f=52&t=9082"
Re: County98's Learn as I Go Thread
Voted!
Nope, won't work that way Bob. The side bolsters are WAY too deep. Major gaps and isn't even close. Also would push the seat bottom out way too far. I set everything in there in all sorts of configurations as I was brainstorming.
So, today was another bust on the back seat. The way it sets the best is with the pivot board and cross brace out and the seat back all the way back against the car steel. Still tall though and after looking at it, would only leave a few inches for any kind of speakers there, and no real insulation for soundproofing. Also, not really sure how to mount yet and feel good that it's secure.
Decided to step back from the back seat for awhile. Might get her going as a 2 seater for a bit, or may re-attack as I get more interior put together.
Oh well, not like I'm on a real timeline or anything. On the up side, I got the fronts permanently mounted and all is well on that point. Had to enlarge the stud holes a little to get the coupler nuts in there, but everything is secured with good hardware and all works fine.
I think I'm going to continue messing around on the interior for a bit. I got my steering wheel adapter from Seth and it looks great. More to come on that later!
Re: County98's Learn as I Go Thread
Spent the morning working on the car today. Starting to cool off a little and had a nice time in the shop with a cup of coffee and some tinkering on the project.
Figured I would try to get the dash all taken apart and see what's up with that stuff. Nothing in the dash looks good, all chrome is discolored, paint bad, pad cracked, etc. Was fairly straightforward disassembling everything, with a couple small hiccups since it's my first time getting in there. Lots of dirt and corrosion, interior of glove box was history of course. Only had one major bummer...
Before pics (from awhile ago)
First, A pillar covers are both cracked, but I think I can glue them up, sand, and paint.
Everything came out fairly simply once I looked at it. Some of the trim rings were pretty stuck, but came out eventually. 
One little thing that caught me up was the radio and inner ashtray removal. I didn't realize there was a small "L" bracket back there that caught me up for a couple minutes. The defroster ducts were still in place and worked out fine.
Dash came out okay, but got suck there on something pretty obvious. I struggled for a little bit and then my wife came over and immediately realized the odometer reset was still mounted. Arg... 
 After removing it, all the screws ( including the 2 hidden ones in the speedo and tach bezels), harness connector, and vacuum line, it came out without breaking anything. YAY!
Well, finally is the crappy part that I'm pretty bummed about. I knew the forward dash was rusty (who's isn't?), but I had hopes of not going whole hog just yet and pull windshield, etc. I was also hoping to strip the fabric from the pad, recover and bolt it back in. Not so much!
One of these sides is good, one is not so good...
Literally crumbled away...
Even after a vacuum and wipe down it's so far gone that it scarred the dash itself. I'm completely dreading pulling the windshield and trim now. 
All in a mornings work!
Figured I would try to get the dash all taken apart and see what's up with that stuff. Nothing in the dash looks good, all chrome is discolored, paint bad, pad cracked, etc. Was fairly straightforward disassembling everything, with a couple small hiccups since it's my first time getting in there. Lots of dirt and corrosion, interior of glove box was history of course. Only had one major bummer...
Before pics (from awhile ago)
One little thing that caught me up was the radio and inner ashtray removal. I didn't realize there was a small "L" bracket back there that caught me up for a couple minutes. The defroster ducts were still in place and worked out fine.
One of these sides is good, one is not so good...

Re: County98's Learn as I Go Thread
You got a lot of work done
Jeremy (cad-kid)
Kronenwetter, WI (Central Wisconsin)
SOLD 9-2016 65 Monza 4spd/140
My 65 Monza thread
 My YouTube page
Kronenwetter, WI (Central Wisconsin)
SOLD 9-2016 65 Monza 4spd/140
My 65 Monza thread
Re: County98's Learn as I Go Thread
Shayne - I feel your pain. About the windshield, I think Dave Motohead has a video about the trim and glass removal. Trim removal is not so bad, but you do need the right tool. The windshield removal will depend on if it was put in with butyl or not. If it is butyl you won't have much issue with the glass. It is important that you take your time. If it is urethane, it could be much more difficult. Razor on a long handle and a cutting wire may be required.
Windshield install is one of the few things I hired a pro for.. Had mine been installed with urethane I would have likely paid for removal as well...
Looking good... Keep it up!
Windshield install is one of the few things I hired a pro for.. Had mine been installed with urethane I would have likely paid for removal as well...
Looking good... Keep it up!
BobWitt - South East Michigan
Member: Corsa and DACC
1966 Corsa 140
Follow my build at: viewtopic.php?f=52&t=9082"
Member: Corsa and DACC
1966 Corsa 140
Follow my build at: viewtopic.php?f=52&t=9082"
Re: County98's Learn as I Go Thread
Thanks for the good words guys! I was thinking of changing out the windshield eventually since it's starting to discolor and separate at the center bottom anyway. I guess I'll just have to move it up on the list some.
I also forgot to post a couple quick pics of the dash without the junk in it, just in case someone needs a pic of what's back there.
The glove box light threw me for a little bit of a loop also, I had no idea there was even one in there...
Take care!
I also forgot to post a couple quick pics of the dash without the junk in it, just in case someone needs a pic of what's back there.
Take care!
-
viewmaster
- Posts: 276
- Joined: Sun Jan 26, 2014 1:34 pm
- Location: Fresno, CA
Re: County98's Learn as I Go Thread
Thanks for the pics and thoughts on the rear seat situation. I have a similar situation with the rear seats from a 2002 Chrysler Sebring vert. Your findings may just help in my solution. Will post what i have come up with for my Monza.
Mike
Mike
'65 '500' Sedan 110 PG
'65 Monza Sedan "Turbo'd" 110 SU conversion 4sp Manual'
'65 Monza Sedan "Turbo'd" 110 SU conversion 4sp Manual'
Re: County98's Learn as I Go Thread
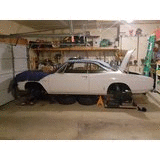
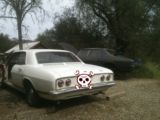
Well, I guess it's been a good while since I've updated, lol. Took another deployment to the middle east and then spent a couple months settling back in. I've been trying to stay up on everyone's threads, but most "forum" type Sites were blocked unfortunately.
Anyway, pushed the car out the back of the shop so we could use the shop for a New Years party. First time the ol' girl has been in the sunlight in a good long while.
It was sunny, clear, and no snow, but cold as all hell.
Next, my father-in-law and I re-tackled the brakes again. After sitting for a few months, I popped the top on the MC and SLOWLY pumped the pedal. Got a couple little bubbles. Arg. Decided to stop avoiding it and pulled the MC for a bench bleed.
The pushrod needed a little cleaning up as well. This is the before pic...lol.
Put it all back together and did an old fashioned 2 person brake bleed. Went around the car twice to make sure and now the brakes seem to work like a champ. Yay! 
SO...now, springs and shocks all new and done, FULL brake system replaced and good to go, wheels and tires are handled, gas tank and fuel system with electric pump done except for the wiring in of the tach safety and the engine fuel lines inside the engine compartment, and finally have the front seats sorted out. Baby steps I suppose.
I decided it was time for a little "pick me up" and started on painting the interior.
Anyway, pushed the car out the back of the shop so we could use the shop for a New Years party. First time the ol' girl has been in the sunlight in a good long while.
Next, my father-in-law and I re-tackled the brakes again. After sitting for a few months, I popped the top on the MC and SLOWLY pumped the pedal. Got a couple little bubbles. Arg. Decided to stop avoiding it and pulled the MC for a bench bleed.
SO...now, springs and shocks all new and done, FULL brake system replaced and good to go, wheels and tires are handled, gas tank and fuel system with electric pump done except for the wiring in of the tach safety and the engine fuel lines inside the engine compartment, and finally have the front seats sorted out. Baby steps I suppose.
I decided it was time for a little "pick me up" and started on painting the interior.
Re: County98's Learn as I Go Thread
Now, before we get crack-a-lackin'...the disclaimer.
I am in NO way trying to pull off a profession paint job with some spray bombs. And I also understand that almost everything I'm painting is going to be covered up anyway. Meh... The truth is that I won't be making the interior fancy for quite some time and I just felt like making her a little more easy on the eyes. I went ahead and primered away all the red, will be covering the floors and roof in sound deadener, and decided to spray the metal interior "exposed" areas and dash in a dark silver.
I wanted to break up the all black "cave" look somewhat, but haven't decided on an exterior color yet. I have time, and figured if it looks like crap, I'm only out a couple spray cans of paint.
Started by pulling the wheel. I've done a few, but in case you haven't...
Use a breaker bar after you pull off the horn ring. Nut is pretty tight for using a normal ratchet in one hand and holding the wheel in the other. Also, make sure your wheels are pretty straight before you pull it.
Next grab a steering wheel puller for the spline. They're only a few buck-a-roo's, and I've had mine for years.
And finally, the guts of the wheel. I knew mine was broken since the turn signal lever just flopped around. I picked up the grant wheel adapter awhile back, and I'll tackle the busted plastic when I go to put the Grant wheel on.
I am in NO way trying to pull off a profession paint job with some spray bombs. And I also understand that almost everything I'm painting is going to be covered up anyway. Meh...
I wanted to break up the all black "cave" look somewhat, but haven't decided on an exterior color yet. I have time, and figured if it looks like crap, I'm only out a couple spray cans of paint.
Started by pulling the wheel. I've done a few, but in case you haven't...
Use a breaker bar after you pull off the horn ring. Nut is pretty tight for using a normal ratchet in one hand and holding the wheel in the other. Also, make sure your wheels are pretty straight before you pull it.
Re: County98's Learn as I Go Thread
I haven't started on the doors yet. Just didn't feel like scraping the weather-stripping. Did get the interior primed tonight though. Didn't turn out too shabby. I have a couple little runs to sand out where I got a little close with the rattle can, but no biggie.
I read about 100 paint debate threads. What it came down to was that I'm just not that worried about it being pro quality perfect. There's no place local to put real auto paint in a spray can, and I didn't feel like ordering online.
I used this:
Sand-able, self etching, and (according to the can) a rust coat. As long as it doesn't lift I'm guessing it will be fine.
Taping the interior of the windshield and rear glass is a PITA, btw...
Before: Green scrubby on the rough areas, 400 grit wet on the exposed stuff.
And primed:
(Still flashing off and my cell doesn't take great pics in low light) 
I also hit the roof supports to clean the appearance up a little and hit the headliner rods with black. Haven't taken pics of that stuff yet, maybe tomorrow if I get the sound deadener up.
OH! Almost forgot. My dash is really jacked up on the right side from my rusty dash pad. Wasn't really ANY good way to work it with the windshield in, and I'm not pulling it yet. I'm working on getting the dash done up to the dash pad line for now. Thats it. The forward part of the dash is just going to be oversray and rusty nastiness.
That's it for today. Started getting late. Tomorrow I'll try the top coats. Here's what I went with, and I know it might seem a silly choice!!

I couldn't find any semi-gloss auto paints at FLAPS that weren't black or white. Then I figured, "why not"? Wheel paint is semi-gloss, supposed to be heat rated and resistant to grease and oils. Maybe if it's durable enough it'll be fine...at least I hope so, lol...
Lastly, I thought about using the roof flashing for sound deadener, but have always had good luck with dynamat and din't want it to fall on my head, stink, or turn to goo later on. I'm trying out the NVX stuff this time, but it should be fine.
That's it for now folks. Glad to be back, and glad to be working on the car again. Happy Corvair-ing! 
I read about 100 paint debate threads. What it came down to was that I'm just not that worried about it being pro quality perfect. There's no place local to put real auto paint in a spray can, and I didn't feel like ordering online.
I used this:
Taping the interior of the windshield and rear glass is a PITA, btw...
Before: Green scrubby on the rough areas, 400 grit wet on the exposed stuff.
OH! Almost forgot. My dash is really jacked up on the right side from my rusty dash pad. Wasn't really ANY good way to work it with the windshield in, and I'm not pulling it yet. I'm working on getting the dash done up to the dash pad line for now. Thats it. The forward part of the dash is just going to be oversray and rusty nastiness.
That's it for today. Started getting late. Tomorrow I'll try the top coats. Here's what I went with, and I know it might seem a silly choice!!
Lastly, I thought about using the roof flashing for sound deadener, but have always had good luck with dynamat and din't want it to fall on my head, stink, or turn to goo later on. I'm trying out the NVX stuff this time, but it should be fine.
Re: County98's Learn as I Go Thread
Well, yesterday was kind of a bust. Thought my primer job was pretty good, but when I went back out the next morning, I found some saggy areas where I hit it a little heavy. Also found my drivers rear sill had a crease and some scratches that I didn't notice the first time. Man, do I NOT like bodywork. And this is just little tinkering! I just don't have the patience, so hat's off to you guys that can make them beautiful!
Crease and deep scratches. Tough to see with no light and bad camera, but they're there. I can feel them.
Went and got some glazing putty. Works good as long as it's very thin. This pic looks like I slobbed it on there, but it's thin and it almost ALL gets sanded back off.
Knocked it down with wet 220 grit, then again with wet 500 sandpaper. I forgot to take pic of it sanded and re-primed, but it came out okay. After curing overnight again, I re-wetsanded everything with the 500 grit and then did a clean water wipe down and a tack free wipe after that.
I'm painting topcoat with the dark silver wheel paint now, so I'll update finished pics after it flashes off.
Crease and deep scratches. Tough to see with no light and bad camera, but they're there. I can feel them.
I'm painting topcoat with the dark silver wheel paint now, so I'll update finished pics after it flashes off.
Re: County98's Learn as I Go Thread
Welp, Looks like I'm not gonna quit my contractor gig to be a professional Corvair painter. Didn't turn out awful though, so I'm not going to redo it anytime soon. I'll press on and do the doors when the mood hits me. The gloss came out semi-glossy which is what I wanted, and there's a tiny metal flake in there that didn't come too bad either even though I forgot to stay cognizant of which way I was spraying and also using a rattle can.
Back sill area:
After it got a little shiny, I realized I still had some contours from the creases in there. Barely see it and only when the light is right, but I see them, lol.
Color on those is a little weird since I was using my shop light in there.
Dash:
There's a drippy area just to the left of the glove box, but that will be hidden. Only really obvious Oops is on the left side of the dash middle. It's just a little fisheye, but I'll see it every time I get in the car. I didn't take a picture of that, lol.
And the column:
You can see a little drip area here also.
That's it for the interior painting experiment for now. Haven't decided whether to do the doors yet, sound deadener, or wrinkle the guage and glovebox.
Have a great day friends!
Back sill area:
After it got a little shiny, I realized I still had some contours from the creases in there. Barely see it and only when the light is right, but I see them, lol.
Color on those is a little weird since I was using my shop light in there.
There's a drippy area just to the left of the glove box, but that will be hidden. Only really obvious Oops is on the left side of the dash middle. It's just a little fisheye, but I'll see it every time I get in the car.
You can see a little drip area here also.
Have a great day friends!
Re: County98's Learn as I Go Thread
Looking really good Shayne! Dang if I had seen your posts last year I would have looked you up when I went to see my youngest daughter graduate from boot camp at Fort Sill.
Edwin Stevenson
Industrial Electrician
Electronics Technician
65 corvair corsa convertible turbo
65 corvair monza
Industrial Electrician
Electronics Technician
65 corvair corsa convertible turbo
65 corvair monza
Re: County98's Learn as I Go Thread
Decided to dig into the gauges today. Kinda fun actually, but taking longer than I thought it would. Got everything blown apart today and started on making it a little prettier.
Been so long since I worked on this thread that I just saw my dash removal stuff is just above here even though it was months ago. Here's a couple before pics anyway.
I went with some Citriclean spray on stripper after I carefully pried the tabs off the face. Glue had given up a long time ago. Worked just fine, if it took a little longer than the stronger stuff. Better in the shop though, not as caustic, no fumes, etc. Kind of a messy job, but here's the requisite post stripping pic! ")
Pulled everything apart and I seemed to have some moisture damage behind there. Little rust on the housings, my cardboard tubes have a little damage, one lightbulb retainer is broken, and my little turn and high beam lenses are shot.
Started by cleaning the gauge faces with a very light brushing. I'm SUPER paranoid about rubbing off some of the markings, lol.
Got called away before I got too far, but did do one of the plexi covers with Meguires plastic polish. That stuff is MAGICAL. Barely took any doing, and cleaned it up like almost new. Super happy with the one I have done so far.
Before and after for reference:
Anyhoo, aside from this stuff I also cleaned up and lightly sprayed the plastic gauge tunnels with Krylon Satin Black. They were looking a little dull and shabby. I think I solved my turn/high beam diffuser lens problem too! I'll put up some pics after I see if it will work or not. More to come hopefully tomorrow!
Been so long since I worked on this thread that I just saw my dash removal stuff is just above here even though it was months ago. Here's a couple before pics anyway.
Before and after for reference:
Last edited by County98 on Thu Jan 26, 2017 7:51 pm, edited 1 time in total.
Re: County98's Learn as I Go Thread
Thanks Toytron. For sure bud, anyone's welcome. Would have been pretty cool to BBQ and get some advice from another Corvair guy. I don't know ANY, so except for the forums, I've pretty much been on my own. Fun to have a project to tinker with though.
-
SyntheticBlnkerFluid

- Posts: 239
- Joined: Tue Jan 28, 2014 7:32 am
- Location: Chebanse, IL
- Contact:
Re: County98's Learn as I Go Thread
I like how this is going. Thanks for the updates, it's better than how my project is going. [emoji1]
Sent from my iPhone using Corvair Forum mobile app
Sent from my iPhone using Corvair Forum mobile app
1968 Monza 140 4-Speed Posi
Rob
Chebanse, IL
Rob
Chebanse, IL