Shane,
It's looking good. I'm kind of in the same boat. Just working on little things when I can. Hopefully this spring I can get down to one of the club members shop and do some underneath work. He has a couple of lifts. Keep it up.
County98's Learn as I Go Thread
Re: County98's Learn as I Go Thread
Joe Nels
1966 Monza Coupe 4 speed
140 HP 4 barrel carb
1966 Monza Coupe 4 speed
140 HP 4 barrel carb

Re: County98's Learn as I Go Thread
Thanks guys. Haven't done much in the last couple days.
Got the heater control done though. A thorough scrubbing and an overnight soak with wd40 freed up the selectors, and I sprayed it in the dash color.


Short cable (defroster?) Popped off, so need to get under dash and figure out where it goes. Moves freely though. Heater cable is frozen, but not digging into it right now. I'm thinking it's probably at the heater box end.
Next up is rusty fuse box and found a broken ebrake pulley.


Sent from my SAMSUNG-SM-G870A using Corvair Forum mobile app
Got the heater control done though. A thorough scrubbing and an overnight soak with wd40 freed up the selectors, and I sprayed it in the dash color.
Short cable (defroster?) Popped off, so need to get under dash and figure out where it goes. Moves freely though. Heater cable is frozen, but not digging into it right now. I'm thinking it's probably at the heater box end.
Next up is rusty fuse box and found a broken ebrake pulley.
Sent from my SAMSUNG-SM-G870A using Corvair Forum mobile app
-
bbodie52

- Corvair of the Month

- Posts: 11894
- Joined: Mon Aug 06, 2012 12:33 pm
- Location: Lake Chatuge Hayesville, NC
- Contact:
Re: County98's Learn as I Go Thread
The attached section from the 1965 Corvair Assembly Manual includes the illustration shown below of the heater controls. It might be helpful with your final assembly...
I have also attached the 1965 Corvair Chassis Shop Manual section that describes the heater.
If you have any questions or issues with the heater fan electrical control, this post entitled Heater Fan Selector Switch Electrical covers the functional system and switch wiring extensively..
 viewtopic.php?f=225&t=9252

If you have any questions or issues with the heater fan electrical control, this post entitled Heater Fan Selector Switch Electrical covers the functional system and switch wiring extensively..
- Attachments
-
- 1965 Corvair Assembly Manual - HEATER CONTROLS AND DUCTS.pdf
- 1965 Corvair Assembly Manual - HEATER CONTROLS AND DUCTS
- (3.05 MiB) Downloaded 51 times
-
- 1965 Corvair Chassis Shop Manual - SECTION 15 - HEATER.pdf
- 1965 Corvair Chassis Shop Manual - SECTION 15 - HEATER
- (4.38 MiB) Downloaded 42 times
Brad Bodie
Lake Chatuge, North Carolina
 1966 Corvair Corsa Convertible
Lake Chatuge, North Carolina
1966 Corvair Corsa Convertible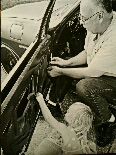
Re: County98's Learn as I Go Thread
Yeah it looks like your e brake pulley has mount issues but it might just be the camera angle.
Ed Stevenson
Ed Stevenson
Edwin Stevenson
Industrial Electrician
Electronics Technician
65 corvair corsa convertible turbo
65 corvair monza
Industrial Electrician
Electronics Technician
65 corvair corsa convertible turbo
65 corvair monza
Re: County98's Learn as I Go Thread
Cool, thanks for the info Brad. I think it's just the camera angle and busted pulley on the ebrake line.
Sent from my SAMSUNG-SM-G870A using Corvair Forum mobile app
Sent from my SAMSUNG-SM-G870A using Corvair Forum mobile app
Re: County98's Learn as I Go Thread
Need help!!! My fuse panel doesn't seem to jive with the '65 service manual or the '66 supp...


The circled ones seem to jive, except I don't understand why radio says 3A, but then says Stereo 7.5A on the other end. Also lists 2 for heater, heater itself, and blower seperate. I don't have that.
Just some differences, and I don't understand the different amp labels on each end of same fuse.
Can someone lay out what fuses I should use from top to bottom please?
Sent from my SAMSUNG-SM-G870A using Corvair Forum mobile app
-
SyntheticBlnkerFluid

- Posts: 239
- Joined: Tue Jan 28, 2014 7:32 am
- Location: Chebanse, IL
- Contact:
Re: County98's Learn as I Go Thread
That's because Stereo was an option. It was a supplemental unit to the radio.
As for the heater, I believe the gas powered heater was still an option in 1966.
Sent from my iPhone using Corvair Forum mobile app
As for the heater, I believe the gas powered heater was still an option in 1966.
Sent from my iPhone using Corvair Forum mobile app
1968 Monza 140 4-Speed Posi
Rob
Chebanse, IL
Rob
Chebanse, IL
Re: County98's Learn as I Go Thread
So, should I use:
20-wiper
3-pnl
7.5-stereo (using stock line as switched power for my single DIN)
10-heater (no a/c)
10-tail/stop
Sound correct?
Just weird that the owners manual AND service manual both show 6 fuses (heater & blower), but I only have 5.
Sent from my SAMSUNG-SM-G870A using Corvair Forum mobile app
20-wiper
3-pnl
7.5-stereo (using stock line as switched power for my single DIN)
10-heater (no a/c)
10-tail/stop
Sound correct?
Just weird that the owners manual AND service manual both show 6 fuses (heater & blower), but I only have 5.
Sent from my SAMSUNG-SM-G870A using Corvair Forum mobile app
Re: County98's Learn as I Go Thread
Well, I'm pressing ahead with the fuses as I have them listed above. I don't have a battery in the car right now, but that may change very soon. If I've got it wrong, please let me know?
Okay, on to todays work. Didn't get NEARLY as far as I had hoped today, but did a lot of tedious work that seemed to take a lot longer than it should have, lol.
Spent a good long time with a dremel and a tiny grinding bit laying on my back under the dash. Blech. I could have pulled the whole harness and worked on the bench, but didn't think it was necessary right this second. Want to give it every opportunity to succeed before I take apart anything more than required.")
Was a rusty, dusty mess, but I think I got the faces of the contacts cleaned up pretty good and installed all new fuses.
My wife decided that my thread was sorely lacking in action photos as well, so...
May I present the Spring Collection's hottest new fashion model, stunningly attired in the seasons latest fashion in active Shop Wear.
All kidding aside, if you're working on sanding down any rust or particulates, WEAR A MASK. Even a cheapy will keep that crap out of your nose holes and lungs, mmmmm, k?
Other thing I got knocked out today was wiring in the head unit for the stereo. I had the RCA's connected before I slid it in there, but went ahead and wired up the rest of it and connected the plug in the back.
I'm going to start a new thread for the stereo install to get more into the details on that. I'll still hit the highlights here, but want to do a step by step I think. I was doing a TON of searches on stereo options and questions, and while there IS a lot of info out there, it's not easily located or in one start to finish place. Won't be anything awe inspiring, but might save someone else some searching. 
Oh! Almost forgot. Finally popped off the snap ring and pulled my crusty accelerator pedal to get it out of the way for now.
Okay, on to todays work. Didn't get NEARLY as far as I had hoped today, but did a lot of tedious work that seemed to take a lot longer than it should have, lol.
Spent a good long time with a dremel and a tiny grinding bit laying on my back under the dash. Blech. I could have pulled the whole harness and worked on the bench, but didn't think it was necessary right this second. Want to give it every opportunity to succeed before I take apart anything more than required.
Was a rusty, dusty mess, but I think I got the faces of the contacts cleaned up pretty good and installed all new fuses.
May I present the Spring Collection's hottest new fashion model, stunningly attired in the seasons latest fashion in active Shop Wear.
Other thing I got knocked out today was wiring in the head unit for the stereo. I had the RCA's connected before I slid it in there, but went ahead and wired up the rest of it and connected the plug in the back.
Oh! Almost forgot. Finally popped off the snap ring and pulled my crusty accelerator pedal to get it out of the way for now.
Re: County98's Learn as I Go Thread
Started Stereo install thread. Feel free to chime in there and help out! I know there's some guru's around here, I've seen your work!
viewtopic.php?f=225&t=12647&p=86592#p86592
viewtopic.php?f=225&t=12647&p=86592#p86592
Re: County98's Learn as I Go Thread
Had kind of a landmark day today for me. I only tried to put a battery in the car one other time and engine turned over, but nothing else.
I realized there was no chassis ground from battery...at all.
Hooked it up and pleasantly surprised with how much worked!
Stereo, cig lighter, headlights, heater fan motor, and wipers all turned on.
No brake lights, tail lights, dome light, or dash lights.


Didn't do any troubleshooting at all, not the point of today, but may be all easy fixes.
VAIRY pleased overall!
Sent from my SAMSUNG-SM-G870A using Corvair Forum mobile app
I realized there was no chassis ground from battery...at all.
Hooked it up and pleasantly surprised with how much worked!
Stereo, cig lighter, headlights, heater fan motor, and wipers all turned on.
No brake lights, tail lights, dome light, or dash lights.
Didn't do any troubleshooting at all, not the point of today, but may be all easy fixes.
VAIRY pleased overall!
Sent from my SAMSUNG-SM-G870A using Corvair Forum mobile app
Re: County98's Learn as I Go Thread
Today was steering wheel day. Started out cool and got my little care package from Clark's. Glove and ashtray rubber nubs, glove box light, and cancelling pawl.
Nubs and glove box light were easy peasy, and then I started on the column...[emoji20]
Started out good. Found the hidden little snap ring that would become my enemy later on.

To get the pawl off, you have to disassemble everything since the retaining screw is on the back.

Transferred over the o-ring and little foam bits. So far, so good! [emoji3]

I'm using Seth's Grant adapter, so needed to "adjust" the angle of the signal arm. By adjust, I mean to carefully bend it in a vice while squinting with one eye closed. We all know that proper body English will keep things from breaking unexpectedly. [emoji12]


Reassembly is where things got dicey.
First, this screw needs to go through before the pawl goes on. Figured this out AFTER I had it all together. Took it all back apart for this stupid screw.

Next, the pawl can't be good-n'-tight. Had to back it off just a hair to get good clickery. (You can use that word too. Just made it up.) Took it off again.
While it was apart, btw, I recoated the upper shaft with grease.
Next was reinstalling that damn snap ring. ARG! For the life of me I fought with this stupid thing for an hour before I realized the steering shaft itself had sucked in about 3/8". After I took it all apart 3 more times...[emoji35]
SOOOO frustrating since I assumed I had just mucked up the assembly. After a quick forum search, the light bulb came on. I used a 1/2" wrench under the barely started nut and using all 3 hands got that little SOB in there. VICTORY!!!!!

Got a new set of instructions from Seth and finished it all up!
Torqued to 40 ft/lbs.

Done!


My garage sale wheel looks pretty good! Sanded and painted the center with the same Steel paint I've been using everywhere else for continuity.
Scrubbed and soaked the pleather in Meguires dressing for a couple days and brought it back to life.

Seth makes a great product with his adapter, I highly recommend it.
Sent from my SAMSUNG-SM-G870A using Corvair Forum mobile app
Nubs and glove box light were easy peasy, and then I started on the column...[emoji20]
Started out good. Found the hidden little snap ring that would become my enemy later on.
To get the pawl off, you have to disassemble everything since the retaining screw is on the back.
Transferred over the o-ring and little foam bits. So far, so good! [emoji3]
I'm using Seth's Grant adapter, so needed to "adjust" the angle of the signal arm. By adjust, I mean to carefully bend it in a vice while squinting with one eye closed. We all know that proper body English will keep things from breaking unexpectedly. [emoji12]
Reassembly is where things got dicey.
First, this screw needs to go through before the pawl goes on. Figured this out AFTER I had it all together. Took it all back apart for this stupid screw.
Next, the pawl can't be good-n'-tight. Had to back it off just a hair to get good clickery. (You can use that word too. Just made it up.) Took it off again.
While it was apart, btw, I recoated the upper shaft with grease.
Next was reinstalling that damn snap ring. ARG! For the life of me I fought with this stupid thing for an hour before I realized the steering shaft itself had sucked in about 3/8". After I took it all apart 3 more times...[emoji35]
SOOOO frustrating since I assumed I had just mucked up the assembly. After a quick forum search, the light bulb came on. I used a 1/2" wrench under the barely started nut and using all 3 hands got that little SOB in there. VICTORY!!!!!
Got a new set of instructions from Seth and finished it all up!
Torqued to 40 ft/lbs.
Done!
My garage sale wheel looks pretty good! Sanded and painted the center with the same Steel paint I've been using everywhere else for continuity.
Scrubbed and soaked the pleather in Meguires dressing for a couple days and brought it back to life.
Seth makes a great product with his adapter, I highly recommend it.
Sent from my SAMSUNG-SM-G870A using Corvair Forum mobile app
-
terribleted

- Posts: 4584
- Joined: Sun Apr 18, 2010 2:36 pm
- Location: Atlanta, GA
- Contact:
Re: County98's Learn as I Go Thread
Lookin good!!
Corvair guy since 1982. I have personally restored at least 20 Vairs, many of them restored ground up.
Currently working full time repairing Corvairs and restoring old cars.
https://www.facebook.com/tedsautorestoration/
Located in Snellville, Georgia
Currently working full time repairing Corvairs and restoring old cars.
https://www.facebook.com/tedsautorestoration/
Located in Snellville, Georgia
Re: County98's Learn as I Go Thread
Long day today and my thumbs and shoulders hurt like hell, lol.
Got the majority of my sound deadener done before I ran out. Oh, well. I'll pick up some more later.
Shoulder workout for sure.

Rest wasn't TOO bad, but I remembered it being a lot more fun when I was a kid. [emoji16] [emoji3]


Sent from my SAMSUNG-SM-G870A using Corvair Forum mobile app
Got the majority of my sound deadener done before I ran out. Oh, well. I'll pick up some more later.
Shoulder workout for sure.
Rest wasn't TOO bad, but I remembered it being a lot more fun when I was a kid. [emoji16] [emoji3]
Sent from my SAMSUNG-SM-G870A using Corvair Forum mobile app
-
SyntheticBlnkerFluid
- Posts: 239
- Joined: Tue Jan 28, 2014 7:32 am
- Location: Chebanse, IL
- Contact:
Re: County98's Learn as I Go Thread
What are you using for sound deadener? It seems like whenever you ask a group of people about what to use, there is so much back and forth on what's the superior product.
Sent from my iPhone using Corvair Forum mobile app
Sent from my iPhone using Corvair Forum mobile app
1968 Monza 140 4-Speed Posi
Rob
Chebanse, IL
Rob
Chebanse, IL
Re: County98's Learn as I Go Thread
I'm using NVX'S version of Dynamat. I'm gonna go into it more on the stereo thread, but all the name brands are about the same.
Sent from my SAMSUNG-SM-G870A using Corvair Forum mobile app
Sent from my SAMSUNG-SM-G870A using Corvair Forum mobile app