1965 Corsa clone, but a sweeeeeet one
-
DROPPEDATBIRTH

- Posts: 42
- Joined: Sun Mar 21, 2010 10:27 pm
Re: 1965 Corsa clone, but a sweeeeeet one
The car looks great and the engine compartment is really nice.
Dustin
Sewickley, PA

"63 Corvair Panel"
Sewickley, PA
"63 Corvair Panel"
-
Gregory_Miller

- Corvair of the Month

- Posts: 919
- Joined: Tue Feb 23, 2010 1:54 pm
Re: 1965 Corsa clone, but a sweeeeeet one
Fan works, hoses connected, cable came loose from the clamp right at the control housing. Maybe I can just re-connect it and lube it.davemotohead wrote:Was your heater fan working?,,heater hoses conected?
-
Gregory_Miller
- Corvair of the Month
- Posts: 919
- Joined: Tue Feb 23, 2010 1:54 pm
Re: 1965 Corsa clone, but a sweeeeeet one
Wow, a long time away, but I'm back, like a bad penny. Since I updated this thread last, I have replaced the heater control cable, all the heat hoses, installed Dave Motohead's pitman arm Delrin bushing and his fresh air hose block off "kit". I got the clock in the dash running again, but didn't align the hands properly (oops!!) so the dash will have to come back out to fix that. The big news is I have finally aquired all the base parts needed to install American-Pis EDIS system in my baby. This will also support the throttle body fuel injection which I still need money for.
That is awesome, can't wait to find a rich uncle I didn't know i had...
- EZ-EFI carb top.jpg (119.56 KiB) Viewed 4474 times

Re: 1965 Corsa clone, but a sweeeeeet one
Welcome back 
Jeremy (cad-kid)
Kronenwetter, WI (Central Wisconsin)
SOLD 9-2016 65 Monza 4spd/140
My 65 Monza thread
 My YouTube page
Kronenwetter, WI (Central Wisconsin)
SOLD 9-2016 65 Monza 4spd/140
My 65 Monza thread
-
Gregory_Miller
- Corvair of the Month
- Posts: 919
- Joined: Tue Feb 23, 2010 1:54 pm
Re: 1965 Corsa clone, but a sweeeeeet one
Great car show last weekend, had 3 LM Vairs there. :)


Re: 1965 Corsa clone, but a sweeeeeet one
I like the light blue one best
Scott
1960 Monza Coupe
1965 Evening Orchid Corsa Turbo (project)
1961 Rampside (project)
1964 Spyder coupe (patina car, running)
1964 faux Spyder (project/parts car)
1964 Monza (parts car)
1963 Monza (parts car)
1960 Monza Coupe
1965 Evening Orchid Corsa Turbo (project)
1961 Rampside (project)
1964 Spyder coupe (patina car, running)
1964 faux Spyder (project/parts car)
1964 Monza (parts car)
1963 Monza (parts car)
-
bbodie52

- Corvair of the Month
- Posts: 11894
- Joined: Mon Aug 06, 2012 12:33 pm
- Location: Lake Chatuge Hayesville, NC
- Contact:
Re: 1965 Corsa clone, but a sweeeeeet one
It seems to have those old American Racing flat spoke wheels on it. I used to have a set of those on my 1965 Corsa turbo coupe. They later ended up on my father's 1970 El Camino, and I switched to Ansen Sprint slotted wheels. But I always liked those American Racing wheels!

Brad Bodie
Lake Chatuge, North Carolina
 1966 Corvair Corsa Convertible
Lake Chatuge, North Carolina
1966 Corvair Corsa Convertible-
Gregory_Miller
- Corvair of the Month
- Posts: 919
- Joined: Tue Feb 23, 2010 1:54 pm
Re: 1965 Corsa clone, but a sweeeeeet one
Yes, those are what they are...wish I had a 5th one for my spare.
-
Gregory_Miller
- Corvair of the Month
- Posts: 919
- Joined: Tue Feb 23, 2010 1:54 pm
Re: 1965 Corsa clone, but a sweeeeeet one
Brad... I was dating a young lady in Newbury Park in the early 80s while in the Navy stationed in San Diego... LONG drive to see her on the weekends. Sorry I missed seeing your Vair down there and you mine.
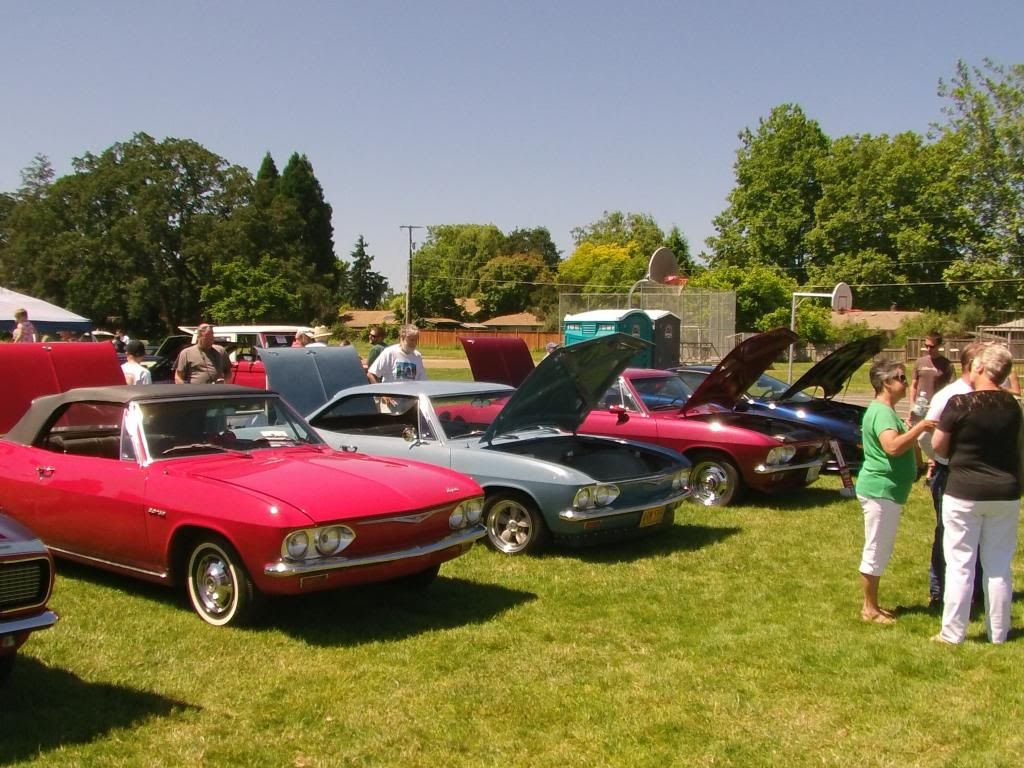
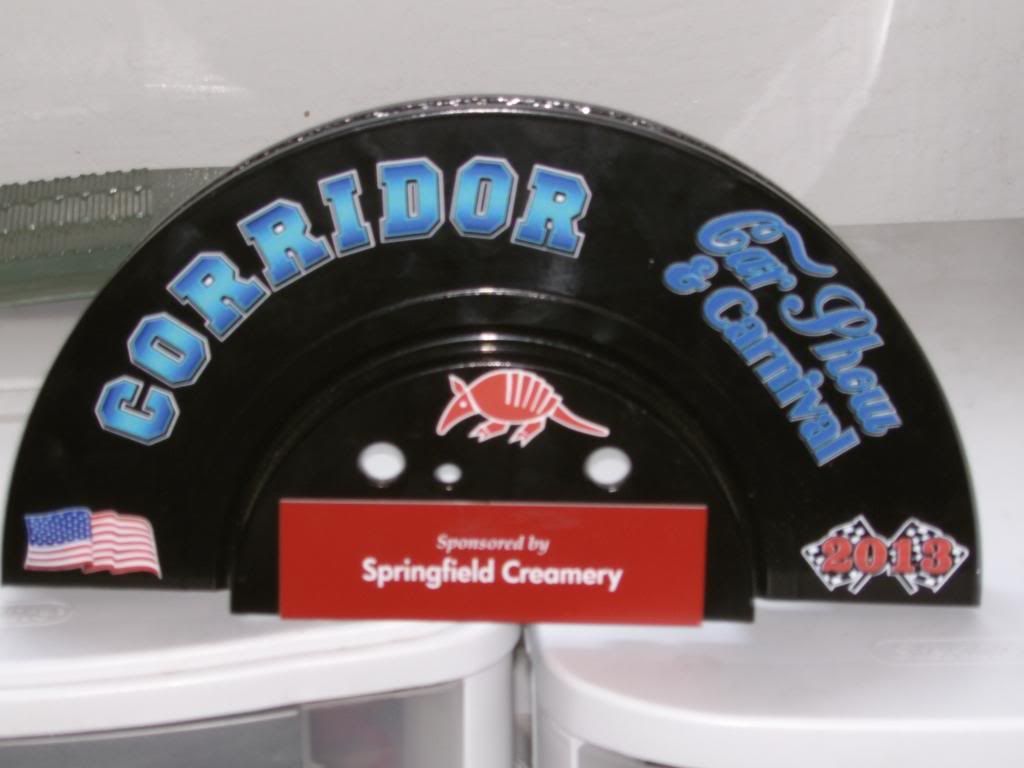
Oh, I got a call last night from the Corridor elementary car show... somehow I didn't hear my name called! 2 other club members were there with their Corvairs too, as posted above. They didn't hear my name either... so I guess I'm not totally deef yet. And, Pics or it didn't happen...
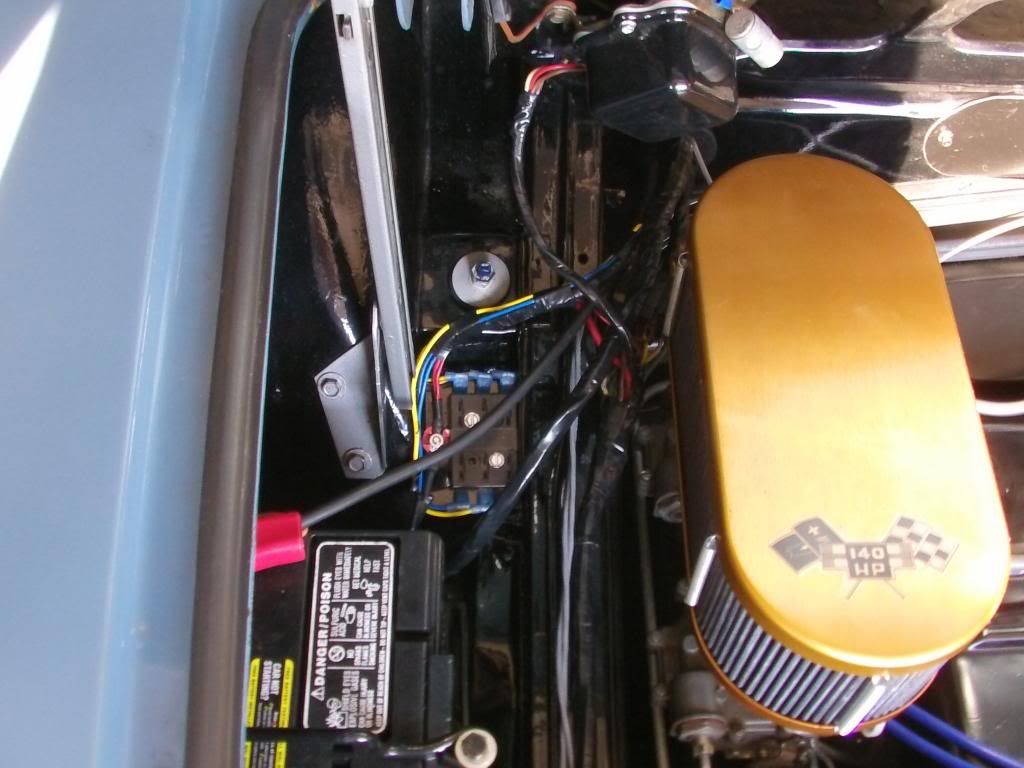
Tonight, going looking for a ATO fuse block with an insulated stud I can replace that cheap plastic insulated stand-off by the battery with. A couple of block-mounted relays, 1 for the fuel pump and the other to drive the SDS brain box and coil pack from Ray Sedman's American-Pi.
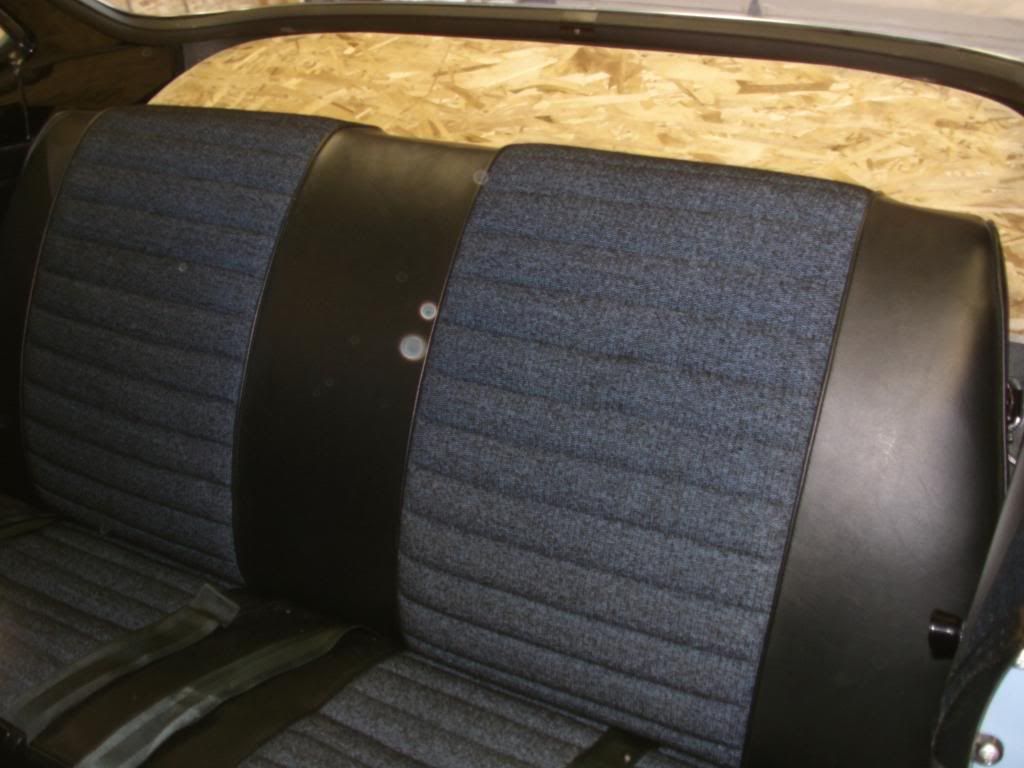
The brain will go in the package area, I will remove the cardboard and fiberglass insulation the PO put in, and install a sheet of plywood to fit the area from just below the rear window to just behind the back seat, with 6x9" speaker holes pre-cut, and covered with black loop carpeting. I can then cut the carpeting out when I get the speakers. A judicious use of strategically-placed FatMat or Dynamat or it's equivalent behind the rear seat, can't afford enough to cover the whole thing right now, maybe more later.. Update this weekend.
Oh, I got a call last night from the Corridor elementary car show... somehow I didn't hear my name called! 2 other club members were there with their Corvairs too, as posted above. They didn't hear my name either... so I guess I'm not totally deef yet. And, Pics or it didn't happen...

Tonight, going looking for a ATO fuse block with an insulated stud I can replace that cheap plastic insulated stand-off by the battery with. A couple of block-mounted relays, 1 for the fuel pump and the other to drive the SDS brain box and coil pack from Ray Sedman's American-Pi.
The brain will go in the package area, I will remove the cardboard and fiberglass insulation the PO put in, and install a sheet of plywood to fit the area from just below the rear window to just behind the back seat, with 6x9" speaker holes pre-cut, and covered with black loop carpeting. I can then cut the carpeting out when I get the speakers. A judicious use of strategically-placed FatMat or Dynamat or it's equivalent behind the rear seat, can't afford enough to cover the whole thing right now, maybe more later.. Update this weekend.
-
Gregory_Miller
- Corvair of the Month
- Posts: 919
- Joined: Tue Feb 23, 2010 1:54 pm
Re: 1965 Corsa clone, but a sweeeeeet one
Beginning of EDIS install: Added a new 6 ATO fuse panel back by the battery, stub on fuse panel replaced the cheesy plastic "hot block" stud, but it did come in handy... I removed the retaining part and after a slight enlargement of the hole, fit on stud of new fuse block perfectly. Still need to find a small plastic cap to cover the exposed area. PO ran 7 wires from the front to the back, I am utilizing 4 of them at this point. 1 will run fuel pump relay, another the relay which will provide power to both the EDIS module and the coil pack. Looking for socketed relays for both items.
This is before I realized the old plastic block would work on the hot stud nicely.
Once I find a couple of relays, one will go in the front near the existing fuse block to run the fuel pump, which is currently running off the "IGN" tab on the fuse block. Nice, can turn key to "acc" and fill carbs before starting if it has sat for more than a few days. The other will go in the package area behind the rear seat, that will be filled with a carpet-covered piece of wood with 2 6x9 speakers, angled from just below the rear window to just behind the top of the rear seat. This will provide a nice hidey-hole to install EDIS module and associated wiring. I'll also add a center mount brake light to the top of the wooden panel that will just peek up above the bottom of the center of the rear window.

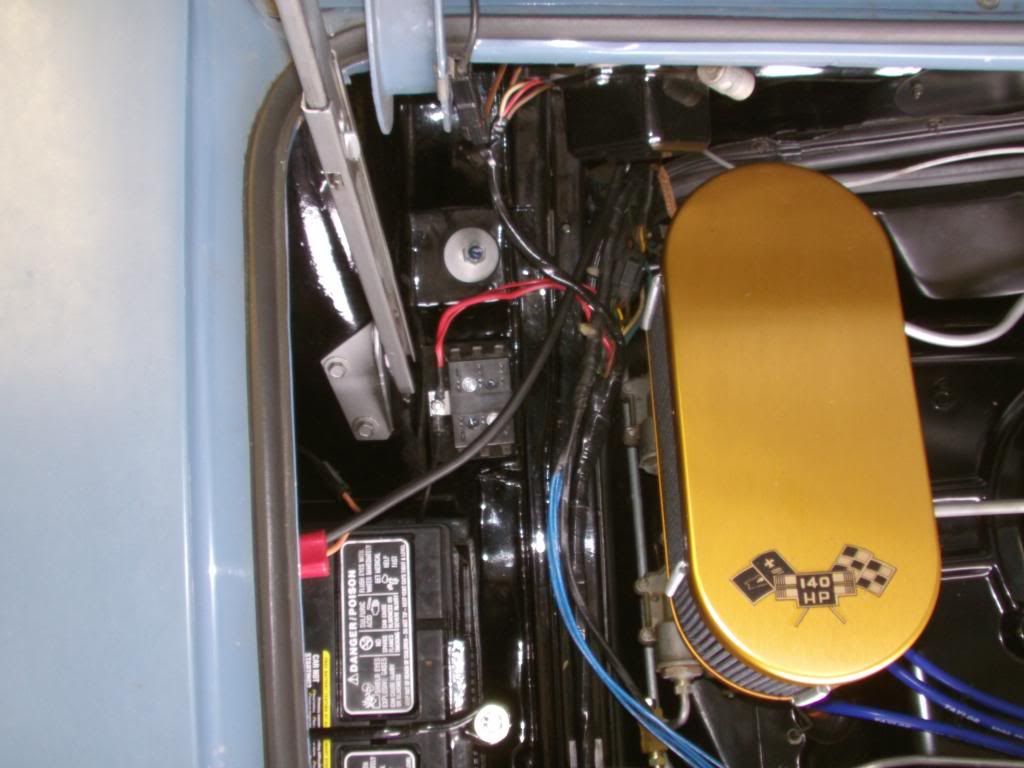
Latest engine compartment photo. No more fresh air hose, and it's tough to see, but new fuse block has 90 degree connectors on wires to help them lay out neater. Don't know why I don't have a better picture of the finished fuse block. I will correct that.

This is before I realized the old plastic block would work on the hot stud nicely.
Once I find a couple of relays, one will go in the front near the existing fuse block to run the fuel pump, which is currently running off the "IGN" tab on the fuse block. Nice, can turn key to "acc" and fill carbs before starting if it has sat for more than a few days. The other will go in the package area behind the rear seat, that will be filled with a carpet-covered piece of wood with 2 6x9 speakers, angled from just below the rear window to just behind the top of the rear seat. This will provide a nice hidey-hole to install EDIS module and associated wiring. I'll also add a center mount brake light to the top of the wooden panel that will just peek up above the bottom of the center of the rear window.

Latest engine compartment photo. No more fresh air hose, and it's tough to see, but new fuse block has 90 degree connectors on wires to help them lay out neater. Don't know why I don't have a better picture of the finished fuse block. I will correct that.
-
Gregory_Miller
- Corvair of the Month
- Posts: 919
- Joined: Tue Feb 23, 2010 1:54 pm
Re: 1965 Corsa clone, but a sweeeeeet one
Got the relays for installing the DIS brains and the fuel pump. It's (the fuel pump only) currently running off the IGN tap on the legacy fuse block. I'll be taking a bit of the load off the old wiring, but I think it was all replaced in the late 80s as part of the resto.. Monza harness out, Corsa harness in. It will be getting stripped in the engine bay to remove the resistor wire and to add a lead to run the coil pack which I think I will locate about where you see the white and yellow wire going to the legacy coil. Seth Emerson will be supplying his famous blue 8MM silicone wires, which have to be both longer and a new fitting on the coil pack end. Anyone need a cool blue set of Seth's wires as seen on my engine pic? We can make a deal once I convert over to the DIS. I'll be making a bracket to attach to the engine bay rail as the coil pack mount is too wide to fit as-is. I'll paint it a nice shiny gloss black to match the rest of the bay. The coil pack base is an anodized blue, might paint it gloss black too. Tomorrow morning before it gets too warm in my garage I'll install the fuel pump relay and attach it to one of the new fused wires from my new fuse panel. Then run speaker and power, plus controller cable from package area to front and also a fuel pump trigger wire from the DIS which will shut down fuel pump if engine stops running. I also went to NAPA and got an oil filter and once I throw away the washer they include which doesn't fit properly (inside diameter of washer too big, allowing it to slop around on filter bolt and leak) and replace with one of the 5 I bought from Clark's then it's oil change time for my baby too. I borrowed my co-worker's router (I bought it for him after I burned up his old one and he hasn't used it once) and I'll countersink the hinges for my rear package area speaker "enclosure" which will also conceal the EDIS components and allow it to be pivoted up for access to anything that needs attention.
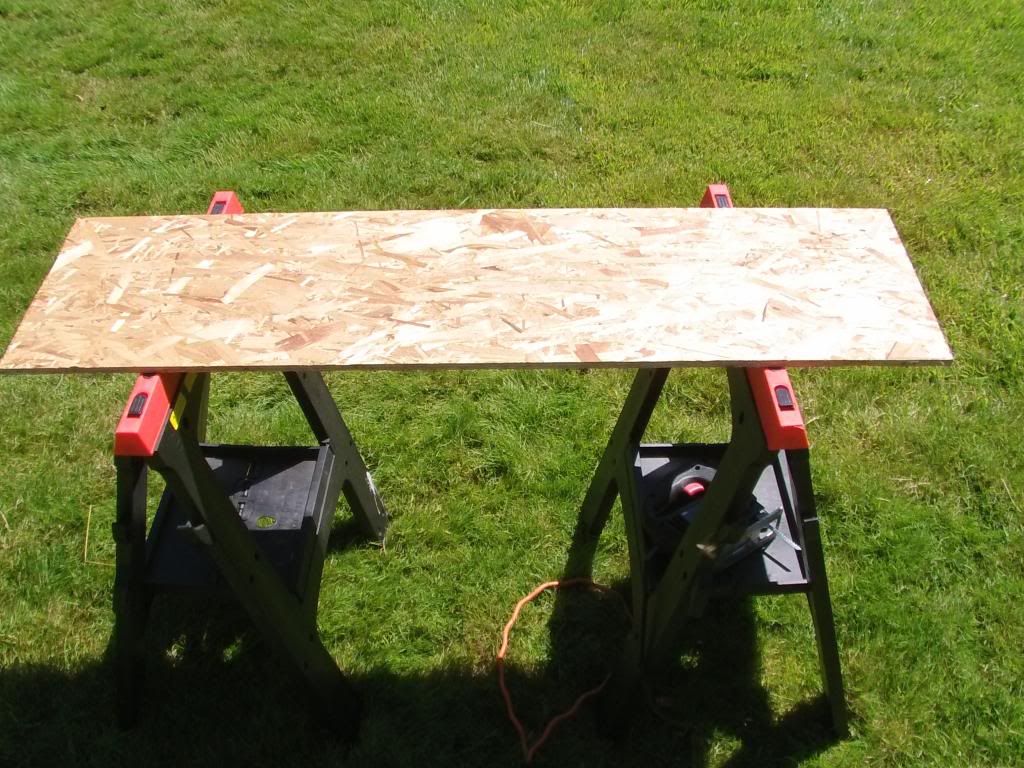
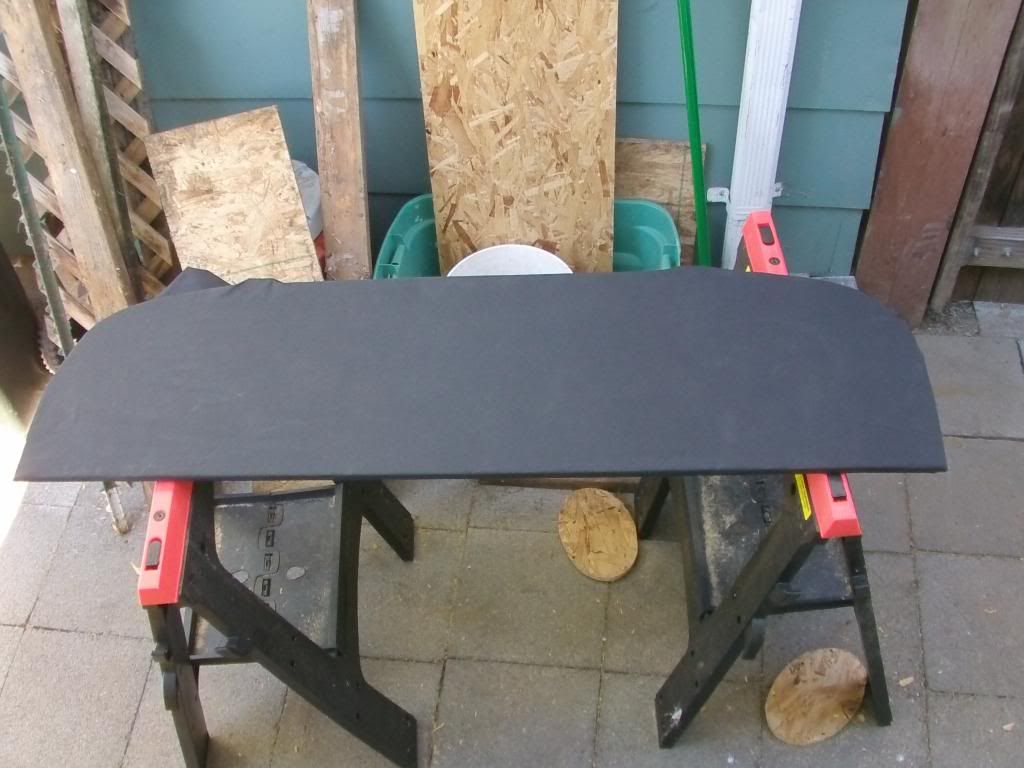
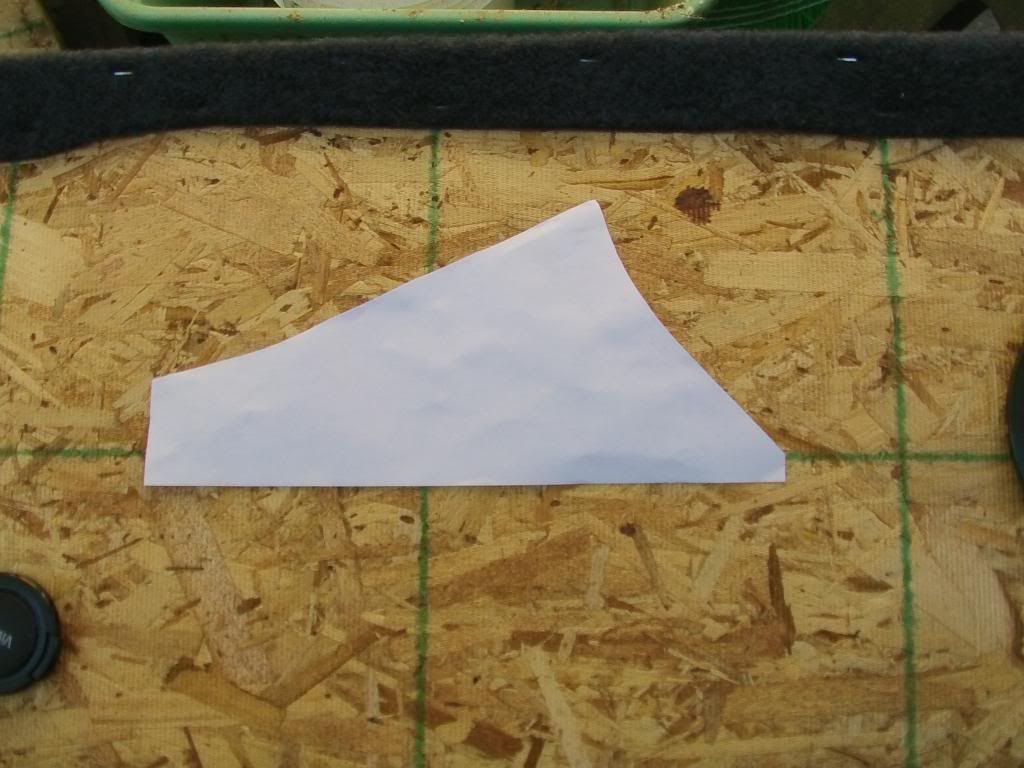
I started with this sheet of OSB, then cut out a cardboard template to capture the curve. I still screwed it up, but the sheet was too wide to begin with, so after I fixed my frak-up, it fit perfectly. Here it is test-fit.
I still need to cut holes for speakers and I have some black duck cloth to cover it with and I'm also trying to find a matching piece of fabric like the seats are covered with to cover it with. A auto fabric manufacturer is sending me samples, hopefully they will be here today so I can hopefully find a match. I'll counter-sink the hinges on the top of the board so it will pivot properly and stay in place in case of sudden stops... and they won't show through the fabric covering the board that way. All the old cardboard in the package area will be coming out, and hopefully I can find some coin to get some DynaMat or similar to put back there.
Going to be a good Corvair weekend.

I started with this sheet of OSB, then cut out a cardboard template to capture the curve. I still screwed it up, but the sheet was too wide to begin with, so after I fixed my frak-up, it fit perfectly. Here it is test-fit.

I still need to cut holes for speakers and I have some black duck cloth to cover it with and I'm also trying to find a matching piece of fabric like the seats are covered with to cover it with. A auto fabric manufacturer is sending me samples, hopefully they will be here today so I can hopefully find a match. I'll counter-sink the hinges on the top of the board so it will pivot properly and stay in place in case of sudden stops... and they won't show through the fabric covering the board that way. All the old cardboard in the package area will be coming out, and hopefully I can find some coin to get some DynaMat or similar to put back there.
Going to be a good Corvair weekend.
-
Gregory_Miller
- Corvair of the Month
- Posts: 919
- Joined: Tue Feb 23, 2010 1:54 pm
Re: 1965 Corsa clone, but a sweeeeeet one
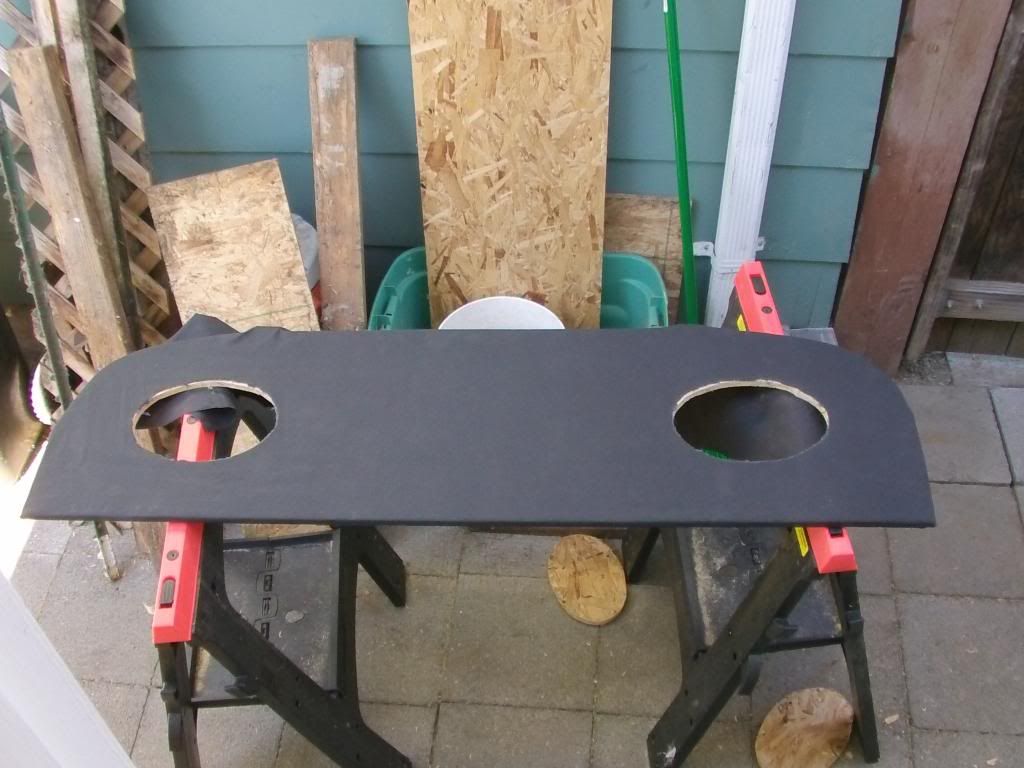
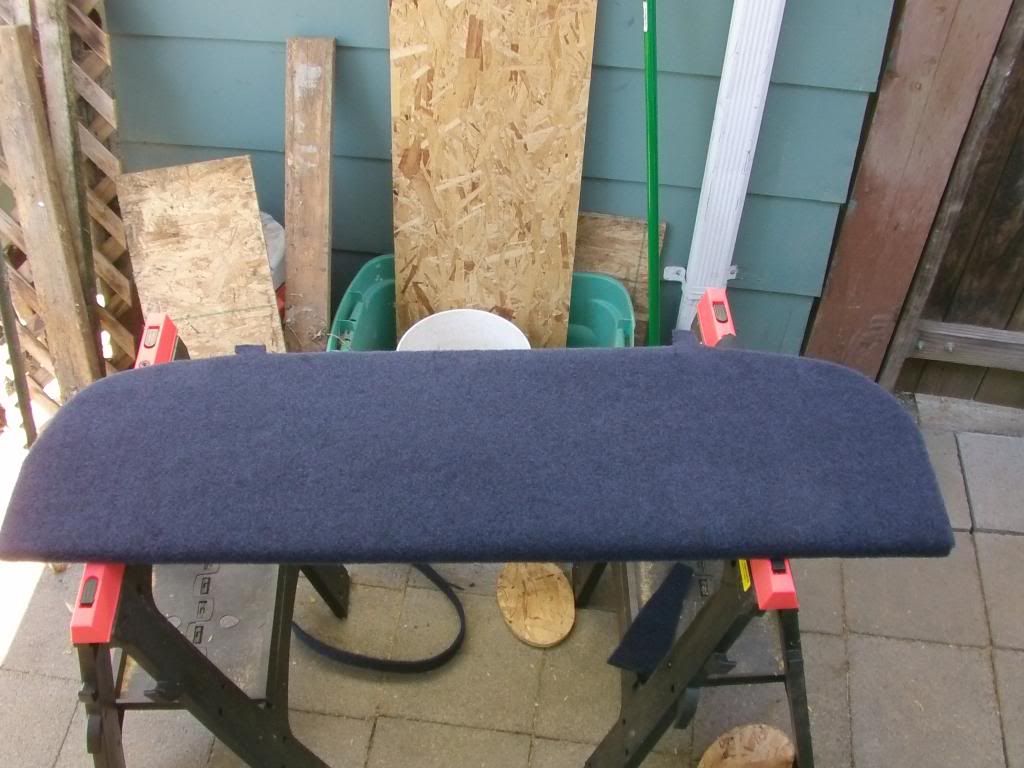
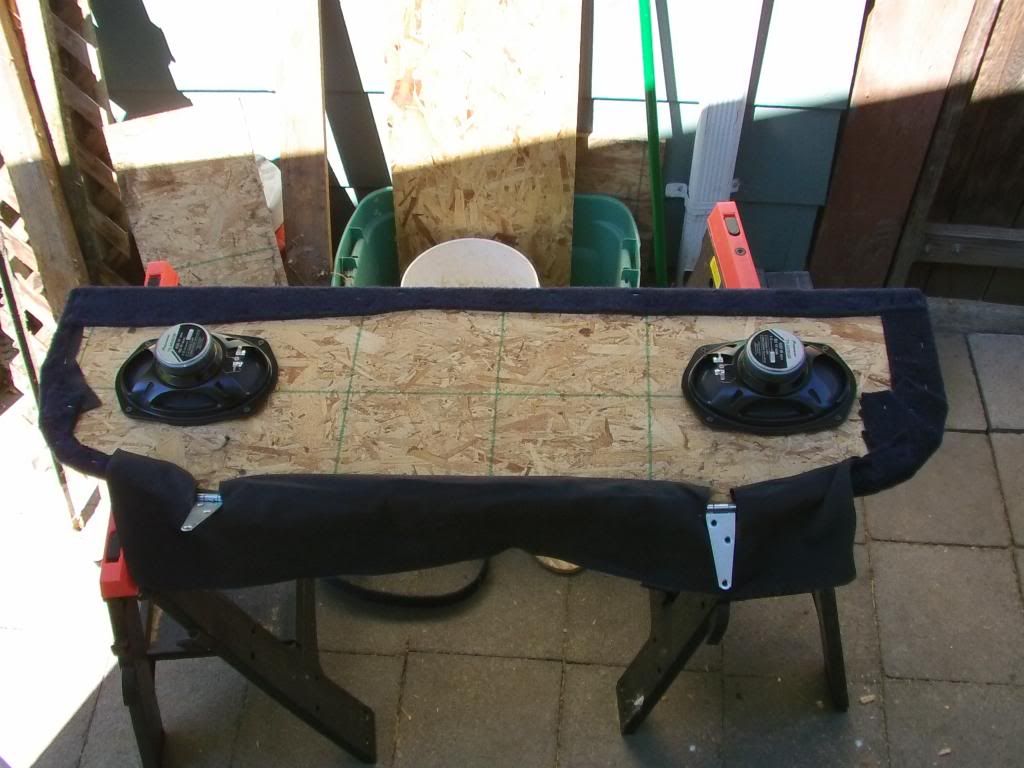
Ok, continued the speaker holder build. Got some speakers with the blessing of the missus. (I've been REALLY good lately.) ") I cut the speaker holes out using the supplied template.
I cut the speaker holes out using the supplied template.

I also countersunk the hinges so they wouldn't stick up under the fabric. I had bought the duck cloth, but I thought it might be cool to match the seat upholstery so I found a place that sent me samples, and what I wanted was $80 a square yard. I didn't want it that much. The wife, kids, and I went to a place called Econo Sales that had a very reasonable substitute, a blue/black trunk carpet. $12. SOLD!!!
I pulled out the old cardboard behind the rear seat, and something I forgot about in the 35 years since I did this to my 68... big ugly holes!!

The PO had covered them with duct tape, (he LOVED duct tape) and the white stuff is the residue from the adhesive. It was all concealed by my deteriorating cardboard. Think about what to do there while continuing...
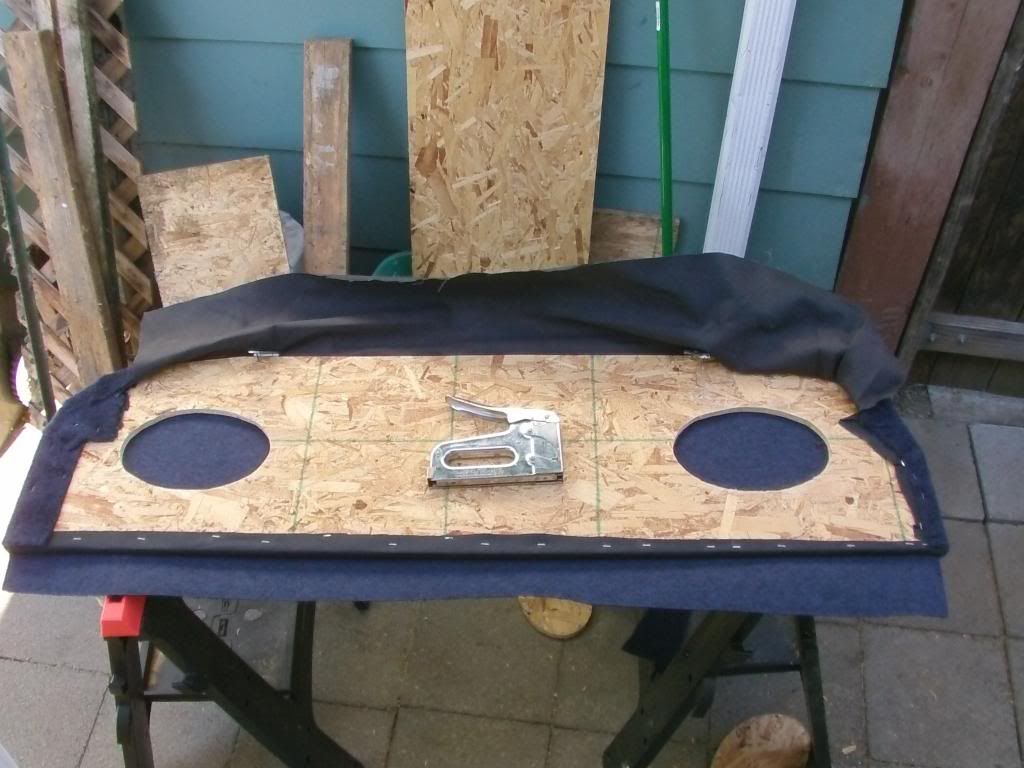
I stretched and stapled the duck cloth down on the OSB.
I cut the holes through where the speakers would reside. I thought about having the speakers hidden, or show. I decided to go hidden. Cutting the duck cloth means 1 less layer for the high frequencies to be lost in. Maybe sometime later I'll get a couple of satellite tweeters to mount in it, a couple of silver buttons showing might be OK. That's definitely for later.
Then I stretched and stapled the final layer on.
I left the extra duck cloth for a reason.
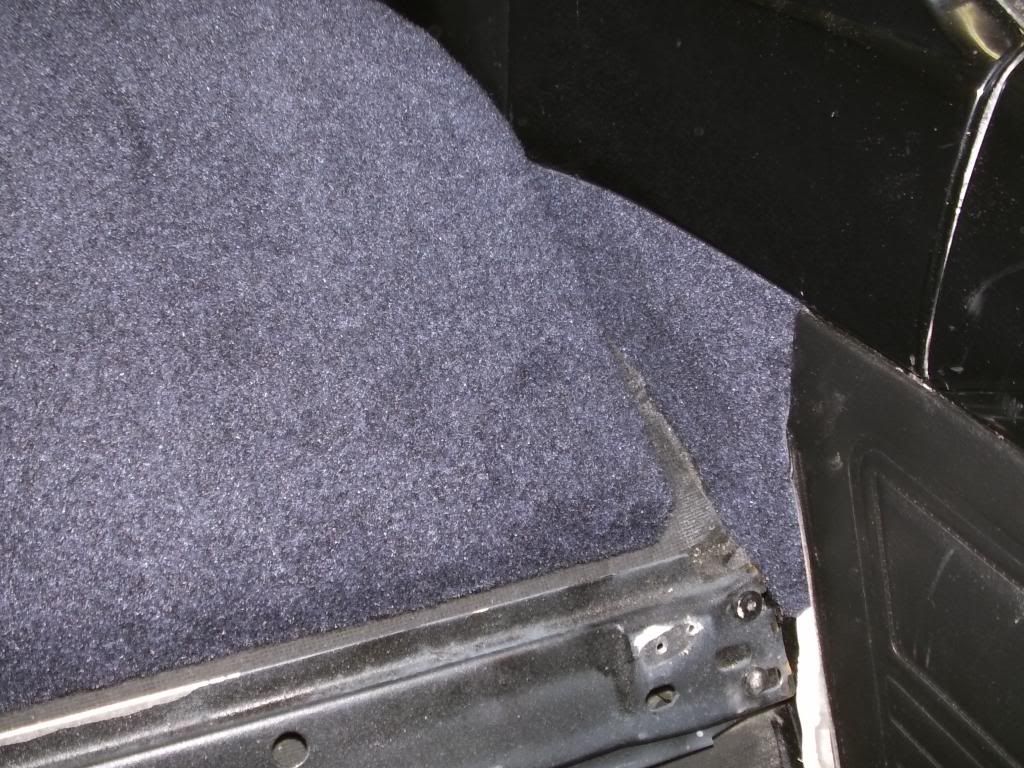
This is what it looks like, no speakers show, but the material is light enough that sound easily passes through it.
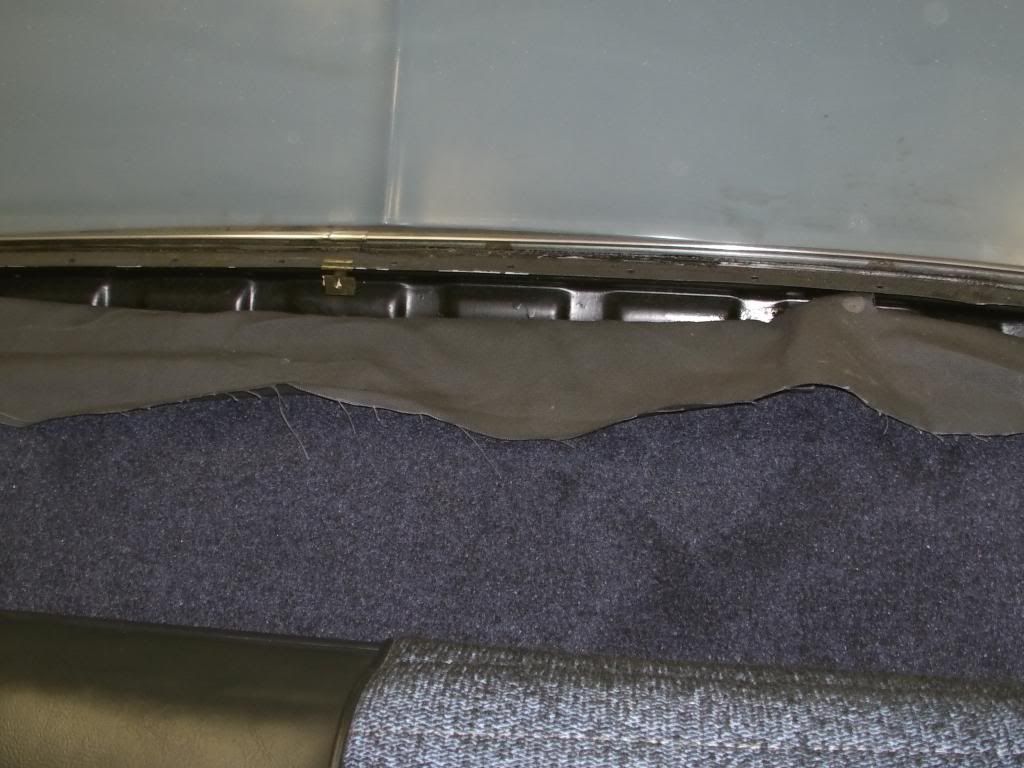
Reverse view. I ran the speaker wires through a loop and then electrical taped them together until they drop below the remaining fiberglass insulation behind the back seat. Want DynaMat, can't afford. *sad*
The hinges allow it to be pivoted up and propped open easily, and I'll be installing all my EDIS brains in this area as well. So, I had to leave a gap between the window trim and the top of this board, to allow it to pivot. It left this revealed.
This is where the extra duck cloth came in handy. If runs from the top of the board, and is clipped in with the plastic window trim. I gave it a touch-up of satin black, they were originally red and the paint had chipped in places.
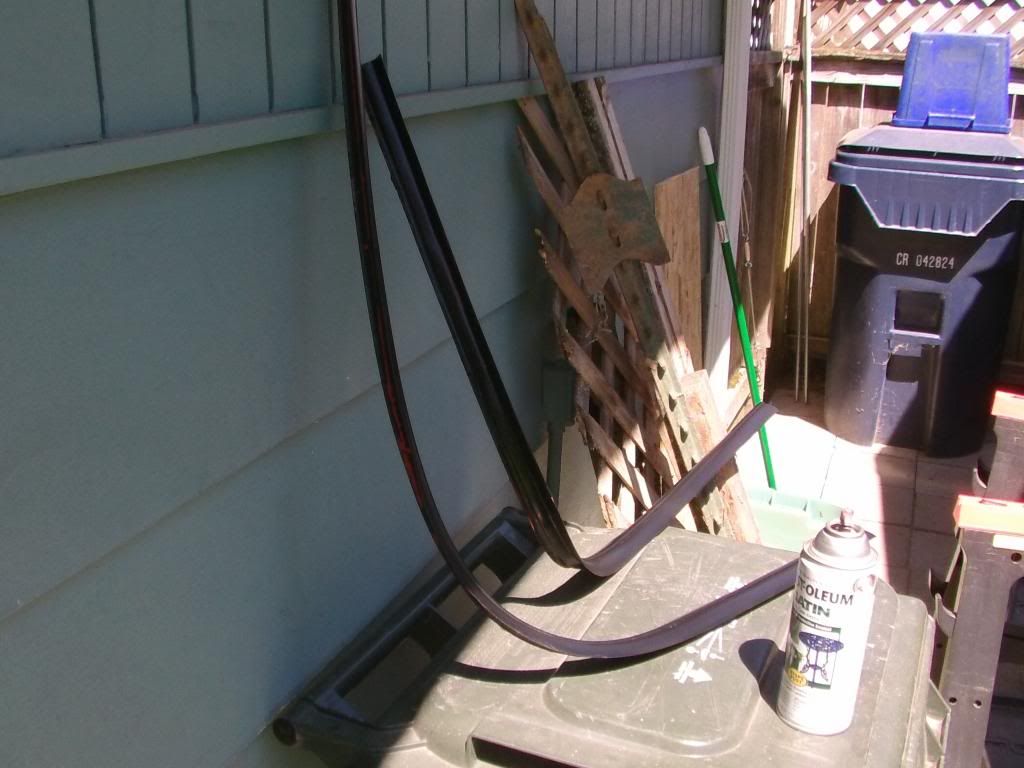
Sunning to dry the fresh coat of paint.
Now, the other thing.. those holes would show if I didn't do something about them. I had some extra duck cloth, and I thought I'd use that first, but I had enough of the trunk carpet left that I..
Cut out a template with paper, and by flipping it over was able to cut out 2 pieces of the carpet, then spray trim adhesive attached them nicely.
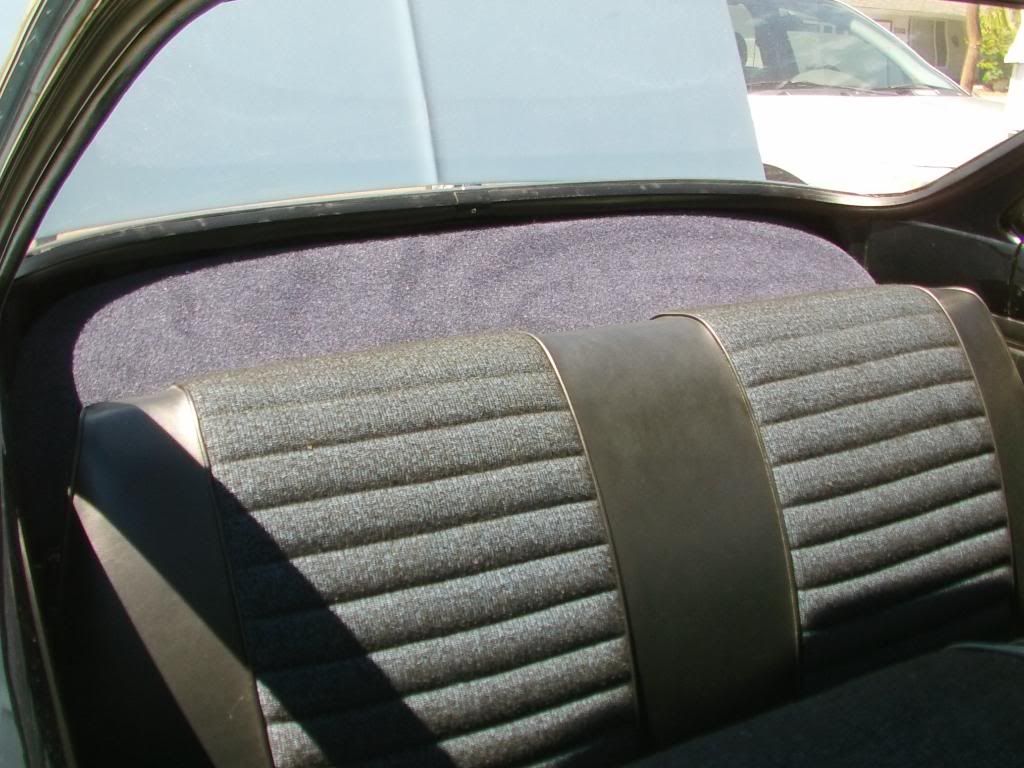
Looks great with the seat folded up.
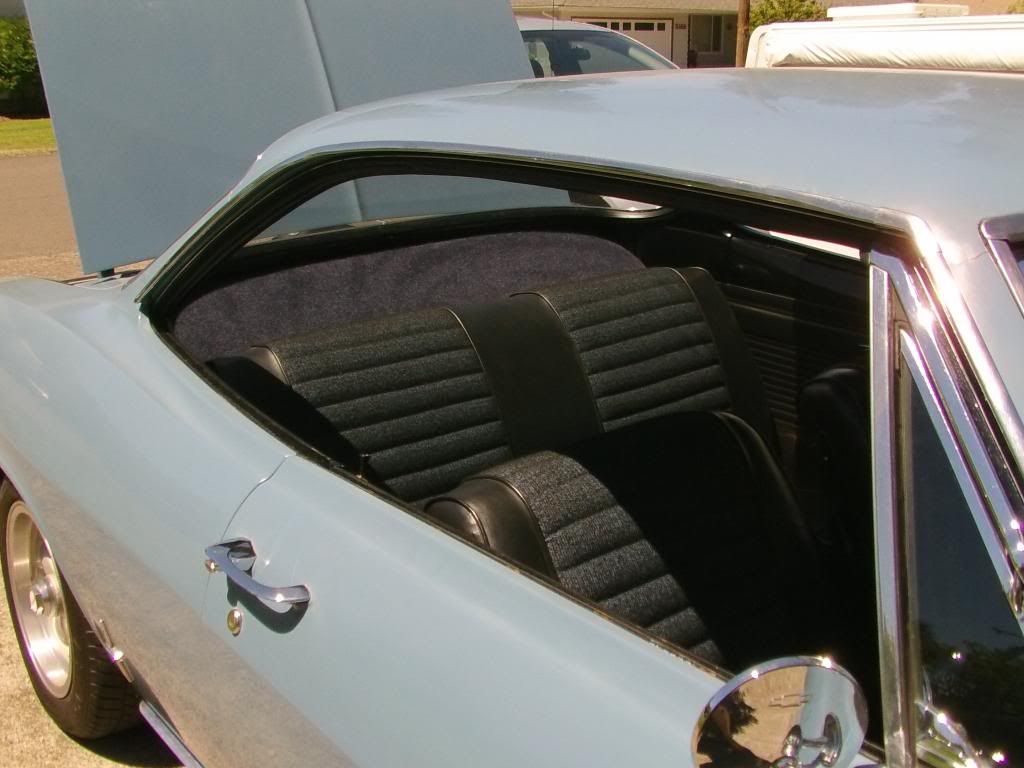
Now, it's all back together, and the gap filled by the duck cloth doesn't show up cause it's in the shadow,
Looks really good, and now I can start the EDIS controller installation. I also put in the fuel pump relay that will be controlled by the same EDIS brain box.

I also countersunk the hinges so they wouldn't stick up under the fabric. I had bought the duck cloth, but I thought it might be cool to match the seat upholstery so I found a place that sent me samples, and what I wanted was $80 a square yard. I didn't want it that much. The wife, kids, and I went to a place called Econo Sales that had a very reasonable substitute, a blue/black trunk carpet. $12. SOLD!!!
I pulled out the old cardboard behind the rear seat, and something I forgot about in the 35 years since I did this to my 68... big ugly holes!!

The PO had covered them with duct tape, (he LOVED duct tape) and the white stuff is the residue from the adhesive. It was all concealed by my deteriorating cardboard. Think about what to do there while continuing...
I stretched and stapled the duck cloth down on the OSB.

I cut the holes through where the speakers would reside. I thought about having the speakers hidden, or show. I decided to go hidden. Cutting the duck cloth means 1 less layer for the high frequencies to be lost in. Maybe sometime later I'll get a couple of satellite tweeters to mount in it, a couple of silver buttons showing might be OK. That's definitely for later.

Then I stretched and stapled the final layer on.

I left the extra duck cloth for a reason.

This is what it looks like, no speakers show, but the material is light enough that sound easily passes through it.

Reverse view. I ran the speaker wires through a loop and then electrical taped them together until they drop below the remaining fiberglass insulation behind the back seat. Want DynaMat, can't afford. *sad*
The hinges allow it to be pivoted up and propped open easily, and I'll be installing all my EDIS brains in this area as well. So, I had to leave a gap between the window trim and the top of this board, to allow it to pivot. It left this revealed.

This is where the extra duck cloth came in handy. If runs from the top of the board, and is clipped in with the plastic window trim. I gave it a touch-up of satin black, they were originally red and the paint had chipped in places.

Sunning to dry the fresh coat of paint.
Now, the other thing.. those holes would show if I didn't do something about them. I had some extra duck cloth, and I thought I'd use that first, but I had enough of the trunk carpet left that I..

Cut out a template with paper, and by flipping it over was able to cut out 2 pieces of the carpet, then spray trim adhesive attached them nicely.

Looks great with the seat folded up.
Now, it's all back together, and the gap filled by the duck cloth doesn't show up cause it's in the shadow,


Looks really good, and now I can start the EDIS controller installation. I also put in the fuel pump relay that will be controlled by the same EDIS brain box.
-
Gregory_Miller
- Corvair of the Month
- Posts: 919
- Joined: Tue Feb 23, 2010 1:54 pm
Re: 1965 Corsa clone, but a sweeeeeet one
Pulled both my primary carbs off this morning, sitting on the bench for a good going-through with Marty Scarr this evening, then search for vacuum leaks, etc...get her running great on legacy ignition system before starting EDIS install.
-
dagdal1967
- Corvair of the Month
- Posts: 225
- Joined: Mon Jun 03, 2013 9:24 am
- Location: Fort Worth, Texas
- Contact:
Re: 1965 Corsa clone, but a sweeeeeet one
Nice work on the Package area speaker holder. You've given me inspiration to try the same thing. I was going to order new cardboard from clarks, but really don't like the way it looks even new.
I'll have to see how I can use your method on my EM.
I'll have to see how I can use your method on my EM.
Doug Gault
Fort Worth, Texas
- 2013 Cadillac ATS Premium
- 1964 Palomar Red Corvair 900 Monza Club Coupe
- 1961 Lincoln Continental
The Air Cooled Addiction Continues...
Fort Worth, Texas
- 2013 Cadillac ATS Premium
- 1964 Palomar Red Corvair 900 Monza Club Coupe
- 1961 Lincoln Continental
The Air Cooled Addiction Continues...
-
Gregory_Miller
- Corvair of the Month
- Posts: 919
- Joined: Tue Feb 23, 2010 1:54 pm
Re: 1965 Corsa clone, but a sweeeeeet one
3 carbs, 1 looks really good, but runs really bad... have to contact the vendor on that one. remaining carbs are the 2 that were on the car already, got them synched a bit better, but needs more base timing. Had a great evening with a Corvair expert, he will come back with 2 known good carbs and we will play some more.
-
Gregory_Miller
- Corvair of the Month
- Posts: 919
- Joined: Tue Feb 23, 2010 1:54 pm
Re: 1965 Corsa clone, but a sweeeeeet one
SDS is now installed, and can power up. Still need to find a nut to fit the air charge temp sender. It resides comfortably under the speaker panel. I verified that it sees the crank angle sensor magnets. Still need to decide where to mount the coil pack assembly and then order my new plug wires. Everything is temp taped, and I still need to get an appropriately-sized grommet for the hole, and then install supports for wideband O2 sensor controller under the car.
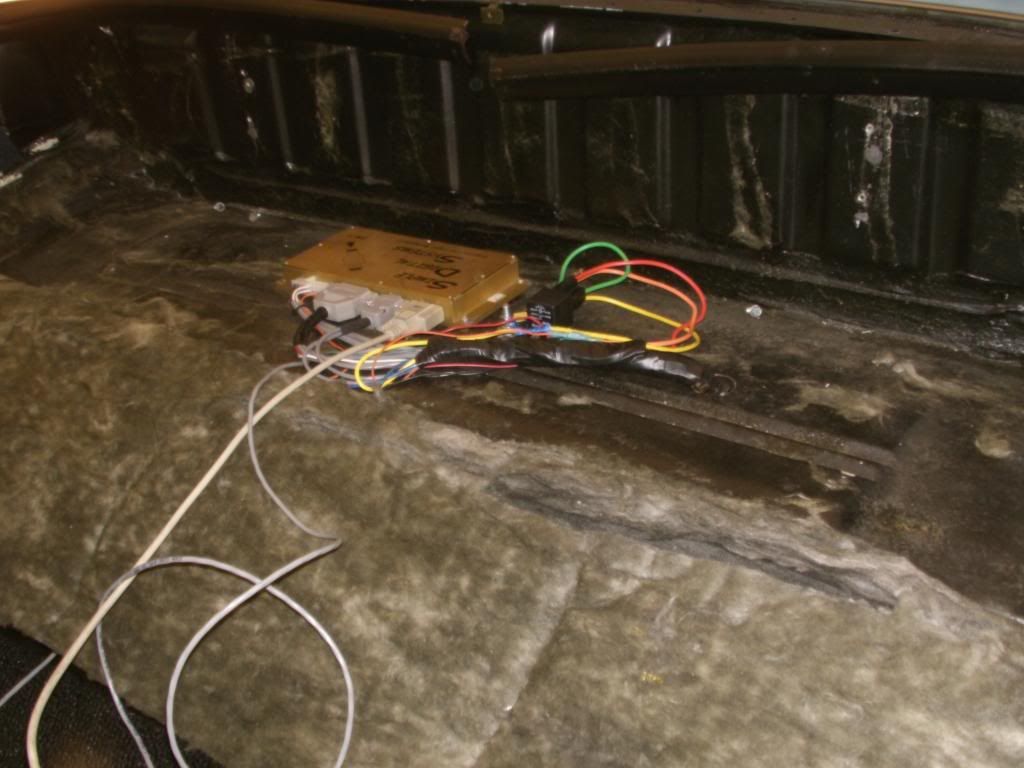
Relay will power both the SDS and the O2 sensor. Serial lead for programmer and mixture knob are the 2 wires to the front.
Closer view of the new fuse block I put in, utilizing the wires the PO ran to the front of the car oh so many years ago. The new leads for the SDS are temp taped up and coiled by the battery. I'll install the air charge sensor in the left air cleaner, where it will be unaffected by blow-by gases and their temperatures that enter the passenger side air cleaner.
And this is what it looks like now, everything nice and stealthy. There is a poster on the Corvair Center forum named CecilW who has hidden his wiring in the engine bay by running it through the "frame" rails... I might do that with all of them including the DIS wiring this winter while I have the power pack out to do the clutch. It inspired me.

Relay will power both the SDS and the O2 sensor. Serial lead for programmer and mixture knob are the 2 wires to the front.

Closer view of the new fuse block I put in, utilizing the wires the PO ran to the front of the car oh so many years ago. The new leads for the SDS are temp taped up and coiled by the battery. I'll install the air charge sensor in the left air cleaner, where it will be unaffected by blow-by gases and their temperatures that enter the passenger side air cleaner.
And this is what it looks like now, everything nice and stealthy. There is a poster on the Corvair Center forum named CecilW who has hidden his wiring in the engine bay by running it through the "frame" rails... I might do that with all of them including the DIS wiring this winter while I have the power pack out to do the clutch. It inspired me.