https://www.hagerty.com/articles-videos ... -for-worse
My 1964 Corvair Monza Record Of Improvements
-
64CorvairMonza
- Posts: 125
- Joined: Wed Nov 20, 2019 9:08 am
- Location: Palm Coast, FLA.
- Contact:
Re: My 1964 Corvair Monza Record Of Improvements
Found this interesting but I am 6' 4" and have long arms and will find the shallow dish to my liking!! And the leg room!
https://www.hagerty.com/articles-videos ... -for-worse
https://www.hagerty.com/articles-videos ... -for-worse
Last edited by 64CorvairMonza on Tue Dec 10, 2019 9:41 am, edited 1 time in total.
-
64CorvairMonza
- Posts: 125
- Joined: Wed Nov 20, 2019 9:08 am
- Location: Palm Coast, FLA.
- Contact:
Re: My 1964 Corvair Monza Record Of Improvements
This is what I should have! Anyone should have known that if the include an electric push button horn button in the kit!! Now where do I get one so I can finish this project?
-
64CorvairMonza
- Posts: 125
- Joined: Wed Nov 20, 2019 9:08 am
- Location: Palm Coast, FLA.
- Contact:
Re: My 1964 Corvair Monza Record Of Improvements
IF anyone wants to buy the kit I have for 1960-1964, make sure you get the correct plunger/wire combo!!!
Last edited by 64CorvairMonza on Tue Dec 10, 2019 1:38 pm, edited 1 time in total.
-
terribleted

- Posts: 4584
- Joined: Sun Apr 18, 2010 2:36 pm
- Location: Atlanta, GA
- Contact:
Re: My 1964 Corvair Monza Record Of Improvements
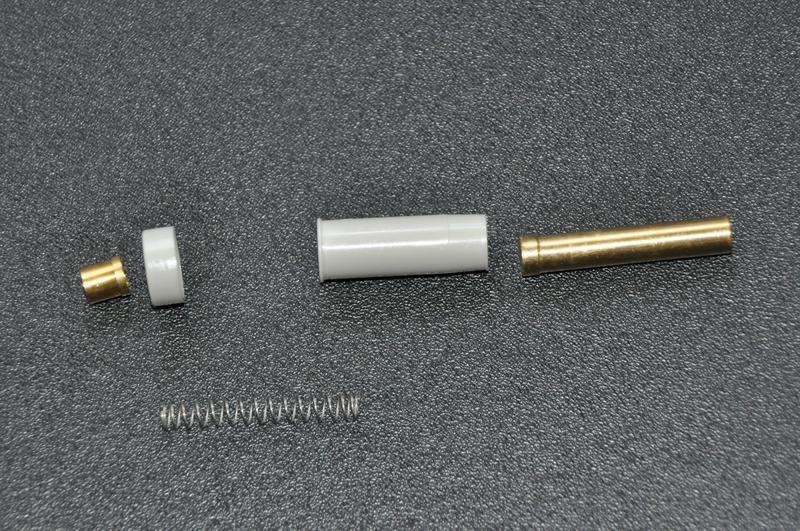
64CorvairMonza wrote: ↑Tue Dec 10, 2019 8:58 am The cheap adapter for $50 from Clarks has the plate with the wire coming off it (positive supply) even for a grounding horn button. That disc with the wire is what I need. Maybe the horn button I got is for 65 and newer. But, I still can't secure that positive pin from sliding up and out! Not bad for $140 eh??In the one photo with the kit like mine, you see the wire connected to the positive plunger that I need. The plunger I got is for a different type of horn button like the metal chrome ones you snap in place. LOOK at the plunger with the wire attacked in the top picture. Is this something I can do, and how? Thanks.
zzzzzz.jpg
zzzzzzzzzzzzzzzzzzzzzzzzzzzzzzzzzzzzzzzzzzzz.jpg
Have you called Clark's about the issues you are having hooking up their adapter? They have very good tech support. I think you must be missing something in the install procedure or something is faulty with the supplied parts.
IF the parts you got from them are not working for you and tech support can not steer you to a fix I would suggest returning the parts. Clark's is very reasonable generally with returns (assuming you have not modified any pieces).
Corvair guy since 1982. I have personally restored at least 20 Vairs, many of them restored ground up.
Currently working full time repairing Corvairs and restoring old cars.
https://www.facebook.com/tedsautorestoration/
Located in Snellville, Georgia
Currently working full time repairing Corvairs and restoring old cars.
https://www.facebook.com/tedsautorestoration/
Located in Snellville, Georgia
-
64CorvairMonza
- Posts: 125
- Joined: Wed Nov 20, 2019 9:08 am
- Location: Palm Coast, FLA.
- Contact:
Re: My 1964 Corvair Monza Record Of Improvements
It's not Clarks. His kits are for the 3 hole standard Grant wheels for $50 - $58 . Mine are from www.perfvair.com for $120 plus accs. and should have carried both versions of that plunger. One for the metal horn button and one for the electronic horn button w/ wire plug. You can only get this type of adapter from Seth and yes, I did send him an e-mail with photos trying to figure this out. Just waiting for his response. I don't want to put a horn button in the dash LOL.....Thanks.
terribleted wrote: ↑Tue Dec 10, 2019 10:10 am64CorvairMonza wrote: ↑Tue Dec 10, 2019 8:58 am The cheap adapter for $50 from Clarks has the plate with the wire coming off it (positive supply) even for a grounding horn button. That disc with the wire is what I need. Maybe the horn button I got is for 65 and newer. But, I still can't secure that positive pin from sliding up and out! Not bad for $140 eh??In the one photo with the kit like mine, you see the wire connected to the positive plunger that I need. The plunger I got is for a different type of horn button like the metal chrome ones you snap in place. LOOK at the plunger with the wire attacked in the top picture. Is this something I can do, and how? Thanks.
zzzzzz.jpg
zzzzzzzzzzzzzzzzzzzzzzzzzzzzzzzzzzzzzzzzzzzz.jpg
Have you called Clark's about the issues you are having hooking up their adapter? They have very good tech support. I think you must be missing something in the install procedure or something is faulty with the supplied parts.
IF the parts you got from them are not working for you and tech support can not steer you to a fix I would suggest returning the parts. Clark's is very reasonable generally with returns (assuming you have not modified any pieces).
-
64CorvairMonza
- Posts: 125
- Joined: Wed Nov 20, 2019 9:08 am
- Location: Palm Coast, FLA.
- Contact:
Re: My 1964 Corvair Monza Record Of Improvements
OK, while looking at Seth's website, it was starring at me all this time and I never caught it!! This is the 'wired' plunger that I should have gotten with my kit!!! I'll give him a call right now!! So glad I finally caught this! One is a plain brass plunger and one is a wired plunger. 
- zzzzzzzzzzzzzzzzzzzzzzzzzzzzzzzzzzzzzzzzzzzzzzz.jpg (7.89 KiB) Viewed 897 times
Last edited by 64CorvairMonza on Tue Dec 10, 2019 12:55 pm, edited 1 time in total.
-
64CorvairMonza
- Posts: 125
- Joined: Wed Nov 20, 2019 9:08 am
- Location: Palm Coast, FLA.
- Contact:
-
64CorvairMonza
- Posts: 125
- Joined: Wed Nov 20, 2019 9:08 am
- Location: Palm Coast, FLA.
- Contact:
Re: My 1964 Corvair Monza Record Of Improvements
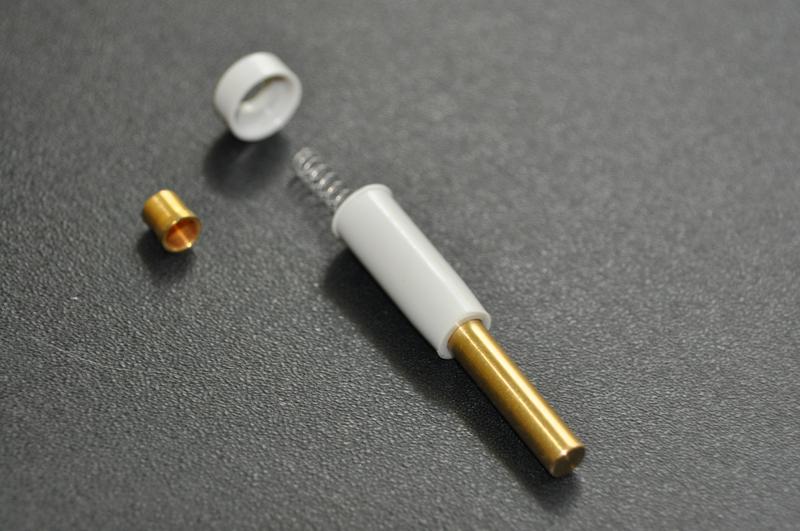
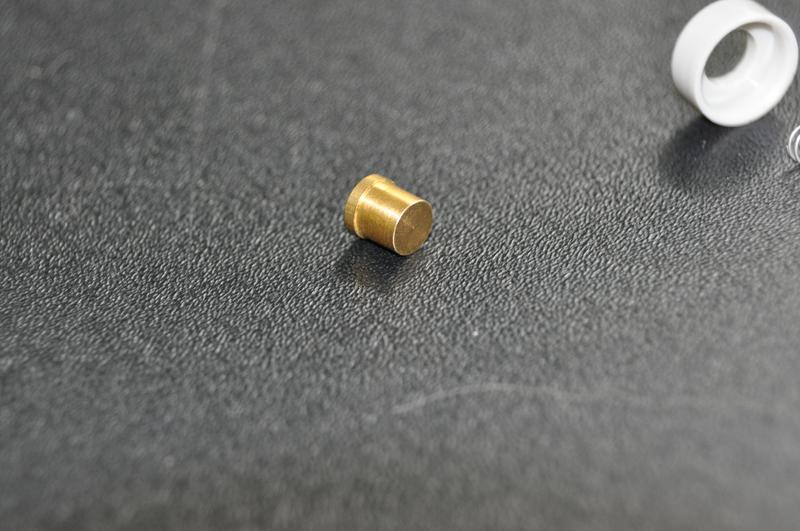
OK, I had gotten curious after I found another website suggesting pulling the plunger apart. I went and took a closer look at it and it appeared to be able to come apart. I held both ends of the two plastic parts in my fingers and gave them a twist while slightly tugging and they clicked apart. I checked to see how easy to assemble them and they snapped back together again. Before I did anything, I called PerfVair.com and spoke with Seth and he suggested that folks usually soldered a lead wire off the end of the short cap and re-installed it. I was glad to see that it came apart because there was no way to solder the wire on without melding the small plastic cap.
Anyway,easy peazy!!! OR you can request one come pre-wired. No biggie. I've a lot of experience soldering micro boards, I think I can handle a copper cap. I thought about drilling a hole through the cap and running the wire through before soldering but I won't. I will attempt to find an old fashioned fuse holder and take one end of the wire out and solder the end plate to the copper plunger cap for a better connection. I wish I hadn't wasted a whole day on this but I should have thought of the fix. Anyway, all's well that ends well and Seth from www.perfvair.com was very helpful and even suggested sending me one if I couldn't solder LOL..... Seth also told me that once you set into the hole in the adapter, place a screw in the hole next to it where the head of the screw or with a washer will hold the plunger in place so it don't pop back out after install. And I'm sure the parts are copper and not brass cause my fingers smelled like a was rubbing pennies between my fingers. Anyway, thanks for all your help!!!!!
Anyway,easy peazy!!! OR you can request one come pre-wired. No biggie. I've a lot of experience soldering micro boards, I think I can handle a copper cap. I thought about drilling a hole through the cap and running the wire through before soldering but I won't. I will attempt to find an old fashioned fuse holder and take one end of the wire out and solder the end plate to the copper plunger cap for a better connection. I wish I hadn't wasted a whole day on this but I should have thought of the fix. Anyway, all's well that ends well and Seth from www.perfvair.com was very helpful and even suggested sending me one if I couldn't solder LOL..... Seth also told me that once you set into the hole in the adapter, place a screw in the hole next to it where the head of the screw or with a washer will hold the plunger in place so it don't pop back out after install. And I'm sure the parts are copper and not brass cause my fingers smelled like a was rubbing pennies between my fingers. Anyway, thanks for all your help!!!!!
-
64CorvairMonza
- Posts: 125
- Joined: Wed Nov 20, 2019 9:08 am
- Location: Palm Coast, FLA.
- Contact:
Re: My 1964 Corvair Monza Record Of Improvements
Here ya go for an explanation of what it should look like when finished.
- Attachments
-
- zzzzzzzzzzzzzzzzzzzzzzzzzzzzzzzzzzzzzzzzzzzzzzzz.png (4.25 KiB) Viewed 890 times
-
terribleted
- Posts: 4584
- Joined: Sun Apr 18, 2010 2:36 pm
- Location: Atlanta, GA
- Contact:
Re: My 1964 Corvair Monza Record Of Improvements
Nice sounds like you are on the right track!!!
Corvair guy since 1982. I have personally restored at least 20 Vairs, many of them restored ground up.
Currently working full time repairing Corvairs and restoring old cars.
https://www.facebook.com/tedsautorestoration/
Located in Snellville, Georgia
Currently working full time repairing Corvairs and restoring old cars.
https://www.facebook.com/tedsautorestoration/
Located in Snellville, Georgia
Re: My 1964 Corvair Monza Record Of Improvements
Have you considered a quick disconnect for the steering wheel? I bought one from Matt Nall and is a big help getting in and out since I’m around your height.
Sent from my iPhone using Corvair Forum mobile app
Sent from my iPhone using Corvair Forum mobile app
65 Monza
Cincinnati, OH
Cincinnati, OH
-
64CorvairMonza
- Posts: 125
- Joined: Wed Nov 20, 2019 9:08 am
- Location: Palm Coast, FLA.
- Contact:
Re: My 1964 Corvair Monza Record Of Improvements
If you are talking about the quick steering wheel release system from Grant, I did install one in my 1965 Chevy Impala and I loved it! Nobody can steel your car if they can't steer it!  I'm not going to do that on my Corvair ,but, it puts the steering about 3" towards you as well and for some, that's a good thing.
doug6423 wrote: ↑Tue Dec 10, 2019 1:35 pm Have you considered a quick disconnect for the steering wheel? I bought one from Matt Nall and is a big help getting in and out since I’m around your height.
Sent from my iPhone using Corvair Forum mobile app
-
64CorvairMonza
- Posts: 125
- Joined: Wed Nov 20, 2019 9:08 am
- Location: Palm Coast, FLA.
- Contact:
Re: My 1964 Corvair Monza Record Of Improvements
I hope it works, because this is ridiculous and I shouldn't even be dealing with this problem.
Last edited by 64CorvairMonza on Tue Dec 10, 2019 5:15 pm, edited 1 time in total.
-
64CorvairMonza
- Posts: 125
- Joined: Wed Nov 20, 2019 9:08 am
- Location: Palm Coast, FLA.
- Contact:
Re: My 1964 Corvair Monza Record Of Improvements
I'm not a happy camper and for the price I paid, I should have at least gotten the right plunger! I have learned a valuable lesson here and this has wasted a whole day. I decided to drill a small hole in the end of the copper cup and after tinning the wire, run it through about 1/2" to hold it so I could solder the wire without if falling off in the process. But first, I sanded the cup with very fine wet sand/dry sand and tinned the cup surface. I stuck the wire through the hole and attempted to solder it to the cap. NOW I need to take the Dremel to it tomorrow and try to grind down some of that soldered wire inside the cap where the spring goes. I'll see if it's still holding solid after I grind the wire out. Not worth the photos.
I also took my Multi-meter and put it on continuity to check the horn button pins against the ring they are snapped into as it will be a ground once installed.. I thought one would be grounded because of the wire that is pressed against the metal ring (see photo)they are mounted in that would ultimately be grounded once the dress ring got mounted on the steering wheel and then into the column. I got a reading off both pins touching one at a time while touching the outer ring. Are they grounded? If so, I can't hook a 12 volt wire to one. Should I get a reading from both pins testing them one at a time? My guess is that one leg at each end of that grounding clip is touching each plug end on the horn button. I assumed that one plug on the horn button gets the positive wire from the plunger and the other plug to a ground screw inside the steering wheel adapter??? Is it so hard to include correct instructions for installation???? I see a 'GROUND' symbol at one pin.
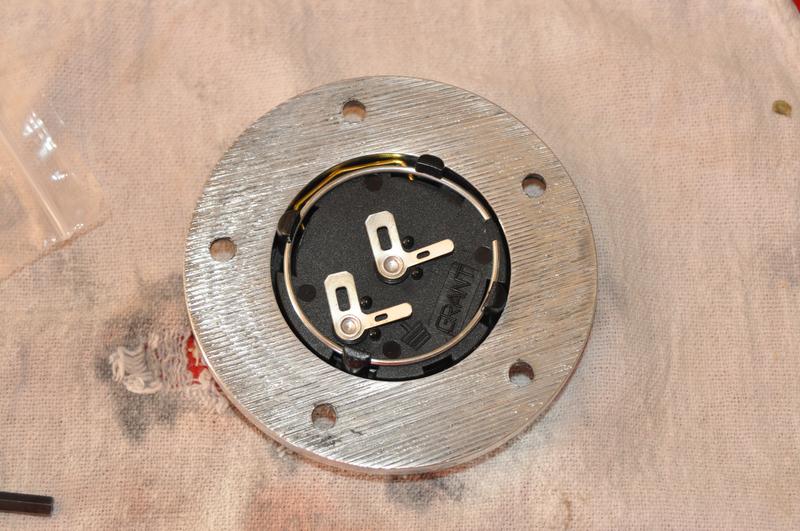
I also took my Multi-meter and put it on continuity to check the horn button pins against the ring they are snapped into as it will be a ground once installed.. I thought one would be grounded because of the wire that is pressed against the metal ring (see photo)they are mounted in that would ultimately be grounded once the dress ring got mounted on the steering wheel and then into the column. I got a reading off both pins touching one at a time while touching the outer ring. Are they grounded? If so, I can't hook a 12 volt wire to one. Should I get a reading from both pins testing them one at a time? My guess is that one leg at each end of that grounding clip is touching each plug end on the horn button. I assumed that one plug on the horn button gets the positive wire from the plunger and the other plug to a ground screw inside the steering wheel adapter??? Is it so hard to include correct instructions for installation???? I see a 'GROUND' symbol at one pin.
-
64CorvairMonza
- Posts: 125
- Joined: Wed Nov 20, 2019 9:08 am
- Location: Palm Coast, FLA.
- Contact:
Re: My 1964 Corvair Monza Record Of Improvements
The only advice I have for anyone wanting to install a cool steering wheel, make sure you get the plunger with the wire coming off of it!!!!!!!!
-
64CorvairMonza
- Posts: 125
- Joined: Wed Nov 20, 2019 9:08 am
- Location: Palm Coast, FLA.
- Contact:
Re: My 1964 Corvair Monza Record Of Improvements
Well, I got my two new mirrors installed today and what a difference they make that car look!!! The passenger looks great with a matching mirror. I got my wired plunger in order and I found that the rubber sleeve that I got from that steering wheel mustang kit, snugly slid right on my new hub adapter and sleeve adapter! Once installed, the only thing that will look like an add-on will be that sweet steering wheel. Nobody will even notice the adapter hub under it. The only thing that is stopping me from installing the steering wheel is the loose turn signal issue. As I mentioned earlier, I want to install a nut on both ends of the turn signal lever and snug them up a bit. Otherwise I would have to change out the actuator and I doubt I'll find any better one unless someone can share a link to a new one. Why? You ask..... The threading is a bit loose/worn now,but, the fine threads are like new on the turn lever. I will search on disassembly instructions and see if it's worth a try. Otherwise I'll just look at my nuts and see if I have what it takes to make it a go............