Hi Everyone!
My name is Walt and I recently purchased a 1964 convertible that is in basically good shape to enjoy cruising on the coast here in central California. I would say that 4 months ago I knew absolutely nothing about Corvairs but was looking for a unique mid-60's car to enjoy. Now, thanks to forums such as this and the vast array of videos that some of the members post online, I know a tremendous amount about these unique cars and am thrilled about the choice I made! So first things first, thank you to all who take the time to post answers to questions and share links and post how-to videos for those of us who need such guidance. And I am such a person - one who needs guidance! I have shied away from wrenching on cars since I left college some 27 years ago, but have wanted to find/make the time to do so but since college, for the most part, I have only owned vehicles that had computers in them so I never wanted to risk messing with them!
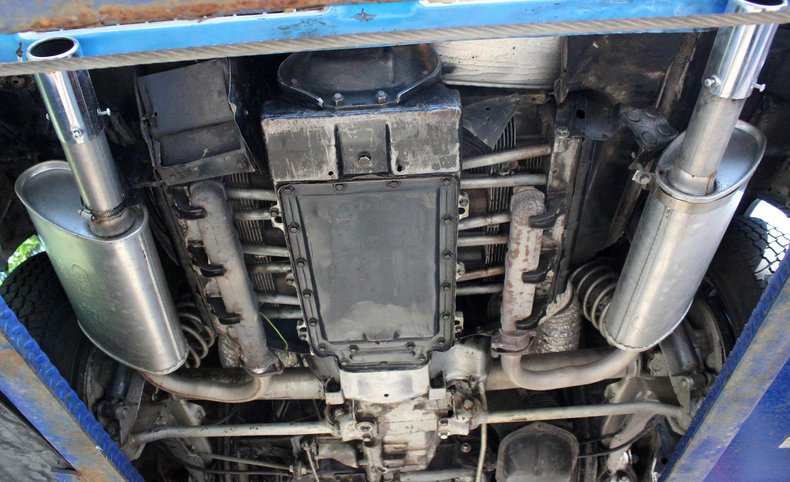
Anyway, that's enough about me for now... I will post a question though... my car came with dual exhaust and the lower shrouds and thermostats missing - which until I saw somewhere here that the lower shrouds existed, I didn't know I was missing anything! - which allowed me to really get to see the motor well. But it had probably 30 years of grime and oil built up everywhere and I had a couple of small oil leaks, so I went and had the engine steam cleaned. What a difference! And now I can clearly see where the oil is coming from... the front of the oil pan seems to seep some oil, and it appears dented as well, so I have a Clark's oil pan and gasket on it's way for that. But the other 2 leaks are coming from what appears to be the middle and front hangers for the right side exhaust manifold. The bolts that are attaching the hangers to the head are juicy and oily and the actual hangers are as well and that is where the drips are coming from - and this is after the steam cleaning. But the valve cover gasket right above it does not appear to be wet or leaking at all... So is this just a matter of not having some sort of sealant on those bolts going into the head or is this something else? Any insight to what would be the fix for this would be appreciated!
Thank you and I look forward to many future conversations :)
Walt
New member new owner
-
joelsplace
- Posts: 2009
- Joined: Wed Oct 13, 2010 12:51 pm
- Location: Northlake, TX
Re: New member new owner
If the oil is actually coming from those studs it means they have broken into the rocker box from being tightened too much. I have one that happened to. I tried sealing the broken area and slowed down the leak but haven't managed to fix it yet. I probably just need to put some sealer on the studs.
157 Corvairs, 5 Ultravans and counting
Northlake, TX
Northlake, TX
-
bbodie52

- Corvair of the Month

- Posts: 11897
- Joined: Mon Aug 06, 2012 12:33 pm
- Location: Lake Chatuge Hayesville, NC
- Contact:
Re: New member new owner


Oil seepage either would come from the valve cover or possibly from one or more push rod tubes where the rubber o-ring seal has become hard, deformed, or otherwise damaged with age. The push rod tubes enter the hot cylinder head directly above the exhaust manifold clamp and stud/nut. There is a rubber o-ring at each end of each push rod tube, but the o-ring that enters the head is exposed to more heat and is more likely to get "cooked", brittle and deformed (not soft and pliable), so the oil from the valve rocker area is likely seeping through and running down onto the exhaust manifold clamp assembly. The exhaust manifold studs are screwed into blind, threaded holes and do not pass through into any area that contains oil. So if the valve cover gasket is not leaking, the push rod tube almost certainly is the source of your oil leak.

If some o-rings are leaking, the rest are likely the same age and material, and are likely not far behind in deterioration with age and exposure. The best new o-rings are made with VITON rubber, which stands up to the cylinder head heat better than other rubber materials. To correct the problem, replacing all of the o-rings on both sides of the engine would be wise.
I have attached sections of the 1961 Corvair Shop Manual and the 1964 Supplement for you to refer to. However, I have also included sections of the 1965 Corvair Chassis Shop Manual, and the 1965 Corvair Chassis Shop Manual - SECTION 6 - ENGINE PUSHROD TUBES AND O-RINGS and VALVE ADJUST, which contains the same push rod tube and o-ring procedure shown in the earlier books, but the 1965 book may have somewhat better pictures. You can get some ideal of th procedure by looking over these attachments. The last attachment focuses specifically on the procedure you would need to follow to replace the o-rings, re-torque the head, and adjust the valves.

Part number C4314: O-RINGS VITON PUSH TUBE & ROCKER FULLSET *SINGLES= ROCKER STUD=C4314A,PUSH TUBE=C4314L
Weight: 0 lbs 4 oz
Catalog Page(s): 4
Price:
1 - 1 $ 10.80
2 - 2 $ 10.40
3 - 4 $ 9.95
5+ $ 9.75
There are numerous CORSA (Corvair Society of America) club chapters in California. I would strongly suggest you use the link below to locate the chapter closest to you and consider joining them. They can advise you concerning obtaining help from a nearby Corvair-qualified mechanic, should you choose to have someone else do the engine work for you. CORSA club chapters often provide technical assistance and training for the do-it-yourself owner, and members may even volunteer to assist you with doing the work on your car.

CORSA (Corvair Society of America) Chapter Locator
Depending on your location in Central California, this club chapter, near Santa Maria and San Luis Obispo, may be a good choice.
Central Coast Corsa Arroyo Grande, CA
Or perhaps this club, in the Fresno area...We are a car club dedicated to the preservation and enjoyment of the Chevrolet Corvair. We’re located on the Central California Coast in San Luis and Northern Santa Barbara Counties. Join us for outings, tech sessions and our annual Vairfest Corvair Car Show.
San Joaquin Corvair Club Fresno, CA
Chapter of the Corvair Society of America (CORSA)
P.O. Box 4693
Fresno, CA 93744
lsb25@cvip.fresno.com
The link below will provide you with a list of useful websites that are Corvair-related. Some of the links will lead you to an extensive technical library that will allow you to download shop manuals and other technical references in Adobe Reader format at no cost. There is also a link that will help you to locate nearby CORSA (Corvair Society of America) club chapters. You will also find a list of essential Corvair parts suppliers. Clark's Corvair Parts in Shelburne Falls, MA is the biggest and oldest Corvair supplier in the world. You will find a link that can provide you with a series of videos that amount to a tour of the Clark's Corvair Parts facilities. Parts suppliers such as this truly make our Corvair hobby possible.
Common and Useful Corvair Websites
- Attachments
-
- 1961 Chevrolet Corvair Shop Manual - Section 6a - Engine.pdf
- 1961 Chevrolet Corvair Shop Manual - Section 6a - Engine
- (3.53 MiB) Downloaded 2 times
-
- 1964 Supplement - Chevrolet Corvair Shop Manual - Section 6a - Engine.pdf
- 1964 Supplement - Chevrolet Corvair Shop Manual - Section 6a - Engine
- (1.6 MiB) Downloaded 1 time
-
- 1965 Corvair Chassis Shop Manual - SECTION 6 - ENGINE.pdf
- 1965 Corvair Chassis Shop Manual - SECTION 6 - ENGINE
- (19.37 MiB) Downloaded 1 time
-
- 1965 Corvair Chassis Shop Manual - SECTION 6 - ENGINE PUSHROD TUBES AND O-RINGS and VALVE ADJUST.pdf
- 1965 Corvair Chassis Shop Manual - SECTION 6 - ENGINE PUSHROD TUBES AND O-RINGS and VALVE ADJUST
- (2.9 MiB) Downloaded 4 times
Brad Bodie
Lake Chatuge, North Carolina
 1966 Corvair Corsa Convertible
Lake Chatuge, North Carolina
1966 Corvair Corsa ConvertibleRe: New member new owner
Two great responses and a whole lot of information! Thank you both for replying. Along with the Clark's oil pan, I do have new Viton o-rings on the way as well because I was thinking that they may need to be replaced, but once I got the engine steam cleaned, I was expecting to see oil running down the outside of the push-rod tubes if the top o-rings were leaking... but that is not the case. The oil is definitely only coming from the actual bolts holding the exhaust hangers onto the head. Which was what was confusing to me, but joelsplace above mentioned the possibility of those bolts pushing into the headspace from being over-tightened which makes sense to me... for a quick fix, I will first try to back those two bolts out, put a little sealer on them, put them back in and see if that does it. Unless my understanding isn't grasping where I would be seeing oil leak if the top o-rings on the push-rod tubes were bad...
I have to say though - on the o-ring replacement job... how does one not fall into the rabbit's hole? What I mean by that is that not knowing if or when certain parts have been replaced or upgraded on this 56 year old car, if I'm taking the valve cover off to get to the push-rod tubes and to do so I have to take off the rockers and the guide plates and of course the push-rods, and oh yeah, by the way once I get the tubes out I'm closer to the lifters than I'll ever be... how does one not just replace everything! Might as well pull out the lifters, put in new ones, put in new push rods and rockers while I'm in there replacing all of the o-rings since I have no idea if those parts are 20, 30 maybe even 50 years old at this point! I get that cost is always a factor, but these parts aren't that pricey... but taking the time to pull all of that apart can be pricey!
Thank you both for your replies!
Re: New member new owner
Actually, here is a photo of the two hangers in question... this is 24 hrs after the steam cleaning... you can see the one on the right is already slathered in oil but you can't see very clearly that it is just originating at the hanger bolt. But see how clean the other bolt is on the hanger on the left? 48 hrs after steam cleaning, this hanger looks like the one on the right and it is just starting at the bolt, there is no oil above the hanger like it's coming from the valve cover gasket...
-
joelsplace
- Posts: 2009
- Joined: Wed Oct 13, 2010 12:51 pm
- Location: Northlake, TX
Re: New member new owner
Lifters make friends with the cam lobes so you don't want to replace them unless you have to. Original rockers are better quality than replacements you can buy so unless they are worn out you don't want to replace them. If the rockers are OK the pushrods probably are also. Lots of o-ring jobs are done without needing anything else.
157 Corvairs, 5 Ultravans and counting
Northlake, TX
Northlake, TX
Re: New member new owner
Alright... good info... I will resist getting overzealous :)
-
bbodie52
- Corvair of the Month
- Posts: 11897
- Joined: Mon Aug 06, 2012 12:33 pm
- Location: Lake Chatuge Hayesville, NC
- Contact:
Re: New member new owner
If the stud has broken through into the valve cover area, perhaps you can clean and seal the area from the rocker arm arena by cleaning the opening and sealing it with some J-B Weld as shown below. Then carefully reinsert the stud to a proper depth — perhaps locking it to that depth with some thread locking compound like the proper grade of LocTite. Once the breakthrough has been closed with J-B Weld and the stud has been reinserted and locked at the proper depth with Loctite, you can reattach the manifold clamp and there should be no more leak.
J-B Weld 8265S Original Cold-Weld Steel Reinforced Epoxy - 2 oz.
by J-B Weld
- J-B WELD ORIGINAL: The Original Cold Weld two-part epoxy system that was designed as an alternative to torch welding. J-B Weld Original provides strong, lasting repairs to multiple surfaces and creates a bond stronger than steel. Perfect for DIY household, automotive, marine, craft repair and much more.
- CURE AND SET TIME: After mixing the tubes at a 1:1 ratio, it takes 4-6 hours to set and 15-24 hours to cure. Once cured, J-B Weld Original can be tapped, filled, sanded, molded and drilled. J-B Weld Original’s set and cure color is dark grey.
- VERSATILE & DEPENDABLE: J-B Weld Original is steel reinforced, has a tensile strength of 5020 PSI and can withstand temperatures up to 550 degrees Fahrenheit (287 degrees Celsius). When fully cured, J-B Weld Original is waterproof and resistant to petroleum, chemical and acid.
- SURFACE APPLICATIONS: Metal, Plastic & PVC, Wood, Concrete, Ceramic & Tile and Fiberglass.
- Will set in 4-6 hours, and cure in 16-24 hours
- Waterproof, petroleum, chemical, and acid resistant when fully cured
- Can be drilled, tapped, machined, filed, sanded and painted
- Stong and nontoxic after it has set and temperature resistant up to 500F
- Tensile strength is 3,960 PSI
- DO IT YOURSELF: Big or small, you can DIY it with J-B Weld. Our heavy duty epoxy and adhesives repair & restore it right the first time. J-B Weld delivers superior performance, quality, and results for the World’s Strongest Bond.
If you do change out the o-rings with VITON o-rings, be sure to properly insert each push rod with the end with TWO HOLES (one on the side) at the rocker arm end. The extra hole on the side of one end of each push rod sprays oil on the rocker arm pivot ball to lubricate the rocker arm better.

Brad Bodie
Lake Chatuge, North Carolina
1966 Corvair Corsa Convertible
Lake Chatuge, North Carolina
1966 Corvair Corsa ConvertibleRe: New member new owner
All very helpful ideas, thank you. I have been looking at pictures of heads online in the valve train area to see if there is normally a hole there and apparently there is not... So perhaps someone did just put these studs in there too far... if the stud does not come out with the nut what would be the best way to get the stud out of there without ruining the threads? Vice grips? Or would it be just smarter to cover the protruding end of the stud with the J-B Weld within the head, since it doesn't look like anything would be interfered by it? Or would it just be best to cover the outside exposed threads of the stud that we see in this photo with some sort of a sealant? Obviously if this does end up being the case the right thing to do would be to take the head off and either fully weld it or just get a new head... but I do not think I'm going that route right now... thank you so much for taking the time to respond
-
joelsplace
- Posts: 2009
- Joined: Wed Oct 13, 2010 12:51 pm
- Location: Northlake, TX
Re: New member new owner
The problem on mine is the upper pushrod tube o-ring has trouble sealing because the bore for it was damaged when the stud was driven in too far.
Lock 2 nuts together to unscrew the stud.
Lock 2 nuts together to unscrew the stud.
157 Corvairs, 5 Ultravans and counting
Northlake, TX
Northlake, TX
Re: New member new owner
Ah, interesting... I guess I am curious to see what mine looks like now as well... And thank you for the tip on getting the stud out... as I mentioned before I am no mechanic!
Re: New member new owner
Hello! It has been a while since I first posted this, but I have found that when I am searching subjects here on the forum I appreciate when the whole train of thought is followed through to its end so I wanted to post how this ended up! So I went in one Saturday to see if the exhaust hanger studs had indeed been pushed through into the rocker area of the head and was causing all of the oil to leak down the studs and exhaust hangers and this is what I found
NOTHING! I found nothing! Neither stud had broken into the rocker area, but clearly oil was pooled up sitting right where the pushrod tube ends were
so I figured maybe the oil actually is leaking past an old o-ring there, dripping down the backside of the area behind the hanger stud and then just saturating it and dripping from there. So this past weekend I was finally able to dig into the job of replacing the o-rings on the pushrod tubes and that did the trick! The old ones were very brittle and I could squeeze them and they would stay as an oval! So I did the whole passenger side and will get to the driver side on another weekend, but that side isn't leaking so it's not critical right now. Anyway, thank you for the advice here... it ultimately helped me solve the issue! Everyone have a great holiday.
Walt
Walt
-
joelsplace
- Posts: 2009
- Joined: Wed Oct 13, 2010 12:51 pm
- Location: Northlake, TX
Re: New member new owner
Glad the heads weren't broken.
157 Corvairs, 5 Ultravans and counting
Northlake, TX
Northlake, TX