Fairly new with a problematic 62
Fairly new with a problematic 62
I recently bought a 1962 Monza 900 with the 102 hp motor and auto trans. The previous owner somehow managed to get the car running starting on the number 2 cylinder. I wanted to fix that and after checking distributor position and making sure number one is where it is supposed to be and straightening out plug wires car will still not run. When I put wires back in previous position car runs but on shut off there is often a clunk. Is it possible that the cam was installed wrong? The distributor (at least I believe) is stabbed correctly for number one firing. I'm stumped.
-
terribleted

- Posts: 4584
- Joined: Sun Apr 18, 2010 2:36 pm
- Location: Atlanta, GA
- Contact:
Re: Fairly new with a problematic 62
Start at by base lining the distributor positioning. Put compression tester in #1 cylinder (R rear) and rotate engine CCW until compression is seen. Continue rotating CCW (COUNTERCLOCKWISE) until timing mark on pulley is at zero reference on rear engine housing. This is #1 TDC (Assuming the camshaft is referenced properly to the crank of course). Remove the distributor cap and note the direction the contact end of the rotor is pointing. The rotor should be pointing straight back toward the balancer or perhaps slightly toward the oil filter from straight back. If it is not remove the distributor and reinstall it such that it is pointing the right way making sure that the oil pump is engaged by the bottom if the distributor shaft and that the distributor is fully seated in its hole. Re-install the cap and wires such that a post of the cap is directly in line with the rotor contact and the vacuum advance has room to rotate both directions without hitting things. This aligned post is #1. Re-install the rest of the plug wires in proper order CW (CLOCKWISE) 1,4,5,2,3,6. Check point gap and start car:)
If you do not have access to a compression test gauge (not terribly expensive at the parts store), You can have a helper (preferably with a long index finger) hold their finger over #1 sparkplug hole to feel for compression. It is hard for one person to do this and rotate the engine CCW with a 3/4 wrench. The other way to align #1 TDC for distributor install is to remove the right valve cover. Note which of the 2 rearmost valves (#1) cylinder is the intake valve (exhaust valve is directly above its exhaust tube so the other one of the pair is intake). Rotate the engine CCW and observed the valves moving. You watch for #1 intake valve to open and then close and then continue engine rotation CCW until the timing mark come up to align at zero reference
You may have already done this just this way. If so and you are sure that the distributor and wires are installed correctly then you need to look at the timing. The clunk when trying to start is usually caused by timing way out of spec caused by mis-wired plugs, distributor improperly installed, points severely out of adjustment or distributor timing adjust way off (if the distributor is properly installed this type starting is virtually always timing way retarded (vacuum advance turn way to far clockwise and pointing closer to back than more toward the right). The clunk sound results from the last cylinder trying to fire actually firing before the top of the compression stroke and trying to force the piston down and crank the wrong direction. I am sure there are other distributor issues that could cause this type symptom (stuck advance mechanism, something broken internally etc.) but these failures are much less common than the simple stuff above. It pays to re-check from the basics before assuming something like an incorrectly indexed cam and tearing the engine out of the car.
I assume you have ample fuel to the engine....dumping a couple thimblefuls of gas directly down the carb throats if need be will almost always start one if the ignition side of the equation is even close. I also assume that there is verified good spark at the plugs. New spark plugs are often a very good thing to install when trouble shooting starting problems as at least for a few tries you can be pretty sure that plug wetness or fouling is not part of the problem.
Corvair guy since 1982. I have personally restored at least 20 Vairs, many of them restored ground up.
Currently working full time repairing Corvairs and restoring old cars.
https://www.facebook.com/tedsautorestoration/
Located in Snellville, Georgia
Currently working full time repairing Corvairs and restoring old cars.
https://www.facebook.com/tedsautorestoration/
Located in Snellville, Georgia
Re: Fairly new with a problematic 62
Thanks for the in depth step by step process I will try it again. I've tried to do this once already but I could have made a mistake. Is it at all possible can position could be an issue. From some of the repairs on this engine it looks very amateurish to say the least.
-
bbodie52

- Corvair of the Month

- Posts: 11891
- Joined: Mon Aug 06, 2012 12:33 pm
- Location: Lake Chatuge Hayesville, NC
- Contact:
Re: Fairly new with a problematic 62
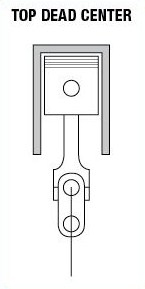
The illustrations below and additional instructions may prove to be helpful...

 http://www.speedwaymotors.com/Tech/loca ... enter.html
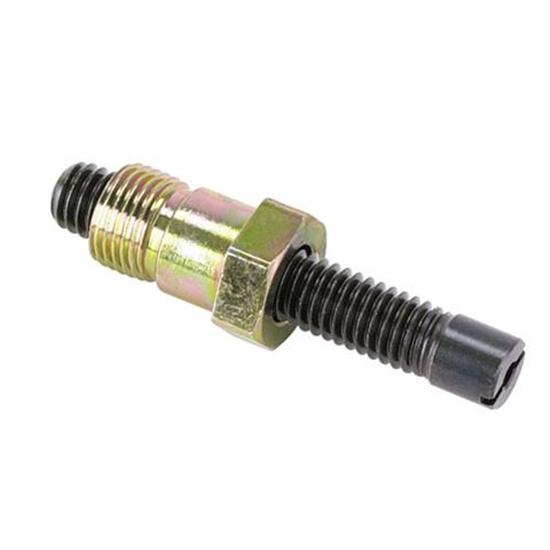
Specs
Material Type: Steel
Sold in Quantity: Each
Finish: Zinc
Thread Pitch: M14-1.25
Extended Length: 1.45
Part # 5503410
$5.99 (Each)
Notes
Adjustable length from 0 to 1.45"
Locating Top Dead Center (TDC)
By Speedway Motors
Created 2014
Locating Top Dead Center is important. Most engines will come with either a Timing Mark or a Timing Tab on them; however it is always a good idea to verify this to be certain. Whether it is to replace a distributor, get spark plug wires in the correct orientation, or install a new camshaft, having the rotating assembly on TDC is crucial. While there are several ways to locate TDC, this article will highlight a couple of the more commonly used methods.
Thumb Method
The first method is often referred to as the thumb method. Remove the #1 spark plug and place your thumb over the hole. Rotate the crankshaft with a breaker bar and the appropriate socket. As you approach TDC there will be an increase in pressure that will push your thumb off of the port. Once this happens you can look in the spark plug hole and move the crankshaft back and forth to get as close as possible to TDC. This will get you within about 15 degrees of TDC; close enough for a distributor or spark plug wires, but not close enough for that new camshaft.
TDC Indicator Method
A second and more accurate way to locate TDC is by using a Top Dead Center Indicator. Screw the indicator into the #1 spark plug hole by hand, and then slowly rotate the crankshaft by hand until the piston come up against the stop. Mark your balancer with a marker, and then slowly rotate the crankshaft by hand in the opposite direction until you come up against the stop again. Mark your balancer again. Measure the distance between the two marks and divide by 2. This is your TDC. Once you’ve found your true TDC why not mark it with a Timing Tape? Speedway Motors offers an MSD Timing Tape with 8 different balancer tapes, so you’re almost certain to find the one you need!
Top Dead Center Indicator
If the cylinder heads are off you can use a similar approach as the Stop Method described above. You simply bolt a strap across the face of the block, and rotate your crankshaft until piston 1 comes up against the strap. Mark that spot, then rotate the crankshaft in the other direction until it again comes up against the strap. Mark that spot and split the difference.
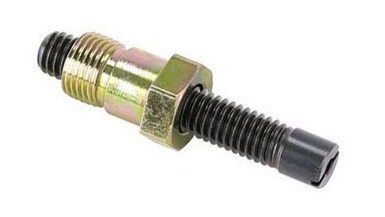
Specs
Material Type: Steel
Sold in Quantity: Each
Finish: Zinc
Thread Pitch: M14-1.25
Extended Length: 1.45
Part # 5503410
$5.99 (Each)
Notes
Adjustable length from 0 to 1.45"
Brad Bodie
Lake Chatuge, North Carolina
 1966 Corvair Corsa Convertible
Lake Chatuge, North Carolina
1966 Corvair Corsa Convertible-
terribleted
- Posts: 4584
- Joined: Sun Apr 18, 2010 2:36 pm
- Location: Atlanta, GA
- Contact:
Re: Fairly new with a problematic 62
Certainly the cam not being properly synched with the crankshaft could cause an issue like this, BUT, before taking the engine out and tearing it apart tis best to be sure it is not a more simple external issue. Another thing that would be a good idea before going to engine removal and assuming there is an internal issue is to re-adjust the valves (not a likely cause of this problem but not hard to do and could have bearing if they are way out). Follow the procedures on page 6A-53 of the 1961 Corvair and Corvair 95 GM shop manual (readily available from Clark's Corvair parts and other vendors....for your 62 you should have the 1961 manual and the 62-63 supplement).Ethaneli wrote: ↑Sat Apr 01, 2017 10:33 pm Thanks for the in depth step by step process I will try it again. I've tried to do this once already but I could have made a mistake. Is it at all possible can position could be an issue. From some of the repairs on this engine it looks very amateurish to say the least.
Corvair guy since 1982. I have personally restored at least 20 Vairs, many of them restored ground up.
Currently working full time repairing Corvairs and restoring old cars.
https://www.facebook.com/tedsautorestoration/
Located in Snellville, Georgia
Currently working full time repairing Corvairs and restoring old cars.
https://www.facebook.com/tedsautorestoration/
Located in Snellville, Georgia
-
bbodie52
- Corvair of the Month
- Posts: 11891
- Joined: Mon Aug 06, 2012 12:33 pm
- Location: Lake Chatuge Hayesville, NC
- Contact:
Re: Fairly new with a problematic 62

If you need a shop manual and/or supplement, they can be downloaded in Adobe Reader (.pdf) format at no cost, using the link below...
Common and Useful Corvair Websites
- Attachments
-
- 1961 Chevrolet Corvair Shop Manual - Section 6a - Engine.pdf
- 1961 Chevrolet Corvair Shop Manual - Section 6a - Engine
- (3.53 MiB) Downloaded 15 times
-
- 1962-1963 Supplement - Chevrolet Corvair Shop Manual - Section 6a - Engine.pdf
- 1962-1963 Supplement - Chevrolet Corvair Shop Manual - Section 6a - Engine
- (1.26 MiB) Downloaded 14 times
Brad Bodie
Lake Chatuge, North Carolina
1966 Corvair Corsa Convertible
Lake Chatuge, North Carolina
1966 Corvair Corsa ConvertibleRe: Fairly new with a problematic 62
Thanks a lot. I have most all of the shop manuals and this isn't my first corvair but it is a first for running into this sort of issue. I personally built the entire motor in my other 62 900 4 speed car. I dont know it all thats for sure but I'm not just feeling my way around a new motor. Lol I will go through the process to reset and stab the distributor correctly and wire plugs correctly. I could have missed something the first time. It wont be possible to pull valve cover gasket without major problems previous owner stripped bolt holes and used too large bolts as replacements. I will have to repair the head or replace eventually. I really appreciate any help and accumulated knowledge all of you dedicated corvair guys have thanks. I have no one local that I know who knows anything about corvairs to voice ideas off.
-
terribleted
- Posts: 4584
- Joined: Sun Apr 18, 2010 2:36 pm
- Location: Atlanta, GA
- Contact:
Re: Fairly new with a problematic 62
If the Valve cover holes are not too far oversized 1/4 x20 heli-coils are a good choice. Can pretty much be done with the engine in the car (might have to lower the rear for upper hole access with the supplied drill bit).
I never mean to discount a persons knowledge, but, I try to be thorough as from this end I do not know whether the poster knows the difference between a screwdriver and an open end wrench:) I have gone thru clocking a dizzy and being sure it was right and had problems like yours that turned out to be errors in what I was sure was right:)
I never mean to discount a persons knowledge, but, I try to be thorough as from this end I do not know whether the poster knows the difference between a screwdriver and an open end wrench:) I have gone thru clocking a dizzy and being sure it was right and had problems like yours that turned out to be errors in what I was sure was right:)
Corvair guy since 1982. I have personally restored at least 20 Vairs, many of them restored ground up.
Currently working full time repairing Corvairs and restoring old cars.
https://www.facebook.com/tedsautorestoration/
Located in Snellville, Georgia
Currently working full time repairing Corvairs and restoring old cars.
https://www.facebook.com/tedsautorestoration/
Located in Snellville, Georgia
Re: Fairly new with a problematic 62
I appreciate your advice and know you mean to help. I will go through and regime the motor and see if perhaps I did it wrong the last time. But I don't think I did. Something is just off about this motor. There are too many weird repairs done from someone it seems that didn't have much knowledge in rebuilding or repairing a motor.
-
terribleted
- Posts: 4584
- Joined: Sun Apr 18, 2010 2:36 pm
- Location: Atlanta, GA
- Contact:
Re: Fairly new with a problematic 62
Anything is possible. A motor I tore apart to rebuild recently was built from one early case 1/2 and one late case half, short throw (145CI) crank and rods, with later 164 CI jugs and 140 hp heads. The engine was run hard this way for over 80k miles although I do not know why it survived:) Someone got very lucky using unmated case halves (there was no evidence of align boring and the bearings were unevenly worn). I wonder what the compression ratio was in this configuration...I guess it would be on the low side.
Corvair guy since 1982. I have personally restored at least 20 Vairs, many of them restored ground up.
Currently working full time repairing Corvairs and restoring old cars.
https://www.facebook.com/tedsautorestoration/
Located in Snellville, Georgia
Currently working full time repairing Corvairs and restoring old cars.
https://www.facebook.com/tedsautorestoration/
Located in Snellville, Georgia