1964 Monza Sedan

Show of your ride, keep track of your project, watch as others progress on their projects
User avatar
JohnDB
Posts: 254
Joined: Fri Apr 30, 2021 5:20 pm
Location: Lancaster County PA

1964 Monza Sedan

Post by JohnDB »

It's been a busy week! My wife and I have been looking around for a classic car for her - she likes my Corsa well enough, but she wanted to find something else that she could work on and make hers. We started looking for an early 60s beetle since her folks had several when she was younger, but the prices are pretty steep or the cars need full metal replacement. I scan Craiglist and Marketplace (perhaps too often) and would show her some options, but there wasn't much even worth going to look at. Last week I noticed a 1964 Monza sedan on CL and showed her a picture, but I wasn't expecting much of a reaction - boy was I wrong!

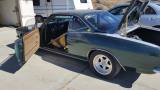
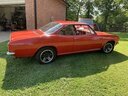
It was about an hour from us and we went to take a look last Sunday. The seller's father purchased the car in 1974 and didn't really drive it too much over the years but always kept it stored inside. When he retired, he decided to work on the car and went over all the mechanicals and then removed the interior and had the car painted. This was about 10 years ago, but the car never got fully reassembled. It's been moved to a few different garages over the past 5 years, but hasn't run in about 2 years. Overall the body and paint are very nice, and most parts are there to put it back together. The mechanicals look very good as well and I think will only need basic maintenance to get back on the road.

After some back and forth, we made a deal for the car. And all of the Corvair parts that he had. We left a deposit and had to schedule to go back today to transfer the title and pack everything up (Can't buy or sell a car in PA on a Sunday).

Talking to the seller more today, his father had been a mechanic at a local Chevy dealer for many years in the 60s and 70s. He liked the Corvair very much, and had many of them over the years. He also kept a lot of spares, as I discovered first hand today:
IMG_3869.jpeg
We talked about getting it running and trying to drive it home, but in the end we decided to call for a tow:
IMG_3870.jpeg
Safe and sound at home and in good company:
IMG_3878.jpeg
Tomorrow will be a lot of sorting and unloading of parts. I suspect there will be some parts for sale in the near future.

A little more about the car, it's a 110/PG and built pretty late in 1964:
IMG_3862.jpeg
Need to do a bit more checking, but looks to have tinted windshield, convenience group, PG, and seat belt delete?

Pretty clean engine bay:
IMG_3879.jpeg
My wife will be doing a lot of the work on the car, and we're both very excited to get it back on the road!
John
1966 Corsa Convertible
sparrow
Posts: 90
Joined: Fri Oct 23, 2020 4:29 am

Re: 1964 Monza Sedan

Post by sparrow »

It looks great! I bet you have it running in no time. My biggest concern would be the fuel system. Don"t get to anxious to start it though, I"m sure you know the drill of starting a car that has been sitting for years. Good luck and congratulations!
User avatar
flat6_musik
Posts: 2659
Joined: Sun Apr 04, 2010 10:03 am
Location: Hesperia, CA

Re: 1964 Monza Sedan

Post by flat6_musik »

Nice find! That's going to be a sweet grocery-getter, and it's a huge plus that it's been stored indoors for so long. I'll bet she just purrrs.
User avatar
doug6423
Posts: 399
Joined: Mon Jun 03, 2019 10:57 am

Re: 1964 Monza Sedan

Post by doug6423 »

:goodpost:
65 Monza
Cincinnati, OH
Project65
Posts: 409
Joined: Tue Dec 07, 2021 8:03 pm
Location: Pennsylvania

Re: 1964 Monza Sedan

Post by Project65 »

Congrats! From the photos, it looks great. That’s really cool… his and hers. This should be a fun project story to follow. :tu:
John
1965 Monza Sedan “The Phoenix”. Rebuild in Progress.
User avatar
JohnDB
Posts: 254
Joined: Fri Apr 30, 2021 5:20 pm
Location: Lancaster County PA

Re: 1964 Monza Sedan

Post by JohnDB »

Thanks for all the comments so far, I think it's going to go back together pretty well.

Somehow in between some substantial rain today we managed to get the parts unloaded from my car - not much to see in pictures right now, but there was a little bit of everything.
IMG_3880.jpeg
IMG_3881.jpeg
IMG_9564.jpeg
IMG_9566.jpeg
If you see something you need, please let me know and we can make a deal!

And a couple more of the current state of the interior (came with a new headliner and carpet set on the back seat):
IMG_3885.jpeg
IMG_3886.jpeg
The drivers seat is in the worst shape with a hole and a split seam, but the passenger seat and back seat look good. Door panels look pretty good as well, and it should all clean up pretty well.

Next step will be to pull the wheels and take a look at all the brakes, then go through the fuel and ignition systems to make sure it is ready to start. All fluids look clean and are at the proper levels, so we've got that going for us.

We've got a list going of what needs to be ordered, so hopefully sometime this week we can finalize what mechanical parts need to be added.
John
1966 Corsa Convertible
User avatar
bbodie52
Corvair of the Month
Posts: 11917
Joined: Mon Aug 06, 2012 12:33 pm
Location: Lake Chatuge Hayesville, NC
Contact:

Re: 1964 Monza Sedan

Post by bbodie52 »

Image

Image


I will decode the body tag for you... :typing:
1964 Sedan Body Tag.jpg
Here is a breakdown of the information on the body tag you provided...
BODY TAG INFO:

04C
Body Build Date: 04 = April (1964), C = Third Week
The first digits are numbers 1 through 12, indicating the month of manufacture. The letter is A-E, indicate the week of the month. If the letter is a "C" it indicates the third week of the month.
ImageImage :EMs Rule: :woo:

STYLE 64 0969 WR 17346 BODY
64 = 1964
Model 0969 — 4-Door Monza Sedan — 5 Passenger, 09 = 900 Series Monza, 69 = 4-Door Sedan,
WR = Willow Run, Michigan Production Plant, Production Sequence No: 17346
1964 Monza 4-Door Sedan — 5-Passenger, Total Production: 21,926.

Image

TRIM 755
755 = AQUA (Monza with Bucket Seats)
This 3 digit codes represents the interior paint and upholstery color and seat type.

INTERIOR PAINT CODE — "A" (Lower Right) = AQUA Interior paint codes: (Interior paint codes do not appear on Los Angeles built cars)
1964: A= Aqua B= Blue C= Saddle D= Red E= Black F= Fawn Q= White/Red

BODY PAINT 918
918 = MEDIUM AQUA "Azure Aqua"
Image
Lucite No. 4253L, Rinshed-Mason No. A1476, Ditzler No. DDL12525

ACC: W 2MP 3C 5O

Willow Run body tag accessory codes

Group 1
W = RPO A02 — Windshield Glass, Tinted

Group 2
M = RPO M35 — 2 Speed Powerglide Automatic Transmission
P = RPO Z01 & Z13 — Convenience group (2 speed wipers, w/washer, day/night mirror, glovebox light, backup lights)

Group 3
C = RPO B70 — Instrument Panel Pad

Group 5
O = RPO A62 — Seatbelt delete (after Jan 1, 1964)

The VIN tag is located in the left door jamb.

40969W245767

VIN - EM Corvair Passenger Car VIN Tag Decoding.jpg
:chevy:

I have attached a copy of the 1964 GM Heritage Center Specifications
1964 Chevrolet Corvair GM Heritage Center Specs.pdf
1964 Chevrolet Corvair GM Heritage Center Specs
(2.57 MiB) Downloaded 49 times


1964 Corvair Sedan from Pennsylvania.jpg
1964 Corvair Sedan from PA.jpg
1964 Corvair Sedan — Pursue Your  Happiness.jpg
:clap: :runwoohoo: :thumbsupwink:
Brad Bodie
Lake Chatuge, North Carolina
Image 1966 Corvair Corsa Convertible
User avatar
JohnDB
Posts: 254
Joined: Fri Apr 30, 2021 5:20 pm
Location: Lancaster County PA

Re: 1964 Monza Sedan

Post by JohnDB »

Thanks, Brad - I had done some basic checking and came up with the same info. We'll be putting some seat belts in the front and rear even though they were deleted from the factory :)

VIN is 40969W245767 which seems to make sense. Engine number is T0421ZF, built April 21 as a 110 hp for a PG, seems to be about right for the car being built in the third week of April.

Got it up in the air this afternoon and gave the rear brakes a once-over:
IMG_3893.jpeg
So far everything is looking pretty good, brake hoses maybe a little old but they aren't cracked at all. Drums look nice, and no leaks found at the wheel cylinders either.
IMG_3889.jpeg
IMG_3892.jpeg
No real surprises found, the body looks great on the bottom. Discovered that there are no heater hoses hooked up, so those will need to go on the list. And the transverse spring needs new bushings at each end, but at least the bolts look good so we should be able to just replace the rubber parts. Also need to track down the long tunnel cover, perhaps a trip back out to the Corvair Ranch soon?
John
1966 Corsa Convertible
sparrow
Posts: 90
Joined: Fri Oct 23, 2020 4:29 am

Re: 1964 Monza Sedan

Post by sparrow »

It looks like you really hit a home run with that car! Everything looks so clean and dry. It almost seems you could go over it with a feather duster and you would be good to go! I had to scrape and clean so much dirt and grime off my two cars that I needed a dump truck to haul it all away. Those brakes look like they have no miles on them, just a little corrosion from sitting. I also noticed the new muffler and it looks like the valve cover bolts were replaced with studs and nuts. I did that with mine and it stopped the leaks. Just curious, what is with the steering box next to the car? It looks like a later model.
User avatar
JohnDB
Posts: 254
Joined: Fri Apr 30, 2021 5:20 pm
Location: Lancaster County PA

Re: 1964 Monza Sedan

Post by JohnDB »

sparrow wrote: Tue Sep 27, 2022 4:57 am It looks like you really hit a home run with that car! Everything looks so clean and dry. It almost seems you could go over it with a feather duster and you would be good to go! I had to scrape and clean so much dirt and grime off my two cars that I needed a dump truck to haul it all away. Those brakes look like they have no miles on them, just a little corrosion from sitting. I also noticed the new muffler and it looks like the valve cover bolts were replaced with studs and nuts. I did that with mine and it stopped the leaks. Just curious, what is with the steering box next to the car? It looks like a later model.
The body seems to be in really good shape, and so far all the mechanicals are looking good. The valve covers have allen head cap screws in them currently, the heads seem a bit small so they might get swapped out later if we notice leaking. The steering box was in the parts that came with the car, and my first guess is that it is from a late model, still need to do some checking. There was also a late steering column, and a simulated wood wheel (you can see it a little in the bottom corner of the picture with the steering box), it has the riveted hub and seems to be for a 65 or 66. It might end up on my Corsa.
John
1966 Corsa Convertible
User avatar
bbodie52
Corvair of the Month
Posts: 11917
Joined: Mon Aug 06, 2012 12:33 pm
Location: Lake Chatuge Hayesville, NC
Contact:

Re: 1964 Monza Sedan

Post by bbodie52 »

Image
Valve Cover Attachment.jpg
Image

I wrote these comments to another Corvair owner some years ago. I thought that the recommendations for valve cover hold-down and to protect the upper row of head nuts and stud threads might prove helpful to you...
bbodie52 wrote: » Tue Sep 25, 2018 11:48 am

:clap: :not worthy: Your meticulous, showroom — even museum-quality restoration establishes a high standard for many to emulate. :nono: So I humbly wish to point out a very minor error in the installation of the valve cover hold-down clamps. :sad5: You installed them upside-down. :tongue: As installed, they amount to a wide washer to spread the hold-down clamping pressure. But flipping them over allows them to function as-designed, using spring pressure to distribute the clamping load on the valve cover.

Image


Image

The picture below shows a couple of assembly tips that are helpful on the Corvair engine. The steel retainers mentioned earlier help to spread the pressure applied to the valve cover and gasket along three points, instead of only the bolt head. The outer ends of each strap are curved. Installed as shown, the curved tips act to apply distributed spring pressure on the valve cover in conjunction with each center bolt.

The upper row of head fasteners tend to rust and soften from engine heat and exposure to the elements. As I discovered in 1969 with my first engine overhaul, it is no fun trying to chisel these nuts off under that intake manifold (if the softened nuts round off and are damaged when a socket wrench slips). In some cases I even had to resort to cutting the stud with a hacksaw blade next to the cylinder barrel, or to removing the damaged nut by center-punching and drilling-out the stud so I could knock the remaining material off with a chisel to remove the cylinder head! :banghead: :angry:

A new fresh set of flange nuts, properly torqued, and then capped with acorn nuts to protect the exposed threads of each stud will make future removal much easier. The use of a six-point socket instead of a 12-point socket provides a better grip on the nut, which helps to prevent the socket from slipping or rounding-off the corners of the head nut. THE USE OF ANTI-SEIZE COMPOUND IS ALSO HIGHLY RECOMMENDED.

A valuable object that has
belonged to my family for several generations...

Image :oldtimer:

MODERN 21ST CENTURY VERSION Image


ImageImage

Image

Image


Image


:link: https://ssl.corvair.com/user-cgi/catalo ... IN&page=13
Image

Image I even discovered custom versions!
Proform 141-903 Valve Cover Hold-Down Clamp
:link: https://www.amazon.com/Proform-141-903- ... B000CMH2H0

Image
Hot Rod SB Chevy Chrome Valve Cover Hold Down Spreader Bars SBC 283-400
:link: https://www.amazon.com/gp/product/B00U2 ... i=15726551

Amazon.com Customer wrote:Prevents gasket surface deformation on stamped steel valve covers
June 7, 2016

These items are a must have for stamped steel valve covers. The regular bolts easily deform stamped steel covers when they are tightened. The dimple that creates in the mounting surface almost always causes a leak.

Using these bars spreads out the clamping force on a much larger area of the valve cover so the gasket surface does not get bent or deformed. I always use them with the T bar type valve cover hold-downs because if the T bar hold down screws are mounted in the head first, then these bars drop right over them and stay in place while screwing the T bar down. The bars can be installed with bolts, but it is a little harder to hold the bar and the bolt combination together while initially trying to start the bolt.
The comment about the compression "dimple" also applies to the sheet metal oil pan. Over-tightening those bolts can crush the area directly below the bolt-head into the soft oil pan gasket, pressing the oil pan sheet metal into the crankcase aluminum metal while compressing the gasket. This applies pressure only directly below each bolt head, while leaving reduced pressure to the oil pan surfaces between the adjacent bolts. Since the pan is flat it does not form an oil storage trough to store the oil (like oil pans on V8 engines). Instead, on a Corvair the oil is held above the oil pan gasket, so the gasket must retain several quarts of oil above the seal surface, instead of only forming a barrier from splashing oil (as found on a V8 engine). This makes the Corvair oil seal more difficult to achieve with the flat stamped steel oil pan.

When installing a steel sheet metal oil pan, check to confirm that the mating surface is flat and has not been distorted by over-tightening in previous installations. Correct with a hammer and dolly technique if needed. Use an inch-pound torque wrench to properly tighten the oil pan bolts. NOTE: The specification in the 1961 Corvair Shop Manual is 40-60 in. lbs. for the ¼-20 bolts. In the 1965 Corvair Chassis Shop Manual, the torque specification increased to 85-105 in. lbs., even though the bolt size remained unchanged). :dontknow:

I would suggest the use of a cast aluminum oil pan, which does a better job of distributing an even load between the oil pan casting and the engine crankcase surface.
I never use any kind of sealer on the valve cover gaskets. I always install the rubber or silicone rubber gaskets dry. The bolts and spring-type hold-downs seem to work fine to seal the covers from any leaks. 40-60 in. lbs. is the torque specification. The use of four 1/4-20 studs in the appropriate length can help by serving as guide pins, and can help to protect the aluminum threads in the heads from damage. Stainless Steel Serrated Flange Hex Lock Nuts may be more appropriate than the nylon insert-type lock nuts, due to heat.

Image
Image
1/4-20 Serrated Flange Hex Lock Nuts, Stainless Steel
Brad Bodie
Lake Chatuge, North Carolina
Image 1966 Corvair Corsa Convertible
User avatar
JohnDB
Posts: 254
Joined: Fri Apr 30, 2021 5:20 pm
Location: Lancaster County PA

Re: 1964 Monza Sedan

Post by JohnDB »

I had noticed that there weren't any acorn nuts on the head studs, already had them in my cart at Clark's! Not too worried about the valve covers at this point, we'll be keeping an eye on them as we get it running.

Got the front wheels off today and things look pretty good. Drums are still riveted to the hubs and look good. I did find what looks like a compression union in the left front brake hard line, so that will get replaced. Also looks like the primary shoe on the drivers side is on the thin side, so it looks like a set of shoes for the front will get installed. On the plus side a set of shoes came with the car!

Driver front:
IMG_3898.jpeg
Passenger front:
IMG_3901.jpeg
Inside the front fenders looks great:
IMG_3895.jpeg
IMG_3900.jpeg
I think the missing bumper support is in the trunk
John
1966 Corsa Convertible
User avatar
JohnDB
Posts: 254
Joined: Fri Apr 30, 2021 5:20 pm
Location: Lancaster County PA

Re: 1964 Monza Sedan

Post by JohnDB »

Placed a healthy Clark's order today, so we should have plenty to do once parts arrive. Spent a few hours on the car today - pulled and re-gapped all the plugs to .030, cleaned the points, re-attached part of the choke linkage on the right carb, and things look pretty good overall.
IMG_3909.jpeg
Disconnected the fuel line from the tank and the + wire to the coil and cranked it a bit as well. It sounds good, and the battery seems to be good enough for now too! I'm going to hook up a temporary fuel system next and see if it will fire up. The gas tank will be coming out to do the RF brake line, so that will get cleaned up and reconnected later.
John
1966 Corsa Convertible
Project65
Posts: 409
Joined: Tue Dec 07, 2021 8:03 pm
Location: Pennsylvania

Re: 1964 Monza Sedan

Post by Project65 »

Wow John. That car is so clean looking. I still can’t get over it. You picked a great car for a starter project. You and your wife will enjoy driving this one soon!
John
1965 Monza Sedan “The Phoenix”. Rebuild in Progress.
User avatar
JohnDB
Posts: 254
Joined: Fri Apr 30, 2021 5:20 pm
Location: Lancaster County PA

Re: 1964 Monza Sedan

Post by JohnDB »

A big box from Clark's arrived yesterday, and a small one from NAPA, and a small one from AutoZone. Today gave us a few minutes to work on some small things, got a new ground cable for the battery installed:

Old:
IMG_3924.jpeg
old vs. new:
IMG_3926.jpeg
installed:
IMG_3927.jpeg
Also got the weatherstrip on the rear of the engine lid installed, and the bumpers on the adjusters:
IMG_3929.jpeg
Took the Corsa out for a ride tonight and got some supplies for a temporary fuel system setup - the plan is to run a temporary gas can and get it fired up tomorrow!
John
1966 Corsa Convertible
User avatar
JohnDB
Posts: 254
Joined: Fri Apr 30, 2021 5:20 pm
Location: Lancaster County PA

Re: 1964 Monza Sedan

Post by JohnDB »

Weather was pretty nice today and we took advantage - rolled her out of the garage and hooked up the temporary fuel system:
IMG_3935.jpeg
Temp fuel system is a pre-flared 5/16" hard line (12" long) into the fuel pump inlet, with a length of 5/16" fuel line clamped on and run into a small gas can.
IMG_3934.jpeg
After some cranking, and putting a bit of fuel into each carb, it fired up and sounded pretty good. Then the right carb started to overflow out the vent thanks to a stuck needle. A few gentile taps later, we fired it back up. It was happy to idle for a bit, but I think we'll need to do some carb work. The right side seems to want to leak randomly from somewhere, and overall didn't seem to be doing much. Idle speed was pretty low, and when I put my hand over the right carb nothing happened - covering the left carb caused a stall. Seems like some idle circuit issues.
John
1966 Corsa Convertible
Post Reply

Return to “Member's Rides, Projects, and Builds”