John’s 65 sedan

Show of your ride, keep track of your project, watch as others progress on their projects
Project65
Posts: 410
Joined: Tue Dec 07, 2021 8:03 pm
Location: Pennsylvania

Re: John’s 65 sedan

Post by Project65 »

:ty:

Thanks Doug. I think the silver cove will complement well with the look I’m after.

Earlier this week I ordered a new set of coil springs and also I picked up a set of rear trailing arms from a fellow club member. When the ‘65 gets home, I’ll start working on the suspension.

I made it to the shop yesterday and was asked to bring down the stainless trim for the windshields and rain gutters. I was surprised to hear that it will be sent out to a specialist and get polished. Can’t wait to see the polished chrome back on the car!

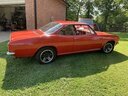
The Body is all buffed out now. That Maroon is looking rich! Trunk and engine cover are painted underneath.
Attachments
Rear view
Rear view
IMG_2778.jpeg
IMG_2770.jpeg
John
1965 Monza Sedan “The Phoenix”. Rebuild in Progress.
66vairguy
Posts: 4656
Joined: Tue Dec 21, 2010 3:44 pm

Re: John’s 65 sedan

Post by 66vairguy »

Looks great. I also painted my four door taillight panel the "Corsa" silver. A nice touch!
Project65
Posts: 410
Joined: Tue Dec 07, 2021 8:03 pm
Location: Pennsylvania

Re: John’s 65 sedan

Post by Project65 »

Thanks!

It’s been a couple of weeks, but the progress on the ‘65 at the body shop continues.

Recent updates include the painting of the hood, engine cover, and doors. Also the window chrome was all polished and is ready for installation.

Today I received a couple of photos of the doors with the fresh coat of the interior paint applied to the trim areas. That light bronze metallic sure looks great!

As the car (and body parts) continue to be painted. I’m amazed as It’s hard to imagine that my old car once looked this nice with the rich colors once upon a time. I can’t wait until I get the completed car out in the natural sunlight.
Attachments
Engine cover begins to complete the look.
Hood looks great!
Hood looks great!
Door
Door
Interior light bronze.  I really like how the two colors go together.
Interior light bronze. I really like how the two colors go together.
Another view of the bronze against the maroon.
John
1965 Monza Sedan “The Phoenix”. Rebuild in Progress.
66vairguy
Posts: 4656
Joined: Tue Dec 21, 2010 3:44 pm

Re: John’s 65 sedan

Post by 66vairguy »

Very nice --- amazing what a coat of paint does. That said, getting to the point of painting a car is a LOT of work.

I decided to paint the door inside trim frame in the same fawn color as the seat. Not original, but matches the door panel color. I got it in a base coat and applied a satin clear coat over it. VERY durable.
Monzaguy
Posts: 140
Joined: Fri Jun 04, 2021 6:13 pm
Location: New York

Re: John’s 65 sedan

Post by Monzaguy »

I am enjoying your build thread. Amazing work :tu:
User avatar
gbullman
Posts: 613
Joined: Thu Nov 05, 2020 6:22 am
Location: Northern New Jersey

Re: John’s 65 sedan

Post by gbullman »

Fantastic! Should be a fun summer for you. I’m glad you stuck with the name Phoenix, so appropriate for this car.
Gary Bullman
66 Corsa Convertible
Project65
Posts: 410
Joined: Tue Dec 07, 2021 8:03 pm
Location: Pennsylvania

Re: John’s 65 sedan

Post by Project65 »

:ty:

Thanks guys! Made it out to the shop today. Progress continues. The Phoenix is rising! I’m so looking forward to this summer and hopefully finishing off the car and getting some driving time in. :cool:

The dashboard and steering column have been painted and they look great! That bronze paint looks so soft and smooth and makes the non-padded dash look classy! It has a satin clear coat on top so it shouldn’t glare in the sun. It matches the bronze on the steering wheel perfectly. When I get the car home in a few weeks, I’ll work on restoring the steering wheel.

The doors, engine cover, and hood are on with new weatherstripping. The windshields are also installed. It’s really coming together, but not quite ready yet.

Hey 66vairguy, curious if you have a paint code for the fawn paint? I’ll be needing some eventually.

Here’s a few photos!
Attachments
Drivers side
Drivers side
Passenger’s side
Passenger’s side
Rear window and air intake grille installed
Doors on and fitting nicely!
Front corner
Front corner
John
1965 Monza Sedan “The Phoenix”. Rebuild in Progress.
66vairguy
Posts: 4656
Joined: Tue Dec 21, 2010 3:44 pm

Re: John’s 65 sedan

Post by 66vairguy »

The dash does look good.

The "seat and door panel" fawn (light fawn) does not have a GM paint code equivalent I could find. I'll have to dig through my old notes to find it. It was a generic "beige" color by SEM. I clear coated it with a satin by Spray-Max. No issues.

I've done three steering wheel in two tone (Only done in 65, but I liked it so I did it on my 66). Since your dash was a base/clear coat, you can use the same base on the steering wheel. I used a spray can loaded with base and SprayMax clear coat (very durable). The steering wheel is such a small job I prefer spray cans to getting the spray gun loaded and cleaning it, but if you shop has a small spray gun they can do it. If you want two tone then the light beige color I used should work. Yes you have to paint one color, wait for it to cure a few days, mask the wheel and do the other color.

DO NOT remove the chrome trim on the rim. A fellow insisted it can be done. I had a junk steering wheel and tried and the rings either broke or the can NOT be tightened properly!!! GM used a special machine!! You can CAREFULLY mask and after painting CAREFULLY cut the paint at the tape so you don't tear the paint removing the tape. In a day I'll dig up some pictures and post and find the "fawn" beige paint brand and code.

I didn't see any cracks on your steering wheel. Most do have them. I cut the crack open, then fill with the the original J-B Weld epoxy. Don't laugh it works! Don't use fast or putty, use original two part. You have to build a tape dam to hold the liquid in place and let it cure a minimum 24 hours. After several years my repairs have held! Sand it down and used some body filler to take care of minor scratches or pits. Prime and paint. A fellow in the club tried the JB putty and it did NOT hold.
66vairguy
Posts: 4656
Joined: Tue Dec 21, 2010 3:44 pm

Re: John’s 65 sedan

Post by 66vairguy »

I found a picture of my 4 dr fawn door panel with the door metal surround painted to match. Keep in mind paint and vinyl colors do vary from batch to batch. I thought it was a good match, but not perfect.

Most fawn interiors used "dark fawn" which was like a metallic gold and brown mixed together for the dash and door surround. It looks like you got a good match. If you want to use the light beige/ivory color for the two tone steering wheel the color I used was SEM 15003 Phantom White vinyl interior color (in a can). It dries flat and scratches easily so I coated it with Spray Max 2K clear coat Semi-Matte 360067 (in a can). Most body supply places know of these brands, or order online.

I was worried about the SEM and Spray-Max compatibility, I did a test and it was fine. Like most base coats, let it dry for an hour BEFORE applying clear coat, BUT don't wait more than a day or the clear coat won't bond as well to the base coat.

See pic and if you have questions let me know.
Attachments
DSCN6430.JPG
Project65
Posts: 410
Joined: Tue Dec 07, 2021 8:03 pm
Location: Pennsylvania

Re: John’s 65 sedan

Post by Project65 »

Thanks!

The only other way I could “match” the light fawn is my original door pillars are that color. I might consider getting a color-match on those.

Your car looks really nice. The color looks great on the doors. Nice choice opposite of the blue.
John
1965 Monza Sedan “The Phoenix”. Rebuild in Progress.
66vairguy
Posts: 4656
Joined: Tue Dec 21, 2010 3:44 pm

Re: John’s 65 sedan

Post by 66vairguy »

Project65 wrote: Fri Dec 29, 2023 2:09 pm Thanks!

The only other way I could “match” the light fawn is my original door pillars are that color. I might consider getting a color-match on those.

Your car looks really nice. The color looks great on the doors. Nice choice opposite of the blue.
Thanks for the compliment.

You will need the SEM white to paint the upper seat back "spears" that go on the inside facing part of the seat.

BTW I liked the white/black interior of my convertible and decided to do my four door interior (was fawn and gold) in fawn and black. Not factory correct, but I built a "driver" not a show car. See pics of the dash and two tone steering wheel I did. It took me a decade to find the 66 only plastic telescoping steering wheel assembly.
Attachments
DSCN6435.JPG
DSCN3916.JPG
Project65
Posts: 410
Joined: Tue Dec 07, 2021 8:03 pm
Location: Pennsylvania

Re: John’s 65 sedan

Post by Project65 »

As I’m waiting for the body work to finish, I thought that I could switch gears and do some additional “restoration” work. I decided to begin cleaning up my headlight bezels.

I’ve acquired some mechanically solid ones in my travels and parts search, as I see Clark’s no longer sells these.

I found an old thread on restoring these and thought I’d give it a go.

I began with simply washing the dirt and revealing the faded finish. Then as others have suggested, I sprayed the one with Easy-off oven cleaner to remove the faded anodizing. This took several applications along with brushing with a toothbrush, and rinsing. Repeat about three times. I had a few scratches that I sanded out. 400 grit up to 2000 grit wet sanding. Then buffing with a buffing wheel and compound to polish the aluminum. I’m finding that hard pressure is needed when buffing to get the stubborn areas, then follow up with light pressure to remove any micro scratches.

Much shinier now! I’ll finish with sealing with a clear-coat.

Here’s a photo of work in progress.
Attachments
Polished on the left in progress.  Faded on the right.
Polished on the left in progress. Faded on the right.
Much nicer.
Much nicer.
John
1965 Monza Sedan “The Phoenix”. Rebuild in Progress.
66vairguy
Posts: 4656
Joined: Tue Dec 21, 2010 3:44 pm

Re: John’s 65 sedan

Post by 66vairguy »

Looks good. BTW -- Scott who runs the forum here had pre-cut stick on black strips to go on the indentations between the headlight openings. They looked good.

The old anodizing is hard and you have to remove it to polish the aluminum. The bare aluminum will start to oxidize immediately. A good sealer is required and most clear coat paints tend to leave a "fogged" or hazy look, especially if put on too thick. When I get out to the garage I'll look for the can of what I used. I recall it was a VHT clear. It was tricky to get a nice clear coat. Too thin and it was rough, too thick and it turned milky white. Once I got the process down it looked good. It's been over a year and the bezels still look good.
Project65
Posts: 410
Joined: Tue Dec 07, 2021 8:03 pm
Location: Pennsylvania

Re: John’s 65 sedan

Post by Project65 »

Thanks for the tip. I PM’d Scott. And am interested in what clear you found to work. :tu:
John
1965 Monza Sedan “The Phoenix”. Rebuild in Progress.
66vairguy
Posts: 4656
Joined: Tue Dec 21, 2010 3:44 pm

Re: John’s 65 sedan

Post by 66vairguy »

Project65 wrote: Sat Dec 30, 2023 12:48 pm Thanks for the tip. I PM’d Scott. And am interested in what clear you found to work. :tu:
The rain stopped so I went to the garage and found it. I used VHT Wheel Paint - Clear Gloss # SP184. Some auto parts stores sell it. Summit Racing and Amazon sell it.
The can says this paint works on aluminum wheels, among other things.

Be WARNED it dries very fast in the sun or on a warm day. Best to use it in the shade and do some tests on other stuff before painting the headlamp bezel. Too thin and it dries rough, too thick and it looks cloudy/milky. You have to JUST get it to flow and stop. The problem area is the big curve by the HI beam opening. If I was making a mess of it I would IMMEDIATELY wipe it off with brake cleaner and try again. That said it is the first clear coat I've put on polished metal that gives a reasonable appearance and stops the aluminum from oxidizing. In the old days I used lacquer that looked great, but within a year the aluminum would oxidize.

The problem with a clear coat on a reflective surface is the light bouncing back shows up any variation in the clear coat - thinner is better.

Good luck
User avatar
doug6423
Posts: 399
Joined: Mon Jun 03, 2019 10:57 am

Re: John’s 65 sedan

Post by doug6423 »

Project65 wrote: Sat Dec 30, 2023 12:48 pm Thanks for the tip. I PM’d Scott. And am interested in what clear you found to work. :tu:
He has them in different colors too. I got mine in red.
65 Monza
Cincinnati, OH
Post Reply

Return to “Member's Rides, Projects, and Builds”