Page 18 of 20
Re: County98's Learn as I Go Thread
Posted: Sun Apr 14, 2024 9:20 am
by RexJohnson
The bolt holes for the mufflers are probably alittle oversized so if you loosen them and try twisting you might be able to get the needed clearance.
Re: County98's Learn as I Go Thread
Posted: Sun Apr 14, 2024 10:45 am
by Dennis66
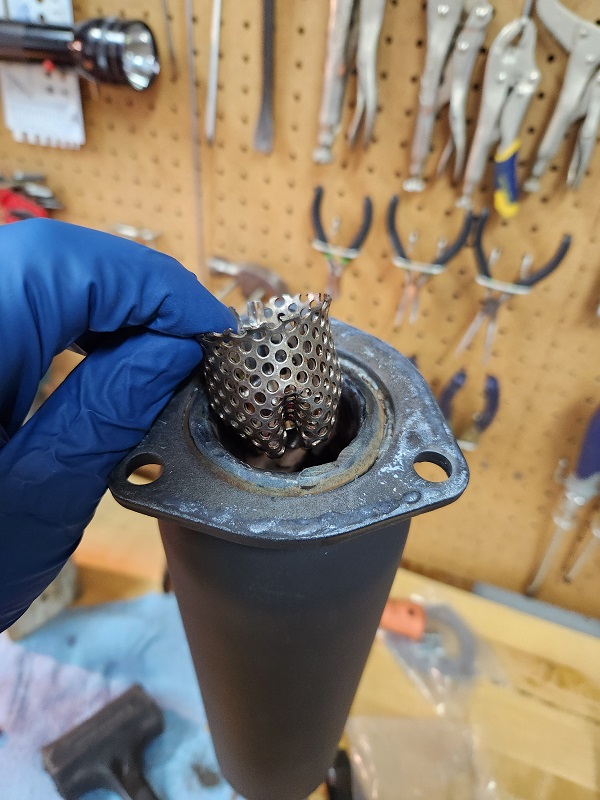
Not much for baffles, looks more like a spark arrester screen (except holes too large). Afraid that's going to be loud. Probably have to clearance the body panels like the turbo Corsas, but that's kind of permanent. Those pipes don't really seem to have the space, but I've wondered about doing baffles like we used to have in the pipes of our old '70s two stroke bikes. Dennis
Re: County98's Learn as I Go Thread
Posted: Sun Apr 14, 2024 4:04 pm
by County98
Agree on the baffles. I'm doubting the glass packs will stay long, but we'll see.
Regardless, if I do custom later, I can still use the cutouts. What I'll probably do is take a bat and try to roll those openings a little, try to drop down the back of the motor slightly, or maybe both.
Re: County98's Learn as I Go Thread
Posted: Sun Apr 14, 2024 5:03 pm
by joelsplace
I would bend the exhaust. No way I would cut the body for those.
Re: County98's Learn as I Go Thread
Posted: Sun Apr 14, 2024 5:47 pm
by County98
That's an option also maybe. Just not sure why mine seems tight, equal on both sides, etc., but too tight to body. They must have sold hundreds of kits, not sure why I'm tight to body on both sides.
Re: County98's Learn as I Go Thread
Posted: Sun Apr 14, 2024 5:48 pm
by joelsplace
Have you tried rotating them?
Re: County98's Learn as I Go Thread
Posted: Sun Apr 14, 2024 6:17 pm
by County98
yes sir. The tips hit far enough forward on the bell that they're always in contact, regardless of the angled part.
I'm kind of working off the assumption now that since I installed new trans and rear motor mounts, I have no "sag" yet whatsoever. I may mess around tomorrow with putting a couple small bushings on the downward nuts of the rear motor mount to gain a tiny bit of space. We'll see.
Re: County98's Learn as I Go Thread
Posted: Mon Apr 15, 2024 3:57 am
by kmart356
Those glasspack “baffles” should be called exhaust restrictors. Looking at those small holes makes me wonder how much reduction in flow and increase in back pressure they cause. Looks like at least 50% reduction, Is that the intent or is it to reduce loudness?
Re: County98's Learn as I Go Thread
Posted: Mon Apr 15, 2024 8:46 am
by County98
I just put them in as the quieter option, out of the box. I agree on them being restrictive though.
Re: County98's Learn as I Go Thread
Posted: Tue Apr 16, 2024 7:17 pm
by County98
Okay, so not my most elegant solution.
Looked at bending the exhaust, but no tubing really to bend without possibly messing up sealing.
Can't rotate, too far up on the bell to make any difference.
Didn't want to cut the body either.
My car hasn't had any bodywork done...ever. Underneath where the exhaust comes out was already a little dinged and bent up over the years. Decided to put my mismatched color rear grill on for some rigidity, and just clearanced (bent) the body lip up underneath until I had some arc.
I know it's a little crappy, but was the easiest solution given all the factors. Still have no idea why mine was so tight, but I guess I'll just chalk it up to manufacturer clearances. Who knows.
Mismatched '66 grill ( will spray bomb soon).
After a little creative use of a hammer and pipe.
Good enough for now.
Re: County98's Learn as I Go Thread
Posted: Wed Apr 17, 2024 5:55 pm
by doug6423
It's not you Shayne it's the exhaust.
I bought the same exhaust a few years ago and had the same problem. One side fit differently than the other. They mount to the log correctly but they are not uniform from the rear. Clark's is aware of the problem but choose not to say anything until you complain. I had to send pictures. After I sent pictures, they admitted to knowing about the issue.
Re: County98's Learn as I Go Thread
Posted: Thu Apr 18, 2024 4:39 am
by sparrow
I think they look fine. Don"t sweat the small stuff.Glad to see you back on your project. Hope you get it on the road soon!
Re: County98's Learn as I Go Thread
Posted: Thu Apr 18, 2024 6:46 pm
by County98
Much appreciated. Good to know about exhaust too.
Saw alot of threads about noise level, but wanted something out there about what to expect. I'm not mad at it, still happy, but I don't like it when things don't work as advertised.
Oh well, no big deal.
Re: County98's Learn as I Go Thread
Posted: Mon Apr 22, 2024 5:14 pm
by County98
Did a couple little things over the last couple days. Just messing around to get some satisfaction between spring chores.
First was cleaning up and putting on cove trim, but not the decklid piece. I'm going to use an old yenko style lid, so probably no trim on there.
I wish all the trim was stainless, but it's not. I'm pretty sure these cove pieces are anodized aluminum. REALLY labor intensive to polish these pieces. Have to get the hard as hell anodizing off, then polish. I didn't do that. My car is survivor ugly, so cleaned it up with some AMAZ paste that gets off the mineral buildup, then hit it with some steel wool. Cleaned up pretty good, but again, certainly not polished.
If you haven't done this, the trim pieces slide over the pot metal corners, the bottom strip gets screwed in and the cove corner trim slides over the ends of the bottom strip.
There are some tiny screws to use here, very short.
Corner trim sits pretty high and outside on the pot metal, but all fit together pretty well.
Clark's does sell these, but my personal experience is that the repop's are pretty thin and need some massaging. They are pretty though if you want to cough up the cash.
Re: County98's Learn as I Go Thread
Posted: Mon Apr 22, 2024 5:24 pm
by County98
The second piece I did was spray bomb the rusty blue rear air grill. Since i had to dig it out of the pile to do the exhaust, figured I'd clean it up a bit.
Paints I used were these: My go to for Corsa Silver is Alumi Blast. Not perfect, but pretty close. The red I got was Rust-Oleum Regal Red. Name was a cool coincidence, so I got it since I was working off memory and it seemed close. It came out a little more orange then I hoped, but it's in the ballpark.
No excuses, but this is just a spray bomb job on the Ugly Tomato. It'll be fine since it's under the car and the whole car needs paint...someday.
Needed to get rid of rusty blue though.
Sandblasted, and straightened the bends out a little. FAR from perfect up close, but it'll be a fine 10 footer.
In self etching primer.
Painted the red, let cure 2 days, then taped off and sprayed the silver. Came out okay, but I'm not starting a paint and body career anytime soon.
I am going to have to bite the bullet and get a trim ring from Clark's I suppose. I love having Clark's available, but the shipping is always a killer. Have to wait until I put in a substantial order.
Re: County98's Learn as I Go Thread
Posted: Tue Apr 23, 2024 9:20 am
by 2LZ
Looking really good. My young buddy has a 2014 Jeep Patriot in silver. He had a spray can of touch up paint with him so we sprayed my "repaired" trim cove piece to try it. It was a good match for the Corsa silver. I'm going to grab a can.
Yes, the shipping is killer. Seems I always have something in my Clark's cart, waiting for more stuff to bundle.