Oil Pan replacement
-
bghandyman
- Posts: 30
- Joined: Sat Mar 06, 2010 5:16 am
Oil Pan replacement
Going to change out the oil pan on my '69 140/vert from original to the Clark's pan. Just looking for any tips or suggestions. Type of gasket and why? Torque specs, and order? Any Locktite or sealent on the bolts? Thanks in advance.
-
bbodie52

- Corvair of the Month

- Posts: 11917
- Joined: Mon Aug 06, 2012 12:33 pm
- Location: Lake Chatuge Hayesville, NC
- Contact:
Re: Oil Pan replacement
The aluminum casting design should not be subject to the problem with stamped steel pans that can deform and crush into the thick gaskets in the areas directly beneath the bolt holes. When this happens the pressure against the gasket is not distributed evenly, with less pressure against the portions of the gasket between the bolt hole areas. The cast aluminum pan will not crush or deform, so it will tend to distribute pressure more-evenly around the perimeter of the pan to help seal the gasket surfaces. The problem with the Corvair design is that about four quarts of liquid resides ABOVE the gasket, unlike conventional oil pans that serve as a reservoir with the oil stored below the gasket surfaces. In those oil pans the gasket surface only has to seal against splashing oil, but the Corvair has to seal against continued pressure from a liquid that is constantly trying to find a way to escape — even when the engine is turned off!
I would suggest an aluminum cast pan is optimum for the Corvair crankcase and oil reservoir. Use one of the gaskets recommended by Clark's Corvair Parts for a cast oil pan, and torque it evenly using an inch-pound torque wrench to the specifications found in the 1965 shop manual. Use anti-seize compound on the bolt threads.
There are several types of gaskets to choose from. As far as shipping costs go, we have it better than those poor souls who live in Europe, South Africa, Australia, or even Canada! I would suggest that you might reduce your shipping costs by consolidating your Corvair needs into a single large shipment. If you need oil filters, air filters, tune-up items, or other items, order all of your anticipated needs for the coming year in one shipment. It is usually cheaper that way, instead of shipping each item in a separate order.


Part number C7228: CLARK ALUMINUM OIL PAN-NEED GSKT C3937 $$ SAVER C7228N-WITH NON-MAGNETIC DRAIN PLUG
Weight: 12 lbs 0 oz
Catalog Pages(s): 29,OT,2
Price: $ 233.70
Part number C7228N: CLARK ALUMINUM OIL PAN-WITH NON-MAGNETIC DRAIN PLUG, NEED GSKT C3937
Weight: 12 lbs 0 oz
Catalog Pages(s): 29,OT,2
Price: $ 219.90
The Otto Parts design — with its added heat transfer surfaces both inside and outside and its black finish — is technically optimum for the Corvair...
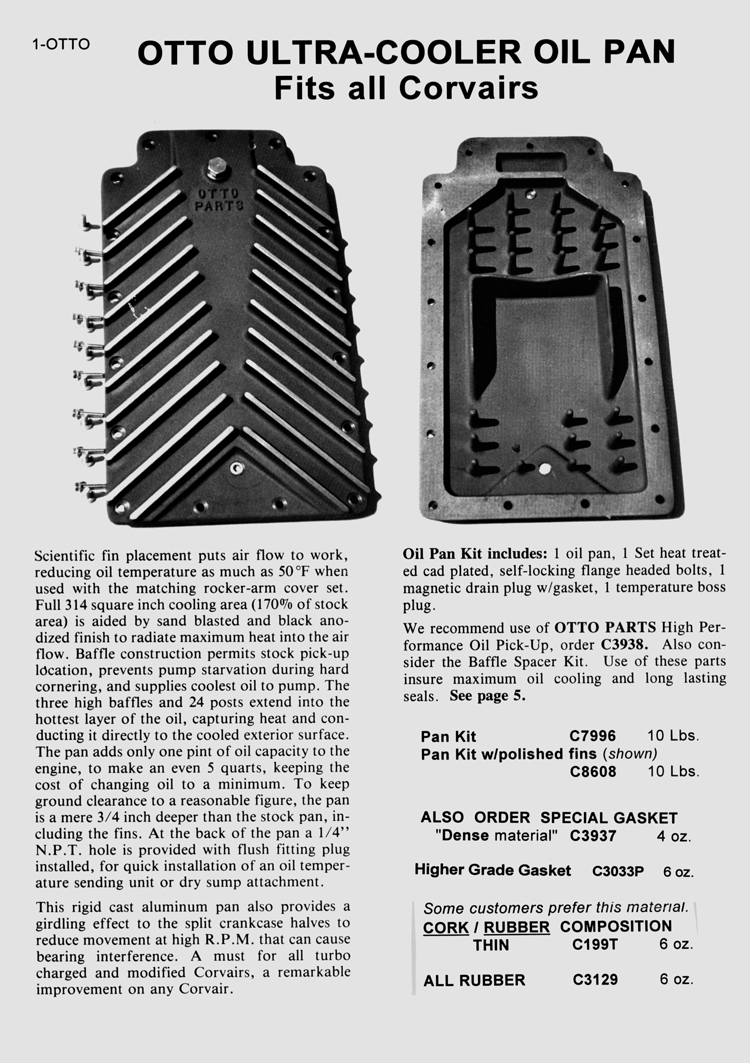
Part number C8608: OTTO OIL PAN WITH POLISHED FINS-ALSO ORDER GSKT-C3937 BAFFLE KIT=C7998
Weight: 9 lbs 0 oz
Catalog Pages(s): 30,OT,1
Price: $ 221.45
Part number C7996: OTTO OIL PAN-ALSO ORDER GSKT C3937 WITH POLISHED FINS=C8608-BAFFLE KIT=C7998
Weight: 10 lbs 0 oz
Catalog Pages(s): 30,OT,1
Price: $ 216.75
Brad Bodie
Lake Chatuge, North Carolina
 1966 Corvair Corsa Convertible
Lake Chatuge, North Carolina
1966 Corvair Corsa ConvertibleRe: Oil Pan replacement
As Brad mentioned torquing with thick gaskets is a problem. Those GM specifications for the oil pan bolts were with the thin paper gasket. Great when new, but most of the old steel oil pans are bent now and you can't get a good seal unless you use a thicker cork or composite gasket. With a thick gasket the GM torque specifications are too great and will result in crushing the thick gasket and bending the pan. With less torque many complain about the bolts not holding the steel pan tight with a thicker gasket - true. I went to a longer bolt, flat washer, lock washer and so far that keeps the bolts from coming loose at a low torque with the thicker cork or composite gasket.
That said - a good aluminum pan with a thin paper gasket is the best way to go.
NOW - BEWARE - some of the after market aluminum pans have been reported to have high and low spots on the gasket surface. One fellow even said he had to machined a pan to get it level, which is difficult to set up.
I'd wait for comments from folks that have used the Clark's pan(s), BTW - WHICH pan. Clark's sell different types and note that some hang down lower in the back and can be damaged if you car sits low.
O.K. Aluminum pan users - what say you.
-
Jerry Whitt
- Posts: 887
- Joined: Thu Sep 26, 2013 2:42 pm
Re: Oil Pan replacement
I have used the "Otto" pan and was quite happy. I used the thicker gasket. After running the engine for a half hour to let it warm up, went back and made sure the bolts were
tight. Found all were a little loose. Probably due to the different metals expanding and contracting at different rates.
Week or so later, after driving quite a bit, jacked it up and went around the bolts again. Took a little more tightening.
I check the bolts anytime the car is up.
tight. Found all were a little loose. Probably due to the different metals expanding and contracting at different rates.
Week or so later, after driving quite a bit, jacked it up and went around the bolts again. Took a little more tightening.
I check the bolts anytime the car is up.
Jerry Whitt
ASE CERTIFIED MASTER TECHNICIAN
Retired
Hemet, Callifornia
65 Monza, purchased new
65 Corsa convertible
ASE CERTIFIED MASTER TECHNICIAN
Retired
Hemet, Callifornia
65 Monza, purchased new
65 Corsa convertible
Re: Oil Pan replacement
Jerry - how thick is the gasket you use? I'm thinking of installing an OTTO pan. Can you tell me how far down the lowest part (cooling fin) of the pan is from the block mating surface towards the rear of the car.Jerry Whitt wrote:I have used the "Otto" pan and was quite happy. I used the thicker gasket. After running the engine for a half hour to let it warm up, went back and made sure the bolts were
tight. Found all were a little loose. Probably due to the different metals expanding and contracting at different rates.
Week or so later, after driving quite a bit, jacked it up and went around the bolts again. Took a little more tightening.
I check the bolts anytime the car is up.
Thanks.
-
subdude17349

- Posts: 22
- Joined: Fri May 29, 2015 12:53 pm
- Location: South Central PA
Re: Oil Pan replacement
Just a couple months ago I replaced my vintage Offenhauser deep sump pan with the Clarks Ultimate pan. I actually ordered 2 different gaskets, just to have them in my hand and see which I preferred. I ordered the C3033P "best aluminium pan gasket", and the C3129 "rubbery composition" gasket.
I wound up using the C3129, and am happy so far. I torqued it evenly on installation, then again after a few heat cycles. Sealed perfectly, no signs of any weeping or dampness.
I wound up using the C3129, and am happy so far. I torqued it evenly on installation, then again after a few heat cycles. Sealed perfectly, no signs of any weeping or dampness.
Same car, same barn. Add 20 years and way too much money....

-
Jerry Whitt
- Posts: 887
- Joined: Thu Sep 26, 2013 2:42 pm
Re: Oil Pan replacement
If memory serves me correctly, it was a Felpro Permaseal gasket. Not rubber or cork but a firm gasket probably 1/16th inch in thickness.
Jerry Whitt
ASE CERTIFIED MASTER TECHNICIAN
Retired
Hemet, Callifornia
65 Monza, purchased new
65 Corsa convertible
ASE CERTIFIED MASTER TECHNICIAN
Retired
Hemet, Callifornia
65 Monza, purchased new
65 Corsa convertible
Re: Oil Pan replacement
Jerry - 1/16" sounds good. The cork or rubber are at least double that - too thick and too soft to be torquing an aluminum pan - IMHO.
I would appreciate the OTTO pan depth at the back of engine. A pic with ruler would be great.
I would appreciate the OTTO pan depth at the back of engine. A pic with ruler would be great.
Re: Oil Pan replacement
Just wondering if it would be beneficial to use 1/4-20 studs that are loctite mounted into the block and then use flange nuts with the serrated surface. I have the stock GM steel pan and it didn't leak for he first 10 days or so. I went back and re tightened the bolts and good for about 5 days before the drip drip drip started again. I'm thinking of going with the aluminum pan too and thoughts the studs might give an advantage in keeping the fastener tight. Am I kidding myself ???
Prior Corvair owner 30+ years ago
Just acquired 64 Spyder, 66 & 65 Corsa,
adding to 69 Corvette BB, 67 GTO,
2015 Corvette Z06,
04 996TT Porsche,
04 Caterham Super 7
just sold 87 Porsche 930 Turbo (Thank God)
Just acquired 64 Spyder, 66 & 65 Corsa,
adding to 69 Corvette BB, 67 GTO,
2015 Corvette Z06,
04 996TT Porsche,
04 Caterham Super 7
just sold 87 Porsche 930 Turbo (Thank God)
Re: Oil Pan replacement
If the studs were damaged it would be very difficult to replace them.Melb-Mike wrote:Just wondering if it would be beneficial to use 1/4-20 studs that are loctite mounted into the block and then use flange nuts with the serrated surface. I have the stock GM steel pan and it didn't leak for he first 10 days or so. I went back and re tightened the bolts and good for about 5 days before the drip drip drip started again. I'm thinking of going with the aluminum pan too and thoughts the studs might give an advantage in keeping the fastener tight. Am I kidding myself ???
I mentioned before - use a longer bolt (not too long) with a flat washer and lock washer.
Re: Oil Pan replacement
BTW - I NEVER use a serrated nut or bolt on aluminum. When you remove them they chew up the aluminum. I've seen some instances of deep damage due to repeated installation of serrated hardware.
On the top cover I use flat STEEL washers between the cover and lock washers. Just as effective as serrated and doesn't damage the aluminum mating surface.
On the top cover I use flat STEEL washers between the cover and lock washers. Just as effective as serrated and doesn't damage the aluminum mating surface.
-
tommy44432

- Posts: 180
- Joined: Mon Mar 10, 2014 3:32 pm
- Location: Lisbon, Ohio
- Contact:
Re: Oil Pan replacement
I used the Clark's pan but went a different route for the gasket. I have a friend that is a maintenance man at a nuclear power facility and supplies me with a lot of stuff he uses in his day to day work. It is all good stuff. The make their own gaskets out of some type of fibrous material. Reminds me of just thick cardboard but it's really good thick cardboard. It is made for use in all conditions including oil applications. I used the material and made my own gasket, applied a small bead of gasket sealer he also supplied, torqued the pan to 95 in/lbs. and never looked back. No runs, no drips.
Re: Oil Pan replacement
Good point. I was talking of using that on the steel pan, not the aluminum. But you're right, what is the point if you make it more of a problem than the one your started off with. I hate leaking engines and trannies. My car garage is bright shiny epoxy floor and I like it CLEAN. I have struggled with the pan on my 65 and finally gave up.66vairguy wrote:BTW - I NEVER use a serrated nut or bolt on aluminum. When you remove them they chew up the aluminum. I've seen some instances of deep damage due to repeated installation of serrated hardware.
On the top cover I use flat STEEL washers between the cover and lock washers. Just as effective as serrated and doesn't damage the aluminum mating surface.
I should just make a pan underneath the motor with a pump to pump it back into the motor
Prior Corvair owner 30+ years ago
Just acquired 64 Spyder, 66 & 65 Corsa,
adding to 69 Corvette BB, 67 GTO,
2015 Corvette Z06,
04 996TT Porsche,
04 Caterham Super 7
just sold 87 Porsche 930 Turbo (Thank God)
Just acquired 64 Spyder, 66 & 65 Corsa,
adding to 69 Corvette BB, 67 GTO,
2015 Corvette Z06,
04 996TT Porsche,
04 Caterham Super 7
just sold 87 Porsche 930 Turbo (Thank God)