Thanks 66vairguy. I was thinking some kind of undercoating would be the answer. I’m also thinking that in the remaining exposed areas of metal, I’ll coat with POR15 first, then the undercoating. Any additional touch-up and coverage will help protect and reduce road noise.
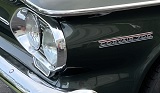
A few weeks back I ordered the vinyl stickers from Scott H for my headlight bezels. After applying and 4 light coats of KBS clear, they’re ready for install. The clear is designed to spray directly on bare metal. Polished aluminum. They look really nice. Much better than before. Thanks again Scott. A great product!
Today I installed the drivers side window weatherstripping channel. I backed the trim with 3M bedding and glazing compound. That applied pretty well. I attached it to the car with new screws. Clark’s doesn’t sell the screws, so I found some online from another seller. They’re the exact ones like the factory. They’re apparently the GM style from ‘64-‘77.
John’s 65 sedan
Re: John’s 65 sedan
- Attachments
-
- Polished bezels with Scott’s stickers and clear coat.
-
- The factory style weatherstripping channel screws.
-
- Channel installed on the driver’s side with new blow-out clips.
John
1965 Monza Sedan “The Phoenix”. Rebuild in Progress.
1965 Monza Sedan “The Phoenix”. Rebuild in Progress.
Re: John’s 65 sedan
It’s been almost 2 weeks since my last post, but the reassembly continues. Longer update here.
Last week I coated the inside bottoms of the doors all around for rust prevention. First a coat of POR15, then a coat of rust reformer and sealer, followed by a layer of rubberized undercoating. The doors are now good inside and out.
I also installed the weatherstripping channel on the passenger’s side and the weatherstripping itself on both sides.
Then I installed a set of mirrors. Boy they really shine and look nice! I had to install the vent window on the passenger’s side as well as the driver’s seat to allow me to sit in the car behind the wheel and position the mirror on the passenger’s side exactly where I wanted it. I didn’t go with sheet metal screws. I picked up some stainless #10-24 screws and stainless nylon lock nuts and bolted them on. They’re good and solid for sure.
I also spent some time tweaking the doors a bit to get them a slightly better fit.
All of that was preparation for installing the windows that I rebuilt. What a really NOT fun job that was. Today I took a few hours off from work and tackled the install. I read from an old thread that white lithium grease seems to work, so I picked up a tub and lubed the rollers. After 6 hours of careful installation and adjusting, the windows are in on the driver’s side. What a chore to get all of the tracks and the weatherstripping to line up just right. I’m sure that I’ll have a little bit of wind whistling when I roll down the road, but it’s as lined up as close to perfect as I could get. The fun of a 4-door hardtop I guess.
I haven’t installed the fuzzies just yet either.
Last week I coated the inside bottoms of the doors all around for rust prevention. First a coat of POR15, then a coat of rust reformer and sealer, followed by a layer of rubberized undercoating. The doors are now good inside and out.
I also installed the weatherstripping channel on the passenger’s side and the weatherstripping itself on both sides.
Then I installed a set of mirrors. Boy they really shine and look nice!
I also spent some time tweaking the doors a bit to get them a slightly better fit.
All of that was preparation for installing the windows that I rebuilt. What a really NOT fun job that was. Today I took a few hours off from work and tackled the install. I read from an old thread that white lithium grease seems to work, so I picked up a tub and lubed the rollers. After 6 hours of careful installation and adjusting, the windows are in on the driver’s side. What a chore to get all of the tracks and the weatherstripping to line up just right.
I haven’t installed the fuzzies just yet either.
- Attachments
-
- Driver’s side glass in. Looking more finished now.
-
- Another view.
John
1965 Monza Sedan “The Phoenix”. Rebuild in Progress.
1965 Monza Sedan “The Phoenix”. Rebuild in Progress.

Re: John’s 65 sedan
Amazing transformation. This car truly is a Phoenix!
Gary Bullman
66 Corsa Convertible
66 Corsa Convertible
Re: John’s 65 sedan
Thanks Gary! It is coming back from the  . I’m loving the transformation!
It’s been a few weeks since my last post, but progress continues.
The passenger side glass is in. I had to reset the front window glass in the channel forward a half-inch as well as realign the doors. The glass now fits and the doors close much better. Still no fuzzies in just yet.
Then I’ve reinstalled the rear tunnel rails. After completely replacing the floor sections, the rails didn’t quite line up. So after some shimming and welding, all lines up now. My long tunnel pan cover was junk, but the donor car pan was salvageable and after welding in three patches, I saved $118 from Clark’s.
Today I masked off the trunk and engine bay and did some prepping for finishing. For the trunk, some rust converter and sealer in the lower front corners, to protect. And epoxy primer. I’m going to apply some surface filler in the trunk for cosmetic appearance. It’s all solid and welded now, but just want to improve it a bit. Out back, I applied some rust converter and sealer as a base coat. Next, will be seam sealer.
Here’s a few photos.
 . I’m loving the transformation!
It’s been a few weeks since my last post, but progress continues.
The passenger side glass is in. I had to reset the front window glass in the channel forward a half-inch as well as realign the doors.
Then I’ve reinstalled the rear tunnel rails. After completely replacing the floor sections, the rails didn’t quite line up.
Today I masked off the trunk and engine bay and did some prepping for finishing. For the trunk, some rust converter and sealer in the lower front corners, to protect. And epoxy primer. I’m going to apply some surface filler in the trunk for cosmetic appearance. It’s all solid and welded now, but just want to improve it a bit. Out back, I applied some rust converter and sealer as a base coat. Next, will be seam sealer.
Here’s a few photos.
- Attachments
-
- Passenger side glass installed and doors aligned.
-
- Trunk preparation for surface filler and finish painting.
-
- Engine bay first base coat. And Rex’s tool!
-
- Side view.
-
- Other side.
John
1965 Monza Sedan “The Phoenix”. Rebuild in Progress.
1965 Monza Sedan “The Phoenix”. Rebuild in Progress.
Re: John’s 65 sedan
As a sedan fan, I just read your thread; wow! Amazing start to nearly finished.
'61 140 PG Rampside
'66 Rear Alum V8 4-dr
'60 Monza PG coupe (sold, sniff, sniff)
'66 Corsa Fitch Sprint Conv. (First car 1971, recently repurchased)
'66 Rear Alum V8 4-dr
'60 Monza PG coupe (sold, sniff, sniff)
'66 Corsa Fitch Sprint Conv. (First car 1971, recently repurchased)
Re: John’s 65 sedan
It’s been a month since my last post and progress has been slower than desired. Shopping for a new car for my wife, and helping my son with him also getting a car, taxes, some travel for work, the holiday, etc. Somewhere in between all of that, there has been progress.
I’ve been trying to get the trunk finished, so I can proceed with the reassembly. After filling in and smoothing the surface imperfections from the welding seams, and applying seam sealer, then primer, today I was able to paint the trunk with the splatter paint. Rattle cans of the correct paint are non-existant, so I resulted to the quarts from Clark’s.
The rest of the car looks too nice for me to have a ratty and scarred trunk, so I took the time to make it look better. I’m glad I did.
I’m very satisfied with how it looks and more satisfied that the painting is done! Finally!!
After this dries, I’m thinking it’s time to begin the reassembly. Wiring, chrome, trim, lights, etc.
- Attachments
-
- Passenger side
-
- Driver side
-
- Whole view
John
1965 Monza Sedan “The Phoenix”. Rebuild in Progress.
1965 Monza Sedan “The Phoenix”. Rebuild in Progress.
-
toms73novass
- Posts: 198
- Joined: Sat Mar 04, 2017 6:58 am
- Location: Grand Island NY
Re: John’s 65 sedan
Looks great, well worth the effort!
1962 700 Wagon
1963 Spyder convertable
1965 Monza
1967 UltraVan 211
1963 Spyder convertable
1965 Monza
1967 UltraVan 211
Re: John’s 65 sedan
That trunk looks great.
Just a suggestion. If you haven't cleaned and lubed the trunk latch mechanism, then I suggest doing it. Just something that makes the car nicer everytime you open the trunk with the key.
I soak the door and trunk latches in solvent (gasoline is fine IF done outside). I follow that up with a light oil and then lube with the basic white lithium grease MIXED with STP oil additive as it keeps the white grease from drying out.

Re: John’s 65 sedan
Slow progress is still progress. Glad to see an update. Dennis
Re: John’s 65 sedan
I just got around to re-reviewing your thread. Awesome job man. Massive amount of work and I'm jealous of your paintjob, lol. Nicely done sir.