County98's Learn as I Go Thread
Re: County98's Learn as I Go Thread
You're more than welcome. I AM literally learning as I go, so they're not really "how to's", more like the stuff I figure out that I wish I would have known first and might help another newbie, lol.
Re: County98's Learn as I Go Thread
I know I jump around a lot. Sometimes I need to do something to keep me entertained though and stay motivated. You might remember my almost free camaro wheels from the first page. I was going to use the back tires and rattle can the wheels myself. Turns out after researching everything I would need to do a really good job (primer/base/clear), and the time involved, my awesome wife decided to treat me and talked me into getting them powder coated by my local guys. They cut me a good deal since I used to have them do some bike parts for me.
I tried to see if they could paint code match to GM Argent Silver, but they had no way to do that. I ended up trying to judge it off some cell phone/google pics and settled on Porsche Silver. Probably not exact, but I'm really liking the finish.
I had them wrapped in 205/55-15 Dunlop Direzza DZ102's. I was originally going to go staggered and with Falken's, but by the time I got around to spending money, I couldn't find them anymore. Oh well. I like the look of these also. Now I just need to quit being lazy and finish up my Oh-So-Slow brake do over.
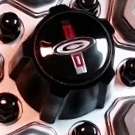
I have the correct center caps for these, they just need a paint job. On my last order to Clark's, they had Corsa horn buttons that were selling as "seconds" for $5 each or so. I picked up 5 of them (One for the inevitable screw up) to trim down and try to use as center caps.
I'm excited to get that far!
Cheers!
-Shayne
I tried to see if they could paint code match to GM Argent Silver, but they had no way to do that. I ended up trying to judge it off some cell phone/google pics and settled on Porsche Silver. Probably not exact, but I'm really liking the finish.
I'm excited to get that far!
Cheers!
-Shayne
Re: County98's Learn as I Go Thread
Those rims look sweet, guess I need to get mine powdercoated eventually too lol.
'66 Monza Coupe Project: viewtopic.php?f=52&t=7188" onclick="window.open(this.href);return false;
Re: County98's Learn as I Go Thread
Thanks Blaze. Needed a little pick me up. Now I have a short term goal to finish up so I can see what they look like with the car back on the ground.
Re: County98's Learn as I Go Thread
Evening guys,
So today I did some work on the car without ever actually touching the car, lol. I painted my brake drums and had them turned at my local place. Not too dramatic, but here's what I did for anyone who doesn't know.
Ugly old rusty drums and half oversprayed camaro centers, compliments of the PO of the wheels. Doubt the drums have ever been turned though, so plenty of material to work with.
Taped off the holes from the inside.
I was going to spray them with the flat black I had laying around, but says it's only good to 200 degrees, so went and got some 550 degree engine enamel. I doubt they would burst into flames or anything after the paints cured, but didn't want it to flake off and get all over the place or into the drums. Better safe than sorry.
I always grew up being told to NOT paint or powdercoat drums, they need to get rid of as much heat as possible. That being said, I'll be able to see them through the wheels, so wanted them a little cleaner.
I filled a 5 gallon bucket with degreaser (read, "dish soap") and water, gave them a good dunk and scrubbed them down a little with a green scotch brite pad. Blew them off with compressed air, let them dry overnight and sprayed. 2 very thin dusting coats, just enough to get them mostly black. Trying to NOT insulate them with paint as much as possible.
You'll also see my trusty Silver Sharpie in action again. Not sure if it really matters, but I wanted to put the same drums on each corner that it started with. They ARE different part numbers front and rear, if you weren't aware already.
Let them flash off for a couple hours and took them down to get turned. Took about an hour while I went and walked around Lowe's. All ready to go now!
Cheers!
-Shayne
So today I did some work on the car without ever actually touching the car, lol. I painted my brake drums and had them turned at my local place. Not too dramatic, but here's what I did for anyone who doesn't know.
Ugly old rusty drums and half oversprayed camaro centers, compliments of the PO of the wheels. Doubt the drums have ever been turned though, so plenty of material to work with.
I filled a 5 gallon bucket with degreaser (read, "dish soap") and water, gave them a good dunk and scrubbed them down a little with a green scotch brite pad. Blew them off with compressed air, let them dry overnight and sprayed. 2 very thin dusting coats, just enough to get them mostly black. Trying to NOT insulate them with paint as much as possible.
You'll also see my trusty Silver Sharpie in action again. Not sure if it really matters, but I wanted to put the same drums on each corner that it started with. They ARE different part numbers front and rear, if you weren't aware already.
-Shayne
Re: County98's Learn as I Go Thread
In continuation...Lowe's is my enemy. i can NOT walk through there and not buy something. SO, bought a bench grinder and a new dremel since mine died about 2 years ago now.
I love new tools. It's a sickness. I love them so.
While I was painting drums this morning, my wife gave me a hand and sprayed the old Camaro center caps for me. Turned out pretty good! They were a little beat up, but not too bad and the little nicks don't really bother me.
I washed them up last night in the same bucket I did the brake drums in and wet sanded them with a little 400 grit to scuff up the plastic and smooth out the white half assed paint from the last guy. New weapon for plastic caps. Krylon Satin Plastic spray.
Freshly sprayed in a couple light coats. Estefanie did great on these.
Tested out the new bench grinder by putting it on the lowest speed and turning down one of the Corsa horn buttons.
Worked pretty good. The horn buttons are taller than I thought, so will stick out another 1/4" or so, but once they're on the wheels, no one will be looking that close. I dressed up the edge with a black sharpie and set it in there to check it out. I need to go get some JB Plastic Weld to glue these I think.
For lug nuts, I ordered on line for some 7/16"x20 bulge style acorns, just like is outlined on the Autoxer.skiblack.com page. Need to mate the Camaro wheel style with the Corvair studs. Don't remember who I got them through though...McGard maybe?
What the finished product will look like.
Take care and happy Corvair-ing,
-Shayne
I love new tools. It's a sickness. I love them so.
While I was painting drums this morning, my wife gave me a hand and sprayed the old Camaro center caps for me. Turned out pretty good! They were a little beat up, but not too bad and the little nicks don't really bother me.
I washed them up last night in the same bucket I did the brake drums in and wet sanded them with a little 400 grit to scuff up the plastic and smooth out the white half assed paint from the last guy. New weapon for plastic caps. Krylon Satin Plastic spray.
-Shayne
Re: County98's Learn as I Go Thread
Lookin good  I just ordered some Monza horn buttons for mine to do the same. Been wanting to do it for a while but forgot until I saw yours lol.
'66 Monza Coupe Project: viewtopic.php?f=52&t=7188" onclick="window.open(this.href);return false;
Re: County98's Learn as I Go Thread
Got some more work done this weekend. Wasn't planning on having a car day today also, but wanted to finish up the chunk I was working on. Brakes are complete!!!! I didn't say "done" because I haven't bled them out yet. But EVERYTHING is new, assembled, and complete. VERY happy. Now I have 2 chunks done; springs and shocks, and now brakes.
Driver and Passenger rear. Same as the front, but also have the Emergency Brake rod to deal with.
Not too bad, just more of the same. One thing that was a little bit of a trick was the wheel cylinder bolts on the rear. They're recessed in a little bit and tough to get a normal wrench on. Especially full of crud and rusty. I used a 3/8" gooseneck wrench, worked like a champ.
All lines done. I was fighting with the rusty nuts on the old brake lines around the rear tee when I finally had a "What am I doing?" moment. Grabbed the dykes and snipped off all the lines and pulled it out. Not like I'm reusing any of the lines, so why am I fighting with them? 
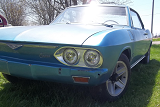
Finally, even though I'll still have to get under the car, I HAD to see her back on the ground. I NEEDED to see her back on the ground, lol. 
Measurements came out right on the money. Factory ride height is around 26". I ordered HD rate plus a little, with a 1" drop in the rear and a 2" drop in front. Ended up with 25 1/4" rear and 24" front. PERFECT. They will also come down a tad more after I get the car rolled around some and the springs settle a bit.
I love it. Pics don't do it justice. I can't pull the car out yet, and I have no room in my garage, so kind of crappy angles. In real life from standing height, it looks low and bad ass. Certainly lowered, but not "can't get over a speed bump" low.
Since it's the first time I've been able to sit in the car (been on 4 jack stands) and even check out my seats, my wife snapped a pic of me day dreaming and enjoying the moment.
Good milestones for me today. Brakes complete and the wheels on for the first time. I'm re-motivated!
Cheers!
-Shayne
Driver and Passenger rear. Same as the front, but also have the Emergency Brake rod to deal with.
I love it. Pics don't do it justice. I can't pull the car out yet, and I have no room in my garage, so kind of crappy angles. In real life from standing height, it looks low and bad ass. Certainly lowered, but not "can't get over a speed bump" low.
- Front (2).jpg (111.07 KiB) Viewed 2474 times
Cheers!
-Shayne
Re: County98's Learn as I Go Thread
On a separate note...
While I was working the drivers rear brake, this connector and wire fell down. I've never seen a connector like it before.
What is it and where does it go?
Cheers!
-Shayne
While I was working the drivers rear brake, this connector and wire fell down. I've never seen a connector like it before.
What is it and where does it go?
-Shayne
Re: County98's Learn as I Go Thread
Thanks for the numbers! It's odd that your rear height is actually the same as mine currently, guess my springs are sagging a bit. Keep up the good work.
'66 Monza Coupe Project: viewtopic.php?f=52&t=7188" onclick="window.open(this.href);return false;
Re: County98's Learn as I Go Thread
Thanks. I had standard rates all around and the numbers actually flipped for me. It was 24 1/2" rear and 25 1/2" front on the originals. That was on 13" rims though as well.
Re: County98's Learn as I Go Thread
Didn't see your second post until now. That's the reverse light switch connector.
'66 Monza Coupe Project: viewtopic.php?f=52&t=7188" onclick="window.open(this.href);return false;
Re: County98's Learn as I Go Thread
Ah. Sweet, thanks. I'll look around in there and see where it goes.
Re: County98's Learn as I Go Thread
Enjoyed your post, keep up the good work. Im doing the same as you but decided to start on the total rebuild of my engine first, that connection you said just fell down looks like it may belong to the transmission. Mine was caked in about an inch of oil and dirt but when I cleaned it up it seemed to resemble the piece in your picture.
Happy Building all!

Re: County98's Learn as I Go Thread
Yes that is the reverse backup light. switch power. should plug to the pins on the side of trans. Enjoy your post keep it up.
Don Howard
Lake City Fl.
66 140 Convertible
Lake City Fl.
66 140 Convertible
Re: County98's Learn as I Go Thread
Afternoon guys,
Got to spend nice Saturday messing around in the garage today. Felt pretty good!
First a recap of my brake bleeding frustration...
Last weekend I figured I had a couple hours to spare and I'd knock out a quick brake bleed. Didn't happen, lol. Another of those things that I've done before and thought would be a breeze. Not so much...Arg. Read a bunch of threads on bleeds and people's problems, figured I was good to go. Went out and got a Mighty Vac and taped all the bleeders while everything was still dry. This is the only place I've used thread tape, and you need to mummy them up pretty good.
While I was doing this, I tried the "gravity method", but after a half hour, I still had no flow at the rear wheels. Started in with the Mighty Vac. Works okay, just like it says you will have the slightest tiny bubbles from air squeaking in around the threads of the bleeders. You can tell the difference between those miniscule bubbles and actual air bubbles, don't worry about that.
Did all 4 corners and was excited to jump in and try it out. Pedal went almost all the way to the floor before I got any good pedal. In the process, I found a couple small leaks, but I expected that. I was afraid of stripping out the fittings, so I didn't crank them down too hard. Tightened a little more on every fitting just to make sure and re-bled.
Same thing, pedal almost to the floor. Crap. Sent up a flare and posted a help thread over on the dark side. After much putzing around, I re-adjusted the MC rod. After I had ANY pedal at all, I smooshed the brakes a few times re-centering the shoes, pulled the wheels again and re-did the static adjustment of the star wheels. Started again at the Passenger rear, and this time the gravity method seemed to work. I'm guessing that with COMPLETELY dry lines, the fluid just wouldn't flow. After having wet lines, the weight of the fluid rolled right along, and by dropping the bleeder hose into a container of fluid, I just let it drip until I went through a full MC of fluid out of each bleeder.
MC Rod adjustment by the book says bottom of pedal gets 1/4" of play before engaging the rod. That equates to the TOP of the pedal being just a hair off the stop. Looks touching in the picture, but there is actually a breath of space there. Disregard the brake light switch, haven't started in on that stuff yet.
Feeling pretty righteous, I jumped in the car and...pedal was barely any better. Pedal is NOT spongy, does NOT bleed down, nor does it pump up. Brake pedal is rock hard, but only a couple inches from the bottom instead of a couple inches from the top.
I'm almost CERTAIN there is no air in the lines, so I think I'm going to leave it alone until I can actually drive the car and let all the self-adjusters work their magic. Seems to be an adjustment issue, but that's all I can think of.
Started getting a little frustrated, so left the girl alone for a week or so. I HAVE good brakes, I just don't like how far the pedal goes down first.
Got to spend nice Saturday messing around in the garage today. Felt pretty good!
First a recap of my brake bleeding frustration...
Last weekend I figured I had a couple hours to spare and I'd knock out a quick brake bleed. Didn't happen, lol. Another of those things that I've done before and thought would be a breeze. Not so much...Arg. Read a bunch of threads on bleeds and people's problems, figured I was good to go. Went out and got a Mighty Vac and taped all the bleeders while everything was still dry. This is the only place I've used thread tape, and you need to mummy them up pretty good.
Did all 4 corners and was excited to jump in and try it out. Pedal went almost all the way to the floor before I got any good pedal. In the process, I found a couple small leaks, but I expected that. I was afraid of stripping out the fittings, so I didn't crank them down too hard. Tightened a little more on every fitting just to make sure and re-bled.
Same thing, pedal almost to the floor. Crap. Sent up a flare and posted a help thread over on the dark side. After much putzing around, I re-adjusted the MC rod. After I had ANY pedal at all, I smooshed the brakes a few times re-centering the shoes, pulled the wheels again and re-did the static adjustment of the star wheels. Started again at the Passenger rear, and this time the gravity method seemed to work. I'm guessing that with COMPLETELY dry lines, the fluid just wouldn't flow. After having wet lines, the weight of the fluid rolled right along, and by dropping the bleeder hose into a container of fluid, I just let it drip until I went through a full MC of fluid out of each bleeder.
MC Rod adjustment by the book says bottom of pedal gets 1/4" of play before engaging the rod. That equates to the TOP of the pedal being just a hair off the stop. Looks touching in the picture, but there is actually a breath of space there. Disregard the brake light switch, haven't started in on that stuff yet.
I'm almost CERTAIN there is no air in the lines, so I think I'm going to leave it alone until I can actually drive the car and let all the self-adjusters work their magic. Seems to be an adjustment issue, but that's all I can think of.
Started getting a little frustrated, so left the girl alone for a week or so. I HAVE good brakes, I just don't like how far the pedal goes down first.