John’s 65 sedan

Re: John’s 65 sedan
I'll just echo what Ted posted - this is an amazing amount of work! Do you do this type of work for other people? My Corsa has some spots that could use some attention at some point.
John
1966 Corsa Convertible
1966 Corsa Convertible
Re: John’s 65 sedan
Thanks for the words of support guys. It’s been a very challenging project to say the least. I have a sentimental attachment to this car. My dad had corvairs from back in the 70’s and this one was the last one he bought. He was the last person to drive it. I last drove it in 1989. I could have found one in better shape to restore, but this one was ours. I just should have saved it 30 years ago.
Regarding it being a 4-door, I like the late model 4-door. I think the 4-door hard top has a cool-factor to it, plus it’s easy for extra passengers to climb aboard and enjoy the ride. I’m actually thinking in my opinion, that for every 20 late model 2-doors I see, I might see one sedan. I think they’re more scarce now, but all of you out there would know better than me.
I’ve never attempted this kind of project. I figured that I couldn’t screw the car up because it was already a rust bucket and likely should have went to the scrap yard. But I’ve gotten better and have built confidence along the way. I’ve found the whole experience extremely rewarding that I’m able to do this. I had do this myself, because I couldn’t afford to pay someone else to do it, and likely no one else would even want to do it. I highly respect your experience and really appreciate the compliments and words of encouragement.
After this project is completed, I’m contemplating another project. I have a ‘63 coupe with a 102 and an automatic and the car is in worse shape than the 65, but if the engine and drive train can be salvaged, that’s a start for something. TBD.
John, I’ve been reading your post. You’re making great progress with yours. I believe you’ll get great advice and the right kind of help on those spots you’re referring to when the time is right.
John
1965 Monza Sedan “The Phoenix”. Rebuild in Progress.
1965 Monza Sedan “The Phoenix”. Rebuild in Progress.
Re: John’s 65 sedan
Today I was able to get a few hours to get back on the project. I’ve been so busy the last couple of weeks. So I was able to dress up the sheet metal repairs on the engine bay air intake section that I’ve been working on and get it almost half welded in place. Again, this donor came out of a coupe, and the side supports needed a little extension to fit up. Otherwise it’s a nice fit.  I’m liking how this is looking.
The area behind I coated with POR15 and touched up the back side of the panel with some primer.
The area behind I coated with POR15 and touched up the back side of the panel with some primer.
- Attachments
-
- Top is welded across
-
- Lower face is tack welded in
John
1965 Monza Sedan “The Phoenix”. Rebuild in Progress.
1965 Monza Sedan “The Phoenix”. Rebuild in Progress.
-
Minferrera19
- Posts: 80
- Joined: Wed Jul 14, 2021 1:05 am
- Location: Massachussetts
Re: John’s 65 sedan
Wow looks really good, how do you get rid of the rust… sandblasting, grinding? And what type of welder do you have Because personally I found flux core welding easiest on thin guage without burning through. Great progress on the car do you have an idea when it will be finished by as well? Your metal fab skills are awesome your really getting into it!
Re: John’s 65 sedan
Most of my rust removal has been with a right angle grinder and a very coarse wire wheel. The rear air intake panel I sent out for sandblasting and primer as well as I had for the front cross member. Otherwise if too severe, my other rust removal is cut it out and weld in a replacement.
So far on the rear intake panel, I probably have about 15 hours into that. It took trimming, fitting, sectioning out bad areas and patching, modifying, as well as having it sandblasted and primed.
My welder I bought to not only do this project, but to have as a long term investment in a great tool. I bought a Hobart Multi-Handler 200. It can stick, mig, or tig as well as run flux core. I learned how to mig weld doing this project. I’m running 0.024” solid core wire with C25 shielding gas. I’m running it on 220V, but it can also run on 110V as it’s a dual voltage welder. I find it very clean with little spatter. The controls are precision. I wouldn’t call it commercial grade, but it’s great for what I’m doing. With this setup, I can weld 18 gauge very easy, and even puddle weld in holes. Where needed, I move around to try and minimize heat and warping. I don’t have a plasma cutter, but use a right angle grinder with an 0.040 wafer wheel. (Go through lots of these). Most of my welding has been 19 gauge, 18 gauge, 16 gauge, and I’ve had some 1/8”.
I was hoping to have the car done this year, but likely I’m underestimating the time it will take. It could realistically roll into next year. I still have major body areas to repair/replace, then there’s other mechanical components also…
 . Too much fun!!!
If I can offer any advice, feel free to ask. I’m not a professional, just a handy rookie hobbiest with a determination to drive my old car again. I’m learning too as you are by reading the great project stories from the other members on this site. That’s the great thing about this site. Share experiences, information, successes and mistakes.
John
1965 Monza Sedan “The Phoenix”. Rebuild in Progress.
1965 Monza Sedan “The Phoenix”. Rebuild in Progress.
Re: John’s 65 sedan
Today I was able to get the engine air intake completely welded in. I like how it looks so far. I thought I’d try grinding down the welds and attempt to smooth out the surface. It’s coming, but still needs some more work. Overall, I’m pleased with the progress.
- Attachments
-
- Top seam finishing in progress
-
- Rear face welded in
-
- Surface finishing in progress
John
1965 Monza Sedan “The Phoenix”. Rebuild in Progress.
1965 Monza Sedan “The Phoenix”. Rebuild in Progress.
Re: John’s 65 sedan
I “finished” the installation of the rear air intake panel today. It was a matter of smoothing out the metal surface of the welds, then I finished it off with a little primer. It’s not spotless, but it’s really good. Perfect for being in the engine bay. It’s solid and not rusted out anymore. All steel. No filler. I wonder if anybody else has ever replaced one of these?
My next target is the rear upper deck behind the back seat. It’s rusted through (like everything else it seems) and thin in other areas. Underneath is a channel that spans the width. I’m going attempt to leave the channel and replace the top plate. It’s a tight area, so cutting it out cleanly will be a challenge.
Here’s a few pics.
- Attachments
-
- Finished top
-
- Finished rear face.
-
- Rear upper deck…the next target.
John
1965 Monza Sedan “The Phoenix”. Rebuild in Progress.
1965 Monza Sedan “The Phoenix”. Rebuild in Progress.
-
Minferrera19
- Posts: 80
- Joined: Wed Jul 14, 2021 1:05 am
- Location: Massachussetts
Re: John’s 65 sedan
Nice work looks great and the fact theres no filler is even better one step closer as I say. I got my heaterbox motor out today and also the wiring harness and a couple brake lines too. After all that was taken out I could see my rear upper deck lid that was in suprisingly good shape. Only minor suface rust (compared to my car). On your car it definitely seems to be rusted if not rotted through in a couple areas. What guage steel are you planning to use? And how much metal are you going to cutout/weld in and im also curious as to how the underneath of the rear upper deck lid
- Attachments
-
- Got lucky only surface rust!
Re: John’s 65 sedan
Hi John, regarding the paint color, my '65 is the original Madera Maroon. I wasn't a fan of maroon colored cars in the past, but love this color on the Corvair. I get tons of compliments on the color. Red makes sense too, given that's how you remember your car.
I enjoy all the info and photos you're providing on the Forum. So cool that you're bringing this special car back to life. Keep up the good work!
I enjoy all the info and photos you're providing on the Forum. So cool that you're bringing this special car back to life. Keep up the good work!
- Attachments
-
Re: John’s 65 sedan
Yeaaahhh….  . I like the look of the maroon on your car. I think you’ve convinced me to go back with the original color.
Also, thank you all for the encouragement. I really appreciate it.
It’s been a very busy month, and wasn’t able to make any progress. I had to wrap-up taxes (government theft), retire my old truck and find a replacement, had a vacation planned, plus all of the yard work as spring is here. I still have making firewood ahead of me.
So today I dedicated the day to getting back on the project and repairing the rusted out rear deck. This was relatively straightforward, but tedious.
I took the wire wheel to a wide area and removed a ton of loose scale and rust, then had to carefully cut out the deck panel while leaving the sub-channel in place.
Shaping the panel just took some careful gentle bending on the brake, the some work on anvil with a hammer to shape it. Trim to fit and weld in place.
It’s solid now, but still have some welding underneath to stitch it to the channel and puddle weld a few pinholes.
I like it!
 . I like the look of the maroon on your car. I think you’ve convinced me to go back with the original color.
Also, thank you all for the encouragement. I really appreciate it.
It’s been a very busy month, and wasn’t able to make any progress. I had to wrap-up taxes (government theft), retire my old truck and find a replacement, had a vacation planned, plus all of the yard work as spring is here. I still have making firewood ahead of me.

So today I dedicated the day to getting back on the project and repairing the rusted out rear deck. This was relatively straightforward, but tedious.
I took the wire wheel to a wide area and removed a ton of loose scale and rust, then had to carefully cut out the deck panel while leaving the sub-channel in place.
Shaping the panel just took some careful gentle bending on the brake, the some work on anvil with a hammer to shape it. Trim to fit and weld in place.
It’s solid now, but still have some welding underneath to stitch it to the channel and puddle weld a few pinholes.
I like it!
- Attachments
-
- Before removal, with some preliminary cuts.
-
- Bad area cut out. Channel remains.
-
- New panel ready to weld.
-
- All welded in topside. Need a few stitch welds underneath.
John
1965 Monza Sedan “The Phoenix”. Rebuild in Progress.
1965 Monza Sedan “The Phoenix”. Rebuild in Progress.
Re: John’s 65 sedan
Hi, I'm new here. Thank you for your advice and recommendations. Hobart is the perfect brand. You did a really great job. Are these welders suitable for that?Project65 wrote: ↑Mon Apr 04, 2022 4:26 pm
Most of my rust removal has been with a right angle grinder and a very coarse wire wheel. The rear air intake panel I sent out for sandblasting and primer as well as I had for the front cross member. Otherwise if too severe, my other rust removal is cut it out and weld in a replacement.
So far on the rear intake panel, I probably have about 15 hours into that. It took trimming, fitting, sectioning out bad areas and patching, modifying, as well as having it sandblasted and primed.
My welder I bought to not only do this project, but to have as a long term investment in a great tool. I bought a Hobart Multi-Handler 200. It can stick, mig, or tig as well as run flux core. I learned how to mig weld doing this project. I’m running 0.024” solid core wire with C25 shielding gas. I’m running it on 220V, but it can also run on 110V as it’s a dual voltage welder. I find it very clean with little spatter. The controls are precision. I wouldn’t call it commercial grade, but it’s great for what I’m doing. With this setup, I can weld 18 gauge very easy, and even puddle weld in holes. Where needed, I move around to try and minimize heat and warping. I don’t have a plasma cutter, but use a right angle grinder with an 0.040 wafer wheel. (Go through lots of these). Most of my welding has been 19 gauge, 18 gauge, 16 gauge, and I’ve had some 1/8”.
I was hoping to have the car done this year, but likely I’m underestimating the time it will take. It could realistically roll into next year. I still have major body areas to repair/replace, then there’s other mechanical components also…. Too much fun!!!
If I can offer any advice, feel free to ask. I’m not a professional, just a handy rookie hobbiest with a determination to drive my old car again. I’m learning too as you are by reading the great project stories from the other members on this site. That’s the great thing about this site. Share experiences, information, successes and mistakes.
All the best!
Re: John’s 65 sedan
Thanks Bachboy.
Here’s my long-winded answer to your question. Hope you (and others) find this info helpful.
I’m not an expert welder, or have years of experience with welding, but I’ll share based on my experience as you have seen, I’ve had a ton of welding on my car.
I wanted my welds to be clean and solid. (Full penetration on a butt weld) So I researched, made the investment, and practiced a bit. Also, as a novice, I wanted a welder that I felt would be easy for me to learn how to use and quickly gain confidence with.
Personally, in my opinion, and based on my research, along with input from a friend of mine who also has several car restoration projects going on, you’ll get cleaner welds and a better finished weld on automotive sheet metal in an indoor environment with a mig welder setup than a flux core welder. He used to run flux core, but now runs a mig.
The mig allows for thinner wire. 0.023 vs 0.030. The thinner wire carries less amps, so it’s less heat. Less heat produces less warping and burn-through. Also it’s cleaner and less spatter.
My advice is make the investment and get one that will mig, and get the bottled gas and run the 0.023 wire (or 0.024…same difference).
The mig is great indoors without wind blowing the shielding gas away.
It takes a bit of finesse I’ve found for making the sheet metal welds come out nice and the mig is a great tool.
Yeah the flux core is tempting, as it’s less expensive up front.
As far as mig goes, after the first bottle, additional bottles are very affordable. Your welds will be much cleaner and your sheet metal will be straighter and less warped. It really doesn’t take much heat to warp the steel.
They make less expensive mig welders, but consider it an investment in a good tool that will serve you for years. Also if you’re DIY, what you’re saving should more than cover the cost of a decent welder. If you’re paying a shop, they’ll charge you likely $60 an hour. So a 10 hour job is $600. I could easily have 10 hours in making 1 or 2 weld patches.
So to answer your question, I could only advise you to go with what I would consider one from a reputable domestic company. (One with a good warranty). I was leaning towards a Lincoln, but really liked the Hobart. (I think both are made in Ohio). I felt the Miller was overkil, more for a professional. You could get by with a 110V mig and do very well with it. The Hobart (at least mine) is similar to a Miller with a progressive feed. (Same parent company). When you hit the trigger, it starts slow, then ramps up the wire feed rate. It allows you to feather the wire to it and make good spot welds with short trigger bursts. I Also love the digital display so I can exactly set the voltage and wire feed rate. I would think it’s much better for repeat precision than simply an analog dial setting.
Hope this helps in your selection.
As for getting back to my project, I’m working on lining up the next bit of body parts. I’m ready to tackle the next major areas which include the rear body panel, and right rear quarter panel. My plans are to cut mine completely off and replace from a donor. I’m hoping that within the very near future, I’ll have what I need.
- Attachments
-
- Former damage with brazed repair and heavy rust pitting.
-
- Dented right rear quarter panel.
-
- Deep pitting
John
1965 Monza Sedan “The Phoenix”. Rebuild in Progress.
1965 Monza Sedan “The Phoenix”. Rebuild in Progress.
-
bbodie52

- Corvair of the Month

- Posts: 11948
- Joined: Mon Aug 06, 2012 12:33 pm
- Location: Lake Chatuge Hayesville, NC
- Contact:
Re: John’s 65 sedan
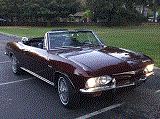
This is a similar non-Turbo 1965 Madera Maroon convertible from a 2015 picture I had in my collection...
Brad Bodie
Lake Chatuge, North Carolina
 1966 Corvair Corsa Convertible
Lake Chatuge, North Carolina
1966 Corvair Corsa ConvertibleRe: John’s 65 sedan
That’s a nice car Brad. Would you recall if the wheels on that car were 14’s or 15’s? I have a set of 14’s like those that I’m considering putting on the car.
As I’m still waiting on getting the additional body parts, I need to keep pressing on. So tonight I shifted back to working on putting together the instrument panel and working on the dash panels.
My instrument panel was… you guessed it… very rough. Upon disassembly, it was very rusty, and deteriorated. I also boogered-up the speedometer removing it. (I was so mad! The speedo cable should have just pulled out, but it didn’t. I took some vice grips to it and trashed it to get it apart.).
I have something like 3 donor instrument panels, but went to the one from a 66 coupe. Overall it was in good shape, but I wanted my miles on the odometer. I didn’t want someone else’s miles. But my speedometer I ruined, so I disassembled the speedometer and switched out the odometer numbers. The ones from the 66 had the numbers peeling off anyway. Mine from the 65 were still in nice shape.
I cleaned the instrument lenses with warm water and even some windex and repaired the small cardboard tubes, and reassembled. It looks pretty nice! With my original miles.
I’ve previously removed the metal panel from the front of the instrument panel for cleaning and painting. I scrubbed the two large panels down, but still need to repaint. Plus, my glove box door is shot as the hinge was totally rusted. I have a black donor, so all will be repainted silver. Just wish someone made crinkle silver. I’ll try a light coat over and hopefully the texture will come through.
- Attachments
-
- Rough original. Why bother?
-
- Good donor!
-
- Swapped out the odometer numbers with my original miles. 89820.
-
- Cleaned up and reassembled. Looks much better!
-
- Cleaned up the dash panels. Needs repainted.
John
1965 Monza Sedan “The Phoenix”. Rebuild in Progress.
1965 Monza Sedan “The Phoenix”. Rebuild in Progress.
Re: John’s 65 sedan
So in my pursuit of continued progress, I’ve encountered more progress and setbacks.
As I’ve looked online for a silver crinkle paint for the dash panels, I’ve become convinced “it does not exist. At least in the Western Hemisphere.”
So I’m going to try the route of painting over the existing crinkle paint with a fresh top coat, and hopefully the texture shows through. Yesterday, I took a the dash panels and the ash tray down to one of the local auto parts stores who also mixes paint. They computer scanned the silver dash panel and found a match! A Chevrolet silver. They also found a gold that matched. So I had a rattle can of each custom made and filled. About $27 for a can. Not bad getting a custom blend can filled. The paint however is only in a gloss. So I bought a satin clear top coat. He said paint, wait 6 hours, then clear coat. Seems simple enough.
Today I planned on painting, but that quickly changed. I realized that the glove box doors for a 65 and 66 are different as the emblem badges and holes in the door are different. So I need a 65 glove box door as a donor. Fortunately I have a friend who has one!
Lastly, my contact on the body panels that I’m needing contacted me. I’ll be able to get the donor parts next week. I can’t wait!
As I’ve looked online for a silver crinkle paint for the dash panels, I’ve become convinced “it does not exist. At least in the Western Hemisphere.”
So I’m going to try the route of painting over the existing crinkle paint with a fresh top coat, and hopefully the texture shows through. Yesterday, I took a the dash panels and the ash tray down to one of the local auto parts stores who also mixes paint. They computer scanned the silver dash panel and found a match! A Chevrolet silver. They also found a gold that matched. So I had a rattle can of each custom made and filled. About $27 for a can. Not bad getting a custom blend can filled. The paint however is only in a gloss. So I bought a satin clear top coat. He said paint, wait 6 hours, then clear coat. Seems simple enough.
Today I planned on painting, but that quickly changed. I realized that the glove box doors for a 65 and 66 are different
Lastly, my contact on the body panels that I’m needing contacted me. I’ll be able to get the donor parts next week. I can’t wait!
- Attachments
-
- Custom silver and gold paints for the dash and interior.
-
- The 66 glove box (black) and the 65 glove box (silver) doors are different as the holes are different.
-
- 65 emblem (left) and 66 emblem (right).
John
1965 Monza Sedan “The Phoenix”. Rebuild in Progress.
1965 Monza Sedan “The Phoenix”. Rebuild in Progress.
Re: John’s 65 sedan
That is really awesome to have a shop that can color match and make spray cans for you! Keep up the excellent work!Project65 wrote: ↑Sat Jun 04, 2022 7:18 pm
So I’m going to try the route of painting over the existing crinkle paint with a fresh top coat, and hopefully the texture shows through. Yesterday, I took a the dash panels and the ash tray down to one of the local auto parts stores who also mixes paint. They computer scanned the silver dash panel and found a match! A Chevrolet silver. They also found a gold that matched. So I had a rattle can of each custom made and filled. About $27 for a can. Not bad getting a custom blend can filled. The paint however is only in a gloss. So I bought a satin clear top coat. He said paint, wait 6 hours, then clear coat. Seems simple enough.
John
1966 Corsa Convertible
1966 Corsa Convertible