Jim's 63 Monza Coupe - the Freshening


Re: Jim's 63 Monza Coupe - the Freshening
Moving on - I pulled wires for rear speakers, and for a tachometer I'm planning to add.
Then I prepped and began painting all the blue/gray metal in the back half of the interior red. Once the back end was done, I installed the rear seatback. This is the red seat from the 61 donor car.
Then I installed the Clark's package shelf cardboard, which went in pretty easy.
I really want to upgrade the stereo system and perhaps even have Bluetooth. I didn't want to cut holes in door panels, or build a box in the package shelf area, so I purchased surface mount speakers instead. These are Pioneer TSX-150 speakers. Plenty of punch, and I think they'll sound great. You can get them on ebay: http://www.ebay.com/itm/191746203423?_t ... EBIDX%3AIT
For the front I ordered the Clark's stereo speaker C9743 http://www.corvair.com/user-cgi/catalog ... N&page=171 It installed ok - but for my car I had to fabricate a mount to keep it snug under the dash.
For the stereo, I looked at the vintage sound units that fit the radio two shaft set up, but they seemed like a lot of $ to keep things looking nearly stock. Since this car is a driver, and I had the spare radio mount housing, I decided to cut out a spot for a single DIN stereo. Much greater bang for the buck. If the next owner wanted to go back to stock. he/she could by using the original radio mount.
I found what I think was a really good deal in a stereo - a Pioneer (yes, I've always liked Pioneer stuff) DEH-X4800BT. It features a cd player, bluetooth, phone support, and more. Available on ebay at what seems like a very good price to me: http://www.ebay.com/itm/151802705610
It comes with a microphone for the hands free bluetooth calling on your phone. I installed it in the ashtray, since it will never see a cigarette anyway. The other nice feature of the stereo is a USB port, which can either be used to play music from a flash drive, directly interface with phone or MP3 player, or (best of all) charge a phone.
Here are a couple more pictures showing wiring and how the back end of the interior is coming along:
Then I prepped and began painting all the blue/gray metal in the back half of the interior red. Once the back end was done, I installed the rear seatback. This is the red seat from the 61 donor car.
I really want to upgrade the stereo system and perhaps even have Bluetooth. I didn't want to cut holes in door panels, or build a box in the package shelf area, so I purchased surface mount speakers instead. These are Pioneer TSX-150 speakers. Plenty of punch, and I think they'll sound great. You can get them on ebay: http://www.ebay.com/itm/191746203423?_t ... EBIDX%3AIT
For the stereo, I looked at the vintage sound units that fit the radio two shaft set up, but they seemed like a lot of $ to keep things looking nearly stock. Since this car is a driver, and I had the spare radio mount housing, I decided to cut out a spot for a single DIN stereo. Much greater bang for the buck. If the next owner wanted to go back to stock. he/she could by using the original radio mount.
I found what I think was a really good deal in a stereo - a Pioneer (yes, I've always liked Pioneer stuff) DEH-X4800BT. It features a cd player, bluetooth, phone support, and more. Available on ebay at what seems like a very good price to me: http://www.ebay.com/itm/151802705610
It comes with a microphone for the hands free bluetooth calling on your phone. I installed it in the ashtray, since it will never see a cigarette anyway. The other nice feature of the stereo is a USB port, which can either be used to play music from a flash drive, directly interface with phone or MP3 player, or (best of all) charge a phone.
- Attachments
-
-
Jim Thomas
Bethel, VT
63 Monza Coupe
Bethel, VT
63 Monza Coupe

Re: Jim's 63 Monza Coupe - the Freshening
Nice!
Jeremy (cad-kid)
Kronenwetter, WI (Central Wisconsin)
SOLD 9-2016 65 Monza 4spd/140
My 65 Monza thread
 My YouTube page
Kronenwetter, WI (Central Wisconsin)
SOLD 9-2016 65 Monza 4spd/140
My 65 Monza thread
Re: Jim's 63 Monza Coupe - the Freshening
A couple of quick updates for today.
Although we think of Corvairs as being two series, it's amazing to me how many differences there were year to year. For example, I bought the 61 donor car to provide some things for my 63. Both coupes, both Monzas. One of the reasons I bought the donor was the almost new interior. I figured I would just swap the seats. Ummm, no.
The 61 front buckets are mounted to the floor with bolts at the back of the adjustment slides, but a fork at the front. So you slide into the fork, then bolt the back. It looks like this:
The 63 seats are bolted at the front and rear. They look like this:
So, to install the 61 seats in the 63, you have to swap the seat rails. And it wasn't an exact fit. A little bending and pounding was needed.
I'll also share a before and after picture of the interior floor, now ready for padding and carpet.
One last bit for today. The outside mirror on the driver's door was pitted badly, so I thought I would replace it. As it turned out, I purchased two from Rafee Corvair. The price was right and the quality is excellent. They came with mounting instructions, so I replaced the drivers side mirror, and installed one on the passengers side. I think they look great. Thanks Rafee!
More soon!
Although we think of Corvairs as being two series, it's amazing to me how many differences there were year to year. For example, I bought the 61 donor car to provide some things for my 63. Both coupes, both Monzas. One of the reasons I bought the donor was the almost new interior. I figured I would just swap the seats. Ummm, no.
The 61 front buckets are mounted to the floor with bolts at the back of the adjustment slides, but a fork at the front. So you slide into the fork, then bolt the back. It looks like this:
I'll also share a before and after picture of the interior floor, now ready for padding and carpet.
Jim Thomas
Bethel, VT
63 Monza Coupe
Bethel, VT
63 Monza Coupe
Re: Jim's 63 Monza Coupe - the Freshening
Update: finishing the interior installation!
Still getting caught up with posts, so I thought I'd summarize the rest of the interior installation. I finished the interior painting, changing all the blue/grey to either red or black.
Once the floor was cleaned up and sealed, I began the carpet install.
It went in pretty well, I think. In this pic you can see some of the LED floor lighting I added, which comes on with the dome light. The dome light remains white, but I added floor level lighting in red on the heater outlets, and one under the radio box. Looks nice at night.
And now the rear seat bottom and front seats go in.
So, interior done (except headliner). Ready for summer 2016 cruising. Lots more to do, but I want it together so I can drive it this summer. :)
Still a few more things to show you. More soon!
Still getting caught up with posts, so I thought I'd summarize the rest of the interior installation. I finished the interior painting, changing all the blue/grey to either red or black.
Once the floor was cleaned up and sealed, I began the carpet install.
Jim Thomas
Bethel, VT
63 Monza Coupe
Bethel, VT
63 Monza Coupe
Re: Jim's 63 Monza Coupe - the Freshening
Looks great  Nice touch with the additional LED lighting.
Jeremy (cad-kid)
Kronenwetter, WI (Central Wisconsin)
SOLD 9-2016 65 Monza 4spd/140
My 65 Monza thread
My YouTube page
Kronenwetter, WI (Central Wisconsin)
SOLD 9-2016 65 Monza 4spd/140
My 65 Monza thread
Re: Jim's 63 Monza Coupe - the Freshening
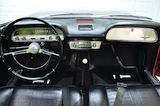
Someone asked me what was mounted under the radio box.
On the left is a red warning light which will be wired to a contact switch on the emergency/parking brake. The light will be on if the key is on, and the parking brake is on. I <ahem> once left on a partially engaged parking brake and didn't realize it until the rear brakes started smoking. I still haven't engineered the bracket to hold the switch. I'll post a picture when I do.
On the right is the 4 way flasher (emergency flasher) switch. The Flarestat was used on many GM products of the late 50's and early 60's when hazard flashers were optional. I found this one used on eBay for a good price. It's pretty easy to install - bring an always hot wire over from the fusebox (the Flarestat comes with it's own fuse) and then connect the other four wires to the wires going to the four turn signal bulbs. It's easy to find them on an early on the lower steering column where the turn signal switch is.
Also, in this picture, you can see the microphone that is part of the hands free bluetooth connection for my phone poking out of the ashtray. Since the ashtray was never going to see a cigarette, I thought I might as well mount it there.
Jim Thomas
Bethel, VT
63 Monza Coupe
Bethel, VT
63 Monza Coupe
-
dagdal1967
- Corvair of the Month

- Posts: 225
- Joined: Mon Jun 03, 2013 9:24 am
- Location: Fort Worth, Texas
- Contact:
Re: Jim's 63 Monza Coupe - the Freshening
Jim,
I have the same Flarestat flasher switch but, because I have the AC deliver unit mounted under the radio, I positioned it on the left side of the steering wheel. I love this thing as it gives you some piece of mind if you're on the side of the road. It has only happened to me once, but I did feel a bit better knowing that the signals were flashing.
I also have a microphone from my hands-free Bluetooth stereo, but mine came with quite a long wire so I ran mine under the carpet and up the left side to position the microphone at the top front arch in the drivers door jam. Found that it gave me better sound quality and it was picking up a lot more vibration noise when it was mounted in the dash.
I'm loving your carpet! I think that is something that I'm going to do this summer. The carpet in mine is decent, but putting new in will make a huge difference in how the interior looks.
Keep up the good work!
Doug Gault
Fort Worth, Texas
- 2013 Cadillac ATS Premium
- 1964 Palomar Red Corvair 900 Monza Club Coupe
- 1961 Lincoln Continental
The Air Cooled Addiction Continues...
Fort Worth, Texas
- 2013 Cadillac ATS Premium
- 1964 Palomar Red Corvair 900 Monza Club Coupe
- 1961 Lincoln Continental
The Air Cooled Addiction Continues...
Re: Jim's 63 Monza Coupe - the Freshening
I haven't posted in a while because I wanted to spend the summer driving and enjoying the Monza rather than working on it. That has worked pretty well so far. Other than a tune up, I haven't had to do anything. Until now.
Driving through town yesterday, past a high stone wall, I heard a 'click click click' reflecting back to me from what seemed like the left rear. So today I climbed under, as as I suspected, the u joint on the drivers side has some play in it. Not terrible, but it needs replacement. Which, if you know me, means I'll do both sides while I'm doing it.
QUESTION: Do I have to pull the axle out, or can I unbolt the u-bolts that hold the axle shaft to the u-joint, move it out of the way, and take out the axle yoke and then press out/press in the new u joint? What holds the axle yoke in the differential?
Thanks!
Jim
Jim Thomas
Bethel, VT
63 Monza Coupe
Bethel, VT
63 Monza Coupe
-
bbodie52

- Corvair of the Month
- Posts: 11891
- Joined: Mon Aug 06, 2012 12:33 pm
- Location: Lake Chatuge Hayesville, NC
- Contact:
Re: Jim's 63 Monza Coupe - the Freshening
See page 6C-5 in the attachment: 1961 Chevrolet Corvair Shop Manual - Section 6c - Rear Axle. If you remove the four nuts holding the axle to the suspension and brake backing plate, the splined axle pulls out from the differential. Then you can remove the four nuts as shown in step 4. Universal joint overhaul begins on page 6C-6.

U-joint installation
 http://corvaircenter.com/phorum/read.ph ... 000,437071
The generic video below will give you some idea of what is needed to press universal joint out of the yoke. I usually use a large bench vise and a couple of sockets to form a press. I would recommend replacing any universal joint that does not have a grease (zerk) fitting, as it is a good idea to grease the universal joints periodically and nobody wants to have to remove the universal joint from the car to do that! Without a zerk fitting to promote lubricating the u-joint periodically, they tend to be neglected.
If you want to replace your universal joints with new units, but don't want to press them out yourself, a machine shop or auto parts store may be able to do it for you.
http://www.corvair.com/user-cgi/catalog ... &page=179B

U-joint installation
The generic video below will give you some idea of what is needed to press universal joint out of the yoke. I usually use a large bench vise and a couple of sockets to form a press. I would recommend replacing any universal joint that does not have a grease (zerk) fitting, as it is a good idea to grease the universal joints periodically and nobody wants to have to remove the universal joint from the car to do that! Without a zerk fitting to promote lubricating the u-joint periodically, they tend to be neglected.
If you want to replace your universal joints with new units, but don't want to press them out yourself, a machine shop or auto parts store may be able to do it for you.
- Attachments
-
- 1961 Chevrolet Corvair Shop Manual - Section 6c - Rear Axle.pdf
- 1961 Chevrolet Corvair Shop Manual - Section 6c - Rear Axle
- (1.17 MiB) Downloaded 34 times
Brad Bodie
Lake Chatuge, North Carolina
 1966 Corvair Corsa Convertible
Lake Chatuge, North Carolina
1966 Corvair Corsa ConvertibleRe: Jim's 63 Monza Coupe - the Freshening
Thanks Brad. I've rebuilt a lot of u joints over the years, not too worried about that part. I wouldn't install one without a zerk fitting. I was just trying to see if I needed to remove the axle or not. If I take off the two u joint straps, can I get the axle out of the way enough to get the yoke out?
(trying to save some time/effort and leave the axle in place)
Jim
(trying to save some time/effort and leave the axle in place)
Jim
Jim Thomas
Bethel, VT
63 Monza Coupe
Bethel, VT
63 Monza Coupe
Re: Jim's 63 Monza Coupe - the Freshening
It's been a fun summer driving the Monza, but now thoughts turn to work to be done this fall.
I am going to replace the u-joints, and while I'm at it, the yoke seals and shifter seal and a trans/diff fluid change.
At the same time, I'm thinking about the rear wheel bearings, and I have no idea how old they are or the last time they were serviced. They seem tight and don't make any noise, but this is a rare case (for me) of not leaving well enough alone. I've seen what a failed rear bearing can do.
Has anyone on the forum tried the tech topic method of lubing the rear wheel bearings? It involves drilling a hole in the bottom of the bearing housing, tapping the hole, installing a zerk fitting, and adding wheel bearing grease to the cavity that way. Pros? Cons? Is there some other better method?
Thanks!
Jim Thomas
Bethel, VT
63 Monza Coupe
Bethel, VT
63 Monza Coupe
Re: Jim's 63 Monza Coupe - the Freshening
Anyone? Anyone? Bueller?
Can anyone chime in on lubing early rear wheel bearings?
Thanks!
Can anyone chime in on lubing early rear wheel bearings?
Thanks!
Jim Thomas
Bethel, VT
63 Monza Coupe
Bethel, VT
63 Monza Coupe
-
bbodie52
- Corvair of the Month
- Posts: 11891
- Joined: Mon Aug 06, 2012 12:33 pm
- Location: Lake Chatuge Hayesville, NC
- Contact:
Re: Jim's 63 Monza Coupe - the Freshening
Here is the rear axle wheel bearing gospel according to Dave Motohead. He is working on a Rampside, but the EM rear axle bearing procedure is the same for all EM cars, vans and trucks...
https://www.youtube.com/watch?v=TdHz-5X0RZg
http://www.corvair1.com/greasing-the-ax ... essing-out
If you find that the bearings are bad and need to be replaced...
https://www.youtube.com/watch?v=XCsVINJY1_8
https://www.youtube.com/watch?v=_MO1A2qujeQ
If you find that you need parts...
http://www.corvair.com/user-cgi/catalog ... graygo.y=0

http://www.corvair.com/user-cgi/catalog ... graygo.y=0

If you find that the bearings are bad and need to be replaced...
If you find that you need parts...
- Attachments
-
- 1961 Chevrolet Corvair Shop Manual - Section 6c - Rear Axle.pdf
- 1961 Chevrolet Corvair Shop Manual - Section 6c - Rear Axle
- (1.17 MiB) Downloaded 37 times
-
- 1962-1963 Supplement - Chevrolet Corvair Shop Manual - Section 6c - Rear Axle.pdf
- 1962-1963 Supplement - Chevrolet Corvair Shop Manual - Section 6c - Rear Axle
- (674.03 KiB) Downloaded 33 times
-
- 1964 Supplement - Chevrolet Corvair Shop Manual - Section 6c - Rear Axle.pdf
- 1964 Supplement - Chevrolet Corvair Shop Manual - Section 6c - Rear Axle
- (661.15 KiB) Downloaded 30 times
Brad Bodie
Lake Chatuge, North Carolina
1966 Corvair Corsa Convertible
Lake Chatuge, North Carolina
1966 Corvair Corsa Convertible