So the first thing's first: getting my car to run right. After talking with my uncle who used to have Corvairs back in the day, he told me it was critical that the spark plugs are tightened properly since the slight blowby can ruin the plug threads and by progrerssion the cylinder head. I removed the original plugs and installed new Autolite 475 plugs, gapped and torqued to 20ft-lbs. By a search of posts on antisieze y/n etc I decided to use a drop of ATF on the threads of each plug rather than use the silvery Permatex thread goo.
Next, I had to secure the throttle link from moving side-to-side. The rod was also pretty worn on the linkage side at the Dr side retainer where it has been pivoting. I used a brass bushing collar cut into 2 halves and inserted them into the worn gap and then locked it into place with a split collar.
I also am not 100% on the bellows vents operation since they did not seem to open while it was idleing. So the car idles very high even after the choke is off. I want to check everything and adjust things in some logical order. Before it go into the carbs I want to make sure the ignition is set right. The car sometimes wants to backfire on Dr side carb when I give it a little throttle whip. My plan is to double check the ignition timing first to make sure that is not the reason for the fast idle and the backfire, and then get into syncing than adjusting the carbs.
The 64 convertable: getting it to run right
-
GriffinGuru

- Posts: 121
- Joined: Mon Aug 24, 2015 7:07 pm
- Location: Mount Joy, PA
The 64 convertable: getting it to run right
- Attachments
-
- My link keeper and bushing
-
- other side- no brass bushing there since it wasn't as worn
-
- bellows are just left open so I can watch the rod to see if it will move outward as it warms up. So far nothing has really moved, so I don't know how hot this thing needs to get to move that rod. My car has no gauges except the speedo.
-
- I see the ignition components are new, I will read up on adjusting points, check vacuum advance lever, and timing with the timing light and proceed from there before adjusting the carbs.
It keeps me humble:
64 Corvair Monza convertible called Lucy (work in progress)
64 Corvair Monza convertible called Lucy (work in progress)
-
bbodie52

- Corvair of the Month

- Posts: 11897
- Joined: Mon Aug 06, 2012 12:33 pm
- Location: Lake Chatuge Hayesville, NC
- Contact:
Re: The 64 convertable: getting it to run right
You are right in wanting to adjust things in a logical order. The two videos below might help you to understand the sequence needed in the tuning procedure. The initial setups for synchronizing the throttles includes isolating the carburetors from each other and from the cross shaft and throttle pedal links, to ensure that the carburetors are not being held open by the throttle linkage itself. The initial presets include establishing the initial contact point with each idle speed screw, and setting them for an equal preset at each carburetor (1½ turns). You should also inspect for any possible vacuum leaks to ensure that all vacuum lines are intact. If the engine is still idling too fast the cause must be determined. It would not be possible to set the correct base ignition timing if the idle speed is so high that the centrifugal advance is impacting the timing. The vacuum advnce must also be disconnected and plugged when using a timing light to set the initial timing.GriffinGuru wrote:...So the car idles very high even after the choke is off. I want to check everything and adjust things in some logical order. Before it go into the carbs I want to make sure the ignition is set right. The car sometimes wants to backfire on Dr side carb when I give it a little throttle whip. My plan is to double check the ignition timing first to make sure that is not the reason for the fast idle and the backfire, and then get into syncing than adjusting the carbs.
After viewing the videos and reading through the shop manual tuning procedures, please let us know if you need any further clarification.
Try disconnecting the portion of the throttle linkage that ties the carburetors together, and to the linkage to the accelerator pedal. This linkage may be binding or not adjusted properly, and may be responsible for preventing the individual carburetors from returning to a correct idle position. It is important to isolate each carburetor throttle mechanism so that it stands alone for the initial adjustment and synchronization settings. Once proper idle speed and mixture has been achieved, the throttle linkage is then adjusted to attach it to the carburetors so that they are linked together without disrupting the individual carburetor settings. Finally the throttle linkage portion that ties the linkage to the driver's accelerator pedal is reattached and tested, to ensure that it permits the throttle linkage in the engine compartment to fully return to idle, and to ensure that depressing the throttle pedal fully opens the throttle butterfly valves in each carburetor equally and fully.
Watching the video presentations below helps to provide insight and understanding about proper sequencing of the tuneup steps and procedures. Skipping around can insert obstacles and problems with getting he engine properly tuned.
The portion of the first video segment toward the end (Part 1, 5:10) and at the beginning of the second segment discusses throttle linkage adjustments and carburetor synchronization.
Tuning the Corvair Engine — Part 1
Tuning The Corvair Engine — Part 2
This thread discusses the use of a Unisyn gauge for synchronizing carburetors. It is an inexpensive tool that has been in use on multiple carburetor engines since the 1950's, and you may want to get one and give it a try...
This diagram will help you o to look for any vacuum leaks. An undetected vacuum leak can make tuning an engine impossible.
The automatic choke mechanism has to do with the fast-idle cam mechanism. This mechanism holds the throttle open on a variety of steps, to increase the idle speed until the engine reaches normal operating temperature and the automatic choke disengages. When the engine is cold the spring tension from the choke sensor presses against the throttle linkage. To start a cold engine, the driver presses the gas pedal one time to move the throttle linkage out of the way of the fast idle cam. The spring tension snaps the fast idle cam into position for starting the car. As the engine warms, the spring tension is reduced, and gradually the fast idle cam moves out of the way. It has no effect on a warm engine.
Do you have copies of the shop manual? If not you can download them at no cost in Adobe Reader (.pdf) format.
Common and Useful Corvair Websites
Corvair Forum
Brad Bodie
Lake Chatuge, North Carolina
 1966 Corvair Corsa Convertible
Lake Chatuge, North Carolina
1966 Corvair Corsa Convertible-
GriffinGuru
- Posts: 121
- Joined: Mon Aug 24, 2015 7:07 pm
- Location: Mount Joy, PA
Re: The 64 convertable: getting it to run right
Thanks bbodie52!,
This seems like one of those "there's yer problem" moment, but since the day I first checked out the car the gas pedal sticks and does not spring back. I have not crawled under the car to remove the tunnel panel and check everything through, and since I can still manually move the throttle rod in the engine compartment, I didn't get to this yet. It seems kind of obvious now, and you also make a good point about the centrifugal advance on the dist. This probably idles at 1200-1500 by the sound (no tach) so the distributer might very well be giving some advance.
I'm no know-it-all or Corvair guru as some may assume about my profile name, so I am always glad for advice and not offended. (the profile name is because I am always the one in my family that everyone who has sciency related questions asks me for the answer. I work as a chemist, but I don't know everything; still, I'll give anything a trying guess).
Well I have some blocks I made today and was planning on setting the car onto these tonight anyway. I don't want to use jackstands, but rather cut old barn-beams into blocks so I can set the car on its wheels and open the doors too. I am going to be chasing down a gas pedal problem afterall and I might need to check it from the passenger cabin also.
Thanks!
It keeps me humble:
64 Corvair Monza convertible called Lucy (work in progress)
64 Corvair Monza convertible called Lucy (work in progress)
-
bbodie52
- Corvair of the Month
- Posts: 11897
- Joined: Mon Aug 06, 2012 12:33 pm
- Location: Lake Chatuge Hayesville, NC
- Contact:
Re: The 64 convertable: getting it to run right
There is a pivot point on the left side of the transaxle, where the forward linkage that ultimately ties to the gas pedal connects to the rod that pushes the engine compartment linkage. You could start there to see if disconnecting the front and rear portions reveals which portion is binding. But during the engine compartment work, where you are tuning and synchronizing the fuel system and ignition system, the link to the gas pedal is disconnected while you work with the engine. The last step is to reconnect and adjust the linkage to the driver's controls.
You should purchase a few specialized tools, such as a dwell/tachometer, timing light, and perhaps a unisyn gauge to make things happen properly during your tuning process. A compression tester (the type with a hose, to connect to the spark plug ports and get past the interference offered by the carburetors and engine shroud) will tell you a lot about the condition of each piston, cylinder, piston rings, intake and exhaust valves, and head gasket seal. It is a good start to verify the mechanical integrity of the engine before you play with the fuel and ignition system.
You really cannot do the job right without some tune-up tools and a shop manual to guide you. The goal is to gain experience and knowledge while going from an unknown quantity to a known, tested and confirmed engine. In the end you will know for certain just what you have there. It should not be a guessing game, and you should not skip around in the hope that everything is OK. The power-plant is over 50 years old. You want a known, reliable engine that you can count on to take you to your destination. (Corvair engines can be the basis for very reliable power. There are a number of pilots that convert them for use in aircraft, and the pilots would not do that if they did not trust the engine for reliability). The experience you gain along the way, coupled with some tools, an emergency spares kit, and a shop manual in the trunk can serve you well if something goes wrong while out on the road. But you don't want to start each trip with your fingers crossed, either!
There is a CORSA (Corvair Society of America) club chapter in the Hershey/Harrisburg area, and another in the Philadelphia area. You might take an interest in one or both, since you are in the middle, about 50-60 miles from them. Getting to know other Corvair owners and see their Corvairs can be helpful and inspiring. You might want to check out their websites. There is also an upcoming one-day Corvair show on Saturday, September 12th in Hershey. If you can attend you would get a chance to talk to Corvair owners, ask questions, and see some nice Corvairs.
Central Pennsylvania Corvair Day — Hershey — September 12
 viewtopic.php?f=104&t=10459

Central PA Corvair Club
http://www.centralpacorvairclub.org/

Philadelphia Corvair Association
http://jtwiley95.wix.com/pcacorsa
You should purchase a few specialized tools, such as a dwell/tachometer, timing light, and perhaps a unisyn gauge to make things happen properly during your tuning process. A compression tester (the type with a hose, to connect to the spark plug ports and get past the interference offered by the carburetors and engine shroud) will tell you a lot about the condition of each piston, cylinder, piston rings, intake and exhaust valves, and head gasket seal. It is a good start to verify the mechanical integrity of the engine before you play with the fuel and ignition system.
You really cannot do the job right without some tune-up tools and a shop manual to guide you. The goal is to gain experience and knowledge while going from an unknown quantity to a known, tested and confirmed engine. In the end you will know for certain just what you have there. It should not be a guessing game, and you should not skip around in the hope that everything is OK. The power-plant is over 50 years old. You want a known, reliable engine that you can count on to take you to your destination. (Corvair engines can be the basis for very reliable power. There are a number of pilots that convert them for use in aircraft, and the pilots would not do that if they did not trust the engine for reliability). The experience you gain along the way, coupled with some tools, an emergency spares kit, and a shop manual in the trunk can serve you well if something goes wrong while out on the road. But you don't want to start each trip with your fingers crossed, either!
There is a CORSA (Corvair Society of America) club chapter in the Hershey/Harrisburg area, and another in the Philadelphia area. You might take an interest in one or both, since you are in the middle, about 50-60 miles from them. Getting to know other Corvair owners and see their Corvairs can be helpful and inspiring. You might want to check out their websites. There is also an upcoming one-day Corvair show on Saturday, September 12th in Hershey. If you can attend you would get a chance to talk to Corvair owners, ask questions, and see some nice Corvairs.
Central Pennsylvania Corvair Day — Hershey — September 12
Central PA Corvair Club
Philadelphia Corvair Association
Brad Bodie
Lake Chatuge, North Carolina
1966 Corvair Corsa Convertible
Lake Chatuge, North Carolina
1966 Corvair Corsa Convertible-
GriffinGuru
- Posts: 121
- Joined: Mon Aug 24, 2015 7:07 pm
- Location: Mount Joy, PA
Re: The 64 convertable: getting it to run right
Thanks Brad,
I was going to ask about some local Corvair groups soon anyway, and I thought I missed the event in Hershey already; so I'm glad I didn't.
I do have a timing light, but none of the other tools you mentioned. As far as compression I am a little worried to see what it looks like just in case things are not ideal. The motor was re-built/re-freshed by the previous owner and his son- I think they did it themselves. I an under the assumption that it was just re-ringed and honed from what I was told, but I don't really know how far they went into it or the quality of work that was done. it sounds reasonable, but it is idleing high and perhaps the carbs are not tight enough. I found loose bolts on the generator mounts and wire connections and I also want to look at the starter myself because it seems to stick on from time to time.
It keeps me humble:
64 Corvair Monza convertible called Lucy (work in progress)
64 Corvair Monza convertible called Lucy (work in progress)
-
GriffinGuru
- Posts: 121
- Joined: Mon Aug 24, 2015 7:07 pm
- Location: Mount Joy, PA
Re: The 64 convertable: getting it to run right
Well here is an update so far:
I sprayed around the carbs and looked for vacuum leaks and it seems good. I set the initial idle setting and mechanical synchronization of the carbs as per the video and shop manual and now my idle is lower and more reasonable. I only got as far as the step to check the ignition timing, and for some reason it seemed like my timing light was showing me 60 degrees advanced as I moved the advance wheel to find the mark. That seems almost impossibly high to even run. I checked the function of the vacuum advance and centrifugal advance and those seen to function properly.
I was about to re-check the timing again, but my starter has acted up now and needs to be dealt with first.
This starter will keep the starter motor running and noting seems to turn it off except for removing the positive battery cable. I have already pulled the starter out and looked at the solenoid which was replaced by the previous owner. He said he was having issues with the starter and believed it was a bad or cheap solenoid. In looking at the solenoid, one big red flag I saw is that someone filed down the end that contacts the starter main motor tab to get it to fit onto the starter body. I did some searching and reading lots of posts about this problem and it seems like mine is also related to the starter or solenoid itself, as I don't see any damage on the ring gear or the starter gear, and it releases the flywheel, but still spins the electric starter motor continuously. Just to be sure, I also checked the ignition switch, but everything seems to ohm correctly in the correct key position.
I'm going to pull the starter out again tomorrow and look at everything in the solenoid more thoroughly. Since it seems to be a little jerry-rigged already, I might just take it to the my local starter guy and have them fix it right. That might be $100, but I have had good experiences with them and found I end up with a superior product than anything I can buy off the shelf nowadays.
I sprayed around the carbs and looked for vacuum leaks and it seems good. I set the initial idle setting and mechanical synchronization of the carbs as per the video and shop manual and now my idle is lower and more reasonable. I only got as far as the step to check the ignition timing, and for some reason it seemed like my timing light was showing me 60 degrees advanced as I moved the advance wheel to find the mark. That seems almost impossibly high to even run. I checked the function of the vacuum advance and centrifugal advance and those seen to function properly.
I was about to re-check the timing again, but my starter has acted up now and needs to be dealt with first.
This starter will keep the starter motor running and noting seems to turn it off except for removing the positive battery cable. I have already pulled the starter out and looked at the solenoid which was replaced by the previous owner. He said he was having issues with the starter and believed it was a bad or cheap solenoid. In looking at the solenoid, one big red flag I saw is that someone filed down the end that contacts the starter main motor tab to get it to fit onto the starter body.
I'm going to pull the starter out again tomorrow and look at everything in the solenoid more thoroughly. Since it seems to be a little jerry-rigged already, I might just take it to the my local starter guy and have them fix it right. That might be $100, but I have had good experiences with them and found I end up with a superior product than anything I can buy off the shelf nowadays.
It keeps me humble:
64 Corvair Monza convertible called Lucy (work in progress)
64 Corvair Monza convertible called Lucy (work in progress)
-
GriffinGuru
- Posts: 121
- Joined: Mon Aug 24, 2015 7:07 pm
- Location: Mount Joy, PA
Re: The 64 convertable: getting it to run right
I have the starter fixed and back to the task at hand. I checked the timing again and it was right about where it needs to be, I set it at 4 degrees BTDC. Also, NOT a good idea to try and tighten down the distributer while it is running!!!  That was too close to the belt and the wrench bumped the pulley and fell out of my hand down by the crank pulley. Scared the hell out of me and I should have known better. Thankfully all fingers are accounted for and no damage to the motor either. I'M NEVER DOING THAT AGAIN!!!!
Anyway, with timing set and motor idleing lower I see that the left carb is spitting gas drops out the vent and our the top. I guess I'll be rebuilding these as soon as I can get gaskets and/or parts.
I have some mixed success with doing carbs: Once with a dodge 2 barrel that worked great, and once on a 2 barrel Ford carb that was on my 1980 Lincoln that was a disaster. To be fair to myself the issue with the Lincoln was that the replacement needle and seat were slightly taller than the original, but by the time I figured that out I had the float so bent up that it was never the same again. I never did anything further with that and sold the car not too much later.
Is it generally better to just re-set the floats or also replace the needle/seat, jets(?) on these once I get a gasket kit. Are these available through Napa or do I need to get the parts through Clarks?
It keeps me humble:
64 Corvair Monza convertible called Lucy (work in progress)
64 Corvair Monza convertible called Lucy (work in progress)
-
64powerglide
- Posts: 1604
- Joined: Tue Mar 25, 2014 9:18 pm
- Location: Kalamazoo Mi..
Re: The 64 convertable: getting it to run right
It will run better at 12 to 14BTDC!!!GriffinGuru wrote:I have the starter fixed and back to the task at hand. I checked the timing again and it was right about where it needs to be, I set it at 4 degrees BTDC.
http://www.corvair.org/chapters/corvanatics/manuals.php" onclick="window.open(this.href);return false;
64Powerglide, Jeff Phillips
Kalamazoo, Mi..
Kalamazoo, Mi..
-
bbodie52
- Corvair of the Month
- Posts: 11897
- Joined: Mon Aug 06, 2012 12:33 pm
- Location: Lake Chatuge Hayesville, NC
- Contact:
Re: The 64 convertable: getting it to run right
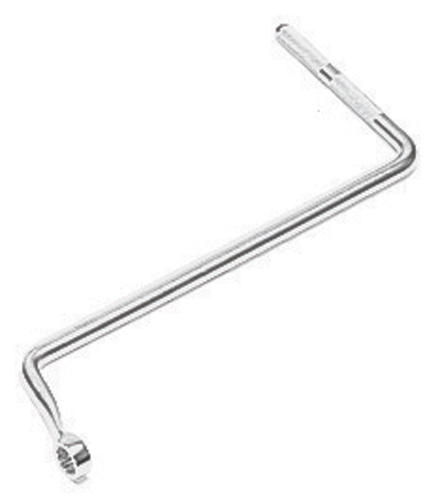 A distributor wrench will allow you to tighten it down, while keeping your hands out of harm's way.
Available at auto parts stores, Sears, online at Amazon.com, etc.
The timing specifications for the 110 hp engine is 12° BTDC (1964 shop manual supplement) or 12°-16° BTDC (1965 Corvair Chassis Shop Manual). I have attached the tune-up sections for both...
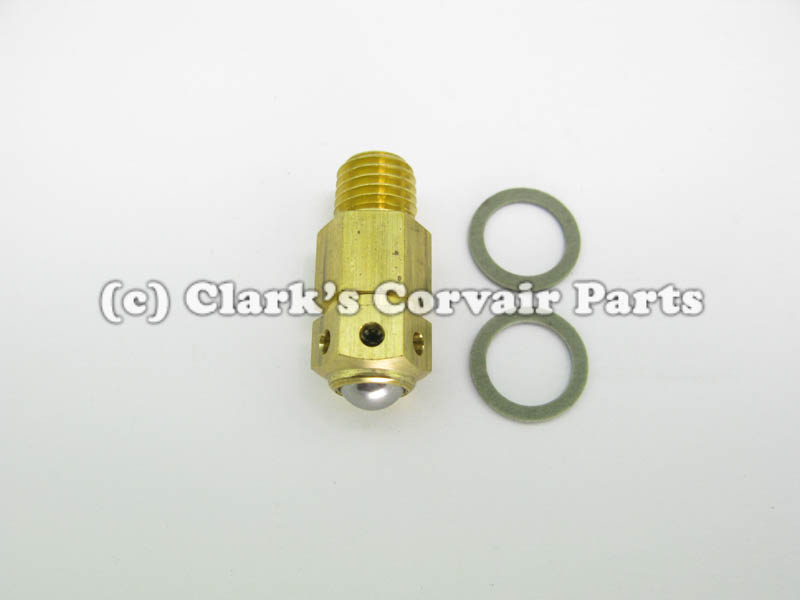
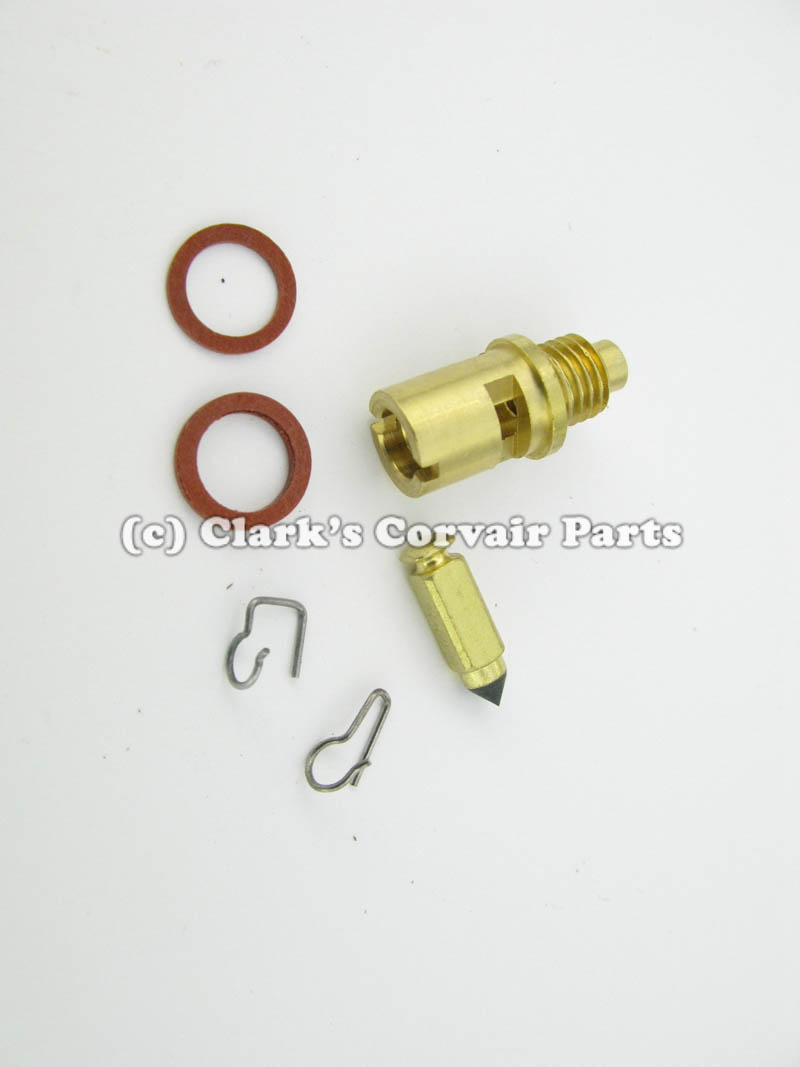
I would recommend sourcing your carburetor rebuild kits from Clark's. Check the floats for leaks by shaking them and listening for the sound of fluid inside. They sometimes fail that way and need to be replaced. Clark's offers some fancy fuel inlet valves (shown at the top of catalog page 58 below). The indication is that they work far better than standard units and last forever.


Brad Bodie
Lake Chatuge, North Carolina
1966 Corvair Corsa Convertible
Lake Chatuge, North Carolina
1966 Corvair Corsa Convertible-
GriffinGuru
- Posts: 121
- Joined: Mon Aug 24, 2015 7:07 pm
- Location: Mount Joy, PA
Re: The 64 convertable: getting it to run right
Hi thanks Brad,
The replacement float valves are interesting, though do you know of anyone who has experience using them? Regardless, I went and bought two kits from my local Napa since I find it is easier for me to go someplace in person when I can. I have yet to use Clarks, but one thing I notice in the pictures from their catalog is there never are any prices. I guess one would find out prices once an item is selected and going to a "shopping cart" tab?
Either way, I will be looking at Clarks or online for those base spacers since mine are missing and Napa did not have a listing for those.
Thanks again...
It keeps me humble:
64 Corvair Monza convertible called Lucy (work in progress)
64 Corvair Monza convertible called Lucy (work in progress)
-
bbodie52
- Corvair of the Month
- Posts: 11897
- Joined: Mon Aug 06, 2012 12:33 pm
- Location: Lake Chatuge Hayesville, NC
- Contact:
Re: The 64 convertable: getting it to run right
On the Clark's online catalog, click on any part number to display pricing and availability information. The paper catalog comes with separate price sheets.
Most counter employees at NAPA or other local stores seldom even know what a Corvair is. The sum total of their research consists of their own online catalog, and often errors creep into those catalog databases. You can always call or email Clark's for clarification, and will likely get a knowledgeable answer from someone who works with Corvairs and Corvair owners around the world every day.
I always encourage Corvair owners to support Clark's or other Corvair specialty vendors. These vendors have only one customer... THE CORVAIR OWNER. Clark's especially offers a very wide range of replacement components that far exceeds anything NAPA or any other local auto parts store will ever offer. If all of the Corvair owners were to disappear from the face of the earth tomorrow, the local auto parts stores would never notice. But if Clark's Corvair Parts and the few other Corvair specialty vendors were to disappear tomorrow, most of the Corvairs on the planet would also begin to disappear quite rapidly!
We depend on Clark's Corvair Parts and the other Corvair vendors to help us to keep our Corvairs alive. They depend on us as customers to keep them alive. Keep this in mind when you go to the local auto parts store. You might find spark plugs, points and a rotor and cap (because they also fit other non-Corvair products). Some other parts, like some brake parts may also be in local store inventory... but many will be catalog items that require special order from central warehouses. And many, many items will not be in the local store's catalog at all!
Watch some of the Clark's Corvair Parts videos and take a virtual tour of their facilities. You will hear quite a lot about just what it takes find manufacturers and to contract with them to reproduce critical items. And watching the upholstery production video is amazing, when you see what it has taken to become a manufacturer of these critical components.
Clark's is a well-run small business that has been operating very well since 1973. Their business model could be taught in college to reveal just what it takes to become a successful, honest and well-run specialty parts vendor and manufacturer that survives more than 40 years supporting a car that was discontinued in 1969. I have been buying from Clark's since the 1970's and I don't even want to think about a world without them, so I hope they can survive for many decades to come.


Clark's Corvair Parts
http://www.corvair.com/user-cgi/pages.cgi
CLARK'S CORVAIR PARTS TOUR — VIDEOS
viewtopic.php?f=81&t=6004&p=41108#p41108

Corvair 1 (Formerly Rafee Corvair)
http://www.corvair1.com/

California Corvair Parts
http://californiacorvairparts.com/

Corvair Ranch (New and Used Parts, Machine Shop, etc.)
http://www.corvairranch.com/
Most counter employees at NAPA or other local stores seldom even know what a Corvair is. The sum total of their research consists of their own online catalog, and often errors creep into those catalog databases. You can always call or email Clark's for clarification, and will likely get a knowledgeable answer from someone who works with Corvairs and Corvair owners around the world every day.
I always encourage Corvair owners to support Clark's or other Corvair specialty vendors. These vendors have only one customer... THE CORVAIR OWNER. Clark's especially offers a very wide range of replacement components that far exceeds anything NAPA or any other local auto parts store will ever offer. If all of the Corvair owners were to disappear from the face of the earth tomorrow, the local auto parts stores would never notice. But if Clark's Corvair Parts and the few other Corvair specialty vendors were to disappear tomorrow, most of the Corvairs on the planet would also begin to disappear quite rapidly!
We depend on Clark's Corvair Parts and the other Corvair vendors to help us to keep our Corvairs alive. They depend on us as customers to keep them alive. Keep this in mind when you go to the local auto parts store. You might find spark plugs, points and a rotor and cap (because they also fit other non-Corvair products). Some other parts, like some brake parts may also be in local store inventory... but many will be catalog items that require special order from central warehouses. And many, many items will not be in the local store's catalog at all!
Watch some of the Clark's Corvair Parts videos and take a virtual tour of their facilities. You will hear quite a lot about just what it takes find manufacturers and to contract with them to reproduce critical items. And watching the upholstery production video is amazing, when you see what it has taken to become a manufacturer of these critical components.
Clark's is a well-run small business that has been operating very well since 1973. Their business model could be taught in college to reveal just what it takes to become a successful, honest and well-run specialty parts vendor and manufacturer that survives more than 40 years supporting a car that was discontinued in 1969. I have been buying from Clark's since the 1970's and I don't even want to think about a world without them, so I hope they can survive for many decades to come.
Clark's Corvair Parts
CLARK'S CORVAIR PARTS TOUR — VIDEOS
Corvair 1 (Formerly Rafee Corvair)
California Corvair Parts
Corvair Ranch (New and Used Parts, Machine Shop, etc.)
Brad Bodie
Lake Chatuge, North Carolina
1966 Corvair Corsa Convertible
Lake Chatuge, North Carolina
1966 Corvair Corsa Convertible-
GriffinGuru
- Posts: 121
- Joined: Mon Aug 24, 2015 7:07 pm
- Location: Mount Joy, PA
Re: The 64 convertable: getting it to run right
Hi Brad, I understand where you are coming from about supporting Clarks, and patronage is important to keep these people in business. I ordered my carb base gaskets from them and they came in about 4 days regular postal shipping.
My local Napa is run by some good people as well though, who know me by name and are classic car and motorcycle guys to boot. The one has a nice '70s Dodge Dart he drives nearly daily, and the manager has a 4 door 70 something Chevelle (I think) that also gets regular use, and although they have no real control on what the Napa franchise carries through their warehouses, they are plenty knowledgeable and I also enjoy talking with them about my various projects.
Anyway, update from the last post:
I rebuilt both my carbs with kits from Napa, and I'm really glad I did the carbs on this car. The left side carb had the float all bent up pretty good from someone adjusting it for some modern art project, and the pump diaphragm was also torn. The right side carb looked like it was never opened in years and was corroded and varnished pretty badly. I also found there are many suggestions for setting the float level. My Napa kit said to set it at 1 1/16", Clarks carb kits say to set the float at 1 1/8", and the factory manual says to set the floats at 1 13/64" (just over 1 3/16"). So I set my floats at 1 1/8", erring on the larger side of that measurement.
Put back together and the left side is still spitting gas (random droplets) out a vent hole. I swapped the carbs from one side to the other and the gas spitting problem stayed on the left side. When I slightly moved the main accelerator rod a little and held it there to give it just a small amount of load, it was then lightly back-firing out the carb. When I looked down into the carb while doing this, I could see that there was flame in the intake every time it popped. At the left side I can also hear a light "shoo-shoo-shoo" sound from out of the carb, while the right sound has only a steady sucking sound.
Now, I know it is something mechanical, but what could it be? My current working theories are:
1. Maybe it is a bad plug wire? That would be nice, and I'll ohm test them to be sure, but I don't think a miss fire would explain the sounds I hear.
2. The last owner said they re ringed and honed the cylinders. Perhaps they have an intake valve over adjusted and it is not closing entirely?
3. Maybe it is an actual bad, bent, or burned valve?
Does anybody have a good suggestion as to tell the difference from an over adjusted valve from a bad valve? I would think in either situation, a compression test would show low compression (I'm borrowing a compression tester tomorrow).
I'm in this for the long haul whatever happens, and I'll fight the good fight with this car.
It keeps me humble:
64 Corvair Monza convertible called Lucy (work in progress)
64 Corvair Monza convertible called Lucy (work in progress)
-
bbodie52
- Corvair of the Month
- Posts: 11897
- Joined: Mon Aug 06, 2012 12:33 pm
- Location: Lake Chatuge Hayesville, NC
- Contact:
Re: The 64 convertable: getting it to run right
I think you are on the right track. You may very well have an intake valve problem on one of the cylinders. Follow the procedure in the shop manual to measure cylinder compression on all six cylinders. That will give you a mechanical health check as a basis for getting your engine in good shape.
Page 6-3 in the atached shop manual section.
Page 6-3 in the atached shop manual section.
- Attachments
-
- 1965 Corvair Chassis Shop Manual - SECTION 6 - ENGINE TUNE-UP.pdf
- 1965 Corvair Chassis Shop Manual - SECTION 6 - ENGINE TUNE-UP
- (2.92 MiB) Downloaded 21 times
Brad Bodie
Lake Chatuge, North Carolina
1966 Corvair Corsa Convertible
Lake Chatuge, North Carolina
1966 Corvair Corsa Convertible-
GriffinGuru
- Posts: 121
- Joined: Mon Aug 24, 2015 7:07 pm
- Location: Mount Joy, PA
Re: The 64 convertable: getting it to run right
OK well where do I start?
After doing some searches and reading some other people's posts, I see that it is fairly common for these engines to need either valve adjustments or other re-adjustments after installing new lifters or has old dry lifters etc.
I pulled my valve covers off and I was going to check my valve lash adjustments (not running). The problem is that on the first cylinder I started with (#1 at TDC because I was checking them all) the valve rocker stud was turning as I tried to loosen the valve nut. WTF?? Same thing with the other #1 valve and also the first valve on #3.
So what is the deal here I was trying to figure out? Did someone not torque these properly? Did they back out over time? Well I removed all the rockers and had to use a wrench to keep the rocker studs from coming completely out. I didn't want to remove all the tension in the head gaskets, because I decided to re torque them again. I read somewhere that these don't require re-torqueing, but this situation is not a regular service procedure.
I torqued all the rocker studs and nuts to spec at 32ft/lbs in proper order (book says to torque betweer 27 and 33 ft/lbs). Every one of the head bolts on the passenger side head re-torqued including the external ones. On the driver side I did the same thing, but only 1 or 2 nuts moved and only a little bit.
What I did find in this process is that #6 intake rocker is quite destroyed where it contacts the valve stem (the side that is also giving me backfire). About 3 of the others are worn and a little peened looking, but none as bad as #6 intake which looks like the valve stem is nearly ready to punch clean through. In the head all my valve springs are even and closed, so at least there is not a valve seat issue, but I am going to do a cylinder test by blowing air into the spark plug holes while all my valves are closed so I can double check none of them are bent or burned out.
So, for now I am going to order at least a few new rocker arms. Are these expensive, or worthwhile to replace the whole set? 12 rockers at $20 apiece if they are even that cheap is $240. I'm going to see costs and might only replace the ones that look peened or un-even which might be about 6 rockers (most occurred on the end cylinders 2, 6, 1, 5)
- Attachments
-
- Pictured is #6 rocker arm... nearly punched through and looks like it ran cockeyed part of the time as there are 2 different valve stem circles: one that dug the deep impression, and the other which is more centered at the normal contact area
-
- All the valve springs seem to be fully out in the head, but I still want to do a leak test to check the cylinders.
It keeps me humble:
64 Corvair Monza convertible called Lucy (work in progress)
64 Corvair Monza convertible called Lucy (work in progress)

Re: The 64 convertable: getting it to run right
Take a look at my first few posts with my 65 (link in my signature). You may not get the cylinders to seal up, it depends no how long it was run. Good luck and keep us posted.
A compression test is valuable when dealing with these issues.
A compression test is valuable when dealing with these issues.
Jeremy (cad-kid)
Kronenwetter, WI (Central Wisconsin)
SOLD 9-2016 65 Monza 4spd/140
My 65 Monza thread
 My YouTube page
Kronenwetter, WI (Central Wisconsin)
SOLD 9-2016 65 Monza 4spd/140
My 65 Monza thread
-
GriffinGuru
- Posts: 121
- Joined: Mon Aug 24, 2015 7:07 pm
- Location: Mount Joy, PA
Re: The 64 convertable: getting it to run right
Wow cad-kid, that was very enlightening...and doubt inspiring!
Now I am unsure about the effectiveness of my re-torqueing of the heads. Everything from loose studs to the piston somehow hitting the head is going through my mind...
There was a lot of talk about loose studs in your build thread, but I don't recall you saying you actually had loose studs in your case; just that it is a somewhat common possibility? Is that correct? There may still be hope for this not being too bad of a situation I am in if all my studs are solid...
I priced a complete set of new standard type ball/socket rocker arms and nut set and it was only about $152 from Clark's including shipping. To add in an extra $4.75 x 6 for the head gaskets and just pull the heads and replace with new gaskets is starting to sound rather appealing, especially on how reasonable it is to pull the heads without removing the motor. Then, once the heads are off I guess I would need push rod O-rings, and perhaps it would be a good idea to at least investigate the lifters at that point since I don't know about the condition of those, and that hammered rocker arm seems to indicate that at some time a lifter could have been stuck. Can lifters be soaked in ATF or something to loosen up any carbon etc, if they look crusty? Funny how things can snowball and increase cost when one just wants to have a motor fixed properly!
I guess, at this point I still need to do the cylinder leak test to be sure the valve is OK. To do a regular compression test, I guess I would have to re-install all my rockers again? P.i.t.a.!!
It keeps me humble:
64 Corvair Monza convertible called Lucy (work in progress)
64 Corvair Monza convertible called Lucy (work in progress)